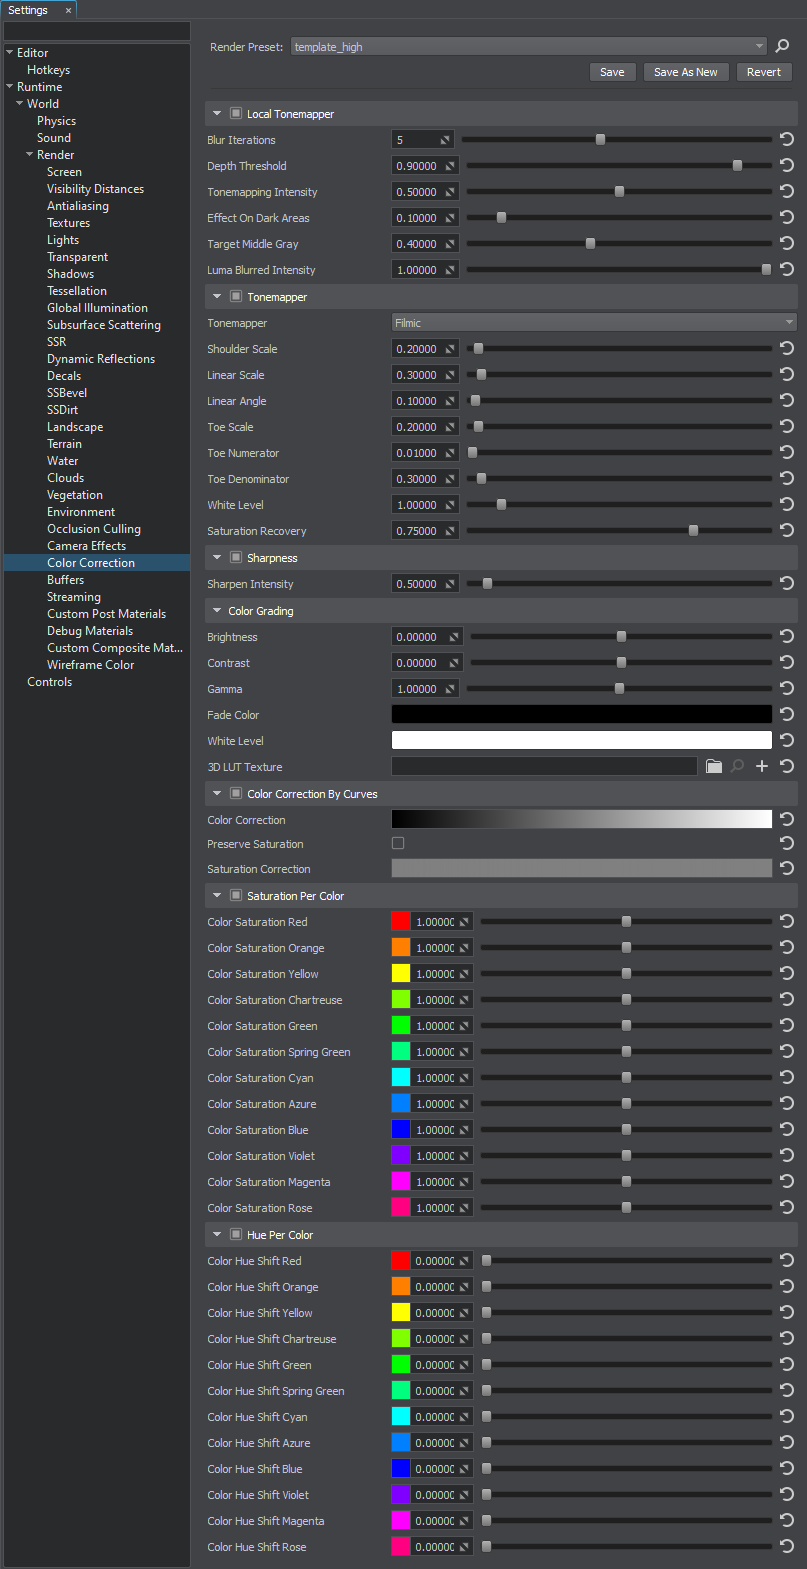
Цветокоррекция
 This section describes settings for color correction of the scene.В этом разделе описаны настройки цветокоррекции сцены.
Scene Color SettingsНастройки цвета сценыLocal TonemapperЛокальный тональный преобразователь#
Local tone mapping uses a spatially varying mapping function determined by the neighborhood of a pixel, which allows an increase in the local contrast and the visibility of some details of an image. The local tonemapper enables the generation of a mask based on the entire image, providing more pleasing results because human vision is more sensitive to local contrast.Локальное тональное отображение использует пространственно изменяющуюся функцию отображения, определяемую окрестностью пикселя, что позволяет увеличить локальный контраст и видимость некоторых деталей изображения. Локальный тональный преобразователь позволяет создавать маску на основе всего изображения, обеспечивая более комфортные для восприятия результаты, поскольку человеческое зрение более чувствительно к локальному контрасту.
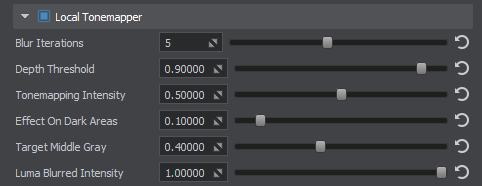
Local Tonemapper SettingsНастройки Local Tonemapper| Local Tonemapper | value indicating if the local tonemapper is enabled. выкл. по умолчанию.
Консольная команда: render_local_tonemapper (API) |
|---|---|
| Blur Iterations | number of blur iterations applied to the screen texture, which is used to define bright and dark portions of the screen. A higher number of iterations increases the blur radius and reduces halo artifacts around objects, but may affect performance. Диапазон значений: [0, 10]. Значение по умолчанию : 5. Консольная команда: render_local_tonemapper_num_blur_iterations (API) |
| Depth Threshold | depth threshold value used to detect the areas affected by local tonemapping. A properly set value may help to reduce halo artifacts. Диапазон значений: [0.0f, 1.0f]. Значение по умолчанию : 0.9f. Консольная команда: render_local_tonemapper_depth_threshold (API) |
| Tonemapping Intensity | intensity of the local tonemapping effect. Диапазон значений: [0.0f, 1.0f]. Значение по умолчанию : 0.5f. Консольная команда: render_local_tonemapper_tonemapping_intensity (API) |
| Effect On Dark Areas | extent of applying the local tonemapping effect on dark areas. Диапазон значений: [0.0f, 1.0f]. Значение по умолчанию : 0.1f. Консольная команда: render_local_tonemapper_effect_on_dark_areas (API) |
| Target Middle Gray | target middle gray value for tonemapping. Диапазон значений: [0.0f, 1.0f]. Значение по умолчанию : 0.4f. Консольная команда: render_local_tonemapper_target_middle_gray (API) |
| Luma Blurred Intensity | intensity of blurring the luma values. It is recommended to keep the default value for this setting. With the value set to 0, a regular screen texture is used instead of a blurred screen texture. This might be required in a rare case of reducing the halo effect and increasing the tonemapping effect for small details. Диапазон значений: [0.0f, 1.0f]. Значение по умолчанию : 1.0f. Консольная команда: render_local_tonemapper_luma_blurred_intensity (API) |
Тональный преобразователь#
The tone mapping provides better image quality by remapping high dynamic range (HDR) colors into a range suitable for mediums with low dynamic range (LDR), like LCD or CRT screens. Its most common purpose is to make an image with a low dynamic range appear to have a higher range of colors providing a more dynamic and realistic effect. It lightens the darkest image regions and makes the lightest regions darker.Тональное отображение обеспечивает лучшее качество изображения, переназначая цвета с высоким динамическим диапазоном (HDR) в диапазон, подходящий для сред с низким динамическим диапазоном (LDR), таких как ЖК-экраны или ЭЛТ-экраны. Его наиболее распространенная цель состоит в том, чтобы изображение с низким динамическим диапазоном казалось с более высоким диапазоном цветов, обеспечивая более динамичный и реалистичный эффект. Он осветляет самые темные области изображения и делает самые светлые области темнее.
When using an HDR camera, always apply tonemapping, otherwise color intensity values exceeding 1 will be clamped at 1, altering the luminance balance of the scene.При использовании камеры HDR всегда применяйте тональное сопоставление, в противном случае значения интенсивности цвета, превышающие 1, будут зафиксированы на 1, изменяя баланс яркости сцены.

Tonemapper settingsНастройки Tonemapper| Tonemapper | value indicating if tone mapping is enabled. вкл. по умолчанию.
Консольная команда: render_tonemapper (API) |
|---|---|
| Tonemapper Mode | mode of tone mapping. Одно из следующих значений:
Консольная команда: render_tonemapper_mode (API) |
FilmicFilmic#
Parameters described below represent John Hable's artist-friendly tonemapping curve, which is constructed by using the following formula:Параметры, описанные ниже, представляют собой удобную для художника кривую сопоставления тонов Джона Хейбла, которая строится с использованием следующей формулы:
- A — Shoulder ScaleA — Значение верхней части кривой (Shoulder)
- B — Linear ScaleB — Значение средней части кривой (Linear)
- C — Linear AngleC — Угол средней части кривой (Linear)
- D — Toe ScaleD — Значение нижней части кривой (Toe)
- E — Toe NumeratorE — Числитель нижней части кривой (Toe)
- F — Toe DenominatorF — Знаменатель нижней части кривой (Toe)
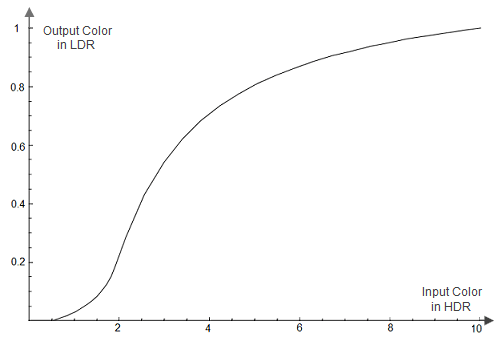 Tone Mapping CurveКривая отображения тонов
For more details about tone mapping curve construction see the article on Filmic Tonemapping with Piecewise Power Curves.Для получения более подробной информации о построении кривой отображения тонов см. статью о сопоставлении тонов фильмов с кусочными кривыми мощности.
| Shoulder Scale | Shoulder Strength tonemapping parameter value that is used to change bright values. Диапазон значений: [0.0f, 1.0f]. Значение по умолчанию : 0.2f. Консольная команда: render_filmic_shoulder_scale (API)
|
||
|---|---|---|---|
| Linear Scale | Linear Strength tone mapping parameter value that is used to change gray values. The Linear Scale controls the length of the tone mapping curve linear part. Диапазон значений: [0.0f, 1.0f]. Значение по умолчанию : 0.3f. Консольная команда: render_filmic_linear_scale (API)
|
||
| Linear Angle | Linear Angle tone mapping parameter value. This parameter controls the slope of the linear part of the tone mapping curve. Диапазон значений: [0.0f, 1.0f]. Значение по умолчанию : 1.0f. Консольная команда: render_filmic_linear_angle (API)
|
||
| Toe Scale | Toe Scale tonemapping parameter value that is used to change dark values. The Toe Scale controls the slope of the tone mapping curve toe (the area of underexposure). Диапазон значений: [0.0f, 1.0f]. Значение по умолчанию : 0.2f. Консольная команда: render_filmic_toe_scale (API)
|
||
| Toe Numerator | Toe Numerator tonemapping parameter value. Диапазон значений: [0.0f, 1.0f]. Значение по умолчанию : 0.01f. Консольная команда: render_filmic_toe_numerator (API)
|
||
| Toe Denominator | Toe Denominator tonemapping parameter value. Диапазон значений: [0.0f, 1.0f]. Значение по умолчанию : 0.3f. Консольная команда: render_filmic_toe_denominator (API)
|
||
| White Level | Linear White Point tonemapping parameter value, which is mapped as pure white in the resulting image. Диапазон значений: [0.0f, inf]. Значение по умолчанию : 1.0f. Консольная команда: render_filmic_white_level (API)
|
||
| Saturation Recovery | color saturation recovery value for the filmic tonemapper. Filmic tonemapper desaturates image colors in bright areas making them look grayish. This parameter enables you to recover initial color saturation in such areas. Higher values make colors more saturated:
Примечание
When the 1.0f value is set specular highlights appear too saturated, so the recommended value is 0.75f (default)Диапазон значений: [0.0f, 1.0f]. Значение по умолчанию : 0.75f. Консольная команда: render_filmic_saturation_recovery (API)
|


ACESACES#
| White Clip | white clip parameter for the ACES operator. Controls the cut-off point for white. Диапазон значений: [0.0f, 10.0f]. Значение по умолчанию : 2.51f. Консольная команда: render_aces_white_clip (API) |
|---|---|
| Toe | toe parameter for the ACES operator. Controls the dark color. Higher values result in darker colors. Диапазон значений: [0.0f, 10.0f]. Значение по умолчанию : 0.03f. Консольная команда: render_aces_toe (API) |
| Shoulder Angle | shoulder angle parameter for the ACES operator. Controls how much overshoot should be added to the curve's shoulder. Диапазон значений: [0.0f, 10.0f]. Значение по умолчанию : 2.43f. Консольная команда: render_aces_shoulder_angle (API) |
| Shoulder Strength | shoulder strength parameter for the ACES operator. Controls the strength of the transition between the curve's midsection and the curve's shoulder. Диапазон значений: [0.0f, 10.0f]. Значение по умолчанию : 0.59f. Консольная команда: render_aces_shoulder_strength (API) |
| Shoulder Length | shoulder length parameter for the ACES operator. Controls the amount of f-stops to add to the dynamic range of the curve. Defines how much of the highlights the curve takes into account. Диапазон значений: [0.0f, 1.0f]. Значение по умолчанию : 0.59f. Консольная команда: render_aces_shoulder_length (API) |
Mix ACES With ReinhardMix ACES With Reinhard#
| Mix With Reinhard | ACES with Reinhard tonemapping operator contribution. If the value is closer to 0, then ACES prevails. Otherwise, when the value is closer to 1, the Reinhard has a grater impact. Диапазон значений: [0.0f, 1.0f]. Значение по умолчанию : 0.5f. Консольная команда: render_aces_with_reinhard_mix (API) |
|---|
ReinhardReinhard#
| Contribution | Reinhard tonemapping operator contribution.
Диапазон значений: [0.0f, 1.0f]. Значение по умолчанию : 1.0f. Консольная команда: render_reinhard_contribution (API) |
|---|
Reinhard Luma-BasedReinhard Luma-Based#
| Contribution | Reinhard Luma-Based tonemapping operator contribution. Controls the overall contribution that the Reinhard operator makes to the final color grading of the image. Higher values result in more tonemapping contribution to the final image. Диапазон значений: [0.0f, 1.0f]. Значение по умолчанию : 1.0f. Консольная команда: render_reinhard_luma_based_contribution (API) |
|---|
SharpnessSharpness#

| Sharpness | value indicating if the sharpening post-processing effect is enabled. выкл. по умолчанию.
Консольная команда: render_sharpen (API) |
|---|---|
| Sharpen Intensity | intensity of the sharpening effect. To use this option, sharpening post-processing effect should be enabled (см. Sharpen). Диапазон значений: [0.0f, inf]. Значение по умолчанию : 0.5f. Консольная команда: render_sharpen_intensity (API) |
Color Grading#
| Brightness |
|
|---|---|
| Contrast |
|
| Gamma | Correction of the overall scene gamma.Корректировка общей гаммы сцены. |
| Fade Color | fade color for the scene on the screen. By gradually changing this value it is possible to create "fade in" and "fade out" effects depending on the w component of the given vector. For example, when the following vectors are passed the result will be:
vec4_zero - default value (white) Консольная команда: render_fade_color (API) |
| White Level | White level of the scene.Баланс белого сцены. |
| LUT Texture | The loading, viewing, or clearing of the Lookup Table texture for color transformation.Загрузка, просмотр или очистка текстуры таблицы поиска для преобразования цвета. |
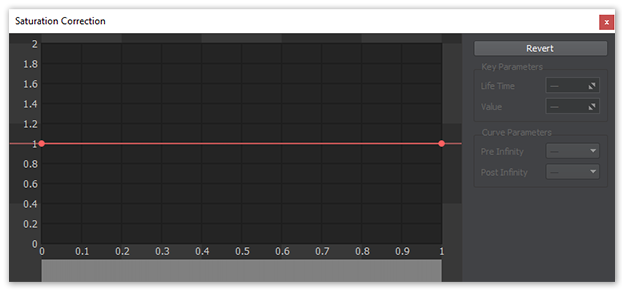
Color Correction by Curves#
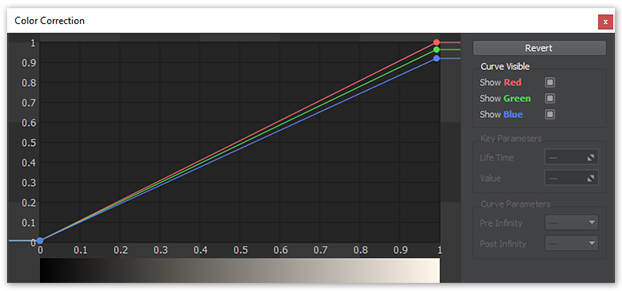
| Color Correction |
Color correction curvesКривые коррекции цвета |
|---|---|
| Preserve Saturation | Preserve initial scene color saturation after applying color correction.Сохранение исходной насыщенности цвета сцены после применения цветокоррекции. |
| Saturation Correction |
Saturation curveКривая насыщенности |
Saturation and HueSaturation and Hue#
Color Correction LUTColor Correction LUT#
Color Correction LUT (Lookup Texture) is an optimized way of performing color grading in a post effect. Instead of tweaking individual color grading parameters, only a single texture is used to produce the corrected image. The lookup is performed by using the original image color as a vector to address the lookup texture.Color Correction LUT (Lookup Texture) - это оптимизированный способ выполнения цветокоррекции в пост-эффекте. Вместо настройки отдельных параметров цветокоррекции для получения исправленного изображения используется только одна текстура. Поиск выполняется с использованием исходного цвета изображения в качестве вектора для обращения к текстуре поиска.
One of the most common applications of lookup tables is to use them to see how images look in different media, such as TV/video or film, which have different color capabilities. Using a lookup table designed to mimic a certain display medium gives a much better idea what your current work will look like after it’s transferred to that medium.Одно из наиболее распространенных применений таблиц поиска - использовать их, чтобы увидеть, как изображения выглядят на различных носителях, таких как телевидение / видео или фильмы, которые имеют разные цветовые возможности. Использование таблицы поиска, разработанной для имитации определенного средства отображения, дает гораздо лучшее представление о том, как будет выглядеть ваша текущая работа после того, как она будет перенесена на этот носитель.
Advantages of using a Color correction LUT include: Преимущества использования LUT коррекции цвета:
- Better performance — realtime computation is replaced by a simple array indexing operation. Повышение производительности - вычисления в реальном времени заменены простой операцией индексации массива.
- More professional workflow opportunities, where all color transforms can be defined using professional image editing software (such as Photoshop or GIMP), which provides a more precise result. Более профессиональные возможности рабочего процесса , где все преобразования цвета могут быть определены с помощью профессионального программного обеспечения для редактирования изображений (например, Photoshop или GIMP), что обеспечивает более точный результат.
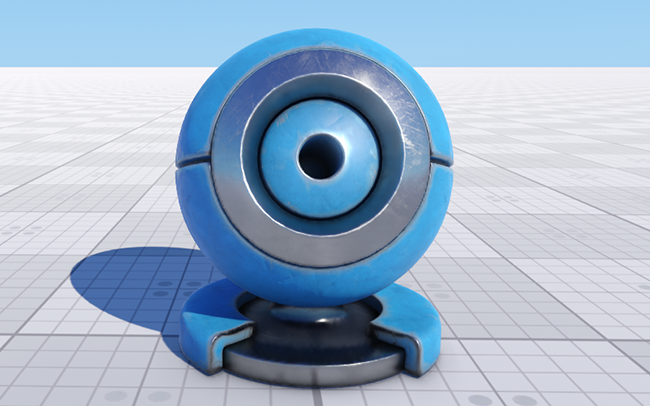
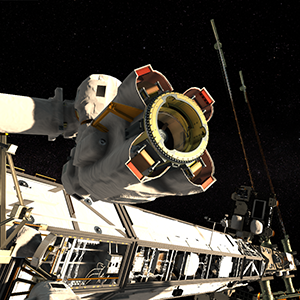
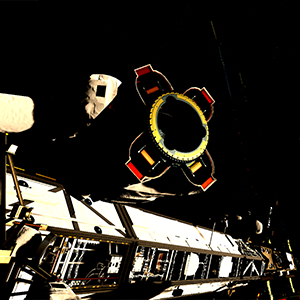
Simple scene with neutral color correction applied.Простая сцена с примененной коррекцией нейтрального цвета.
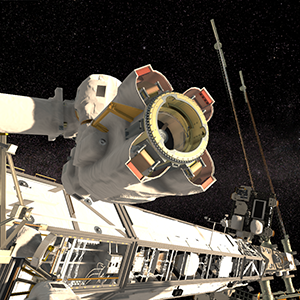
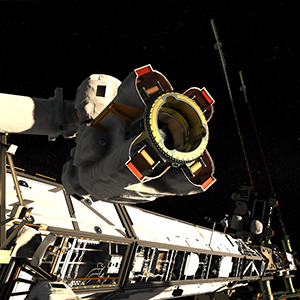
Same scene using the lookup texture with shadows, highlights and vibrance applied.Та же сцена с использованием текстуры поиска с примененными тенями, светами и яркостью.Various visual effects can be created by changing the color correction LUT dynamically in realtime.Можно создавать различные визуальные эффекты, динамически изменяя LUT коррекции цвета в реальном времени.Lookup Texture RequirementsТребования к текстуре поиска#
The 2D texture representation must be laid out in a way that it represents an unwrapped volume texture (as an image sequence of "depth slices").Представление 2D-текстуры должно быть расположено таким образом, чтобы оно представляло развернутую объемную текстуру (как последовательность изображений «срезов глубины»).

A 1024 x 32 texture, representing a 32x32x32 color LUT.Текстура 1024 x 32 , представляющая цветовую LUT 32x32x32 .Workflow ExampleПример рабочего процесса#
- Generate a default lookup texture by clicking the
 button (Save texture) right to the LUT texture field and saving it as a TGA file (by selecting it in the Typefield).Сгенерируйте текстуру поиска по умолчанию, нажав кнопку (Save texture) справа от поля текстуры LUT и сохранив ее как файл TGA (выбрав его в поле Type).
 - Take a screenshot of your scene.Сделайте скриншот вашей сцены.
- Import your screenshot into a graphics editor (e.g., Photoshop or GIMP) and perform all necessary image correction operations (brightness, contrast, etc.) to achieve a desired look.Импортируйте снимок экрана в графический редактор (например, Photoshop или GIMP) и выполните все необходимые операции по исправлению изображения (яркость, контраст и т.д.), Чтобы добиться желаемого вида.
- Import your generated default lookup texture into the graphics editor and perform the same operations as for the scene screenshot. Save the modified lookup texture as a new LUT.Импортируйте созданную вами текстуру поиска по умолчанию в графический редактор и выполните те же операции, что и для снимка экрана сцены. Сохраните измененную текстуру подстановки как новую LUT.
- In Render Settings -> Color -> LUT texture, select you new texture.В Render Settings -> Color -> LUT texture выберите новую текстуру.
Now your scene in UnigineEditor looks exactly as in the graphics editor!Теперь ваша сцена в UnigineEditor выглядит точно так же, как в графическом редакторе!
Информация, представленная на данной странице, актуальна для версии UNIGINE 2.20 SDK.