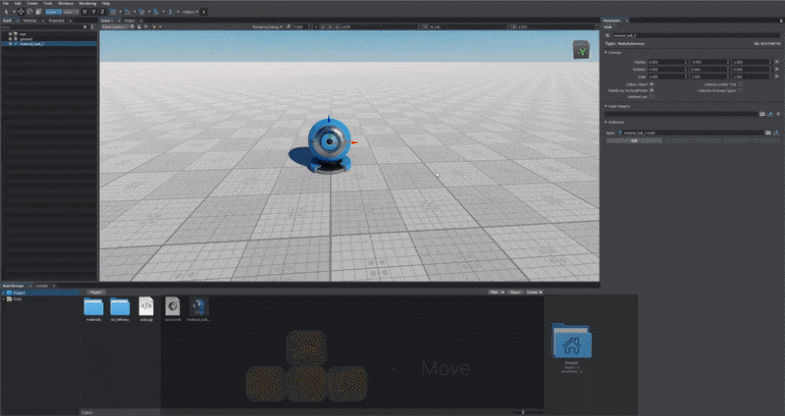
选择和放置节点
 The main functions of node's selection and positioning are available via the Positioning panel.节点选择和定位的主要功能可以通过定位面板获得。

All available controls for selecting and positioning nodes can be found on the Nodes tab of the Editor Hotkeys settings.用于选择和定位节点的所有可用控件都可以在 Editor Hotkeys 设置的 Nodes 选项卡上找到。
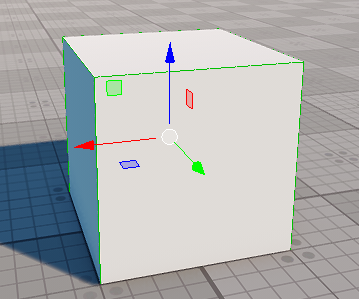
Selecting Nodes选择节点#
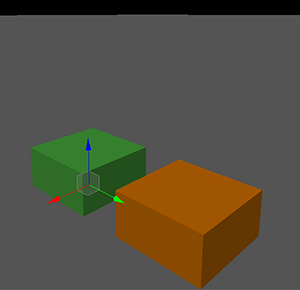
To select a single node in the scene, choose ![]() on the Positioning panel (or press Q) and click the left mouse button on this node. In this case, only the mesh surface you have clicked is selected. To select several mesh surfaces, hold Shift and click required surfaces.要选择场景中的单个节点,请在Positioning面板上选择
on the Positioning panel (or press Q) and click the left mouse button on this node. In this case, only the mesh surface you have clicked is selected. To select several mesh surfaces, hold Shift and click required surfaces.要选择场景中的单个节点,请在Positioning面板上选择 ![]() (或按 Q)并在该节点上单击鼠标左键。在这种情况下,只会选择您单击的网格曲面。要选择多个网格曲面,请按住 Shift 并单击所需的曲面。
(或按 Q)并在该节点上单击鼠标左键。在这种情况下,只会选择您单击的网格曲面。要选择多个网格曲面,请按住 Shift 并单击所需的曲面。
You can convert the selected node to a NodeReference by pressing Ctrl+Shift+G (or click Edit -> Convert to NodeReference).您可以通过按 Ctrl+Shift+G(或单击 Edit -> Convert to NodeReference)将选定节点转换为 NodeReference。To select several nodes, do either of the following:要选择多个节点,请执行以下任一操作:
-
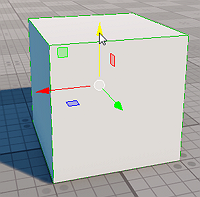
Use the selection box: click and hold the left mouse button, drag the mouse to select the required nodes. In this case, all surfaces of each mesh (if they exist) are selected.使用选择框:单击并按住鼠标左键,拖动鼠标选择需要的节点。在这种情况下,每个网格的所有表面(如果存在)都被选中。
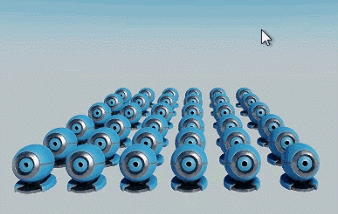 Select using Selection Box使用选择框选择
 -
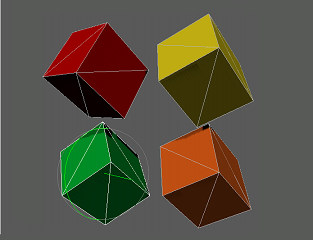
Select one of the nodes, press and hold Shift to add nodes to the selection and Ctrl to remove.选择其中一个节点,按住 Shift 将节点添加到选择中,按住 Ctrl 删除。
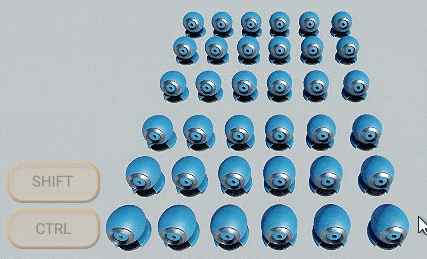 Add and remove nodes from selection从选择中添加和删除节点
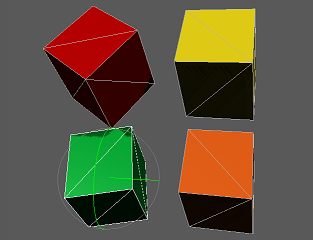
To select all nodes in the world, press Ctrl+A.要选择世界上的所有节点,请按 Ctrl+A。When the node is selected, the following is shown:选择节点后,显示如下:
- Wireframe of the node节点的线框
- Bounding box of the node节点的边界框
- Bounding box of the selected surface (or surfaces)选定曲面(或曲面)的边界框
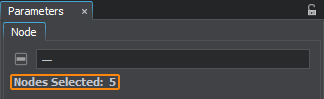
The total number of currently selected nodes is displayed in the Parameters window.当前选择的节点总数显示在 Parameters 窗口中。
To remove nodes from the selection (deselect), press and hold Ctrl and click the left mouse button on the required nodes.要从选择中删除节点(取消选择) ,请按住 Ctrl 并在所需节点上单击鼠标左键。
To deselect all selected nodes, press Esc or Ctrl+Shift+A.要取消选择所有选定节点,请按 Esc 或 Ctrl+Shift+A。
The selected nodes can be positioned in the world by using one of the ways described below.可以使用所描述的方式之一在世界中定位选定的节点以下.
You can set a pivot point relative to which the selected nodes will be transformed.你可以设置一个中心点相对于选定的节点将被转换。Inverse Selection逆向选择#
Inverse selection can be useful for complex selections. For example, if you need to select all objects in a scene except the specific ones, you can select these specific objects and invert the selection.逆向选择对于复杂的选择很有用。例如,如果您需要选择场景中除特定对象之外的所有对象,则可以选择这些特定对象并反转选择。
To invert the current selection, press Ctrl+I.要反转当前选择,请按 Ctrl+I。
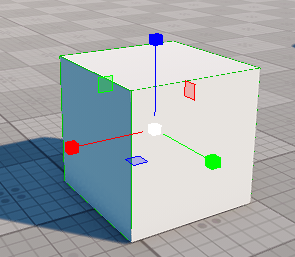
Moving, Rotating and Scaling Nodes移动、旋转和缩放节点#
To transform nodes, choose the required transformation mode (manipulator) on the Positioning panel of the Toolbar.要变换节点,请在工具栏的定位面板上选择所需的变换模式(操纵器):
您可以通过 Parameters 窗口指定位置和旋转坐标以及比例因子。Move Nodes移动节点#
To move the node:移动节点:
- Choose the
 manipulator on the Positioning panel (or press W).在Positioning面板上选择 操纵器(或按 W)。
 -
Click the required node. The axes along which the node can be moved will be shown.单击所需的节点。将显示节点可以移动的轴。
 Move Node移动节点
 -
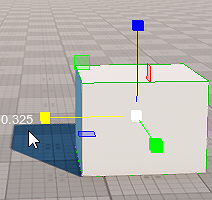
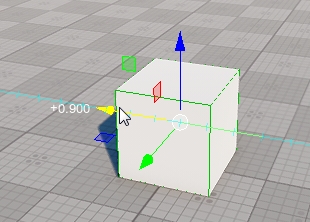
Move the node:移动节点:
- If the arrow manipulator is dragged, the node can be moved along the selected axis.如果拖动箭头操纵器,则可以沿选定的轴移动节点。
- If the rectangle manipulator is dragged, the node can be moved by two axes.如果拖动矩形操纵器,则可以将节点移动两个轴。
- If the circle manipulator is dragged, the node can be moved in the screen plane.如果拖动圆形操纵器,则可以在屏幕平面中移动节点。
 Move along 1 axis沿 1 个轴移动
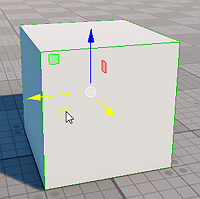 Move by 2 axes移动 2 个轴
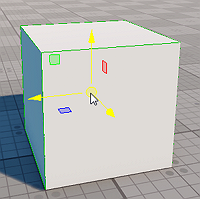 Move in the screen plane在屏幕平面内移动
You can also move the selected node by pressing the arrow keys:你也可以通过按箭头键来移动选中的节点:
- Choose the manipulator.选择 操纵器。
-
Enable snapping by grid and specify the movement step. Step can be set either by direct input of digits or using the box as a slider.使能够按网格捕捉并指定移动步骤。可以通过直接输入数字或使用框作为滑块来设置步长。
 If snapping by grid is disabled, the node is moved by 1.0 unit.如果按网格捕捉禁用,节点移动 1.0 单位。
 - Select the node you want to move in the viewport. Move the node using the arrow keys. The direction of movement is projection-dependent.
在视口中选择要移动的节点。使用箭头键移动节点。运动方向取决于投影。
In addition, you can:此外,您还可以:
- Ignore the node's hierarchy when moving the selected node: press Alt and move the node without its children.移动选定节点时忽略节点的层次结构:按 Alt 并移动没有子节点的节点。
- Move the selected node to the camera by pressing Alt+X.按 Alt+X 将选定节点移动到相机。
Rotate Nodes旋转节点#
To rotate the node:要旋转节点:
- Choose the
 manipulator on the Positioning panel (or press E).在Positioning面板上选择 操纵器(或按 E)。
 -
Click the required node. The sphere with the axes, around which the node can be rotated, will be shown.单击所需的节点。将显示带有轴的球体,节点可以围绕其旋转。
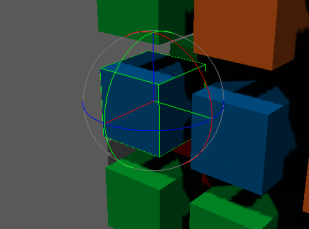 Rotate node旋转节点
 -
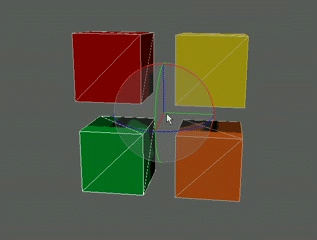
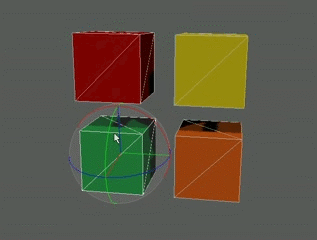
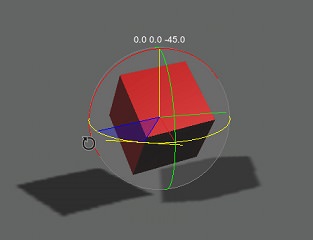
Rotate the node:旋转节点:
- If an axis of the sphere is dragged, the node is rotated around the axis.如果拖动球体的轴,则节点围绕轴旋转。
- If the sphere is dragged, the node can be rotated freely around several axes.如果球体被拖动,节点可以围绕多个轴自由旋转。
 Rotate around 1 axis绕 1 轴旋转
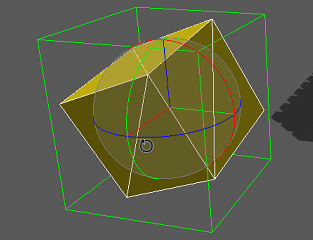 Rotate freely自由旋转
You can also rotate the selected node with the given step by using the arrow keys:您还可以使用箭头键以给定的步长旋转选定的节点:
- Choose the manipulator.选择 操纵器。
-
Enable snapping by angle and specify the step for the rotation angle. Step can be set either by direct input of digits or using the box as a slider.使能够按角度捕捉并指定旋转角度的步长。可以通过直接输入数字或使用框作为滑块来设置步长。If snapping by angle is disabled, the node is rotated by 20 degrees.如果按角度捕捉禁用时,节点旋转 20 度。
- Select the node you want to rotate in the viewport. Rotate the node by using the arrow keys. The direction of rotation is projection-dependent.
在视口中选择要旋转的节点。使用箭头键旋转节点。旋转方向取决于投影。
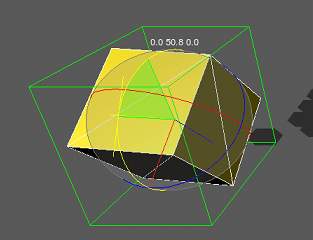
Scale Nodes缩放节点#
To scale the node:要缩放节点:
- Choose the
 manipulator on the Positioning panel (or press R).在Positioning面板上选择 操纵器(或按 R)。
 -
Click the required node. The axes, along which the node can be scaled, will be shown.单击所需的节点。将显示可沿其缩放节点的轴。
 Scale Node缩放节点
 -
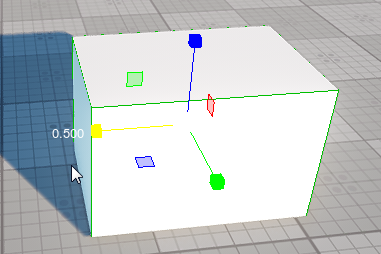
Scale the node:缩放节点:
- If the red, green, or blue cube manipulator located at the end of any axis is dragged, the node is scaled along this axis.如果拖动位于任意轴末端的红色、绿色或蓝色立方体操纵器,则节点将沿该轴缩放。
- If the red, green, or blue square manipulator is dragged, the node is scaled along two axes.如果拖动红色、绿色或蓝色方形操纵器,则沿两个轴缩放节点。
- If the white cube manipulator at the origin is dragged, the node is scaled along three axes.如果拖动原点的白色立方体操纵器,则沿三个轴缩放节点。
 Scale along 1 axis沿 1 轴缩放
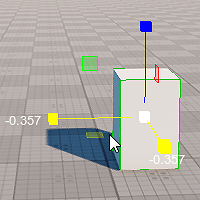 Scale along 2 axes沿 2 个轴缩放
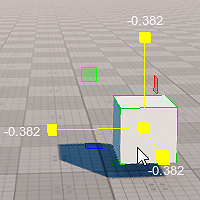 Scale along 3 axes沿 3 个轴缩放
It is also possible to scale the selected node with the given step by using the arrow keys:也可以通过使用箭头键以给定的步骤缩放选定的节点:
- Choose the manipulator.选择 操纵器。
-
Enable snapping by scale and specify the step. Step can be set either by direct input of digits or using the box as a slider.使能够按比例捕捉并指定步骤。可以通过直接输入数字或使用框作为滑块来设置步长。If snapping by scale is disabled, the node is scaled by 0.1 unit.如果按比例捕捉禁用时,节点按 0.1 单位缩放。
- Select the node you want to scale in the viewport. Scale the node using the arrow keys. The direction of scaling is projection-dependent.
选择要在视口中缩放的节点。使用箭头键缩放节点。缩放方向取决于投影。
Clone and Delete Nodes克隆和删除节点#
To clone a node:克隆节点:
- Select the node.选择节点。
-
Press Ctrl+D (or Edit -> Clone).按 Ctrl+D(或 Edit -> Clone)。注意The cloned node will have the same position as the source node.克隆的节点将与源节点具有相同的位置。
To clone and transform a node:要克隆和转换节点:
- Select the node.选择节点。
- Choose , , or on the Positioning panel (or press W, E, or R).在定位面板上选择 、 或 (或按 W, E 或 R)。
- Press and hold Shift and transform the node.按住 Shift 并变换节点。
- Press Shift + D as many times as required (or press and hold this combination) to create more clones. Every next clone will use the last applied transformation.根据需要多次按 Shift + D(或按住此组合)以创建更多克隆。每个下一个克隆都将使用最后应用的转换。
![]()
To clone a node with snapping and manual positioning:使用捕捉和手动定位克隆节点:
-
Enable Snapping By Grid and set the required step value. Step can be set either by direct input of digits or using the box as a slider.启用 Snapping By Grid 并设置所需的步长值。可以通过直接输入数字或使用框作为滑块来设置步长。
- Select an object to be cloned in the world.选择要在世界中克隆的对象。
- Choose the Move manipulator.选择移动机械手。
- Press and hold Shift + Alt while dragging an object with the mouse or using arrows on the keyboard. A new clone is created every step.在使用鼠标或使用键盘上的箭头拖动对象时按住 Shift + Alt。每一步都会创建一个新的克隆。
You can also clone the node holding Shift and using the arrow keys. The direction of cloning is projection-dependent: 你也可以克隆持有 Shift 并使用箭头键的节点。克隆的方向取决于投影:
To delete a node, select it and press Delete (or click Edit -> Delete Object).要删除节点,请选择它并按 Delete(或单击 Edit -> Delete Object)。
Pivot Point and Coordinate System枢轴点和坐标系#
Transformations of the node are relative to the pivot point. The pivot point is used to control the way nodes rotate and scale.节点的变换是相对于枢轴点的。枢轴点用于控制节点旋转和缩放的方式。
To rotate or scale several nodes, select them, choose the required manipulator, and specify the position of its pivot point by using the pivot point toggle.要旋转或缩放多个节点,选择它们,选择所需的机械手,并使用枢轴点切换指定其枢轴点的位置。
If one node is selected, the pivot point position will not change when toggling.如果选择一个节点,则切换时枢轴点位置不会改变。- If the
 button is active, the pivot point is set to the center of selection.如果 按钮处于活动状态,则将枢轴点设置为选择中心。
 - If the
 button is active, the pivot point is set to the center of the last selected node.如果 按钮处于活动状态,则将枢轴点设置为最后一个选定节点的中心。
To toggle the pivot point, you can press Z.要切换枢轴点,您可以按 Z。For example:例如:
-
If you select several nodes, set the pivot point toggle to Center, and rotate these nodes, they rotate around the center of selection as follows:如果选择多个节点,将枢轴点切换设置为 Center,然后旋转这些节点,它们将围绕选择中心旋转,如下所示:
 Pivot point in the center of selection选择中心的枢轴点注意If you scale the nodes, they are scaled out from or in toward the center of selection.如果您缩放节点,它们会从选择中心向外或向内缩放。
 -
If you set the pivot point toggle to Pivot and rotate the selected nodes, each node will rotate around its center as follows:如果将枢轴点切换设置为 Pivot 并旋转选定节点,则每个节点将围绕其中心旋转,如下所示:
 Pivot point coincides with the center of the last selected node枢轴点与最后一个选定节点的中心重合注意If you scale nodes, each node is scaled relative to its center.如果缩放节点,则每个节点都相对于其中心进行缩放。
The basis of the manipulator pivot point can be toggled as follows:操纵器枢轴点的基础可以如下切换:
-
If the
 button is active, the world space orientation is used for the manipulator pivot point.如果 按钮处于活动状态,则世界空间方向将用于操纵器枢轴点。For example, if you set the combination for the selected nodes and rotate them around the Y axis, you will get the following:例如,如果您为选定的节点设置 组合并围绕 Y 轴旋转它们,您将得到以下信息:
Before rotation: After rotation: 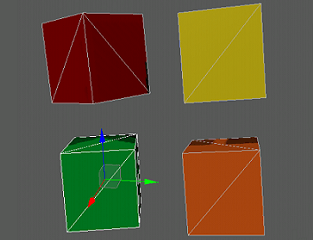
 Pivot point is oriented by the world space枢轴点以世界空间为导向Nodes have been rotated by 45 degrees around the Y axis节点已绕 Y 轴旋转 45 度
 -
If the
 button is active, the coordinate system of the parent node is used for the pivot point orientation.如果 按钮处于活动状态,则父节点的坐标系用于枢轴点方向。For example, if you set the combination for the selected nodes and rotate them around the Y axis, you will get the following:例如,如果您为选定的节点设置 组合并围绕 Y 轴旋转它们,您将得到以下信息:
Before rotation: After rotation: 
 Pivot point is oriented by the local basis of the parent
node (the red cube) 枢轴点由父
节点(红色立方体)的局部基础定向Nodes have been rotated by 45 degrees around the Y axis节点已绕 Y 轴旋转 45 度 -
If the
 button is active, the pivot point is oriented by the local coordinate system of the node. It means that its orientation does not depend on the parent node orientation.如果 按钮处于活动状态,则枢轴点由节点的局部坐标系定向。这意味着它的方向不依赖于父节点的方向。For example, if you set the combination for the selected nodes and rotate them around the Y axis, you will get the following:例如,如果您为选定的节点设置 组合并围绕 Y 轴旋转它们,您将得到以下信息:
Before rotation: After rotation: 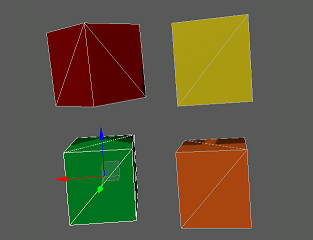
 The pivot point is oriented by the local basis of the last
selected node (the green cube) 枢轴点由最后
选择的节点(绿色立方体)的局部基础定向The nodes have been rotated by 45 degrees around the Y axis节点已绕 Y 轴旋转 45 度
To toggle the manipulator basis, you can press Z.要切换操纵器基础,您可以按 Z。Manipulations Snapping操作捕捉#
To perform positioning, rotation, and scaling manipulations with a higher precision, the Positioning panel provides tools that allow defining a manipulation step.为了以更高的精度执行定位、旋转和缩放操作,定位面板提供了允许定义操作步骤的工具。
Snapping Nodes by Grid按网格捕捉节点#
Snap by Grid enables to position a node along the axis or over the grid with a given arbitrary step (By Grid) or with a step equal to the dimensions of node's bounding box (By Bound Box).Snap by Grid 允许以给定的任意步长(By Grid) 或以等于节点边界框尺寸的步长 (By Bound Box) 沿轴或网格定位节点。
Snapping should be enabled when moving the node by using arrow keys. If disabled, the node is moved by 1 unit by default.使用移动节点时应启用捕捉方向键.如果禁用,节点默认移动 1 单位。To snap a node by grid:要按网格捕捉节点:
- Choose
 on the Positioning panel (or press Shift+W)在定位面板上选择 (或按 Shift+W)
 -
Choose By Grid and specify the grid step (in units) using the drop-down box:选择 By Grid 并使用下拉框指定网格步长(以单位为单位):
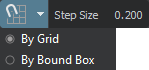 Step can be set either by direct input of digits or using the box as a slider.可以通过直接输入数字或使用框作为滑块来设置步长。Now you can move any node in the world along an axis or across a grid with the given step.现在,您可以使用给定的步长沿轴或跨网格移动世界中的任何节点。
 -
- If one axis is chosen (the arrow manipulator is dragged), the node is aligned along the axis.如果选择一个轴(拖动箭头操纵器),则节点沿轴对齐。
- If a node is repositioned by two axes (the rectangle manipulator is dragged), the node will be aligned by a horizontal or vertical grid.如果一个节点被两个轴重新定位(矩形操纵器被拖动),该节点将通过水平或垂直网格对齐。
 Snapping by an axis按轴捕捉
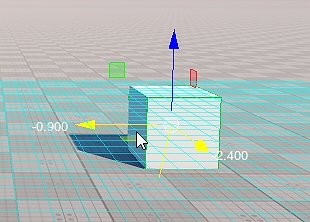 Snapping by a grid stripes通过网格条纹捕捉
To snap a node by Bounding Box:通过 Bounding Box捕捉节点:
- Choose on the Positioning panel (or press Shift+W)在定位面板上选择 (或按 Shift+W)
-
Choose By Bound Box using the drop-down box:使用下拉框选择 By Bound Box:
Now you can move any node in the world along an axis or across a grid with the step equal to the size of the node.现在,您可以沿轴或跨网格移动世界上的任何节点,步长等于节点的大小。
-
- If one axis is chosen (the arrow manipulator is dragged), the node is aligned along the axis.如果选择一个轴(拖动箭头操纵器),则节点沿轴对齐。
- If a node is repositioned by two axes (the rectangle manipulator is dragged), the node will be aligned by a horizontal or vertical grid.如果一个节点被两个轴重新定位(矩形操纵器被拖动),该节点将通过水平或垂直网格对齐。
Snapping Nodes by Angle按角度捕捉节点#
Snap by Angle allows rotating a node along the axis with a given step (in degrees).Snap by Angle 允许以给定的步长(以度为单位)沿轴旋转节点。
Snapping should be enabled when rotating the node by using arrow keys.使用旋转节点时应启用捕捉方向键.To snap a node by angle:按角度捕捉节点:
- Choose
 on the Positioning panel (or press Shift+E).在定位面板上选择 (或按 Shift+E)。
 -
Specify the step for the rotation angle using the following drop-down box:使用以下下拉框指定旋转角度的步长:
 Step can be set either by direct input of digits or using the box as a slider.可以通过直接输入数字或使用框作为滑块来设置步长。Now you can rotate any node in the world around the axis with the given step.现在,您可以使用给定的步长围绕轴旋转世界中的任何节点。
 -
 Rotation by 45 degrees旋转 45 度
Snapping Nodes by Scale按比例捕捉节点#
Snap by Scale allows scaling a node along the axis with a given step.Snap by Scale 允许以给定的step沿轴缩放节点。
Snapping should be enabled when scaling the node by using arrow keys.使用缩放节点时应启用捕捉方向键.To snap a node by scale:要按比例捕捉节点:
- Choose
 on the Positioning panel.在定位面板上选择 。
 -
Specify the step for the scale factor using the following drop-down box:使用以下下拉框指定比例因子的步长:
 Step can be set either by direct input of digits or using the box as a slider.可以通过直接输入数字或使用框作为滑块来设置步长。Now you can scale any node in the world along the axis with the given step.现在,您可以使用给定的步长沿轴缩放世界上的任何节点。
 -
 Scaling by step 0.5按步长 0.5 缩放
You can use the Ctrl button to invert snapping controls (Grid, Angle, and Scale).您可以使用 Ctrl 按钮来反转捕捉控件(网格、角度和比例)。Snapping Nodes to Surface将节点捕捉到曲面#
Snapping a node to a surface of another node provides pixel-perfect positioning of the nodes relative to each other.将一个节点捕捉到另一个节点的表面提供了节点相对于彼此的像素完美定位。
To snap a node to the surface:要将节点捕捉到曲面:
- Select a node that should be snapped.选择一个应该被捕捉的节点。
- Choose
 on the Positioning panel (or press Alt+W).在定位面板上选择 (或按 Alt+W)。
 -
Specify snapping settings via the following panel:通过以下面板指定捕捉设置:
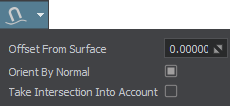
Option Description Offset from Surface Specifies the distance from the node's pivot point to the surface (in units).指定到节点的距离中心点到表面(以单位为单位)。注意- To increase/decrease the distance to the surface, use the WHEEL UP/WHEEL DOWN hotkeys.要增加/减少到表面的距离,请使用WHEEL UP/WHEEL DOWN热键。
- To reset the distance to the surface, use the MIDDLE CLICK hotkey.要重置到表面的距离,请使用MIDDLE CLICK热键。
Orient by Normal Specifies whether the node should be oriented by the surface normal.指定节点是否应按曲面法线定向。注意The hotkey is RIGHT MOUSE BUTTON.热键是鼠标右键。Take Intersection Into Account If enabled, the node interacts only with the surfaces that have the Intersection option enabled.如果启用,节点只与启用了Intersection选项的曲面交互。 -
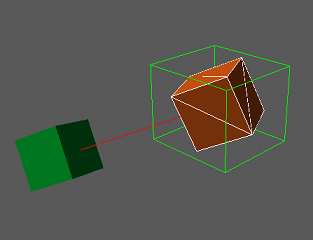
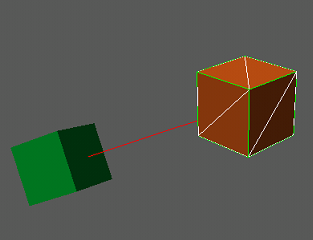
Move the node until the red stripe intersects the required surface of the other node. Click the left mouse button to place the node.移动节点,直到红色条纹与另一个节点的所需表面相交。单击鼠标左键放置节点。注意To abort placement, press ESC.要中止放置,请按 ESC。
The node will follow the mouse as on the image below:该节点将跟随鼠标,如下图所示:
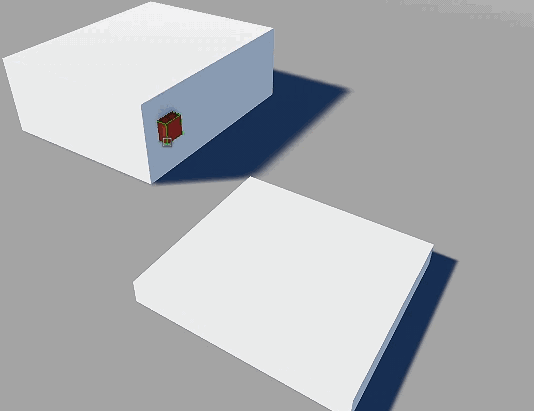
Node is oriented by normalNode is not oriented by normal
 Node is oriented by normalNode is oriented by normal
 Node is not oriented by normalNode is not oriented by normal
|
Node is oriented by normal节点按法线定向 |
Node is not oriented by normal节点不是正常定向的 |
Dropping Nodes to Ground将节点落地#
Dropping a node to the ground means positioning a selected node to the surface below or above this node.将节点放到地面意味着将选定节点定位到该节点下方或上方的表面。
To drop a node to the surface:要将节点拖放到表面:
- Select a node (or several nodes) that should be dropped.选择应该删除的一个节点(或几个节点)。
-
On the Positioning panel, find
 and specify the required settings in the drop-down window:在Positioning面板上,找到 并在下拉窗口中指定所需的设置:
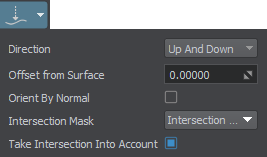
Option Description Direction Specifies the direction of dropping:指定下降方向:-
Up — find the closest surface above the object.
Up — 找到物体上方最近的表面。
-
Down — find the closest surface below the object.
Down — 找到物体下方最近的表面。
-
Up And Down — find the closest surface below the object and above it.
Up And Down — 找到物体下方和上方最近的表面。
Offset from Surface Specifies the distance from the node's pivot point to the surface (in units).指定到节点的距离中心点到表面(以单位为单位)。Orient by Normal Specifies whether the node should be oriented by the surface normal.指定节点是否应按表面法线定向。Intersection Mask Sets an intersection mask that defines whether a node (or nodes) will be positioned on a surface to which it is dropped.设置一个交叉口掩码它定义了一个节点(或多个节点)是否将被放置在它被放置到的表面上。A node will be positioned on a surface if they both have matching intersection masks. Otherwise, the node will penetrate the surface.如果它们都具有匹配的交叉掩码,则节点将被定位在表面上。否则,节点将穿透表面。Take Intersection Into Account If enabled, the node interacts only with the surfaces that have the Intersection option enabled.如果启用,节点只与启用了Intersection选项的曲面交互。 -
Click to drop a node (nodes).单击 以删除一个节点(节点)。
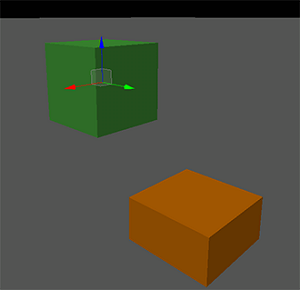
 Initial position of a node节点的初始位置Node dropped to surface (default settings)节点下降到表面(默认设置)
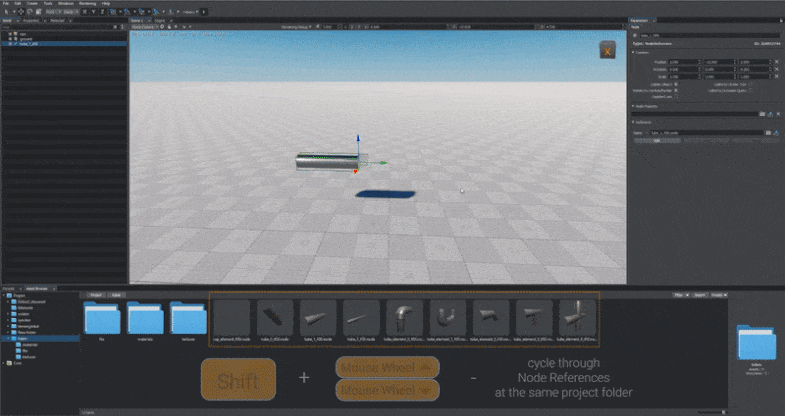
Switching between Node References在节点引用之间切换#
You can quickly replace the source node of Node Reference with another one stored in the same folder. To do that, select a Node Reference in the World Nodes hierarchy window or the Viewport, hold Shift and use the mouse wheel or the Page Up and Page Down buttons.您可以快速将 Node Reference 的源节点替换为存储在同一文件夹中的另一个节点。为此,请在 World Nodes 层次结构窗口或视口中选择 Node Reference,按住 Shift 并使用鼠标滚轮或 Page Up 和 Page Down 按钮。