使用Projection插件进行投影
您应该升级到
 Projection allows you to create multi-projector setups. Edge blending, non-linear image mapping, and color correction for each projection are supported. Therefore, Projection can project images onto large curved screen displays covering 360 degrees, if necessary. Moreover, each projection can be fully customized to use a required view frustum.Projection允许您创建多投影仪设置。支持边缘融合,非线性图像映射以及每个投影的颜色校正。因此,如有必要,Projection可以将图像投影到覆盖360度的大型曲面屏幕显示器上。此外,可以完全自定义每个投影以使用所需的视锥。

Projection setup投影设置

Customizable projection with ProjectionProjection的可自定义投影See Also也可以看看#
Launching Projection启动Projection#
To launch the application and render projections:要启动应用程序并渲染投影:
-
Specify an engine plugin library (bin/plugins/Unigine/Surround/UnigineProjection_*) together with the rest of required start-up arguments (such as rendering API, window size, etc.). For example:指定引擎插件库(bin/plugins/Unigine/Surround/UnigineProjection_*)以及所需的其余部分启动参数(例如渲染API,窗口大小等)。例如:命令行
main_x64.exe -extern_plugin UnigineProjectionYou can use the 64-bit debug or release version of the library. (The engine automatically loads the appropriate version of the library depending on the specified main application.)您可以使用该库的64位调试或发行版本。 (引擎会根据指定的主应用程序自动加载相应版本的库。) -
To change the number of displays in a row, specify -width CLI option. For example:要更改连续显示的数量,请指定-width CLI选项。例如:命令行
main_x64.exe -extern_plugin UnigineProjection -width 2By default, up to 8 projections are supported to be output from one rendering node.默认情况下,最多支持从一个渲染节点输出8个投影。

Projection with two projectionsProjection有两个投影Setting Up Projections设置投影#
To set up projections, open the system menu by pressing Esc and click the Projection button.要设置投影,请按Esc打开系统菜单,然后单击Projection按钮。

The Projection Configurator window will open. This window makes it possible to:Projection Configurator窗口将打开。该窗口可以:
- Rotate and flip projections.旋转和翻转预测。
- Control warping for each projection.控制翘曲对于每个投影。
- Set up edge blending and masks for each projection.设置边缘融合和每个投影的蒙版。
- Correct color intensity for each projection.正确的颜色强度对于每个投影。
You should first choose a Projection to be adjusted at the top-right corner.您应该先选择一个投影在右上角进行调整。
Warping翘曲#
The Warp tab allows you to set up geometry correction for your projections. Areas where geometry correction is required include:Warp选项卡允许您为投影设置几何校正。需要进行几何校正的区域包括:
- Advanced off-axis correction where projector placement is awkward and needs an advanced mapping over the keystone function in a projector先进的离轴校正,其中投影机的放置很麻烦,并且需要对投影机的梯形校正功能进行高级映射
- Non-planar screens such a curved screens and hemispherical domes非平面屏幕,例如弯曲屏幕和半球形圆顶
- Projecting one image from one projector onto more than one surface将一台投影机上的一幅图像投影到一个以上的表面上
- Unusual projection applications onto custom designed screens异常的投影应用程序到定制设计的屏幕上

Interface界面Warping is performed by modifying the displayed grid. The following options are available:通过修改显示的网格来执行变形。提供以下选项:
| Projection | Select a projection in the drop-down list to set up its parameters. You can also use Page Up and Page Down buttons to switch between projections.在下拉列表中选择一个投影以设置其参数。您也可以使用Page Up和Page Down按钮在投影之间切换。 |
|---|---|
| Multiplier | The displacement step in pixels to be used when moving points with arrow keys. Use + to increase the value, or - to decrease it.使用箭头键移动点时要使用的位移步长(以像素为单位)。使用+增加值,或使用-减少值。 |
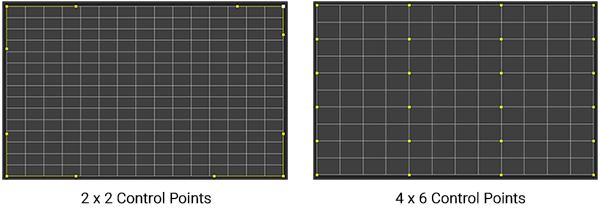
| Resolution |
注意
The maximum grid size is 32 x 32.最大网格大小为32 x 32。 |
| Points |
注意
Points are always moved in the screen-space coordinates regardless of image orientation (whether it is flipped or not), this means if you press left arrow, the point always goes left.无论图像的方向如何(无论是否翻转),点总是在屏幕空间坐标中移动,这意味着如果按向左箭头,则该点总是向左移动。
|
| Canvas |
|


 button to undo all panning and zooming actions and make the grid fit the window
Color and Brightness Correction色彩和亮度校正#
The Color tab allows you to correct color intensity, as well as to adjust color balance for the selected projection.Color选项卡允许您校正色彩强度,以及调整所选投影的色彩平衡。
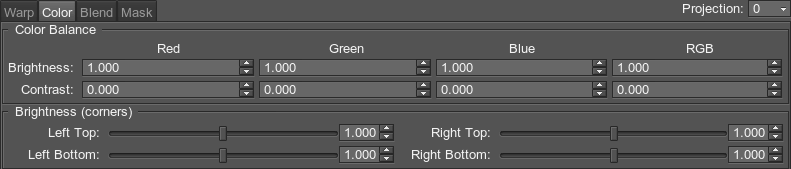

 All color parameters can be reset to defaults by clicking the corresponding parameter name (by line or by column for the Color Balance set of parameters, and individually for each corner).通过单击相应的参数名称(对于Color Balance参数集,按行或按列,对于每个角分别按行或按列),可以将所有颜色参数重置为默认值。
Blending调和#
The Blend tab allows you to configure blending in the selected area and along the edges.Blend选项卡允许您在选定区域和沿边缘配置混合。
| Screen-Space Blending |
|
|---|
Defining a screen-space blending area定义屏幕空间混合区域
The blended area混合区

Masking掩蔽#
The Mask tab allows using masks to cut out certain areas of the selected projection. Mask选项卡允许使用遮罩切出所选投影的某些区域。
To create a mask, click Add and ensure that the Creation Mode button is enabled. Then create at least three points on the grid by clicking in the required place. The corresponding area of the projection will be cut out. The list of masks for the current projection is displayed under the grid. You can add new masks and remove existing ones using the corresponding buttons.要创建遮罩,请单击Add并确保已启用Creation Mode按钮。然后通过单击所需的位置在网格上至少创建三个点。投影的相应区域将被切除。当前投影的蒙版列表显示在网格下方。您可以使用相应的按钮添加新的蒙版并删除现有的蒙版。
To add new points to the mask selected in the list, ensure that the Creation Mode button is enabled. Then you can add new points by clicking within the grid area. To insert a new point into an existing mask, select the point next to which a new point is to be added, and click to insert a new one. You can drag an existing point to move it. To remove a point, right-click it.要将新点添加到列表中选定的蒙版,请确保启用Creation Mode按钮。然后,您可以通过在网格区域内单击来添加新点。要将新点插入现有遮罩中,请选择要在其旁边添加新点的点,然后单击以插入新点。您可以拖动现有点以将其移动。要删除点,请右键单击它。
You can also adjust your masks precisely by specifying the coordinates of each point. Select a point on the grid (its color will turn to green) and enter the coordinates in the Position fields below.您还可以通过指定每个点的坐标来精确调整蒙版。在网格上选择一个点(其颜色将变为绿色),然后在下面的Position字段中输入坐标。
You can change the type of a selected control point using the following icons:您可以使用以下图标更改所选控制点的类型:
 — automatic linear interpolation (no control handles available) —自动线性插值(无控制手柄)
 — symmetric control handles for smooth curves —平滑曲线的对称控制手柄
 — asymmetric control handles (you can control each handle independently)-非对称控制手柄(您可以独立控制每个手柄)
 — automatic smooth curve (no control handles available)-自动平滑曲线(无控制手柄)
As you select a mask in the list, its parameters are displayed on the panel next to it:在列表中选择一个遮罩时,其参数将显示在其旁边的面板上:

- Enabled — enables or disables display of the selected mask. Can be used for convenience when configuring overlapping regions, when there are a lot of masks.Enabled —启用或禁用所选遮罩的显示。当配置重叠区域时,如果有很多遮罩,可以方便使用。
- Name — mask name, can be edited.Name —掩码名称,可以编辑。
- Smooth — roundness of the mask edges.Smooth —遮罩边缘的圆度。
Render使成为#

The Render block of settings is located at the bottom of the Projection Configurator window. These settings are designed to facilitate fine-tuning of the projection by displaying the auxiliary elements on the actual projection.Render设置块位于Projection Configurator窗口的底部。这些设置旨在通过在实际投影上显示辅助元素来简化投影的微调。
- The Debug Color option allows you to temporarily set individual colors for different projections. This helps to visualize overlapping regions.Debug Color选项允许您为不同的投影临时设置单独的颜色。这有助于可视化重叠区域。
- Show Grid — display the grid on the projection.Show Grid —在投影上显示网格。
- Warp Points — display points and auxiliary red lines going from a selected point or points to the center of each side.Warp Points —显示从一个或多个选定点到每侧中心的点和辅助红线。
- Blend Lines — display screen-space blend lines and auxiliary purple lines going from a selected point or points to the center of each side.Blend Lines —显示屏幕空间混合线和辅助紫色线,其从一个或多个选定点延伸到每侧中心。
Multiple Projections' Viewing Settings多个投影的观看设置#
If more than two projections are created with Projection, the following viewing settings can be tweaked in the System menu -> Plugins.如果使用Projection创建了两个以上的投影,则可以在System menu -> Plugins中调整以下查看设置。
| FOV |
FOV = 60
FOV = 80
|
|---|---|
| Angle |
Angle = 40 degrees角度= 40度 |
| Bezel X | Compensates for the horizontal bezel of monitors. Positive values decrease the viewport space; negative ones increase it (for overlapping).补偿显示器的水平边框。正值会减小视口空间;正值会减小视口空间。负数会增加它(用于重叠)。 |
| Bezel Y | Compensates for the vertical bezel of monitors. Positive values decrease the viewport space; negative ones increase it (for overlapping).补偿显示器的垂直边框。正值会减小视口空间;正值会减小视口空间。负数会增加它(用于重叠)。 |


Saving and Loading Presets保存和加载预设#
After the projection configuration is set up, it can be saved to a preset file (*.proj) to be loaded at any time (e.g. to set up another projection):设置投影配置后,可以将其保存到预设文件(*.proj)中以随时加载(例如,设置另一个投影):
- Save button to save a preset fileSave按钮保存预设文件
- Load button to load a preset fileLoad按钮加载预设文件
- A *.proj file that you save contains settings only for the currently selected projection.您保存的*.proj文件仅包含当前所选投影的设置。
- Settings loaded from a *.proj file are applied to the currently selected projection.从*.proj文件加载的设置将应用于当前选择的投影。
Customizing Projection自定义Projection#
Projection can be customized to support custom viewing frustums (symmetric or asymmetric ones) for each projection.可以自定义Projection以支持每个投影的自定义视锥(对称或非对称视锥)。
Projection ViewportsProjection视口#
Projection has one primary viewport, while all other viewports are rendered as auxiliary ones. By default, the primary display is the UNIGINE engine viewport used for one-monitor configuration. It uses matrices of the Player used by the engine to view the scene. Other displays are arbitrary cameras with any perspective and facing whatever direction needed. Each display has its own model-view and projection matrices. Both the primary projection and auxiliary ones can be enabled or disabled, if necessary.Projection具有一个主视口,而所有其他视口则呈现为辅助视口。默认情况下,主显示是用于单显示器配置的UNIGINE引擎视口。它使用引擎使用的Player矩阵查看场景。其他显示器是具有任意角度并面向所需方向的任意摄像机。每个显示器都有自己的模型视图和投影矩阵。如果需要,可以启用或禁用主投影和辅助投影。
- The primary viewport can be set to any projection (for supported configurations it is already set).可以将主视口设置为任何投影(对于支持的配置,它已经被设置)。
- Each viewport has its own model-view and projection matrices.每个视口都有自己的模型视图和投影矩阵。
- By default, only a primary one has a graphical user interface (render system GUI, editor widgets, wireframe, or the profiler). However, separate GUIs can be drawn on all projections.默认情况下,只有主要的一个具有图形用户界面(渲染系统GUI,编辑器小部件,线框或事件探查器)。但是,可以在所有投影上绘制单独的GUI。
- All viewports have their own Viewport and Reflection mask to selectively render nodes and reflections from them.所有视口都有自己的视口反射遮罩可选择性地渲染节点和来自节点的反射。
Default Configurations默认配置#
For default configurations, the primary viewport is set to the following projection:对于默认配置,主视口设置为以下投影:
- For 2 projections, the 1st viewport.对于2个投影,第一个视口。
- For 3 projections, the 2nd viewport.对于3个投影,第二个视口。
- For 4 projections, the 2nd viewport.对于4个投影,第二个视口。
- For 5 projections, the 3rd viewport.对于5个投影,第三个视口。
How to Customize Projections如何自定义投影#
Rendering of Projection viewports is controlled by the wall.h script (found in the <UnigineSDK>/data/core/scripts/system/ folder). There are two possible setups depending on how the primary projection is rendered. It can be drawn by:Projection视口的渲染由wall.h脚本(位于<UnigineSDK>/data/core/scripts/system/文件夹中)控制。有两种可能的设置,具体取决于渲染主投影的方式。可以通过以下方式得出:
- The default engine renderer (the same as when a usual one-monitor application is rendered)默认引擎渲染器(与呈现通常的单显示器应用程序时相同)
- The Projection renderer itself (which is safer if you are going to use asymmetric frustum for the center projection and modify its model-view matrix)Projection渲染器本身(如果要对中心投影使用不对称的视锥,并修改其模型视图矩阵,则更加安全)
Only one of two renderers should be enabled at the same time.只能同时启用两个渲染器之一。The following example demonstrates how to tweak cameras configuration and choose the renderer for the main projection.以下示例演示了如何调整相机配置并为主投影选择渲染器。
1. Using default engine renderer1.使用默认引擎渲染器#
The first variant is to render the main (primary) projection by the default engine renderer.第一种变体是通过默认引擎渲染器渲染主(主)投影。
-
In case the created configuration is not already supported, set the primary projection via Unigine::Plugins::Projection::setPrimary():如果尚不支持创建的配置,请通过Unigine::Plugins::Projection::setPrimary()设置主投影:源代码 (C++)
// Set the first projection as a primary one Unigine::Plugins::Projection::get()->setPrimary(1); -
Enable all non-primary projections via Unigine::Plugins::Projection::SetEnabled(). The main one should be left disabled, as it is drawn by the default engine renderer.通过Unigine::Plugins::Projection::SetEnabled()启用所有非主要投影。主菜单应保留为禁用状态,因为它是由默认引擎渲染器绘制的。源代码 (C++)
// Enable the 2nd projection in a row // The second argument of the function sets 'enabled' flag Unigine::Plugins::Projection::get()->setEnabled(1, 1); -
Set projection and model-view matrices for an auxiliary projection.设置辅助投影的投影和模型视图矩阵。源代码 (C++)
// Settings for the 2nd projection
CameraPtr camera1 = Projection::get()->getCamera(1, 0);
camera1->setProjection(projection_1);
camera1->setModelview(modelview_1);
2. Using Projection renderer2.使用Projection渲染器#
Another variant is to render the main projection by the Projection renderer. This variant can be used, for example, if you want to set up symmetric frustums for all projections.另一个变体是通过Projection渲染器渲染主投影。例如,如果要为所有投影设置对称的平截头体,则可以使用此变体。
-
Set the projection to be used as a primary one and enable its rendering by Projection.设置要用作主要投影的投影,并通过Projection启用其渲染。源代码 (C++)
// Set the first projection as a primary one Unigine::Plugins::Projection::get()->setPrimary(1); -
Disable rendering into the default UNIGINE viewport via Unigine::Render::setEnabled():通过Unigine::Render::setEnabled()禁用渲染到默认的UNIGINE视口:源代码 (C++)
Unigine::Render::setEnabled(0); -
Enable all Projection projections including the primary one. As a result, all viewports will be rendered by Projection renderer itself:启用所有Projection投影,包括主要的。结果,所有视口将由Projection渲染器本身渲染:源代码 (C++)
// Enable all projections Unigine::Plugins::Projection::get()->setEnabled(0, 1); Unigine::Plugins::Projection::get()->setEnabled(1, 1); -
Set model-view and projection matrices for all projections.为所有投影设置模型视图和投影矩阵。源代码 (C++)
// Settings for the 1st projection
Unigine::Plugins::Projection::get()->setProjection(0, projection_0);
Unigine::Plugins::Projection::get()->setModelview(0, modelview_0);

// Settings for the 2nd projection
Unigine::Plugins::Projection::get()->setProjection(1, projection_1);
Unigine::Plugins::Projection::get()->setModelview(1, modelview_1);