色彩校正
 This section describes settings for color correction of the scene.本节介绍场景色彩校正的设置。
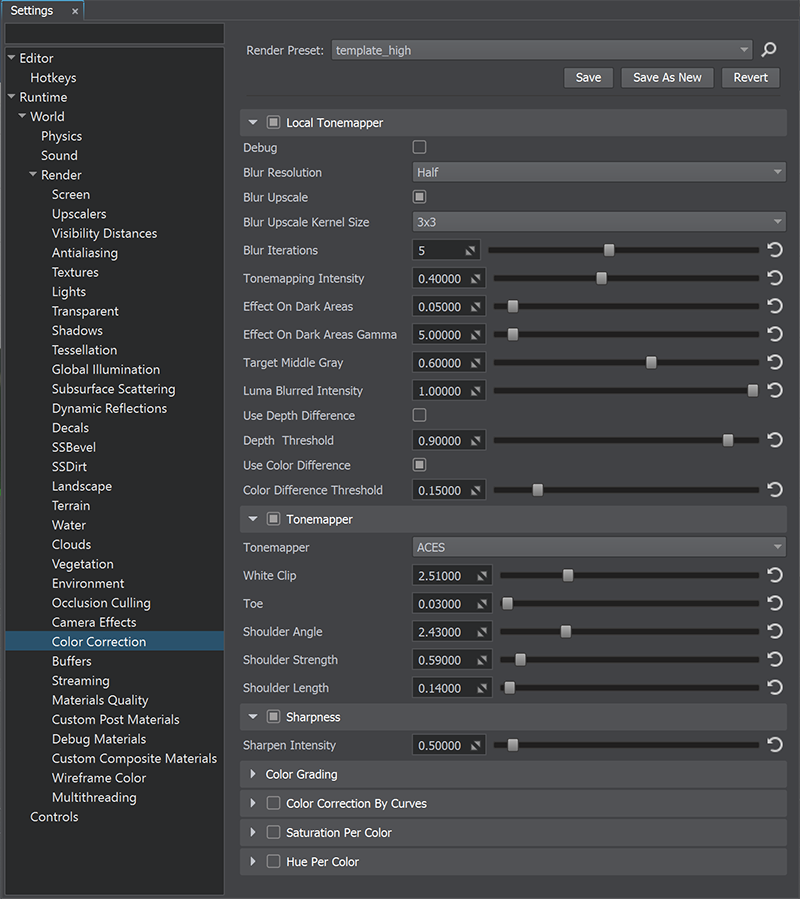
Scene Color Settings场景颜色设置Local TonemapperLocal Tonemapper#
Local tone mapping uses a spatially varying mapping function determined by the neighborhood of a pixel, which allows an increase in the local contrast and the visibility of some details of an image. The local tonemapper enables the generation of a mask based on the entire image, providing more pleasing results because human vision is more sensitive to local contrast.局部色调映射使用由像素邻域确定的空间变化映射函数,这可以增加局部对比度和图像某些细节的可见性。 局部色调映射器可以根据整个图像生成蒙版,从而提供更令人满意的结果,因为人类视觉对局部对比度更敏感。
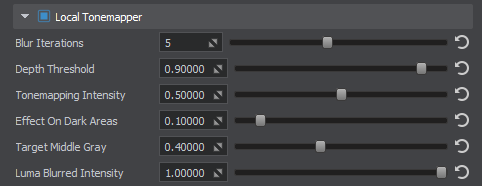
Local Tonemapper SettingsLocal Tonemapper设置| Local Tonemapper | value indicating if the local tonemapper is enabled. 关 默认.
通过控制台访问: render_local_tonemapper (API控制) |
|---|---|
| Blur Iterations | number of blur iterations applied to the screen texture, which is used to define bright and dark portions of the screen. A higher number of iterations increases the blur radius and reduces halo artifacts around objects, but may affect performance. 数值范围: [0, 10]. 默认值为 : 5. 通过控制台访问: render_local_tonemapper_num_blur_iterations (API控制) |
| Depth Threshold | depth threshold value used to detect the areas affected by local tonemapping. A properly set value may help to reduce halo artifacts. 数值范围: [0.0f, 1.0f]. 默认值为 : 0.9f. 通过控制台访问: render_local_tonemapper_depth_threshold (API控制) |
| Tonemapping Intensity | intensity of the local tonemapping effect. 数值范围: [0.0f, 1.0f]. 默认值为 : 0.5f. 通过控制台访问: render_local_tonemapper_tonemapping_intensity (API控制) |
| Effect On Dark Areas | extent of applying the local tonemapping effect on dark areas. 数值范围: [0.0f, 1.0f]. 默认值为 : 0.1f. 通过控制台访问: render_local_tonemapper_effect_on_dark_areas (API控制) |
| Target Middle Gray | target middle gray value for tonemapping. 数值范围: [0.0f, 1.0f]. 默认值为 : 0.4f. 通过控制台访问: render_local_tonemapper_target_middle_gray (API控制) |
| Luma Blurred Intensity | intensity of blurring the luma values. It is recommended to keep the default value for this setting. With the value set to 0, a regular screen texture is used instead of a blurred screen texture. This might be required in a rare case of reducing the halo effect and increasing the tonemapping effect for small details. 数值范围: [0.0f, 1.0f]. 默认值为 : 1.0f. 通过控制台访问: render_local_tonemapper_luma_blurred_intensity (API控制) |
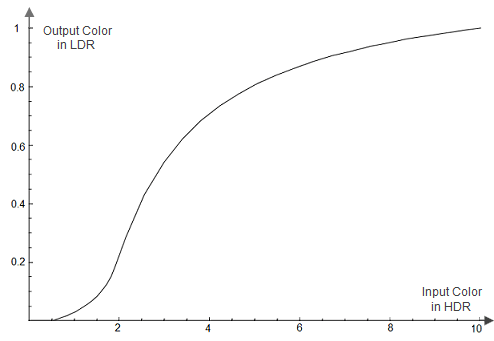
Tonemapper#
调映提供更好的图像质量的重大动态范围(HDR)的颜色到一系列适用于媒介以较低的动态范围(利润),如液晶或CRT屏幕。 其最常见的目的是使一个像一个低的动态范围似乎要有一个更高的颜色范围,提供更多的动态和真实的效果。 它减轻了最黑暗的图像的地区,并使最轻地暗。
当使用HDR摄像机的,总是色调映射应用,否则色彩的强度值超过 1 将被夹在 1,改变亮度平衡的现场。
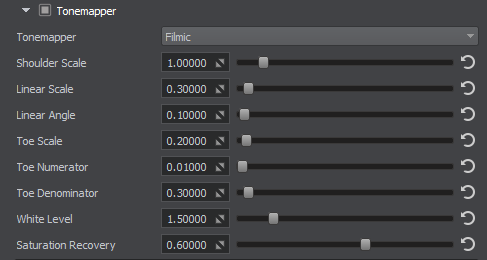
FilmicFilmic#
参数,如下所述代表约翰*Hable的艺术家的友好的色调映射曲线,而是由使用的公式如下:
- A — Shoulder Scale (肩规模)
- B — Linear Scale (线的规模)
- C — Linear Angle (直线的夹角)
- D — Toe Scale (脚趾垢)
- E — Toe Numerator (脚趾分子)
- F — Toe Denominator (脚趾点)
更多的细节有关调映射曲线建筑看文章上的电影色调映射的分段功率曲线。
| Shoulder Scale | 该 肩强度的 电影音映射参数值被用于改变光亮的价值观。
|
||
|---|---|---|---|
| Linear Scale | 的 线性强度的 电影音映射参数值被用于改变灰色的价值观。 线性规模 控制的长度调映射曲线的直线部分。
|
||
| Linear Angle | 该 直线的夹角 电影音映射参数值。 控制的斜线部分的调映射曲线。
|
||
| Toe Scale | 该 脚趾强度的 电影音映射参数值被用于改变的黑暗的价值观。 控制坡的 调映射曲的脚趾(该地区的曝光不足)。
|
||
| Toe Numerator | 该 脚趾子 电影音映射参数值。
|
||
| Toe Denominator | 该 脚趾点 电影音映射参数值。
|
||
| White Level | 该 直线的白点 电影音映射参数值,这是映射作为纯粹的白色在得到的图像。
|
||
| Saturation Recovery | 颜色饱和恢复的价值的 [0.0f,1.0f] 的范围。 电影tonemapper desaturates图像的色彩明亮的地区,使他们看起来灰. 这个参数使你恢复最初的颜色饱和,在这些地区。
注意
当 1.0f 值设定的镜面突出显得太饱和,因此建议值 0.75f (默认)。 |


ACESACES#
Mix ACES With ReinhardMix ACES With Reinhard#
| Mix With Reinhard | 具有 Reinhard 色调映射运算符贡献的 ACES。 控制组合中混合 ACES 和 Reinhard 色调映射器的比例。 如果该值更接近于 0,则以 ACES 为准。 否则,当值接近 1 时,Reinhard 的影响更大。 |
|---|
ReinhardReinhard#
| Contribution | Reinhard 色调映射算子的贡献: C / (1 + C)
控制 reinhard 算子对图像最终颜色分级的总体贡献。 [0.0f; 1.0f] 范围内的较高值会导致对最终图像的色调映射贡献更大。 |
|---|
Reinhard Luma-BasedReinhard Luma-Based#
Color Grading#
| Brightness | 校正整体场景亮度:
|
|---|---|
| Contrast | 校正整体场景对比度:
|
| Gamma | 校正整个场景的伽玛。 |
| White | 场景的白平衡。 |
| LUT Texture | 加载,查看或清除查找表纹理以进行颜色转换。 |
Color Correction by Curves#
| Color Correction | 最终图像的色调范围和色调响应。水平输入颜色值根据红色,绿色和蓝色通道的曲线映射到垂直输出值。通过一次调整所有三个通道,您可以控制最终图像的亮度。
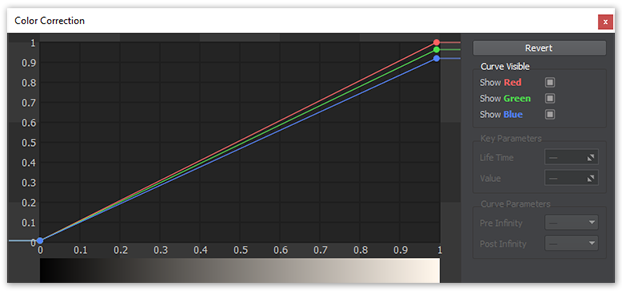 色彩校正曲线 色彩校正曲线 |
|---|---|
| Preserve Saturation | 应用色彩校正后,保留初始场景色彩饱和度。 |
| Saturation Correction | 校正整个场景饱和度的曲线。输入的亮度值映射到垂直饱和度值:
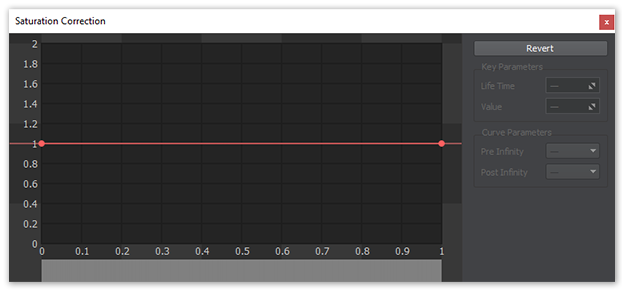 Linear Scale = 0.3 (by default)饱和度曲线 Linear Scale = 0.3 (by default)饱和度曲线 |
Saturation and HueSaturation and Hue#
| Saturation per Color | 光谱的12种主要颜色的饱和度微调。
Toe Scale = 0.20 (by default)饱和度调整 |
|---|---|
| Hue per Color | 色相的12种主要颜色的色相(色彩偏移)微调。
 色相调整 色相调整 |
Color Correction LUTColor Correction LUT#
Color Correction LUT(查找纹理)是在后期效果中执行颜色分级的一种优化方法。无需调整单个的颜色分级参数,仅使用单个纹理即可生成校正后的图像。通过使用原始图像颜色作为矢量来处理查找纹理来执行查找。
Correction of the overall scene brightness:查找表最常见的应用之一是使用它们来查看图像在具有不同色彩功能的不同媒体(例如电视/视频或电影)中的外观。使用旨在模仿某种显示媒体的查找表,您可以更好地了解当前工作转移到该显示媒体后的样子。
使用色彩校正LUT的优点包括:
- Negative values darken the colors up to black.更好的性能-实时计算被简单的数组索引操作所取代。
- 更多专业工作流程机会,可以使用专业图像编辑软件(例如Photoshop或GIMP)定义所有颜色转换,从而提供更精确的结果。

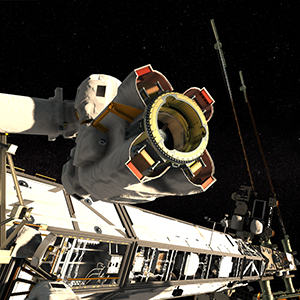
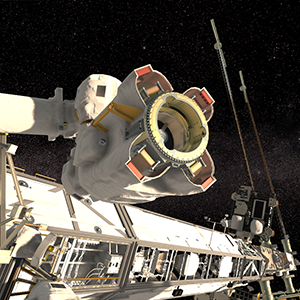
应用了中性色彩校正的简单场景。
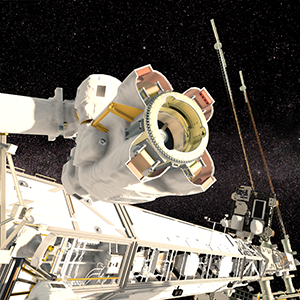
使用具有阴影,高光和鲜艳度的查找纹理的同一场景。通过实时动态更改色彩校正LUT,可以创建各种视觉效果。Lookup Texture Requirements查找纹理要求#
2D纹理表示必须以表示展开的体积纹理的方式进行布局(作为“深度切片”的图像序列)。

1024 x 32 纹理,代表 32x32x32 颜色LUT。Workflow Example工作流程示例#
- 通过单击LUT纹理字段右侧的
 按钮(Save texture)并将其另存为 TGA 文件(通过在Typefield中选择它),可以生成默认的查找纹理。
 - 拍摄场景截图。
- 将您的屏幕截图导入图形编辑器(例如Photoshop或GIMP),然后执行所有必要的图像校正操作(亮度,对比度等),以获得所需的外观。
- 将生成的默认查找纹理导入图形编辑器,并执行与场景屏幕截图相同的操作。将修改后的查找纹理另存为新的LUT。
- The higher the value, the more saturated and vibrant the colors are.在Render Settings -> Color -> LUT texture中,选择新纹理。
现在,UnigineEditor中的场景与图形编辑器中的场景完全一样!
本页面上的信息适用于 UNIGINE 2.20 SDK.