设置相机
 The main camera functions are available via the Camera panel of the Editor Viewport: you can switch between cameras, add new cameras to the current world, open the Camera Settings window, and toggle the flashlight attached to the camera.主要的相机功能可通过 Camera 面板获得编辑器视口:您可以在相机之间切换,将新相机添加到当前世界,打开相机设置窗口,然后切换手电筒附在相机上。
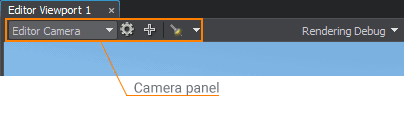
Camera Panel相机面板By default, there are 2 cameras in the world:默认情况下,世界上有 2 个摄像头:
- Engine Camera created from the world script. The view from this camera is rendered in a separate Engine Viewport, and you cannot change its settings via UnigineEditor. This camera represents the current player. Engine Camera can be changed via the script.Engine Camera 从世界脚本创建。此相机的视图在单独的Engine Viewport中渲染,您无法通过 UnigineEditor 更改其设置。此相机代表当前玩家。 Engine Camera 可以通过脚本.
-
Editor Camera created from the editor script. This is the default camera in UnigineEditor.Editor Camera 从编辑器脚本创建。这是 UnigineEditor 中的默认相机。注意Both Engine Camera and Editor Camera always exist in the world.Engine Camera 和 Editor Camera 始终存在于世界中。
You can also add new cameras. Such cameras can be used as watchpoints in the world: you can position cameras at different points of the world and then switch between them via the Camera panel of the Editor Viewport, when necessary.你也可以添加新相机.这样的相机可以用作世界上的观察点:你可以位置世界不同点的相机,然后通过相机面板在它们之间切换编辑器视口, 必要时。
The number of cameras is unlimited.摄像机的数量是无限的。Adding a New Camera添加新相机#
To add a new camera to the current world:将新相机添加到当前世界:
-
Change the position and orientation of the current camera by using the navigation controls.使用导航控件.注意Position, orientation, and settings of the current camera are copied for the new camera.为新相机复制当前相机的位置、方向和设置。
-
On the Camera panel, click
 . A new camera will be added to the list of the available cameras with the PlayerDummy name.在 Camera 面板上,单击 。一个新的摄像头将添加到可用摄像头列表中,名称为 PlayerDummy。
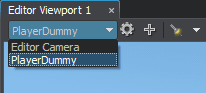 A new available camera新的可用相机At the same time, the camera will be added to the world as a PlayerDummy node.同时,相机将作为 PlayerDummy 节点添加到世界中。
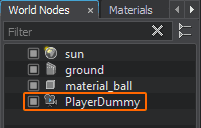 A new PlayerDummy node一个新的 PlayerDummy 节点
 - Change the default camera settings to the required ones.更改默认相机设置到所需的。
Positioning the Camera定位相机#
To set a new position and orientation for the camera, place the camera to the required position and adjust its orientation as necessary by using the navigation controls.要为摄像头设置新的位置和方向,请将摄像头放置到所需位置,并根据需要使用导航控件.
All camera movements are immediately saved. Consider that when positioning cameras.所有相机移动都会立即保存。在定位相机时考虑这一点。You can also position the camera by selecting it in the World Hierarchy window and directly changing its transformation via the Parameters window.您也可以通过在 World Hierarchy 窗口中选择相机并通过 Parameters 窗口直接更改其变换来定位相机。
Setting Up the Camera设置相机#
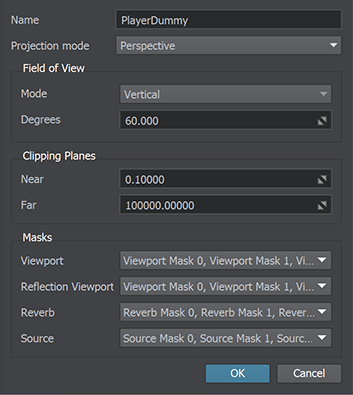
As settings of a new camera are simply copied from the current camera, you may need to change them via the Camera Settings window.由于新相机的设置只是从当前相机复制而来,您可能需要通过 Camera Settings 窗口更改它们。
To open the Camera Settings window, choose the required camera and click ![]() on the Camera panel.要打开 Camera Settings 窗口,请选择所需的相机并单击 Camera 面板上的
on the Camera panel.要打开 Camera Settings 窗口,请选择所需的相机并单击 Camera 面板上的 ![]() 。
。
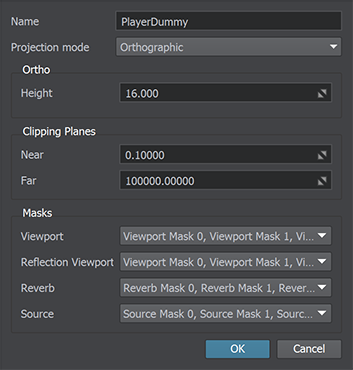
Camera Settings相机设置#
The list of available camera settings depends on the camera mode:可用相机设置列表取决于相机模式:
- Perspective mode透视模式
- Orthographic mode正交模式
|
|
|
Perspective Camera Settings透视相机设置 |
Orthographic Camera Settings正交相机设置 |
| Option | Description | ||||
|---|---|---|---|---|---|
| Name | Name of the current camera. If you change the camera name, the name of the node (PlayerDummy) will be also changed.当前摄像机的名称。如果更改相机名称,节点名称 (PlayerDummy) 也会更改。 |
||||
| Ortho |
|
||||
| Height |
注意
该选项仅在正交相机模式下可用(选中 Ortho 选项)。 |
||||
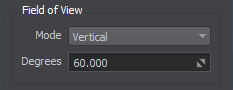
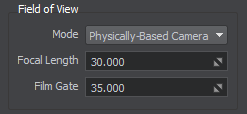
| Field of View (available only for the perspective mode) Field of View (仅适用于透视模式) |
|||||
| Mode |
|
||||
| Degrees |
注意
Available for the camera with the vertical FOV only.可用于带有垂直视野只要。 |
||||
| Focal Length |
注意
Available for the physically-based camera only.可用于基于物理的仅限相机。 |
||||
| Film Gate |
注意
Available for the physically-based camera only.可用于基于物理的仅限相机。 |
||||
| Clipping Planes | |||||
| Near | Distance to the camera near clipping plane.
裁剪平面附近到相机的距离.
|
||||
| Far | Distance to the camera far clipping plane.
注意
An extremely big difference between the Near and Far Clipping Planes can cause black screen. Therefore, if the required Far Clipping Plane value is outside the range, adjust the Near Clipping value proportionately.到相机远裁剪平面的距离.
An extremely big difference between the Near and Far Clipping Planes can cause black screen. Therefore, if the required Far Clipping Plane value is outside the range, adjust the Near Clipping value proportionately.An extremely big difference between the Near and Far Clipping Planes can cause black screen. Therefore, if the required Far Clipping Plane value is outside the range, adjust the Near Clipping value proportionately.注意
An extremely big difference between the Near and Far Clipping Planes can cause black screen. Therefore, if the required Far Clipping Plane value is outside the range, adjust the Near Clipping value proportionately.近剪裁平面和远剪裁平面之间的巨大差异会导致黑屏。因此,如果需要的 Far Clipping Plane值超出范围,请按比例调整Near Clipping值。 |
||||
| Masks 面具 |
|||||
| Viewport | A Viewport bit mask for the camera that enables to selectively display objects, decals and lights in the camera viewport. If at least one bit matches, the object, decal or light will be rendered. The mask can be edited.摄像机的 Viewport 位掩码,可以在摄像机视口中选择性地显示对象、贴花和灯光。如果至少有一位匹配,则将渲染对象、贴花或灯光。可以编辑蒙版。 |
||||
| Reflection Viewport | A reflection viewport bit mask for the reflection camera that enables selective display of reflections from objects. The mask can be edited. reflection camera 的 reflection viewport 位掩码,可以选择性地显示来自对象的反射。可以编辑蒙版。 |
||||
| Reverberation | A reverberation mask for the camera determines what reverberation zones can be heard. At least one bit of this mask should match the reverb mask of the sound source and the reverb mask of the reverberation zone. The mask can be edited.一种混响遮罩因为摄像机决定了可以听到的混响区域。此掩码的至少一位应与声源的混响掩码和混响区域的混响掩码匹配。可以编辑蒙版。 |
||||
| Sound | A sound mask for the camera that what sound channels can be heard. If at least one bit matches the sound source mask, the sound can be heard. Each bit of the source mask specifies a sound channel. The mask can be edited. 一种声音面具对于可以听到哪些声道的相机。如果至少一位与声源掩码匹配,则可以听到声音。源掩码的每一位指定一个声道。可以编辑蒙版。 |
||||
Rendering the Camera Viewport in a Separate Window在单独的窗口中渲染相机视口#
The view from each camera can be rendered into a separate Editor Viewport window.每个摄像机的视图可以渲染成单独的编辑器视口窗户。
To render a view from a camera to a separate viewport, perform the following steps:要将摄像机中的视图渲染到单独的视口,请执行以下步骤:
-
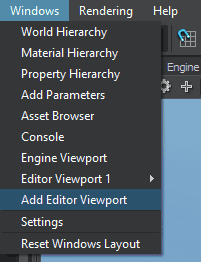
Add a new Editor Viewport window, choose Windows -> Add Editor Viewport.添加一个新的编辑器视口窗口,选择 Windows -> Add Editor Viewport。
 A new viewport named Editor Viewport 2 will open.将打开一个名为 Editor Viewport 2 的新视口。
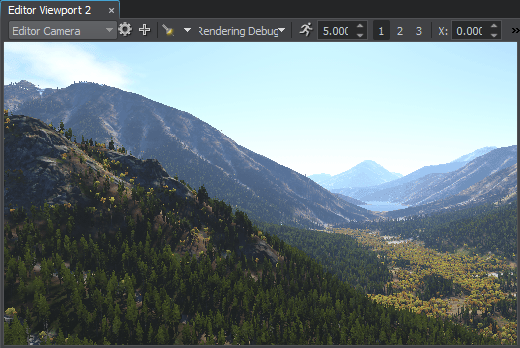 New Editor Viewport新编辑器视口
 -
Select the required camera to render the view from in the drop-down list of the Camera panel.从“相机”面板的下拉列表中选择需要渲染视图的相机。
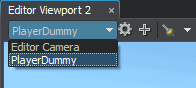 注意You can change the camera at any time, if necessary.如有必要,您可以随时更换相机。
The total number of viewports that can be opened simultaneously is not limited. Each new viewport window has the same functionality as the main Editor Viewport window.可以同时打开的视口总数不受限制。每个新视口窗口都具有与主 Editor Viewport 窗口相同的功能。
You can use several Editor Viewports to operate with several nodes located far away from each other, or to view different orthographic projections of the scene (Top, Front, and Side views).您可以使用多个编辑器视口对彼此远离的多个节点进行操作,或查看场景的不同正交投影(顶视图、前视图和侧视图)。
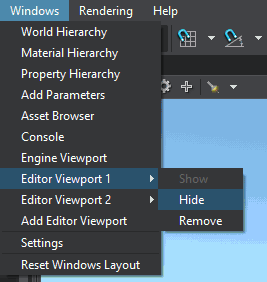
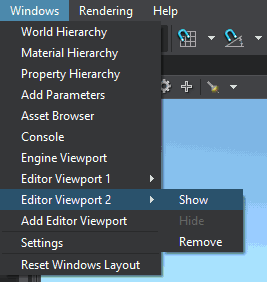
Hiding and Showing Viewports隐藏和显示视口#
You can hide the Editor Viewport window and show the one that is hidden. To toggle the Editor Viewport window, select its name in the Windows menu and choose Show or Hide.您可以隐藏 Editor Viewport 窗口并显示隐藏的窗口。要切换 Editor Viewport 窗口,请在 Windows 菜单中选择其名称并选择 Show 或 Hide。
|
|
|
Hide the Editor Viewport 1隐藏编辑器视口 1 |
Show the Editor Viewport 2显示编辑器视口 2 |
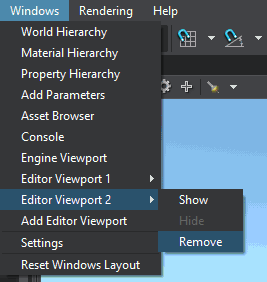
Removing Viewports移除视口#
You can remove an Editor Viewport window when you no longer need one. To do so, select the name of the Editor Viewport window, that you want to remove in the Windows menu and choose Remove.当您不再需要一个 Editor Viewport 窗口时,您可以删除它。为此,请在 Windows 菜单中选择要删除的 Editor Viewport 窗口的名称,然后选择 Remove。
本页面上的信息适用于 UNIGINE 2.20 SDK.