This page has been translated automatically.
视频教程
界面
要领
高级
实用建议
专业(SIM)
UnigineEditor
界面概述
版本控制
设置和首选项
项目开发
调整节点参数
Setting Up Materials
设置属性
照明
Sandworm
使用编辑器工具执行特定任务
如何擴展編輯器功能
嵌入式节点类型
Nodes
Objects
Effects
Decals
光源
Geodetics
World Nodes
Sound Objects
Pathfinding Objects
Players
编程
基本原理
搭建开发环境
使用范例
C++
C#
UnigineScript
UUSL (Unified UNIGINE Shader Language)
Plugins
File Formats
材质和着色器
Rebuilding the Engine Tools
GUI
双精度坐标
应用程序接口
Animations-Related Classes
Containers
Common Functionality
Controls-Related Classes
Engine-Related Classes
Filesystem Functionality
GUI-Related Classes
Math Functionality
Node-Related Classes
Objects-Related Classes
Networking Functionality
Pathfinding-Related Classes
Physics-Related Classes
Plugins-Related Classes
IG Plugin
CIGIConnector Plugin
Rendering-Related Classes
VR-Related Classes
创建内容
内容优化
材质
Material Nodes Library
Miscellaneous
Input
Math
Matrix
Textures
Art Samples
Tutorials

纹理导入指南

You can import textures in convenient formats (such as .tga, .jpg, .png, .hdr, etc.). As you import a texture via the Asset Browser, using drag and drop or the Import button, the following import settings are displayed. These settings can also be changed later via the Parameters window.您可以以方便的格式(例如.tga, .jpg, .png, .hdr,等)导入纹理。使用拖放或Import按钮通过Asset Browser导入纹理时,将显示以下导入设置。这些设置也可以稍后通过Parameters窗口进行更改

Import settings for a texture asset导入纹理资源的设置

Common Parameters常用参数#

Unchanged

Defines whether the texture is to be used "as is" or a runtime will be created for it in accordance with the specified import options.定义是“按原样”使用纹理还是使用运行将根据指定的导入选项为其创建。

注意
When this option is enabled, the texture is used by the Engine and added to the final build "as is". E.g., you can use this option for your custom HDR texture.启用此选项后,引擎将使用纹理并将纹理“按原样”添加到最终版本中。例如,您可以将此选项用于自定义HDR纹理。
Texture Preset

This preset determines what sort of texture is to be generated, it defines compression algorithms and color channels to be used. The list of available presets includes the following:该预设确定要生成哪种纹理,它定义了要使用的压缩算法和颜色通道。可用预设的列表包括以下内容:

  • Albedo (RGB) — for 3-channel albedo textures (postfix: _alb)Albedo (RGB) — 3通道反照率纹理(后缀_alb
  • Albedo (RGB — color, A — opacity) — for 4-channel albedo textures (postfix: _alb)Albedo (RGB — color, A — opacity) —用于4通道反照率纹理(后缀_alb
  • Diffuse (RGB) — for 3-channel diffuse textures (postfix: _d)Diffuse (RGB) — 3通道扩散纹理(后缀_d
  • Diffuse (RGB — color, A — opacity) — for 4-channel diffuse textures (postfix: _d)Diffuse (RGB — color, A — opacity) —用于4通道扩散纹理(后缀_d
  • Shading (R — metalness, G — roughness, B — specular) — for 3-channel shading textures (postfix: _sh)Shading (R — metalness, G — roughness, B — specular) — 3通道阴影纹理(后缀_sh
  • Shading (R — metalness, G — roughness, B — specular, A — microfiber) — for 4-channel shading textures (postfix: _sh)Shading (R — metalness, G — roughness, B — specular, A — microfiber) —用于4通道阴影纹理(后缀_sh
  • Specular (RGB — specular, A — gloss) — for 4-channel specular textures (postfix: _s)Specular (RGB — specular, A — gloss) —用于4通道镜面纹理(后缀_s
  • Normal Map (RG) — for 2-channel normal textures (postfix: _n)Normal Map (RG) — 2通道普通的纹理(后缀_n
  • Normal Map (RG — normals, B — opacity) — for 3-channel normal textures (postfix: _nrgb)
    注意
    Unigine Engine expects a normal map in DirectX format. If your normal map is in OpenGL format, tick Invert G Channel in the import menu. As a general rule, if the lighting seems weird, try inverting the G Channel and see if it gets better.
    Normal Map (RG — normals, B — opacity) — 3通道普通的纹理(后缀_nrgb
  • Ambient Occlusion — for ambient occlusion textures (postfix: _a)Ambient Occlusion环境光遮蔽纹理(后缀_a
  • Emission — for emission textures (postfix: _e)Emission排放纹理(后缀_e
  • Parallax — for parallax height maps (postfix: _h)Parallax视差高度图后缀_h
  • Mask (R) — for 1-channel mask textures (postfix: _m)Mask (R) 用于1通道蒙版纹理(后缀_m
  • Mask (RG) — for 2-channel mask textures (postfix: _m)Mask (RG) 用于2通道蒙版纹理(后缀_m
  • Mask (RGB) — for 3-channel mask textures (postfix: _m)Mask (RGB) 用于3通道蒙版纹理(后缀_m
  • Mask (RGBA) — for 4-channel mask textures (postfix: _m)Mask (RGBA) 用于4通道蒙版纹理(后缀_m
  • Mask For Vegetation (R) — for 1-channel textures used as masks to distribute vegetation added as a Grass or Mesh Clutter object across the area (postfix: _m). Using the standard Mask preset for vegetation instead of this one may lead to incorrect results. If no preset is selected, the Mask (R) preset is set by default.Mask For Vegetation (R) 用于1通道纹理用作蒙版,以分布作为GrassMesh Clutter 对象添加在整个区域的植被(后缀_m)。使用标准Mask预设植被,而不是这个可能会导致不正确的结果。如果不选择,则默认设置Mask (R)参数。
  • Mask For Vegetation (RG) — for 2-channel textures used as masks to distribute vegetation added as a Grass or Mesh Clutter object across the area (postfix: _m). Using the standard Mask preset for vegetation instead of this one may lead to incorrect results. If no preset is selected, the Mask (RG) preset is set by default.Mask For Vegetation (RG) 用于2通道纹理用作蒙版,以分布作为GrassMesh Clutter 对象添加在整个区域的植被(后缀_m)。使用标准Mask预设植被,而不是这个可能会导致不正确的结果。如果不选择,则默认设置Mask (RG)参数。
  • Mask For Vegetation (RGB) — for 3-channel textures used as masks to distribute vegetation added as a Grass or Mesh Clutter object across the area (postfix: _m). Using the standard Mask preset for vegetation instead of this one may lead to incorrect results. If no preset is selected, the Mask (RGB) preset is set by default.Mask For Vegetation (RGB) 用于3通道纹理用作蒙版,以分布作为GrassMesh Clutter 对象添加在整个区域的植被(后缀_m)。使用标准Mask预设植被,而不是这个可能会导致不正确的结果。如果不选择,则默认设置Mask (RGB)参数。
  • Mask For Vegetation (RGBA) — for 4-channel textures used as masks to distribute vegetation added as a Grass or Mesh Clutter object across the area (postfix: _m). Using the standard Mask preset for vegetation instead of this one may lead to incorrect results. If no preset is selected, the Mask (RGBA) preset is set by default.Mask For Vegetation (RGBA) 用于4通道纹理用作蒙版,以分布作为GrassMesh Clutter 对象添加在整个区域的植被(后缀_m)。使用标准Mask预设植被,而不是这个可能会导致不正确的结果。如果不选择,则默认设置Mask (RGBA)参数。
  • Cube Map — for cubemap textures, that can be used for your world's environment or for Environment Probes (postfix: _c)Cube Map 用于立方体贴图纹理,可用于您的世界环境环境探针后缀_c
  • Voxel Probe — for 3D lighting textures used for Voxel Probes (postfix: _vp)Voxel Probe 用于3D照明纹理用于体素探头(后缀_vp
  • Volume — for 3D textures, that can be used for volumetric effects or color variations (postfix: _v)Volume 用于3D纹理,可用于体积效果或颜色变化(后缀_v
  • Light Map — for 3-channel light maps (postfix: _l)Light Map 3通道灯光贴图后缀_l
  • IES — for IES light profile textures (postfix: _ies)IES 用于IES灯光轮廓纹理(后缀_ies
  • 3D LUT — for color correction textures3D LUT色彩校正纹理
Image Type

Type of the texture to be generated. Available options are:要生成的纹理的类型。可用的选项有:

  • 2D — 2D texture. This is the most commonly used type of texture. These textures are used in various materials and be mapped to 3D meshes, GUI elements, etc.2D 2D纹理。这是最常用的纹理类型。这些纹理用于各种材质并映射到3D网格,GUI元素等。
  • 3D — 3D texture. This type of textures can be used for volumetric effects or color variations. 3D 3D纹理。这种类型的纹理可用于体积效果或颜色变化。
  • Cube — cubemap texture. It can be used for your world's environment, sky dome or Environment Probe. The imported cubemap will be oriented the following way:Cube 立方体贴图纹理。它可以用于您的世界环境天空穹顶Environment Probe。导入的立方体贴图将通过以下方式定向:

    The following layouts of source cubemaps are supported:支持以下源立方体贴图的布局:

    Horizontal cross layout横向十字布局 Vertical cross layout垂直交叉布局 Cylindrical Panorama圆柱全景
  • 2D Array — array of 2D textures. These textures can be used for terrain details, etc.2D Array 2D纹理的数组。这些纹理可用于地形细节等。
Image Format

Defines the image pixel format: bit depth and channels used. Compressed formats are supported. The default format is RGB8.定义图像像素格式:位深度和使用的通道。支持压缩格式。默认格式为RGB8

The drop-down menu contains all possible formats. However, if an unsuitable format is selected for the texture, the image would not be imported properly. For example, the normal texture accepts ATI2 files only. For more details on formats, see the description of the texture asset format.下拉菜单包含所有可能的格式。但是,如果为纹理选择了不合适的格式,则将无法正确导入图像。例如,普通纹理仅接受ATI2文件。有关格式的更多详细信息,请参见纹理资源格式

Mipmap Type

Type of filtering to be used for mipmap generation. Available options are:用于生成Mipmap的过滤类型。可用的选项有:

  • Box — choose this type to use simple box filter for mipmap generation.Box:选择此类型可使用简单的框式过滤器生成mipmap。

    注意
    If a texture contains very narrow features (e.g., lines), then aliasing artifacts may be very pronounced. In this case it might be better to choose the Combined option.如果纹理包含非常狭窄的特征(例如线条),则混叠伪影可能会非常明显。在这种情况下,最好选择Combined选项。
  • Point — choose this type to use point filtration for mipmap generation.Point:选择此类型可将点过滤用于生成mipmap。

  • Combine — choose this type to get mipmaps from the source image.Combined: 选择此类型以从源图像获取多点映射。

    注意
    If the width and/or height of the source image are not power of 2, set the corresponding resolution parameter to Original.如果源图像的宽度和/或高度不是2的幂,则设置对应的分辨率参数Original
  • Sharpen — sharpness is applied for generated mipmaps. To configure the extent of sharpness, the following parameters are available:Sharpen:锐化应用于生成的mipmap。要配置清晰度的程度,可以使用以下参数:

    • Sharpness Intensity — intensity of the sharpness effect.Sharpness Intensity:锐度效果的强度。
    • Sharpness Radius — radius to which the effect is applied, with sub-texel accuracy.Sharpness Radius:应用效果的半径,具有子纹理精度。
    • Sharp Only Lightness — only the HSL lightness value is affected by the sharpness effect.Sharp Only Lightness:只有HSL亮度(lightness)值受锐利效果的影响。
    按此放大 按此放大 按此放大
    Source image 1024x1024源图像1024 × 1024 Mipmap 256x256,
    Intensity 0.4,
    Radius 1
    Mipmap 256x256,
    Intensity 1.0,
    Radius 1
  • Blur — blurring is applied for generated mipmaps. To configure the extent of blurring, the following parameter is available:Blur:模糊应用于生成的mipmap。要配置模糊程度,可以使用以下参数:

    • Blur Radius — radius, in texels, to which the effect is applied.Blur Radius:应用该效果的半径(以纹理为单位)。
    按此放大 按此放大 按此放大
    Source image 1024x1024源图像1024 × 1024 Mipmap 256x256,
    Blur Radius 1
    Mipmap 256x256,
    Blur Radius 3
Mipmaps SRGB Correction Enables sRGB gamma correction for mipmaps.为Mipmap启用sRGB伽玛校正。

Resolution Parameters分辨率参数#

Width

Texture width (a power of 2).纹理宽度(2的幂)。

  • Original — source image width is used.Original:使用源图像宽度。
  • Auto (default) — the power of 2 value closest to the source image width is used.Auto(默认):使用最接近源图像宽度的2的幂。
Height

Texture height (a power of 2).纹理高度(2的幂)。

  • Original — source image height is used.Original:使用源图像高度。
  • Auto (default) — the power of 2 value closest to the source image height is used.Auto(默认):使用最接近源图像高度的2的幂。
注意
If the original width or height is not equal to a power of 2 and is selected as an import setting, the imported texture would fail to be compressed.如果原始宽度或高度不等于2的幂,并且被选择为导入设置,则导入的纹理将无法压缩。

Other Parameters其他参数#

Invert G Channel

Enable inversion of the green channel of the imported image. Depending on the game engine or 3D software package you use, normal maps can be handled differently. This option is used to simplify conversion of normal maps from different source platforms.启用导入图像绿色通道的反转。根据您使用的游戏引擎或3D软件包,法线贴图的处理方式可能有所不同。此选项用于简化来自不同源平台的法线贴图的转换。

Texture Postfixes纹理后缀#

Texture postfix is important, as it defines compression algorithms and color channels to be used. Postfixes correspond to certain texture presets. The list of available postfixes includes the following ones:纹理后缀很重要,因为它定义了要使用的压缩算法和颜色通道。后缀对应于某些纹理预设。可用的后缀列表包括以下内容:

  • texture_alb for albedo textures (RGB — color, A — opacity). Other possible postfixes are: _al, _albedo, _albedomap, _albedo_map, _albedotexture, _albedo_texture, _col, _color, _colormap, _color_map, _colortexture, _color_texture.texture_alb反照率纹理(RGB 颜色,A 不透明度)。也可以使用以下后缀:_al, _albedo, _albedomap, _albedo_map, _albedotexture, _albedo_texture, _col, _color, _colormap, _color_map, _colortexture, _color_texture
  • texture_d for diffuse textures (RGB — color, A — opacity). Other possible postfixes are: _d, _dif, _diff, _diffuse, _diffusemap, _diffuse_map, _diffusetexture, _diffuse_texture.texture_d扩散纹理(RGB 颜色,A 不透明度)。也可以使用以下后缀:_d, _dif, _diff, _diffuse, _diffusemap, _diffuse_map, _diffusetexture, _diffuse_texture
  • texture_n for normal textures (RG — surface normal components). Other possible postfixes are: _nrm, _norm, _nrml, _normal, _normalmap, _normal_map, _normaltexture, _normal_texture.texture_n普通的纹理(RG 表面法线分量)。也可以使用以下后缀:_nrm, _norm, _nrml, _normal, _normalmap, _normal_map, _normaltexture, _normal_texture
  • texture_nrgb for normal textures that store opacity in the B channel (RG — normals, B — opacity).texture_nrgb普通的在B通道中存储不透明度的纹理(RG:法线,B:不透明度)。
  • texture_s for specular textures (RGB — specular, A — gloss). Other possible postfixes are: _sp,_ spec, _specular, _specularmap, _specular_map, _speculartexture, _specular_texture.texture_s镜面纹理(RGB:高光,A:光泽)。也可以使用以下后缀:_sp,_ spec, _specular, _specularmap, _specular_map, _speculartexture, _specular_texture
  • texture_sh for shading textures (R — metalness, G — roughness, B — specular, A — microfiber).texture_sh阴影纹理(R:金属度,G:粗糙度,B:镜面反射,A:超细纤维)。
  • texture_a for ambient occlusion textures (R — AO map). Other possible postfixes are: _ao, _oc, _aomap, _ao_map, _aotexture, _ao_texture, _ambient, _occlusion, _aocclusion, _occlusionmap, _occlusion_map, _occlusiontexture, _occlusion_texture, _ambientocclusion, _ambient_occlusion.texture_a环境光遮蔽纹理(R AO贴图)。也可以使用以下后缀:_ao, _oc, _aomap, _ao_map, _aotexture, _ao_texture, _ambient, _occlusion, _aocclusion, _occlusionmap, _occlusion_map, _occlusiontexture, _occlusion_texture, _ambientocclusion, _ambient_occlusion
  • texture_h for parallax height maps (parallax effect) (R — height map). Other possible postfixes are: _p, _pa, _par, _parallax, _parallaxmap, _parallax_map, _parallaxtexture, _parallax_texture, _height, _heightmap, _height_map, _heighttexture, _height_texture, _dis, _disp, _displacement, _displacementmap, _displacement_map, _displacementtexture, _displacement_texture.texture_h视差高度图(视差效果)(R:高度图)。也可以使用以下后缀:_p, _pa, _par, _parallax, _parallaxmap, _parallax_map, _parallaxtexture, _parallax_texture, _height, _heightmap, _height_map, _heighttexture, _height_texture, _dis, _disp, _displacement, _displacementmap, _displacement_map, _displacementtexture, _displacement_texture
  • texture_l for light maps (RGB — light color).texture_l贴图(RGB 浅色)。
  • texture_e for emission textures (RGB — glow color). Other possible postfixes are: _em, _emis, _emission, _emmap, _em_map, _emtexture, _em_texture, _emissionmap, _emission_map, _emissiontexture, _emission_texture.texture_e排放纹理(RGB 发光颜色)。也可以使用以下后缀:_em, _emis, _emission, _emmap, _em_map, _emtexture, _em_texture, _emissionmap, _emission_map, _emissiontexture, _emission_texture
  • texture_m for image mask textures, including those used to distribute vegetation across the area.texture_m用于图像蒙版纹理,包括用于在整个区域分布植被的蒙版。
  • texture_c for cubemap textures used as the world environment or environment probe.texture_c用作世界的立方体贴图纹理环境或者环境探针
  • texture_vp for 3D lighting textures used for voxel probes.用于3D的texture_vp照明纹理用于体素探针。
  • texture_v for 3D textures used for volumetric effects or color variations.texture_v用于用于体积效果或颜色变化的3D纹理。
  • texture_ies for IES light profile textures.IES灯光轮廓纹理的texture_ies

You can define default import options for a texture by simply adding a postfix to its name.您可以通过简单地在纹理名称后添加后缀来定义纹理的默认导入选项。

注意
When you import a texture with a postfix, make sure that it corresponds to the texture's type and purpose. E.g. if you name an albedo texture as "color_n.jpg", it will be imported as a 2-channel normal map by default.使用后缀导入纹理时,请确保其与纹理的类型和用途相对应。例如,如果您将反照率纹理命名为“ color_n.jpg”,则默认情况下会将其作为2通道法线贴图导入。

Assigning Imported Texture分配导入的纹理#

To assign the imported texture to a material, you can choose one of the following ways:要将导入的纹理分配给材质,可以选择以下方式之一:

  • Drag the icon of the texture asset from the Asset Browser window to the destination field in the Parameters window.将纹理资源的图标从Asset Browser窗口拖动到Parameters窗口的目标字段。

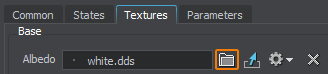
  • Use the button next to the destination field in the Parameters window to select the desired asset. 使用Parameters窗口中目标字段旁边的按钮选择所需的资源。

  • Type the name of the asset to the destination field in the Parameters window manually. If an asset with the specified name exists in the project it will be shown while you type.

    在[目标]栏位中输入资源名称。Parameters手动窗口。如果项目中存在具有指定名称的资源,则在键入时将显示该资源。

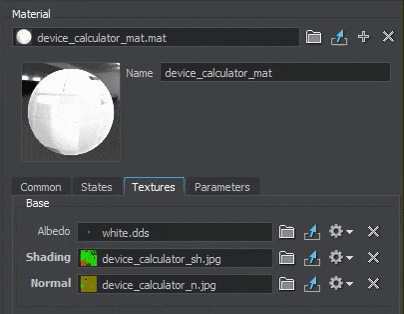
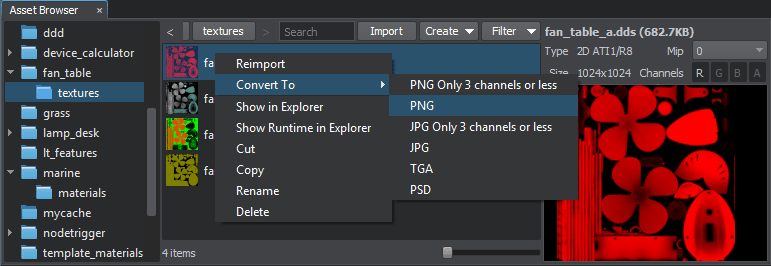
Texture Conversion纹理转换#

Texture Conversion is a feature that allows optimizing a texture at a later stage of the project without changing the asset GUID, thus preserving all necessary links. Any texture asset used in your project can be converted to one of the available formats.纹理转换是一项功能,它允许在项目的后期阶段优化纹理,而无需更改资源GUID,从而保留所有必要的链接。项目中使用的任何纹理资源都可以转换为可用格式之一。

To convert a texture, right-click the texture in the Asset Browser to open the context menu, and select Convert To and the required file format. The file immediately will be converted to a selected format.要转换纹理,请在Asset Browser中右键单击该纹理以打开上下文菜单,然后选择Convert To和所需的文件格式。该文件将立即转换为选定的格式。

最新更新: 2023-12-15
Build: ()