VR最佳实践
 Virtual Reality (VR) is an immersive medium creating the sensation of being entirely transported into a virtual or digitally reproduced real three-dimensional world. It can provide a lot more convincing experience than screen-based media, and has its peculiarities that should be taken into account.虚拟现实(VR)是一种沉浸式媒体,具有被完全传输到虚拟或数字复制的真实三维世界中的感觉。与基于屏幕的媒体相比,它可以提供更多令人信服的体验,并且应考虑其独特之处。
The best practices described in this article are intended to highlight some key points to be aware of when developing a VR project and help you produce content ensuring a safe and enjoyable VR experience for users.本文介绍的最佳实践旨在突出一些在开发VR项目时需要注意的关键点,并帮助您制作内容以确保为用户提供安全愉快的VR体验。
VR TemplatesVR Template#
Thinking about VR developers, we created two VR templates for C++ and C# and made the VR Sample demo available for C++ (for C# there is a dedicated sample called vr_sample embedded right into the C# VR Template), enabling you to jump straight in and start creating projects of your own.考虑到VR开发人员,我们创建了同时适用于C ++和C#的VR Sample demo,使您可以直接进入并开始创建自己的项目。
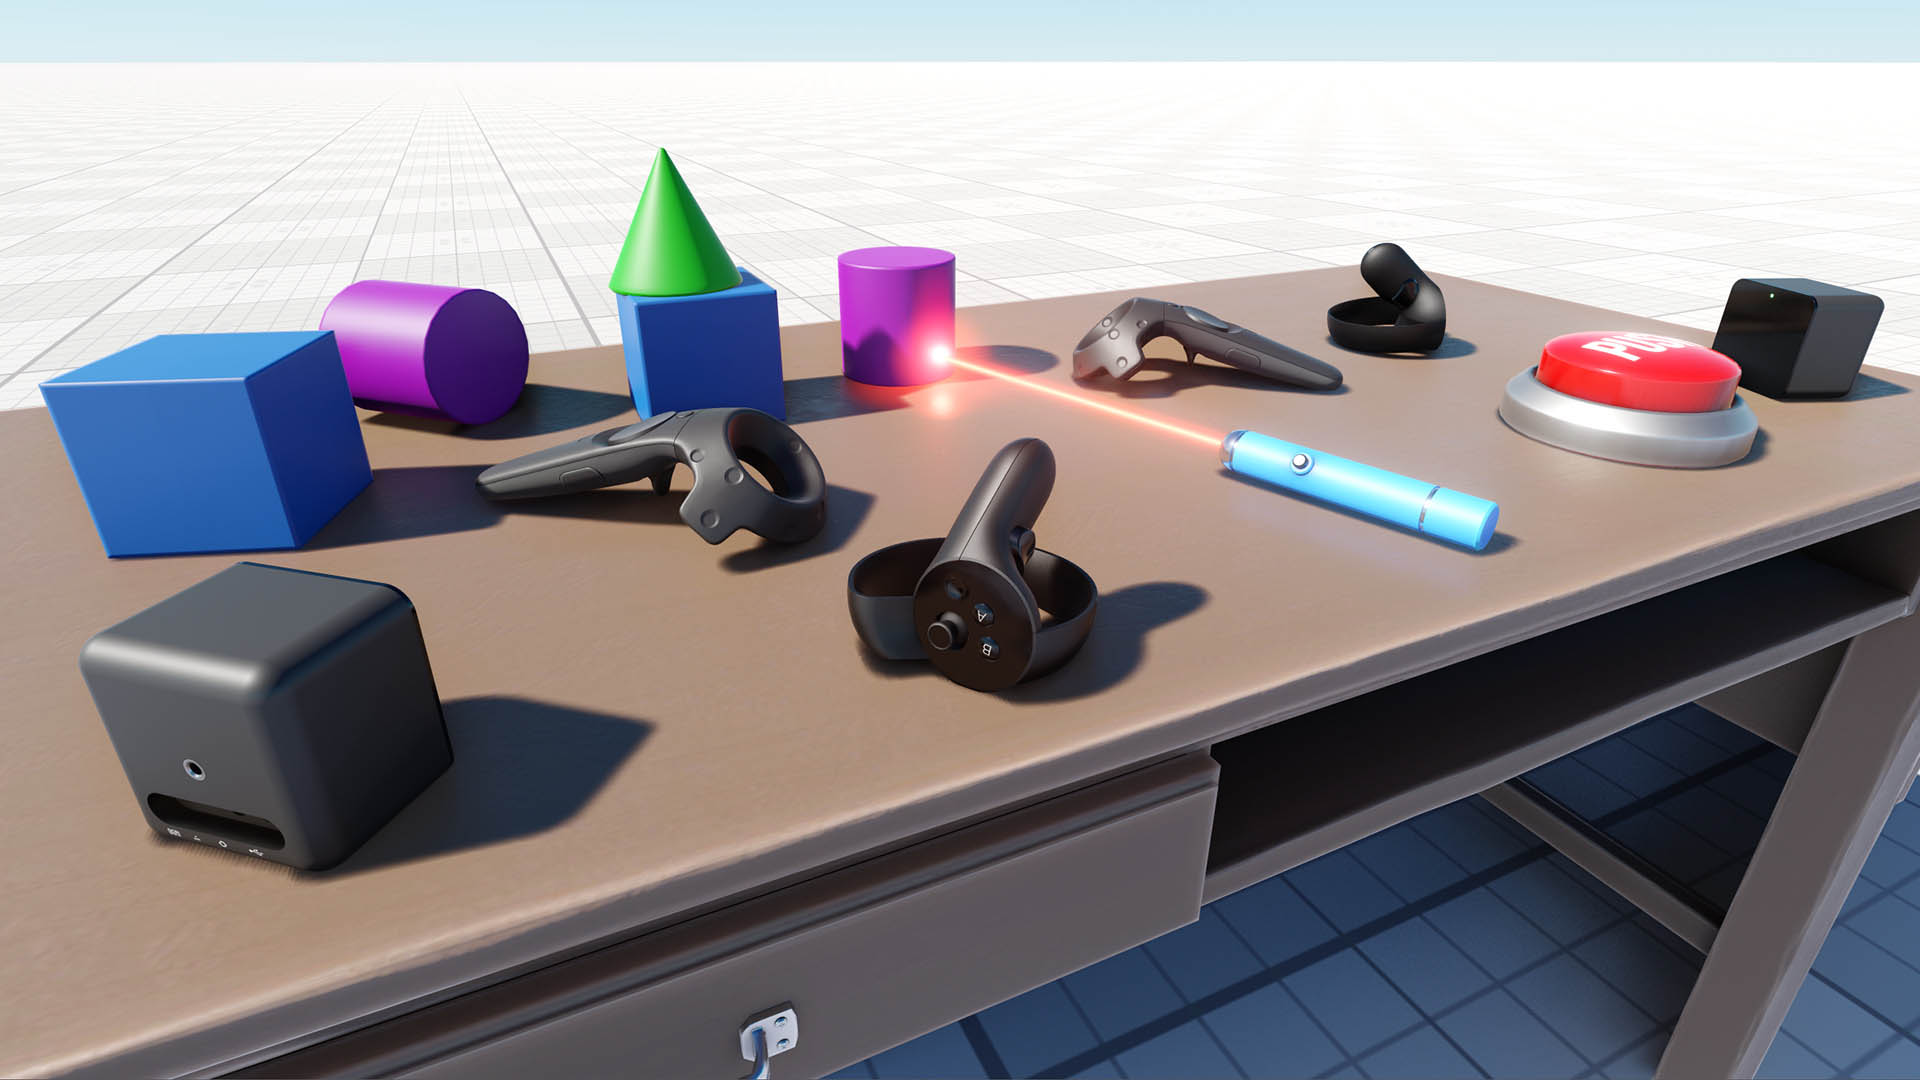
We recommend to use this demo as a basis for your C++ VR project (if you use C# - grab the embedded vr_sample). Here you'll find a set of 3D models of all popular VR controllers, as well as implementation of basic mechanics such as grabbing and trowing objects, pressing buttons, opening/closing drawers and a lot more.我们建议将此演示用作您的VR项目的基础。在这里,您可以找到所有流行的VR控制器的3D模型集,以及诸如抓取和拖拽对象,按下按钮,打开/关闭抽屉等基本机制的实现。
The worlds in the demo-project and embedded sample have their settings optimized for best performance in VR and include a .render asset that can be loaded at any time by simply double-clicking on it in the Asset Browser to reset any changes you made to default optimized values.此示例项目中的世界已对其设置进行了优化,以实现VR的最佳性能,并包含一个.render资源,只需在 Asset Browser 中双击该资源即可随时加载您对默认优化值所做的任何更改。
You can also select the VR project template when creating a new application via the SDK Browser to create an empty VR application from scratch (having demo content and code stripped off).在VR project template when creating a new application via the SDK Browser to create an empty VR application from scratch (having demo content and code stripped off).Assets Size资源规模#
Perception of scale of objects around you is likely to be the key point that makes the difference between VR and a flat picture on the screen. Your models might look "right" on the screen, but in VR you'll surely notice if a table has somewhat unusual height, the size of your chair as well as sizes of objects on your table are wrong.感知周围物体的大小可能是使VR与屏幕上的平面图像有所不同的关键。您的模型在屏幕上可能看起来“正确”,但是在VR中,您肯定会注意到桌子的高度有些不同,椅子的尺寸以及桌子上的物体的尺寸都是错误的。
To deliver the best user experience in VR you must ensure that everything in your world has a correct scale. Failing to meet this requirement may lead to all kinds of sensory issues for users, and could even result in Virtual Reality Sickness.要在VR中提供最佳的用户体验,您必须确保世界上的所有事物都具有正确的比例。未能满足此要求的用户可能会遇到各种感官问题,甚至可能导致虚拟现实疾病。
You can use the following tips to avoid mistakes mentioned above:您可以使用以下提示来避免上述错误:
- Create all your models keeping their scale as close to real as possible. For example, you should measure the height of your table, windowsill and chair. Having just these parameters and using them as a base to determine the size of your models, will make them realistic. 创建所有模型,并保持其比例尽可能接近真实尺寸。例如,您应该测量桌子,窗台和椅子的高度。仅使用这些参数并将它们用作确定模型大小的基础,将使它们变得现实。
-
Remember, that UNIGINE's unit, like in many other engines, is equal to 1 meter, while in many Digital Content Creation tools it is equal to 1 cm by default for convenience.
You can adjust the scale of your 3D models if necessary when importing them by setting the scale factor in geometry import parameters greater or less than 1.
请记住,与许多其他引擎一样,UNIGINE的单位等于 1米,而在许多数字内容创建工具中,UNIGINE的单位等于为方便起见,默认情况下为1厘米。
您可以在导入3D模型时调整其比例,方法是在几何导入参数中将比例因子设置为大于或小于1。
- Test your content in VR. This approach is useful in any case, as we are not just creating virtual copies of existing objects, sometimes it may be necessary to create something new, something that doesn't exist. Such new created objects may require additional scale adjustments to ensure realistic look.
It is recommended to create a dummy model first, put it into your world and check it in VR, to ensure that all dimensions are ok. As you're done with the dummy, you may proceed to your 3D model.
This approach will help you to avoid painful adjustment of your 3D model's proportions at the final stage.
在VR中测试您的内容。这种方法在任何情况下都非常有用,因为我们不仅要创建现有对象的虚拟副本,有时可能需要创建一些新的,不存在的东西。此类新创建的对象可能需要进行其他比例调整以确保逼真的外观。建议首先创建一个虚拟模型,将其放入您的世界并在VR中进行检查,以确保所有尺寸都可以。完成虚拟模型的制作后,您可以继续进行3D模型。
这种方法将帮助您避免在最后阶段痛苦地调整3D模型的比例。
- You can use VR controllers as references for measurement. Imagine, you have a Vive controller in your hand and see its size relative to other objects around you. The 3D model of this controller in your virtual world has the exact scale of the original, So, you can import this model to a DCC tool (3DS Max, Maya, etc.) and use it as a reference when creating other objects.您可以使用VR控制器作为测量的参考。想象一下,您手中有一个Vive控制器,并且可以看到其相对于周围其他物体的大小。您的虚拟世界中此控制器的3D模型具有与原始模型完全相同的比例,因此,您可以将此模型导入DCC工具(3DS Max,Maya等),并在创建其他对象时用作参考。
Please keep in mind that objects in VR are viewed best when they are in a range between 0.75 and 3.5 meters from the player's camera.请记住,当VR对象位于距播放器相机 0.75 和 3.5 米之间的范围内时,观看效果最佳。
Virtual Reality Sickness虚拟现实疾病#
Virtual Reality Sickness is quite similar to motion sickness, it occurs when using VR headsets. It can significantly affect or even ruin user's VR experience, and may be a barrier to the effective use of VR training tools. 虚拟现实疾病与晕车非常相似,它是在使用VR头戴式耳机时发生的。它会严重影响甚至破坏用户的VR体验,并可能成为有效使用VR培训工具的障碍。
Follow the recommendations given below to reduce the risk of VR Sickness and ensure that your users will have a pleasant VR experience:请遵循以下建议,以减少VR疾病的风险,并确保您的用户将拥有令人愉悦的VR体验:
- You must maintain framerate equal to or greater than the HMD's display refresh rate. Ideally, it should be kept a little bit higher to make sure you always stay above. Lags and dropped frames produce judder which is discomforting in VR. So, make sure to optimize your project as much as possible.
您必须保持帧率等于或大于HMD的显示刷新率。理想情况下,应将其保持较高一点,以确保您始终位于上方。滞后和掉落的帧会产生抖动,这在VR中令人不适。因此,请确保尽可能优化您的项目。
- The worst thing you can do to your user in VR is to display cinematic cutscenes or take control of camera movement in conflict with the user’s real-world self-motion. So, don't do that.在VR中,对用户而言,最糟糕的事情是显示电影过场动画或控制与用户真实世界的自我运动冲突的摄像机运动。所以,不要那样做。
- The Field of View (FOV) must match the physical geometry of the headset and lenses. Otherwise, the world will look warped as you turn your head, which may cause discomfort and nausea. So, FOV value should be set automatically via the device's SDK and internal configuration. Avoid overriding it manually yourself and do not let users change it. 视野(FOV)必须与耳机和镜头的物理几何形状匹配。否则,当您转过头时,世界就会看上去很扭曲,这可能会引起不适和恶心。因此,应通过设备的SDK和内部配置自动设置FOV值。避免自己手动覆盖它,并且不要让用户更改它。
- Avoid using camera bobbing effect to simulate walking (typical for the most first person games). Moving the camera up and down is annoying, it breaks VR experience and causes VR Sickness.避免使用相机晃动效果来模拟步行(对于大多数第一人称视角的游戏通常是这样)。上下移动相机很烦人,这会破坏VR体验并导致VR不适。
- Zooming in or out with the camera is not recommended, as it can induce VR Sickness, particularly if doing so causes head and camera movements to fall out of 1-to-1 correspondence with each other.不建议使用相机放大或缩小,因为它会导致VR晕动,特别是如果这样做会导致头部和相机的运动彼此之间不一对一对应。
- Remember, that any acceleration creates a mismatch among your visual, vestibular, and proprioceptive senses. The term acceleration here refers to any change in the motion of the user, whether in direction or speed. Slowing down or stopping, turning while moving or standing still, and stepping or getting pushed sideways are all forms of acceleration. Make such conflicts as short (preferably instantaneous) and infrequent as you can. Have accelerations initiated and controlled by the user whenever possible.请记住,任何加速度都会在您的视觉,前庭和本体感受之间产生不匹配。这里的 acceleration (加速度)是指用户运动的任何变化,无论是方向还是速度。减速或停止,在移动或站立不动时转弯,以及踩踏或向侧面推都是加速的形式。尽可能使冲突尽可能短(最好是瞬间发生)和不频繁发生。尽可能由用户启动和控制加速度。
- Shaking, jerking, or bobbing the camera will be uncomfortable for the player. So, do not shake the camera to emphasize an event (e.g. a grenade explosion), it may make sense in a screen-based media, but not in VR.晃动,晃动或摆动相机会使播放器不舒服。因此,请勿摇晃相机以强调事件(例如手榴弹爆炸),这在基于屏幕的媒体中可能有意义,但在VR中则没有意义。
- Avoid stairs, use lifts instead, as moving quickly up and down the stairs can be very disorienting for the player.避免爬楼梯,而应使用电梯,因为在楼梯上快速上下移动可能会使玩家感到迷惑。
- Developers are often used to using VR devices and may not notice or feel something that other person would. So, to make sure that your application does not cause VR Sickness you should check it as much as possible, engaging as many different people as you can.开发人员通常习惯于使用VR设备,并且可能不会注意到或感觉到别人会感到的东西。因此,为确保您的应用程序不会引起VR疾病,您应该尽可能地对其进行检查,并请尽可能多的人参与。
Please note that the points listed above do not consitute a complete list of root causes for VR Sickness. It is intended to give you a basic idea of what might cause users of your VR application to feel sick.请注意,以上几点并不构成VR疾病的根本原因的完整列表。目的是让您对可能导致您的VR应用程序用户感到不适的基本概念。
Render Settings渲染设置#
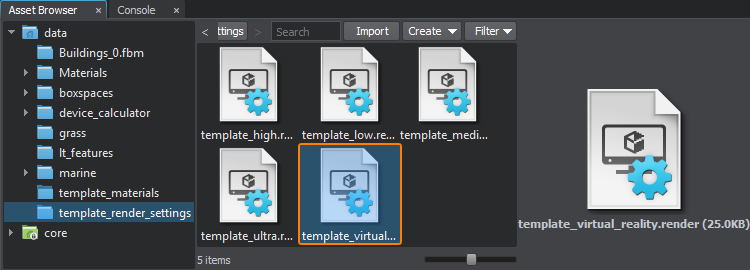
For your convenience, in the data/template_render_settings folder of each new created project there is a ready-to-use template_virtual_reality.render asset with all settings optimized for best performance in VR (this asset contains the same settings as the one used in the VR Sample). You can load and apply these settings by simply double-clicking on the asset in the Asset Browser. You can also double-click on this asset to reset any changes you made to default optimized values.为方便起见,在每个新创建的项目的data/template_render_settings文件夹中,都有一个即用型template_virtual_reality.render资源,其所有设置均已针对VR中的最佳性能进行了优化(此资源包含与VR Sample中使用的设置相同的设置) 。您只需在资源浏览器中双击资源即可加载和应用这些设置。您也可以双击该资源以重置对默认优化值所做的所有更改。
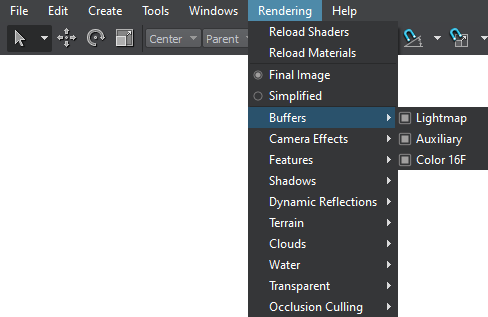
For your project it may also be useful to enable the Depth Pre Pass. It is available either in the Buffers settings or in the Render -> Features menu:对于您的项目,启用深度预传递可能也很有用。在Buffers设置或Render -> Features菜单中均可用:
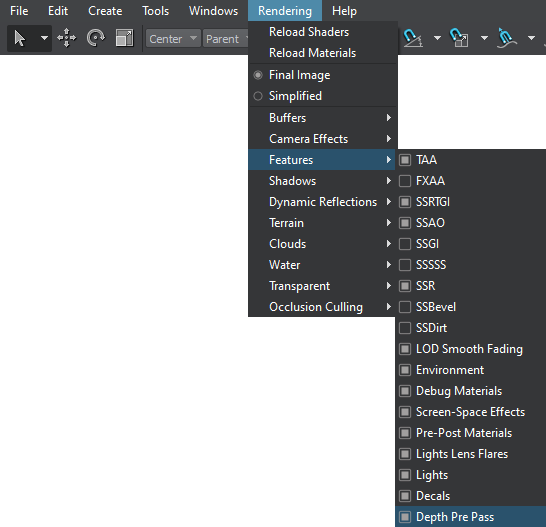
After enabling this option, check if the performance has increased.启用此选项后,检查性能是否提高。
It is also recommended to disable other buffers if they are not used:如果不使用其他缓冲区,也建议禁用它们:
Screen-Space Effects屏幕空间效果#
All screen-space effects in VR are very expensive, as their performance is strongly dependent on rendering resolution. Here are some basic recommendations: VR中的所有屏幕空间效果都非常昂贵,因为它们的性能很大程度上取决于渲染分辨率。以下是一些基本建议:
- Turn screen-space effects off and don't use them at all whenever possible. This is the best option for performance.关闭屏幕空间效果,并尽可能不要使用它们。这是提高性能的最佳选择。
- Use only the ones that provide significant visual improvement of the final image, such as Tone Mapping, SSAO, and Bloom. Just these three effects can provide a very good visual result.仅使用那些对最终图像有明显视觉改善的图像,例如Filmic Tone Mapping, SSAO和Bloom。仅这三个效果就可以提供很好的视觉效果。
- Use Quad, or maximum Half resolution whenever possible. This parameter is available for both SSAO and Bloom effects.尽可能使用Quad或最大Half分辨率。此参数可用于 SSAO 和Bloom效果。
- Using Screen Space Reflections, Screen Space Shadows and SSRTGI effects in VR is not recommended for mid-range GPUs, as these effects use screen-space ray tracing which is very performance consuming at high resolutions.对于中档GPU,不建议在VR中使用Screen Space Reflections, Screen Space Shadows和SSRTGI效果,因为这些效果使用屏幕空间光线跟踪,因此在高分辨率下非常消耗性能。
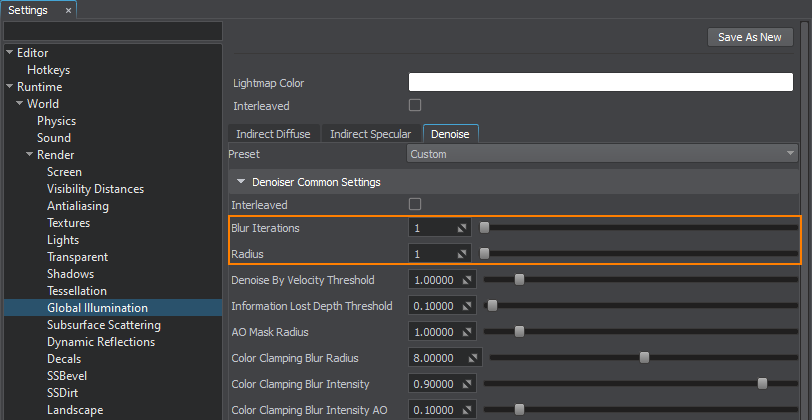
-
Disable Denoise (a preferable option), or set Blur Iterations and Radius to 1:禁用 Denoise(更可取的选择),或将 Blur Iterations 和 Radius 的值设置为1:
Antialiasing抗锯齿#
Antialiasing plays a very important role in VR, as the majority of popular HMDs have a wider FOV than monitors do. Thus, regardless of high resolution, aliasing is still very noticeable. It gets even worse as having your head always moving in VR results in flickering and jagged edges of objects. Things get especially bad for round glossy objects, where aliasing is extremely rough.抗锯齿在VR中起着非常重要的作用,因为大多数流行的HMD的FOV比监视器的FOV宽。因此,不管高分辨率如何,混叠仍然非常明显。更糟的是,您的头部始终在VR中移动会导致物体闪烁和锯齿状边缘。对于圆形的光滑物体,尤其是糟糕的是,这些物体的别名非常粗糙。
Recommendations here are as follows:这里的建议如下:
- Use Temporal Antialiasing, as it is good at fighting flickering and jagged edges. Flexible TAA settings, such as Pixel Offset and Preserve Details, make it possible to avoid blurring the final image. Recommended settings for VR are as follows: Pixel Offset = 1.0 and Preserve Details = 3. However, these values may vary depending on your scene, so we advice to adjust them for the clearest, flicker-free picture quality.使用 Temporal Antialiasing ,因为它擅长消除闪烁和锯齿状边缘。灵活的TAA设置,例如Pixel Offset和Preserve Details,可以避免模糊最终图像。建议的VR设置如下:Pixel Offset = 1.0和Preserve Details = 3。但是,这些值可能会因您的场景而异,因此我们建议对其进行调整,以实现最清晰,无闪烁的图像质量。
- It is not recommended to use FXAA, as it only adds blur in VR and does not remove jagged edges, when your head moves.不建议使用FXAA,因为它只会在VR中模糊,并且在您移动头部时不会消除锯齿状的边缘。
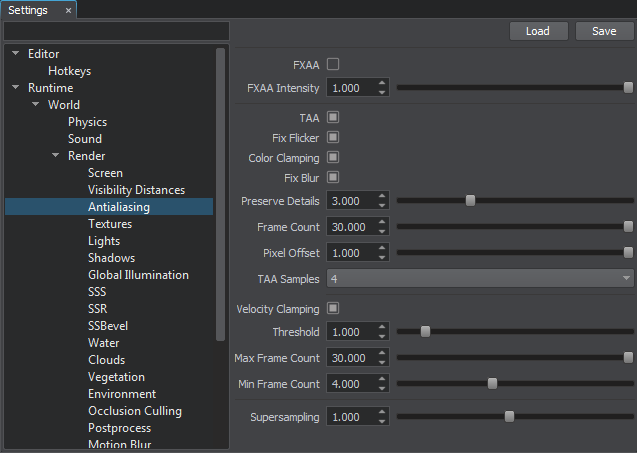
Recommended antialiasing settings推荐的抗锯齿设置Lighting灯光#
Lighting in VR is probably the most expensive operation, especially dynamic lighting. Add to this real-time calculation of shadows and think how many FPS you are going to lose. VR中的照明可能是最昂贵的操作,尤其是动态照明。添加到阴影的这种实时计算中,并考虑您将损失多少FPS。
So, in your VR project you should always use pre-baked lighting and reflections as this is the cheapest option to render. Bake all your lighting and reflections to Voxel / Environment Probes respectively. Take note, that additive blending mode enables you to combine the advantages of baked lighting with flexible control typical for dynamic one.因此,在您的VR项目中,应始终使用预烘焙的照明和反射,因为这是最便宜的渲染选项。将所有照明和反射分别烘焙到Voxel / Environment Probes。请注意,附加混合模式使您能够将烘焙照明的优点与动态照明典型的灵活控制相结合。
Basically, there are the following options (ordered from the lightest to the heaviest):基本上,有以下选项(从最轻到最重的顺序):
- Not to use any light sources in your world at all. This is the fastest and cheapest option.根本不使用任何光源。这是最快,最便宜的选择。
- Use a single Voxel Probe with all lighting baked into it. To increase performance you can disable the Specular option.使用单个Voxel Probe,将所有照明烘焙到其中。要提高性能,可以禁用Specular选项。
- Use a Voxel Probe with Reflections disabled for diffuse lighting and Environment Probe for reflections.使用禁用了反射的Voxel Probe进行漫反射照明,使用Environment Probe进行反射。
- Use static lighting and shadows, or at least mixed mode.使用静态照明和阴影,或至少使用混合模式。
- A more costly option is to use real light sources (World, Omni, Projected) but without shadows (e.g. for dynamic objects that emit light). Shadows significantly affect performance in a VR application, especially if the Penumbra mode is enabled in the Shadows Settings (Settings -> Render -> Shadows). So, better don't switch it on, if you don't need it.
 Disabled shadows for a light source and disabled Penumbra Mode in the Rendering Settings一种更昂贵的选择是使用真实光源(World, Omni, Projected),但没有阴影(例如,发光的动态对象)。阴影会显着影响VR应用程序的性能,尤其是在启用了Penumbra Mode的情况下Shadows Settings(Settings -> Render -> Shadows)。所以,如果不需要,最好不要启用这个模式。Disabled shadows for a light source and disabled Penumbra Mode in the Rendering SettingsDisabled shadows for a light source and disabled Penumbra Mode in the Rendering SettingsDisabled shadows for a light source and disabled Penumbra Mode in the Rendering Settings在渲染设置中禁用光源的阴影和半影模式
 - Use real light sources with shadows, but configure the shadow mode to be static or mixed. For example, if you have some static objects in your room, that are not under direct sunlight, it seems reasonable to make their shadows static as well.使用带阴影的真实光源,但将阴影模式配置为静态或混合。例如,如果您的房间里有一些静态物体,这些物体不在阳光直射下,那么将它们的阴影也设为静态似乎是合理的。
- Use real light sources with shadows as is. This is the best-looking and simple option, but keep in mind that you'll have to sacrifice something else to gain performance. For example, you can reduce the number of polygons of your objects, as it directly affects performance of shadows.照原样使用带有阴影的真实光源。这是最美观,最简单的选择,但请记住,您必须牺牲一些其他东西才能获得性能。例如,您可以减少对象的多边形数量,因为它直接影响阴影的性能。
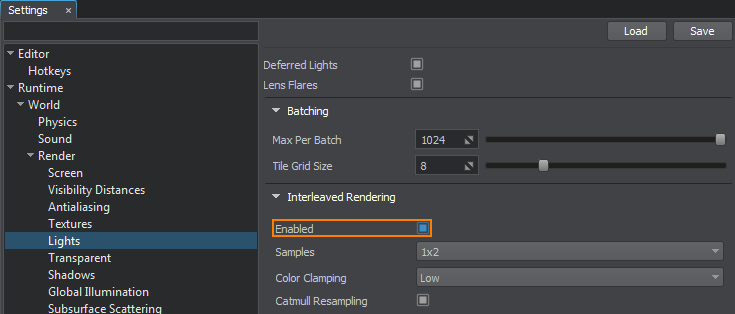
One more option that can boost performance is interleaved lights rendering, which allows reducing rendering load, while keeping the image quality high. You can enable interleaved rendering mode for lights and adjust its parameters via the Lights section of the Settings window (Window -> Settings -> Render -> Lights).另外一个可以提高性能的选项是 交错光渲染 ,它可以减少渲染负载,同时保持较高的图像质量。您可以通过设置窗口(Lights section of the Settings window (Window -> Settings -> Render -> Lights).
Make sure to use dimmer lights and colors than you normally would. Strong and vibrant lighting and highly saturated colors in VR can cause VR Sickness.确保使用比通常更暗的灯光和颜色。 VR中强烈而充满活力的灯光和高度饱和的色彩会导致VR不适。
Decals贴花#
If you can use polygonal geometry instead of decals, use it! Decals in VR should be used only if there are no other options, it is better not to use them at all! 如果您可以使用多边形几何图形代替贴花,请使用它! VR中的贴花仅在没有其他选择的情况下才使用,最好不要使用它们!
In case if you need to use a semi-transparent analogue of a decal it is recommended to use the mesh_base material with Alpha Test mode and Jitter Transparency option enabled.如果需要使用贴花的半透明类似物,建议使用mesh_base材质并启用Alpha Test模式并启用 Jitter Transparency 选项。
Transparency透明度#
Rendering transparency can be very costly, as it has to be re-evaluated per-frame in order to ensure that nothing has changed. It's a case when cost wipes out all benefits.
If you use Alpha Blend mode of the mesh_base material, in the Light Passes group you should enable only the ones that are required, as it significantly affects performance. 渲染透明度可能非常昂贵,因为必须逐帧进行重新评估,以确保没有任何变化。在这种情况下,成本会消除所有收益。
如果使用 mesh_base 材质的Alpha Blend模式,则在Light Passes组中,应仅启用所需的那些,因为它会显着影响性能。
![]()
Clouds and Sky云与天空#

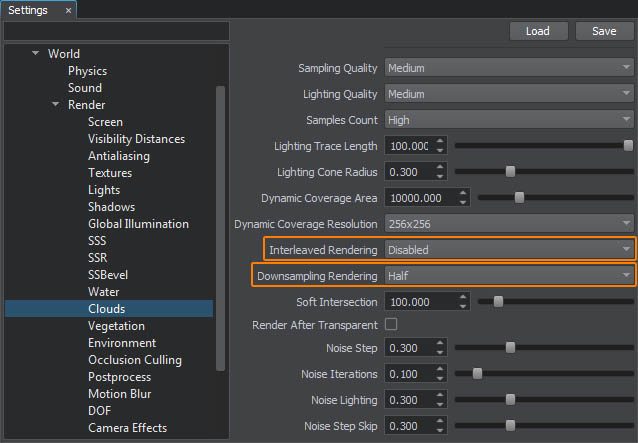
Avoid using volumetric clouds (Cloud Layer objects), unless there is no other option and it is a critical requirement for your project. They are very expensive at high resolutions as they simulate realistic lighting and shape of the clouds in real-time. If you still need to use volumetric clouds, it is recommended to set the Downsampling Rendering parameter to Quarter or Half. It is also recommended to enable Interleaved Rendering mode, when clouds are viewed from the ground, or from above (at significant distance), but be aware that quick and sudden movements may result in noticeable cloud graininess. 避免使用体积云 (Cloud Layer对象),除非没有其他选择,并且这对您的项目是至关重要的。它们在高分辨率下非常昂贵,因为它们可以实时模拟逼真的照明和云的形状。如果仍然需要使用体积云,建议将Downsampling Rendering参数设置为Quarter或Half。当从地面或从上方(远距离)观察云时,也建议启用Interleaved Rendering模式,但请注意,快速而突然的移动可能会导致云的明显颗粒感。
When volumetric clouds are not required, it is better to use one of the following options:不需要体积云时,最好使用以下选项之一:
-
Just set an HDRI panorama via the Environment settings.只需通过Environment设置即可设置HDRI全景图。If your project requires changing the time of the day, this can be done by blending Environment Presets, and thus smoothly replacing one HDRI texture (for the day-time sky) with another (for the evening).如果您的项目需要更改一天中的时间,则可以通过混合“环境预设”来完成,从而用一种HDRI纹理(用于白天的天空)平滑地替换为另一种(用于夜间)的HDRI纹理。
-
Use a Sky object with an HDRI texture and 2D clouds option enabled.使用启用了和2D clouds选项的Sky2D clouds对象。
Dynamic procedural environment, although being performance friendly, does not come completely for free. You can disable it via Rendering -> Features -> Environment in the main menu and use a Sky object with an HDRI texture instead. This will actually look better and give you a bit more performance, however, in this case you'll have no haze at the horizon, as it is a part of Environment.动态过程环境虽然性能友好,但并非完全免费。您可以通过主菜单中的Rendering -> Features -> Environment禁用它,而可以使用带有HDRI纹理的Sky对象。这实际上看起来会更好,并且可以为您带来更多性能,但是,在这种情况下,由于环境是环境的一部分,因此您不会感到茫然。
Terrain地面#
It is recommended to use Landscape Terrain instead of Global Terrain, as it is rendered faster for higher resolutions.建议使用Landscape Terrain而不是Global Terrain,因为它可以更快地呈现出更高的分辨率。
Geometry几何#
You should keep in mind, that ideally your VR application should maintain target frame rate at 90 FPS, this means that a single frame should be rendered in just 11.1 milliseconds. Not so much, taking into account the stereo mode and approximately 4x resolution.请记住,理想情况下,您的VR应用程序应将目标帧速率保持在 90 FPS,这意味着单个帧应在 11.1 毫秒内呈现。考虑到立体声模式和大约 4x 分辨率,不是很多。
All faces that will never be seen in VR should be removed to avoid rendering them. For example, a back of a cupboard standing against a wall. However, in VR applications, users have a lot more freedom to look around. So, when deciding to remove a certain face you should double check whether it can be seen or not. Simplify your meshes as much as possible.应删除所有在VR中不会看到的面孔,以避免渲染它们。例如,橱柜的后部靠墙站立。 但是,在VR应用程序中,用户具有更大的自由度。因此,在决定删除某张脸时,应仔细检查是否可以看到它。尽可能简化网格。
To use assets created with photogrammetry in your VR projects, reduce the amount of polygons, bake lighting using the Voxel Probe and enable static shadows.要在VR项目中使用通过摄影测量创建的资源,请减少多边形的数量,使用bake lighting using the Voxel Probe and enable 静态阴影。Monitoring Performance监控表现#
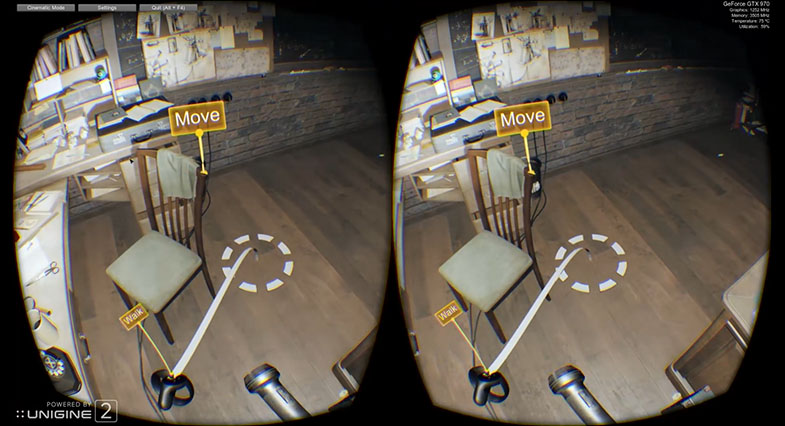
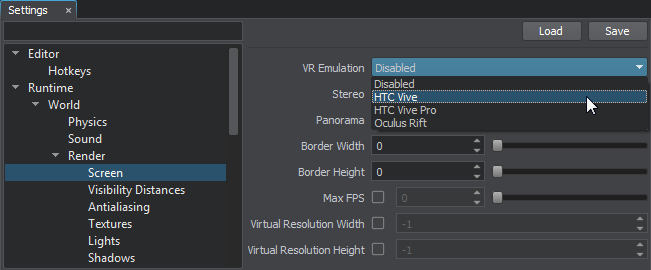
You can enable VR emulation to monitor your application's performance directly in the Editor. Just select the desired VR Emulation mode in the Screen settings (Settings -> Render -> Screen), e.g. when you select HTC Vive Pro, you get exactly the same stereo image, that is rendered for this HMD, with the FPS counter displaying actual performance.您可以启用VR仿真来直接在编辑器中监视应用程序的性能。 只需在Screen设置(Settings -> Render -> Screen)中选择所需的VR Emulation模式,例如 当您选择HTC Vive Pro时,您将获得与此HMD渲染的完全相同的立体声图像,而FPS计数器将显示实际性能。
If you want a more detailed performance analysis, open the Microprofile tool. It'll show you where exactly the bottlenecks are, so you could fix them.如果要进行更详细的性能分析,请打开Microprofile工具。它会向您显示瓶颈的确切位置,因此您可以解决它们。
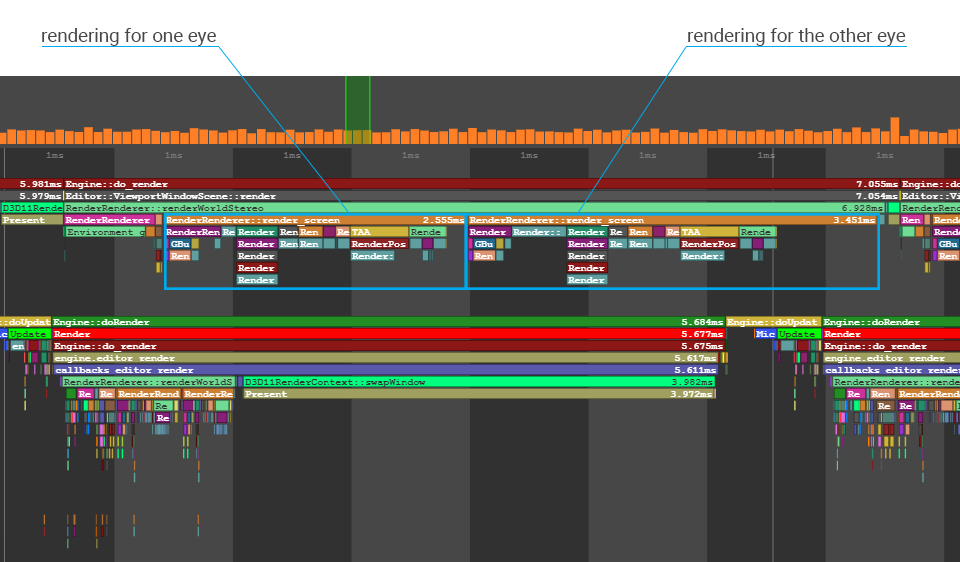
Rendering operations for each eye in Microprofile Microprofile中每只眼睛的渲染操作本页面上的信息适用于 UNIGINE 2.20 SDK.