Plugins for Maya
Warning
Maya plugin is deprecated and no longer supported. We can't guarantee the stable work of the plugin.
Manual Installation#
If Unigine plugins were not installed automatically, do the following:
- Go to the UNIGINE SDK folder, plugins/Maya/ directory and choose the plugin depending on the installed version of Maya.
- Copy a binary file into the plug-ins folder, namely:
- On Windows, copy the *.mll file into the Maya*/bin/plug-ins directory (* means installed version of Maya: 2013, 2014 or 2015).
- On Linux, copy the *.so file into the /usr/autodesk/maya*-x64/bin/plug-ins directory (* means installed version of Maya: 2013, 2014 or 2015).
- On Mac OS X, copy the *.bundle file into the Applications/Autodesk/maya*/Maya.app/Contents/MacOS/plug-ins directory (* means installed version of Maya: 2013, 2014 or 2015).
- Copy the MEL script (*.mel) into the others directory, namely:
- On Windows, copy into the Maya*/scripts/others (* means installed version of Maya: 2013, 2014 or 2015).
- On Linux, copy into the /usr/autodesk/maya*-x64/scripts/others(* means installed version of Maya: 2013, 2014 or 2015).
- On Mac OS X, copy into the Applications/Autodesk/maya*/Maya.app/Contents/scripts/others(* means installed version of Maya: 2013, 2014 or 2015).
- Run Maya.
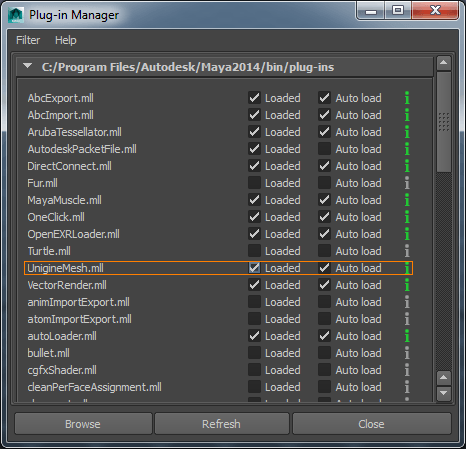
- Choose Window -> Settings/Preferences -> Plug-in manager in the Maya main menu.
- Set Loaded and Auto load flags for UnigineMesh plugins.
 Loaded and Auto load flags checked for the UnigineMesh.mll
Export into Mesh#
To export static geometry or an animated object into the *.mesh file:
- Select a model you want to export into Unigine.
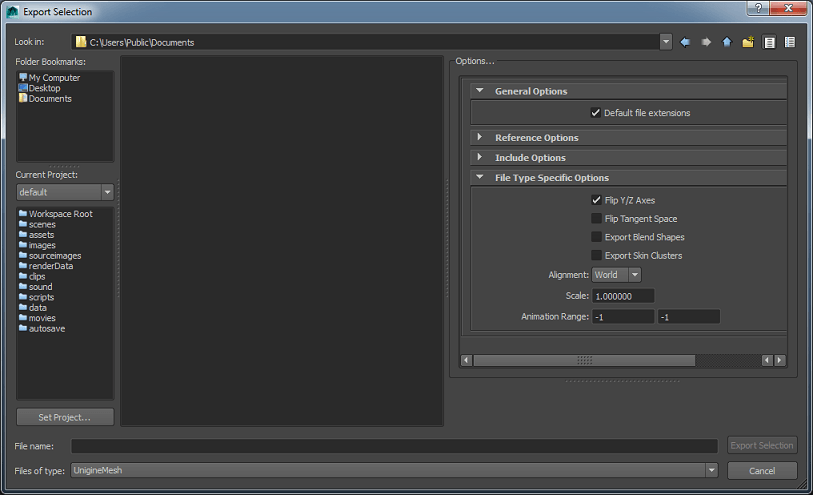
- Select File -> Export Selection... in the main menu.
- Choose UnigineMesh in theFiles of type drop-down list.
By using the way described above, you can export animated (skinned) object baked together with its animation in one file (*.mesh). To export only the bind pose of the model, specify the 0 values in both fields of the Animation Range.

Static geometry export (into MESH format)
Notice
For skinned mesh:
- The maximum number of bones per surface is equal to 128.
- Each vertex can have up to 4 bones assigned to it.
| Flip Y/Z Axes | This option flips the Y and Z axes and inverts Y axis. |
|---|---|
| Flip Tangent Space | Flips the sign of the binormal component of the tangent space. |
| Export Blend Shapes | Exports blend shapes (i.e. morph targets). |
| Export Skin Clusters | Exports skin clusters (i.e. skin controllers). You should check this option to export a skinned mesh. |
| Alignment | Sets a point that will be used as the origin of coordinates:
|
| Scale | Scaling ratio. This value scales the size of a mesh. The default value of 1 means the mesh is exported without scaling. |
| Animation Range | Sets the range of animation. To export only the bind pose of the model without animation, specify the 0 values in both fields. To export animation, specify the first and the last animation frame number. |
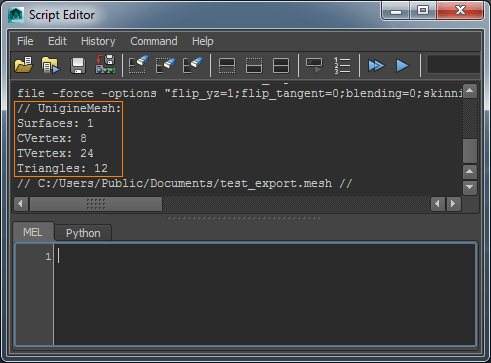
To check whether the export is done successfully, choose Window -> General Editors -> Script Editor and check the following information:

Notice
The exported surfaces and animations will be sorted alphabetically.
Export Only Animation of Skinned Mesh#
To export the animation of Unigine skinned mesh into the *.anim file:
- Select a model whose animation you want to export into Unigine.
- Select File -> Export Selection... in the main menu.
- Choose UnigineMesh in the Files of type drop-down list.
- Specify the name of the exported file with the *.anim extension. For example: my_animation.anim.
- Click Export Selection.
Notice
The exported animations will be sorted alphabetically.
Import of Mesh and Skinned Mesh#
To import a Unigine-native mesh or skinned mesh into Maya:
- Select File -> Import in the main menu.
- Choose UnigineMesh in the Files of type drop-down list.
- Choose a file in *.mesh format.
- Click Import.
Last update:
2021-12-13
Help improve this article
Was this article helpful?
(or select a word/phrase and press Ctrl+Enter)