Creating End UI
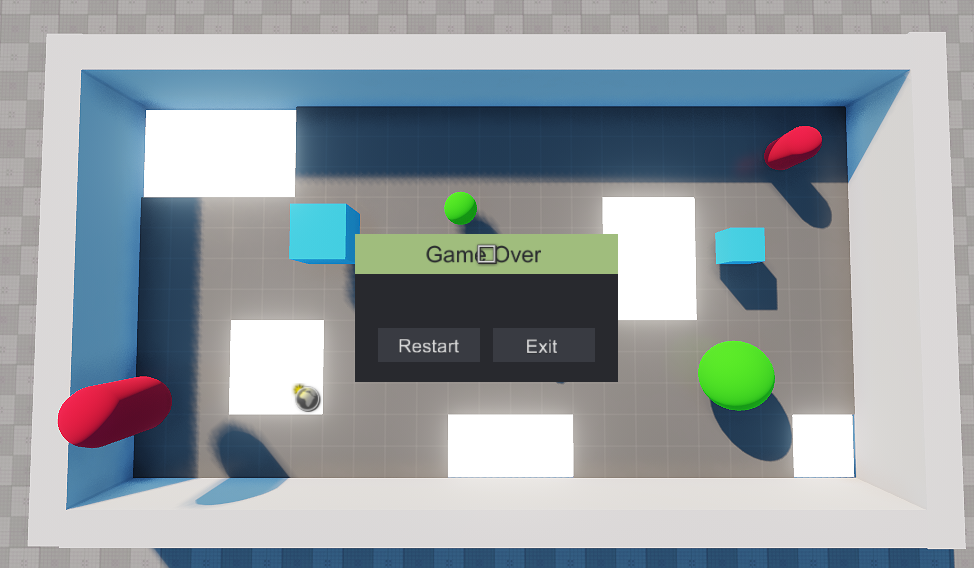
The end widget should be visible when the game is over. The user will be able to restart the game or exit the application via the corresponding buttons.

Step 1. Make the World Widget Controller#
The widget controller node will specify the handlers for different types of UI elements and show the UI at the end of the game.
-
Create a new C# component and call it EndWidget. Open the component in your IDE and copy the code below. Save your code in an IDE to ensure it's automatic compilation on switching back to UnigineEditor.
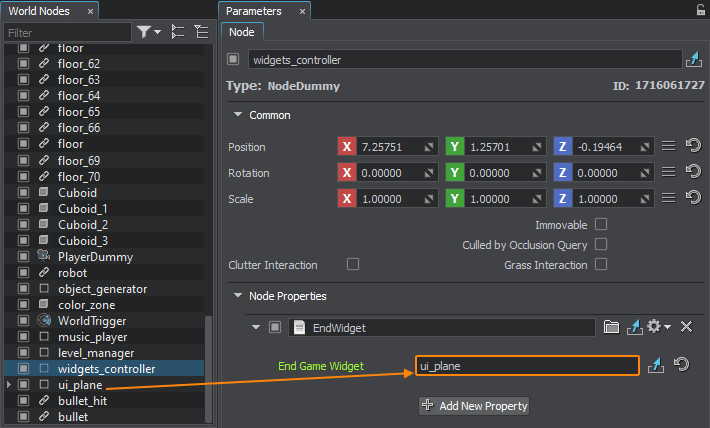
Source code (C#)public class EndWidget : Component { // object with the end game message public Node endGameWidget; LevelManager levelManager; void Init() { // set the end game event handler levelManager = ComponentSystem.FindComponentInWorld<LevelManager>(); if (levelManager != null) { levelManager.endGameEvent += EndGameEventHandler; } // set the mouse click handler for UI elements (Restart/Exit) UiElement.onClick += OnClickHandler; // hide the end UI endGameWidget.Enabled = false; } void EndGameEventHandler() { // set gui and input Input.MouseHandle = Input.MOUSE_HANDLE.USER; // show the end UI endGameWidget.Enabled = true; } void OnClickHandler(UiElement.Element uiType) { // restart the level by reloading the world if (uiType == UiElement.Element.Restart) { Unigine.Console.Run("world_reload"); } // exit the game if (uiType == UiElement.Element.Exit) App.Exit(); } void Shutdown() { // remove handlers if (levelManager != null) levelManager.endGameEvent -= EndGameEventHandler; UiElement.onClick -= OnClickHandler; } } - Switch to the UnigineEditor, create a new Dummy Node, call it "widgets_controller" and assign the EndWidget component to it.
-
Create a new C# component and call it UiElement. This component handles the selection and button functions calls. Open the UiElement component in your IDE and copy the code below. Don't forget to save your code.
UiElement.cs
Source code (C#)using System; using System.Collections; using System.Collections.Generic; using Unigine; [Component(PropertyGuid = "e512600290d09f79496242849bd0ec1371f58256")] public class UiElement : Component { [ShowInEditor][Parameter(Tooltip = "Type of UI element")] private Element uiType = Element.None; [ShowInEditor][ParameterMask(Tooltip = "Mask for detecting mouse intersection")] private int uiMask = 1; [ShowInEditor][Parameter(Tooltip = "Scale on hover")] private float selectScale = 1; [ShowInEditor][ParameterColor(Tooltip = "Emission color on hover")] private vec4 selectEmission = vec4.ONE; static public event Action<Element> onClick; public enum Element { Restart, Exit, None } public uint Id { get; private set; } static public bool AnyIsSelect { get { if (selectedObjects == 0) return false; return true; } } // ID of UI element static private uint idCount = 0; // count of selected objects static private int selectedObjects = 0; private WorldIntersection intersection = null; private bool isSelect = false; Unigine.Object uiObject = null; private vec3 sourceScale = vec3.ONE; private vec4 sourceEmission = vec4.ONE; void Init() { // set ID Id = idCount; ++idCount; selectedObjects = 0; // get the UI element uiObject = node as Unigine.Object; // remember the source scale and emission color sourceScale = node.Scale; sourceEmission = uiObject.GetMaterialParameterFloat4("emission_color", 0); intersection = new WorldIntersection(); } protected override void OnDisable() { // deselect an object if (isSelect) { --selectedObjects; if (selectedObjects < 0) selectedObjects = 0; isSelect = false; OnLeave(); } } void Update() { // get points for intersection vec3 dir = Game.Player.GetDirectionFromScreen(); vec3 p0 = Game.Player.WorldPosition; vec3 p1 = p0 + dir * 25.0f; // find the intersection Unigine.Object obj = World.GetIntersection(p1, p0, uiMask, intersection); if (obj != null) { // try to get the UI element component and select/deselect it UiElement uiElement = ComponentSystem.GetComponent<UiElement>(obj); if (uiElement != null && uiElement.Id == Id) { if (!isSelect) { OnEnter(); isSelect = true; ++selectedObjects; } } else if (isSelect) { OnLeave(); isSelect = false; --selectedObjects; } } else { if (isSelect) { OnLeave(); isSelect = false; --selectedObjects; } } // invoke the mouse click event if (isSelect && Input.IsMouseButtonDown(Input.MOUSE_BUTTON.LEFT)) OnClick(); } private void OnEnter() { // set a visual effect on selection node.Scale = sourceScale * selectScale; uiObject.SetMaterialParameterFloat4("emission_color", selectEmission, 0); } private void OnLeave() { // remove a visual effect when the UI element is not selected anymore node.Scale = sourceScale; uiObject.SetMaterialParameterFloat4("emission_color", sourceEmission, 0); } private void OnClick() { onClick?.Invoke(uiType); } } - Next, add a win condition check, end widget text, and a delegate call to the LevelManager class. To do so, open the LevelManager component in an IDE and add the following code. Save your code in an IDE to ensure it's automatic compilation on switching back to UnigineEditor.
LevelManager.cs
public class LevelManager : Component
{
//========================== NEW - BEGIN ===============================
	public event Action endGameEvent;

	ObjectText endText;
//=========================== NEW - END ================================

	// level timer
	public float timer = 100.0f;

	bool isCounting = true;

	int physicalObjectsNum;

	WidgetLabel widget_timer, widget_goal;

	void Init()
	{
		InitGUI();

		// find the object text node of the widget
		endText = Game.Player.FindNode("header_text", 1) as ObjectText;

		// count physical objects in the level
		physicalObjectsNum = node.NumChildren;
	}

	void InitGUI()
	{
		// getting a GUI pointer
		Gui gui = Gui.Get();

		// creating a label widget and setting up its parameters
		widget_timer = new WidgetLabel(gui, "Time Left:");
		widget_timer.SetPosition(10, 10);
		widget_timer.FontColor = vec4.RED;

		widget_goal = new WidgetLabel(gui, "Objects Left: ");
		widget_goal.SetPosition(10, 30);
		widget_goal.FontColor = vec4.BLUE;

		// add widgets to the GUI
		gui.AddChild(widget_timer, Gui.ALIGN_OVERLAP);
		gui.AddChild(widget_goal, Gui.ALIGN_OVERLAP);
	}

//========================== NEW - BEGIN ===============================
	void Update()
	{
		// decrease the timer
		if (isCounting)
		{
			timer -= Game.IFps;
			if (timer <= 0)
			{
				//end game
				endText.Text = "Game Over";
				endGameEvent?.Invoke();
				isCounting = false;
			}
		}

		//win
		if (physicalObjectsNum <= 0)
		{
			endText.Text = "Success!";
			endGameEvent?.Invoke();
			isCounting = false;
		}

		// show the current time and objects left to clear
		if (isCounting)
		{
			widget_timer.Text = "Time Left: " + timer.ToString("0.0") + " s";
			widget_goal.Text = "Objects Left: " + physicalObjectsNum.ToString();
		}
		//hide the widgets on end game
		else
		{
			widget_timer.Enabled = false;
			widget_goal.Enabled = false;
		}

	}
//=========================== NEW - END ================================

	void Shutdown()
	{
		widget_timer.DeleteLater();
		widget_goal.DeleteLater();
	}

	public void DecPhysicalObjectsNum()
	{
		physicalObjectsNum--;
	}
}
Step 2. Set Up the World Widget#
The end widget provides button functionality and additional information about the current game outcome. To properly display the end widget, position it in front of the camera.
- Drag the programming_quick_start\ui\ui_plane.node from the Asset Browser to the world.
-
Parent it to the PlayerDummy camera. Set the position of the ui_plane node to the following values.

-
Click the Edit for the ui_plane node reference and expand the hierarchy.

- Assign a UiElement component to the child restart_button node.
-
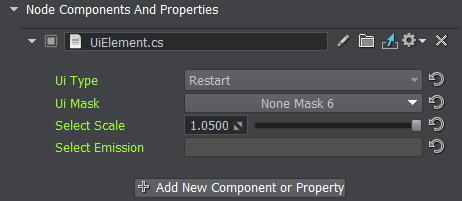
Set the Ui Type to Restart, check the 6th bit option for the Ui Mask (matching the button’s Intersection Mask) to correctly process selection intersections and set the Select Scale to 1.05 in order to make buttons bigger on cursor hover. Also, set the Select Emission to #505050 to make the button change its color.

- Set up a new UiElement component the same way for the exit_button, but set the Ui Type to Exit.
- Confirm the node reference editing by clicking Apply in the Parameters window of the ui_plane node.
-
Assign the ui_plane node to the End Game Widget field under the EndWidget component of the widgets_controller node.

- Save changes to the world, go to File->Save World or press Ctrl+S hotkey. Build and run the game to see the UI in action.