Скриптовые материалы
A scriptable material is a base material with expressions (fragments of code written in UnigineScript) executed at certain stages of rendering sequence offering you an exceptional flexibility. For example, you can use them to create your own custom post effects such as DoF or Bloom.Скриптовый материал - это базовый материал с выражениями (фрагментами кода, написанными на UnigineScript ), выполняемыми на определенных этапах рендеринга дает вам исключительную гибкость. Например, вы можете использовать их для создания собственных пост-эффектов, таких как DoF или Bloom.
Scriptable materials represent an ideal instrument for fast prototyping of any custom effects, as they allow you to:Сриптовые материалы представляют собой идеальный инструмент для быстрого прототипирования любых пользовательских эффектов, поскольку они позволяют:
- write any logic in UnigineScript,написать любую логику на UnigineScript,
- apply them globally or per-camera,применять их глобально или для каждой камеры,
- have all necessary parameters added to UI automatically.все необходимые параметры добавляются в пользовательский интерфейс автоматически.
A single or multiple scriptable materials can be applied globally via the corresponding tab of the Settings window (usually, the Custom Post Materials tab) or attached to a certain camera via the Parameters window. Expressions assigned to a scriptable material are executed only if the material is enabled. The order of execution is defined by the material's number in the list of appllied scriptable materials (either global or camera-specific). The order can be changed if necessary.Один или несколько скриптовых материалов можно применить глобально (через раздел Scriptable Materials окна Settings) или прикрепить к определенной камере (через окно Settings). Выражения, назначенные скриптовому материалу, выполняются, только если материал включен. Порядок выполнения определяется номером материала в списке применяемых скриптовых материалов (глобальных или применяемых к конкретной камере). При необходимости порядок можно изменить.
Scriptable material lists are pretty much like the lists of components assigned to nodes, enabling you to adjust all available parameters and control which materials to apply.Списки скриптовых материалов во многом похожи на списки компонентов , назначенных узлам, что позволяет настраивать все доступные параметры и контролировать, какие материалы применять.

As base materials, scriptable ones are created and edited manually.Скриптовые материалы, как и другие базовае материалы, создаются и редактируются вручную.
Creating a Scriptable Base Material with ULONСоздание скриптового материала с помощью ULON#
The custom scriptable base material is the same as the default one: it is read-only, non-hierarchical, referred by the name and so on.Пользовательский базовый скриптовый материал такой же, как и материал по умолчанию: он доступен только для чтения, не иерархичен, упоминается по имени и и так далее .
Let's write a material in the ULON file format.Напишем материал в формате файла ULON .
Implementing Material LogicРеализация логики материала#
- Create the post_sobel.basemat text file in the data/materials folder and open it in a plain text editor.Создайте текстовый файл post_sobel.basemat в папке data/materials и откройте его в текстовом редакторе.
- Specify the name for the base material and attributes for it.
Source Code (ULON)Укажите название базового материала и атрибуты для него.
BaseMaterial post_sobel <preview_hidden=1 var_prefix=var texture_prefix=tex> { ... }Исходный кодBaseMaterial post_sobel <options_hidden=1 preview_hidden=1 var_prefix=var texture_prefix=tex> { ... } - Describe material's resources and parameters.
Source Code (ULON)Опишите ресурсы и параметры материала.
// specify an internal texture to be used Texture src_color <source=procedural internal=true> // define the material's states and parameters available in the Editor Group "Sobel operator" { State multiply = false Slider threshold = 1.0 <min=0.0 max=1.0> Slider scale = 1.0 <min=0.0 max=1.0> }Исходный код// specify an internal texture to be used Texture src_color <type=procedural internal=true> // define the material's states and parameters available in the Editor Group "Sobel operator" { State multiply = false Slider threshold = 1.0 <min=0.0 max=1.0> Slider scale = 1.0 <min=0.0 max=1.0> } - Write the fragment shader for the custom outline render pass.
Source code (UUSL)Напишите фрагментный шейдер для пользовательского прохода рендеринга.
// define the outline render pass Pass render_sobel_operator { // write the fragment shader in UUSL or HLSL Fragment= #{ #include <core/materials/shaders/render/common.h> STRUCT_FRAG_BEGIN INIT_COLOR(float4) STRUCT_FRAG_END MAIN_FRAG_BEGIN(FRAGMENT_IN) // get the inverse resolution of the viewport (1.0 / width, 1.0 / height) float2 offset = s_viewport.zw; // take 3x3 samples OUT_COLOR = TEXTURE_BIAS_ZERO(tex_src_color, IN_UV); float3 c0 = TEXTURE_BIAS_ZERO(tex_src_color, IN_UV + offset * float2( 1, 0)).rgb; float3 c1 = TEXTURE_BIAS_ZERO(tex_src_color, IN_UV + offset * float2( 0, 1)).rgb; float3 c2 = TEXTURE_BIAS_ZERO(tex_src_color, IN_UV + offset * float2( 1, 1)).rgb; float3 c3 = TEXTURE_BIAS_ZERO(tex_src_color, IN_UV + offset * float2( 1, -1)).rgb; float3 c4 = TEXTURE_BIAS_ZERO(tex_src_color, IN_UV + offset * float2(-1, 0)).rgb; float3 c5 = TEXTURE_BIAS_ZERO(tex_src_color, IN_UV + offset * float2( 0, -1)).rgb; float3 c6 = TEXTURE_BIAS_ZERO(tex_src_color, IN_UV + offset * float2(-1, -1)).rgb; float3 c7 = TEXTURE_BIAS_ZERO(tex_src_color, IN_UV + offset * float2(-1, 1)).rgb; // find edge with Sobel filter float3 sobel_x = c6 + c4 * 2.0f + c7 - c3 - c0 * 2.0f - c2; float3 sobel_y = c6 + c5 * 2.0f + c3 - c7 - c1 * 2.0f - c2; float3 sobel = sqrt(sobel_x * sobel_x + sobel_y * sobel_y); // apply threshold float edge = saturate(1.0f - dot(sobel, toFloat3(var_threshold))); // apply scale float3 result = saturate(OUT_COLOR.rgb + var_scale) * edge; #ifdef STATE_MULTIPLY OUT_COLOR.rgb *= result; // for colored result #else OUT_COLOR.rgb = result; // for black & white result #endif MAIN_FRAG_END #} }Исходный код// define the outline render pass Pass render_sobel_operator { // write the fragment shader in UUSL or HLSL Fragment= #{ #include <core/shaders/common/fragment.h> MAIN_BEGIN(FRAGMENT_OUT, FRAGMENT_IN) // get the inverse resolution of the viewport (1.0 / width, 1.0 / height) float2 offset = s_viewport.zw; // take 3x3 samples OUT_COLOR = TEXTURE_BIAS_ZERO(tex_src_color, IN_UV); float3 c0 = TEXTURE_BIAS_ZERO(tex_src_color, IN_UV + offset * float2( 1, 0)).rgb; float3 c1 = TEXTURE_BIAS_ZERO(tex_src_color, IN_UV + offset * float2( 0, 1)).rgb; float3 c2 = TEXTURE_BIAS_ZERO(tex_src_color, IN_UV + offset * float2( 1, 1)).rgb; float3 c3 = TEXTURE_BIAS_ZERO(tex_src_color, IN_UV + offset * float2( 1, -1)).rgb; float3 c4 = TEXTURE_BIAS_ZERO(tex_src_color, IN_UV + offset * float2(-1, 0)).rgb; float3 c5 = TEXTURE_BIAS_ZERO(tex_src_color, IN_UV + offset * float2( 0, -1)).rgb; float3 c6 = TEXTURE_BIAS_ZERO(tex_src_color, IN_UV + offset * float2(-1, -1)).rgb; float3 c7 = TEXTURE_BIAS_ZERO(tex_src_color, IN_UV + offset * float2(-1, 1)).rgb; // find edge with Sobel filter float3 sobel_x = c6 + c4 * 2.0f + c7 - c3 - c0 * 2.0f - c2; float3 sobel_y = c6 + c5 * 2.0f + c3 - c7 - c1 * 2.0f - c2; float3 sobel = sqrt(sobel_x * sobel_x + sobel_y * sobel_y); // apply threshold float edge = saturate(1.0f - dot(sobel, to_float3(var_threshold))); // apply scale float3 result = saturate(OUT_COLOR.rgb + var_scale) * edge; #ifdef STATE_MULTIPLY OUT_COLOR.rgb *= result; // for colored result #else OUT_COLOR.rgb = result; // for black & white result #endif MAIN_END #} } - Write the Expression callback in Unigine Script to be called after the Post Materials stage (EndPostMaterials event) of the render sequence to perform outline render pass with Sobel filter.
Исходный код (UnigineScript)Напишите функцию обратного вызова (Expression) на Unigine Script, которая будет вызываться после прохода Post Materials (RENDER_CALLBACK_END_POST_MATERIALS) для выполнения прохода рендеринга контура с фильтром Собеля.
// the expression in Unigine Script defines a callback Expression RENDER_CALLBACK_END_POST_MATERIALS = #{ // declare the source texture from the screen frame Texture source = engine.render.getTemporaryTexture(engine.render_state.getScreenColorTexture()); // define the source texture from the screen frame source.copy(engine.render_state.getScreenColorTexture()); //set the color source texture to use it in the shader setTexture("src_color", source); // render the outline result texture to output it to the screen renderPassToTexture("render_sobel_operator", engine.render_state.getScreenColorTexture()); // release the temporaty texture engine.render.releaseTemporaryTexture(source); #}Исходный код (UnigineScript)// the expression in Unigine Script defines a callback Expression RENDER_CALLBACK_END_POST_MATERIALS = #{ // declare the source texture from the screen frame Texture source = engine.render.getTemporaryTexture(engine.render_state.getScreenColorTexture()); // define the source texture from the screen frame source.copy(engine.render_state.getScreenColorTexture()); //set the color source texture to use it in the shader setTexture("src_color", source); // render the outline result texture to output it to the screen renderPassToTexture("render_sobel_operator", engine.render_state.getScreenColorTexture()); // release the temporaty texture engine.render.releaseTemporaryTexture(source); #} - The full source code for the material is given below. You can copy it to the post_sobel.basemat and save the file.
Полный исходный код материала приведен ниже. Вы можете скопировать его в post_sobel.basemat и сохранить файл.Исходный код
BaseMaterial post_sobel <preview_hidden=1 var_prefix=var texture_prefix=tex> { // specify an internal texture to be used Texture src_color <source=procedural internal=true> // define the material's states and parameters available in the Editor Group "Sobel operator" { State multiply = false Slider threshold = 1.0 <min=0.0 max=1.0> Slider scale = 1.0 <min=0.0 max=1.0> } // define the outline render pass Pass render_sobel_operator { // write the fragment shader in UUSL or HLSL Fragment= #{ #include <core/materials/shaders/render/common.h> STRUCT_FRAG_BEGIN INIT_COLOR(float4) STRUCT_FRAG_END MAIN_FRAG_BEGIN(FRAGMENT_IN) // get the inverse resolution of the viewport (1.0 / width, 1.0 / height) float2 offset = s_viewport.zw; // take 3x3 samples OUT_COLOR = TEXTURE_BIAS_ZERO(tex_src_color, IN_UV); float3 c0 = TEXTURE_BIAS_ZERO(tex_src_color, IN_UV + offset * float2( 1, 0)).rgb; float3 c1 = TEXTURE_BIAS_ZERO(tex_src_color, IN_UV + offset * float2( 0, 1)).rgb; float3 c2 = TEXTURE_BIAS_ZERO(tex_src_color, IN_UV + offset * float2( 1, 1)).rgb; float3 c3 = TEXTURE_BIAS_ZERO(tex_src_color, IN_UV + offset * float2( 1, -1)).rgb; float3 c4 = TEXTURE_BIAS_ZERO(tex_src_color, IN_UV + offset * float2(-1, 0)).rgb; float3 c5 = TEXTURE_BIAS_ZERO(tex_src_color, IN_UV + offset * float2( 0, -1)).rgb; float3 c6 = TEXTURE_BIAS_ZERO(tex_src_color, IN_UV + offset * float2(-1, -1)).rgb; float3 c7 = TEXTURE_BIAS_ZERO(tex_src_color, IN_UV + offset * float2(-1, 1)).rgb; // find edge with Sobel filter float3 sobel_x = c6 + c4 * 2.0f + c7 - c3 - c0 * 2.0f - c2; float3 sobel_y = c6 + c5 * 2.0f + c3 - c7 - c1 * 2.0f - c2; float3 sobel = sqrt(sobel_x * sobel_x + sobel_y * sobel_y); // apply threshold float edge = saturate(1.0f - dot(sobel, toFloat3(var_threshold))); // apply scale float3 result = saturate(OUT_COLOR.rgb + var_scale) * edge; #ifdef STATE_MULTIPLY OUT_COLOR.rgb *= result; // for colored result #else OUT_COLOR.rgb = result; // for black & white result #endif MAIN_FRAG_END #} } // the expression in Unigine Script defines a callback Expression RENDER_CALLBACK_END_POST_MATERIALS = #{ // declare the source texture from the screen frame Texture source = engine.render.getTemporaryTexture(engine.render_state.getScreenColorTexture()); // define the source texture from the screen frame source.copy(engine.render_state.getScreenColorTexture()); //set the color source texture to use it in the shader setTexture("src_color", source); // render the outline result texture to output it to the screen renderPassToTexture("render_sobel_operator", engine.render_state.getScreenColorTexture()); // release the temporaty texture engine.render.releaseTemporaryTexture(source); #} }Исходный кодBaseMaterial post_sobel <options_hidden=1 preview_hidden=1 var_prefix=var texture_prefix=tex> { // specify an internal texture to be used Texture src_color <type=procedural internal=true> // define the material's states and parameters available in the Editor Group "Sobel operator" { State multiply = false Slider threshold = 1.0 <min=0.0 max=1.0> Slider scale = 1.0 <min=0.0 max=1.0> } // define the outline render pass Pass render_sobel_operator { // write the fragment shader in UUSL or HLSL Fragment= #{ #include <core/shaders/common/fragment.h> MAIN_BEGIN(FRAGMENT_OUT, FRAGMENT_IN) // get the inverse resolution of the viewport (1.0 / width, 1.0 / height) float2 offset = s_viewport.zw; // take 3x3 samples OUT_COLOR = TEXTURE_BIAS_ZERO(tex_src_color, IN_UV); float3 c0 = TEXTURE_BIAS_ZERO(tex_src_color, IN_UV + offset * float2( 1, 0)).rgb; float3 c1 = TEXTURE_BIAS_ZERO(tex_src_color, IN_UV + offset * float2( 0, 1)).rgb; float3 c2 = TEXTURE_BIAS_ZERO(tex_src_color, IN_UV + offset * float2( 1, 1)).rgb; float3 c3 = TEXTURE_BIAS_ZERO(tex_src_color, IN_UV + offset * float2( 1, -1)).rgb; float3 c4 = TEXTURE_BIAS_ZERO(tex_src_color, IN_UV + offset * float2(-1, 0)).rgb; float3 c5 = TEXTURE_BIAS_ZERO(tex_src_color, IN_UV + offset * float2( 0, -1)).rgb; float3 c6 = TEXTURE_BIAS_ZERO(tex_src_color, IN_UV + offset * float2(-1, -1)).rgb; float3 c7 = TEXTURE_BIAS_ZERO(tex_src_color, IN_UV + offset * float2(-1, 1)).rgb; // find edge with Sobel filter float3 sobel_x = c6 + c4 * 2.0f + c7 - c3 - c0 * 2.0f - c2; float3 sobel_y = c6 + c5 * 2.0f + c3 - c7 - c1 * 2.0f - c2; float3 sobel = sqrt(sobel_x * sobel_x + sobel_y * sobel_y); // apply threshold float edge = saturate(1.0f - dot(sobel, to_float3(var_threshold))); // apply scale float3 result = saturate(OUT_COLOR.rgb + var_scale) * edge; #ifdef STATE_MULTIPLY OUT_COLOR.rgb *= result; // for colored result #else OUT_COLOR.rgb = result; // for black & white result #endif MAIN_END #} } // the expression in Unigine Script defines a callback Expression RENDER_CALLBACK_END_POST_MATERIALS = #{ // declare the source texture from the screen frame Texture source = engine.render.getTemporaryTexture(engine.render_state.getScreenColorTexture()); // define the source texture from the screen frame source.copy(engine.render_state.getScreenColorTexture()); //set the color source texture to use it in the shader setTexture("src_color", source); // render the outline result texture to output it to the screen renderPassToTexture("render_sobel_operator", engine.render_state.getScreenColorTexture()); // release the temporaty texture engine.render.releaseTemporaryTexture(source); #} }
Applying Material and Adjusting ParametersПрименение материала и настройка параметров#
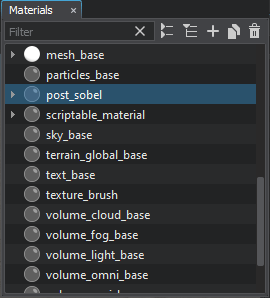
- Launch the UNIGINE Editor via the SDK Browser. In the Materials tab, you will find the imported post_sobel material in the list of base materials.
 Запустите UnigineEditor через браузер SDK. На вкладке «Материалы» вы найдете импортированный материал post_sobel в списке базовых материалов.

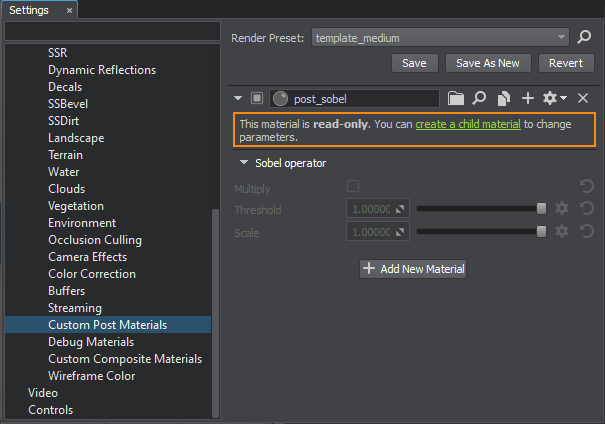
- To apply the material globally, go to Windows -> Settings and in the Custom Post Materials section click Add New Material. Assign the post_sobel material by dragging it to the field or by specifying the name of the material. Чтобы применить материал глобально, перейдите к Windows -> Settings и в разделе Scriptable Materials нажмите Add New Scriptable Material. Назначьте материал post_sobel, перетащив его в поле или указав имя материала.
- Click create a child material to be able to specify states and parameters of the material. The new child material of the post_sobel will be created and assigned here.
 Щелкните Create a child material, чтобы указать состояния и параметры материала. Здесь будет создан и назначен новый дочерний материал post_sobel.

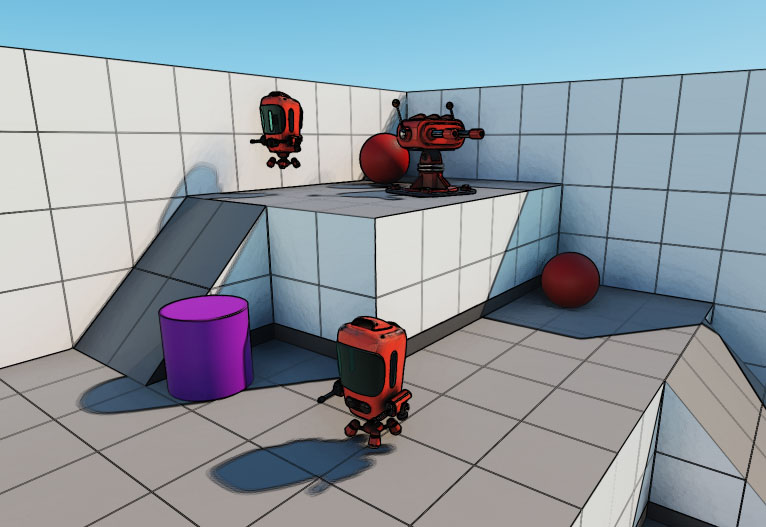
- Check Multiply to make a colorful final image. Adjust the Threshold and Scale values to customize the effect.
 The applied post process outline effect.The applied post process outline effect.The applied post process outline effect.Отметьте Multiply, чтобы получить красочное окончательное изображение. Отрегулируйте значения Threshold и Scale, чтобы настроить эффект.
 The applied post process outline effect.Примененный эффект контура постобработки.
That's it! You have just created a scriptable material for all of the application’s cameras. To apply the post process effect only to a specific camera, go to the Parameters tab of the corresponding Player node and assign the material to it.
 Вот и все! Вы только что создали скриптовый материал применяемый глобально ко всем камерам. Чтобы применить эффект постобработки только к определенной камере, перейдите на вкладку Parameters соответствующего Player и назначьте ему материал.

Информация, представленная на данной странице, актуальна для версии UNIGINE 2.19 SDK.
