Управление геймплеем
 Let's create the LevelManager component to manage game rules, level states and the User Interface. The manager creates a graphical user interface and shows the time left until the game is over. It also checks and shows the number of objects left to clear away from the Play Area.Давайте создадим компонент LevelManager для управления геймплеем, состояниями уровней и пользовательским интерфейсом. Менеджер создает графический пользовательский интерфейс и показывает время, оставшееся до окончания игры. Он также проверяет и показывает количество объектов, которые осталось убрать с игровой площадки.
Step 1. Set Up Timer and Game UIШаг 1. Настройка таймера и пользовательского интерфейса игры#
A node with the LevelManager component assigned should be present in the world for rules to take effect. It will manage the timer and update the widget user interface for the game.Нода с назначенным компонентом LevelManager должна присутствовать в мире, чтобы правила вступили в силу. Она будет управлять таймером и обновлять пользовательский интерфейс виджета для игры.
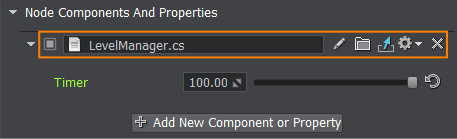
- Create a new C# component and call it LevelManager.Создайте новый компонент C# и назовите его LevelManager.
-
Open the LevelManager component in an IDE and copy the code below. Save your code in an IDE to ensure it's automatic compilation on switching back to UnigineEditor.
Откройте компонент LevelManager в среде IDE и скопируйте приведенный ниже код. Сохраните свой код в IDE, чтобы обеспечить его автоматическую компиляцию при возврате к UnigineEditor.
LevelManager.cs
using System; using System.Collections; using System.Collections.Generic; using Unigine; [Component(PropertyGuid = "AUTOGENERATED_GUID")] // <-- this line is generated automatically for a new component public class LevelManager : Component { // level timer public float timer = 100.0f; bool isCounting = true; int physicalObjectsNum; WidgetLabel widget_timer, widget_goal; void Init() { InitGUI(); // count physical objects in the level physicalObjectsNum = node.NumChildren; } void InitGUI() { // getting a GUI pointer Gui gui = Gui.GetCurrent(); // creating a label widget and setting up its parameters widget_timer = new WidgetLabel(gui, "Time Left:"); widget_timer.SetPosition(10, 10); widget_timer.FontColor = vec4.RED; widget_goal = new WidgetLabel(gui, "Objects Left: "); widget_goal.SetPosition(10, 30); widget_goal.FontColor = vec4.BLUE; // add widgets to the GUI gui.AddChild(widget_timer, Gui.ALIGN_OVERLAP); gui.AddChild(widget_goal, Gui.ALIGN_OVERLAP); } void Update() { // decrease the timer if (isCounting) { timer -= Game.IFps; if (timer <= 0) { //end game isCounting = false; } } //win if (physicalObjectsNum <= 0) { isCounting = false; } // show the current time and objects left to clear if (isCounting) { widget_timer.Text = "Time Left: " + timer.ToString("0.0") + " s"; widget_goal.Text = "Objects Left: " + physicalObjectsNum.ToString(); } //hide the widgets on end game else { widget_timer.Enabled = false; widget_goal.Enabled = false; } } void Shutdown() { widget_timer.DeleteLater(); widget_goal.DeleteLater(); } public void DecPhysicalObjectsNum() { physicalObjectsNum--; } } - Create a new Dummy Node called "level_manager" and place it somewhere in the world.Создайте новую Dummy Node с именем "level_manager" и поместите ее где-нибудь в мире.
-
Add the LevelManager component to the level_manager node.Добавьте компонент LevelManager к ноде level_manager.
We created the system GUI via the API from the code. The alternative method is to use UI files.Мы создали системный графический интерфейс с помощью API из кода. Альтернативный метод заключается в использовании файлов пользовательского интерфейса.
Step 2. Detect Physical ObjectsШаг 2. Обнаружение физических объектов#
Only the level_manager's children nodes shall be deleted by the Kill Zone's trigger. Let's add each physical object that we created earlier as a child to the level_manager node. For the rules to function properly you also need to add a new condition and a method call to the KillZone component that checks if the entered node has a parent with the LevelManager component attached.Только дочерние ноды level_manager должны быть удалены триггером Kill Zone. Давайте добавим каждый физический объект, который мы создали ранее, в качестве дочернего элемента к ноде level_manager. Чтобы правила функционировали должным образом, вам также необходимо добавить новое условие и вызов метода к компоненту KillZone, который проверяет, есть ли у входящей в зону ноды родительский элемент с подключенным компонентом LevelManager.
-
Open the KillZone component in your IDE, add a levelManager field and replace the content of Enter callback function according to the following code. Save your code in an IDE to ensure it's automatic compilation on switching back to UnigineEditor.Откройте KillZone component в вашей IDE, добавьте поле levelManager и замените содержимое функции обратного вызова Enter в соответствии со следующим кодом. Сохраните свой код в IDE, чтобы обеспечить его автоматическую компиляцию при возврате к UnigineEditor.KillZone.cs
using System; using System.Collections; using System.Collections.Generic; using Unigine; [Component(PropertyGuid = "AUTOGENERATED_GUID")] // <-- this line is generated automatically for a new component public class KillZone : Component { // the area into which an object should fall WorldTrigger trigger; //========================== NEW - BEGIN =============================== LevelManager levelManager; //=========================== NEW - END ================================ void Init() { trigger = node as WorldTrigger; if (trigger != null) trigger.EventEnter.Connect(Enter); // set the handler to be executed when an object enters the area } void Enter(Node target) { //========================== NEW - BEGIN =============================== levelManager = target.GetComponentInParent<LevelManager>(); // check if the parent node has a LevelManager component attached if (levelManager != null) { // delete the entered node and decrease the amount of physical objects levelManager.DecPhysicalObjectsNum(); target.DeleteLater(); } //=========================== NEW - END ================================ } } -
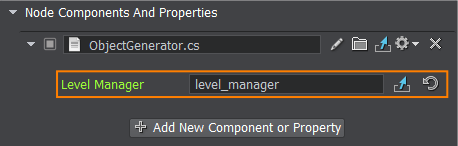
Let's set the level_manager node as a parent to physical objects. Open the ObjectGenerator component in your IDE and replace the code with the following. Save the code in your IDE and switch back to UnigineEditor.Давайте установим ноду level_manager в качестве родительской ноды для физических объектов. Откройте компонент ObjectGenerator в вашей IDE и замените код следующим. Сохраните код в своей IDE и переключитесь обратно на UnigineEditor.ObjectGenerator.cs (C#)
using System; using System.Collections; using System.Collections.Generic; using Unigine; [Component(PropertyGuid = "AUTOGENERATED_GUID")] // <-- this line is generated automatically for a new component public class ObjectGenerator : Component { //========================== NEW - BEGIN =============================== public Node levelManager; //=========================== NEW - END ================================ private void Init() { //========================== NEW - BEGIN =============================== if (levelManager) { //=========================== NEW - END ================================ // cube ObjectMeshDynamic box = Primitives.CreateBox(new vec3(1.0f)); //========================== NEW - BEGIN ============================= box.Parent = levelManager; //========================== NEW - END =============================== box.TriggerInteractionEnabled = true; box.SetIntersection(true, 0); box.SetIntersectionMask(0x00000080, 0); // check the BulletIntersection bit box.WorldTransform = MathLib.Translate(new vec3(0.5f, 7.5f, 1.0f)); box.SetMaterialFilePath("materials/mesh_base_0.mat", "*"); box.Name = "box"; BodyRigid bodyBox = new BodyRigid(box); ShapeBox shapeBox = new ShapeBox(bodyBox, new vec3(1.0f)); new ShapeSphere(bodyBox, 0.5f); bodyBox.ShapeBased = false; bodyBox.Mass = 2.0f; // sphere ObjectMeshDynamic sphere = Primitives.CreateSphere(0.5f, 9, 32); //========================== NEW - BEGIN =============================== sphere.Parent = levelManager; //========================== NEW - END =============================== sphere.TriggerInteractionEnabled = true; sphere.SetIntersection(true, 0); sphere.SetIntersectionMask(0x00000080, 0); // check the BulletIntersection bit sphere.WorldTransform = MathLib.Translate(new vec3(4.5f, 5.5f, 1.0f)); sphere.SetMaterialFilePath("materials/mesh_base_1.mat", "*"); sphere.Name = "sphere"; BodyRigid bodySphere = new BodyRigid(sphere); new ShapeSphere(bodySphere, 0.5f); bodySphere.ShapeBased = false; bodySphere.Mass = 2.0f; // capsule ObjectMeshDynamic capsule = Primitives.CreateCapsule(0.5f, 1.0f, 9, 32); //========================== NEW - BEGIN =============================== capsule.Parent = levelManager; //========================== NEW - END =============================== capsule.TriggerInteractionEnabled = true; capsule.SetIntersection(true, 0); capsule.SetIntersectionMask(0x00000080, 0); // check the BulletIntersection bit capsule.WorldTransform = MathLib.Translate(new vec3(4.5f, 0.5f, 3.0f)); capsule.SetMaterialFilePath("materials/mesh_base_2.mat", "*"); capsule.Name = "capsule"; BodyRigid bodyCapsule = new BodyRigid(capsule); new ShapeCapsule(bodyCapsule, 0.5f, 1.0f); bodyCapsule.ShapeBased = false; bodyCapsule.Mass = 2.0f; //========================== NEW - BEGIN =============================== } //=========================== NEW - END ================================ } } -
Select the object_generator node in the World Nodes window and drag the level_manager node to the corresponding field of the ObjectGenerator component.Выберите ноду object_generator в окне World Nodes и перетащите ноду level_manager в соответствующее поле компонента ObjectGenerator.
- Save changes to the world, go to File->Save World or press Ctrl+S hotkey. Then run the game to see the game rules in action.Сохраните изменения в мире, перейдите к File->Save World или нажмите Ctrl+S. Затем запустите игру, чтобы увидеть геймплей в действии.
Информация, представленная на данной странице, актуальна для версии UNIGINE 2.19.1 SDK.