Создание треков определенного типа
The type of a track is defined by a parameter that it animates. Each track animates only one parameter. A parameter is a setting of an object, property, material, etc. that should be animated. Тип трека определяется параметром , который он анимирует. Каждый трек анимирует только один параметр. Параметр — это настройка объекта, свойства, материала и т.д., которые необходимо анимировать.
The article lists the types of tracks available in the Tracker and gives instructions on how to create a track of a certain type. В статье перечислены типы треков, доступных в Tracker, и даны инструкции, как создать трек определенного типа.
Node-Related TracksТреки, связанные с нодой#
Node-related tracks allow animating common and type-specific node settings. For example, you can create a track that enables a node, or changes its position. Such tracks need to be bound to some specific node in the world. Треки, связанные с нодой, позволяют анимировать общие и специфичные для типа параметры ноды. Например, вы можете создать трек, который активирует ноду или изменяет ее положение. Такие треки нужно привязать к какой-то конкретной ноде в мире.
Creating a Node-Related TrackСоздание трека, связанного с нодой#
To create a node-related track, perform the following:Чтобы создать трек, связанный с нодой, выполните следующие действия:
- Click
 to add a track that will animate some parameter. The Add Parameter window will open.Нажмите
  , чтобы добавить трек, который будет анимировать какой-либо параметр. Откроется окно Add Parameter.
 -
Choose a node in the list and then choose a parameter that should be animated and click Ok.Выберите ноду в списке, затем выберите параметр, который нужно анимировать, и нажмите Ok.
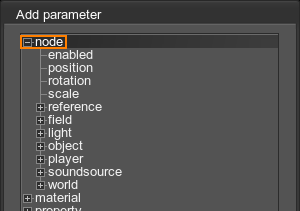
If you want to animate a type-specific node parameter, click + to the left of the desired node type and choose the parameter.Если вы хотите анимировать параметр ноды определенного типа, щелкните + слева от нужного типа ноды и выберите параметр.
-
In the Select Node dialog window that opens, bind the track to a node from the list and click Ok.В открывшемся диалоговом окне Select Node привяжите трек к ноде из списка и нажмите Ok.
ПримечаниеYou can later change the node bound to the track in the Name field of the Track Info section: double-click the field and choose a node in the list.Позже вы можете изменить ноду, привязанную к треку, в поле Name секции Track Info: дважды щелкните поле и выберите ноду в списке.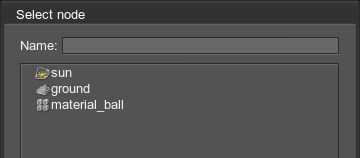 ПримечаниеIf the track animates a type-specific parameter, it should be bound to the node of the corresponding type. Otherwise, an error message will occur.Если трек анимирует параметр, специфичный для типа, он должен быть привязан к ноде соответствующего типа. В противном случае появится сообщение об ошибке.
 - Compose a track by creating the required number of key frames.Создайте трек путем добавления необходимого количества ключевых кадров.
Common Node ParametersОбщие параметры нод#
Common parameters of node-related tracks allow you to toggle the node on and off, change its position, orientation and scale along the X, Y, and Z axes.Общие параметры треков, связанных с нодой, позволяют включать и выключать ноду, изменять ее положение, ориентацию и масштаб по осям X, Y и Z.
Moving a NodeПеремещение ноды#
The position parameter allows you to animate node movement along the axes. A spline, along which the node moves, can be visualized in the scene: enable both the track graph and Visualizer (Helpers -> Show Visualizer) in order to see the created track path.Параметр position позволяет анимировать движение ноды по осям. Сплайн, по которому движется ноды, можно визуализировать в сцене: включите как track graph, так и Visualizer (Helpers -> Show Visualizer), чтобы увидеть созданный путь трека.
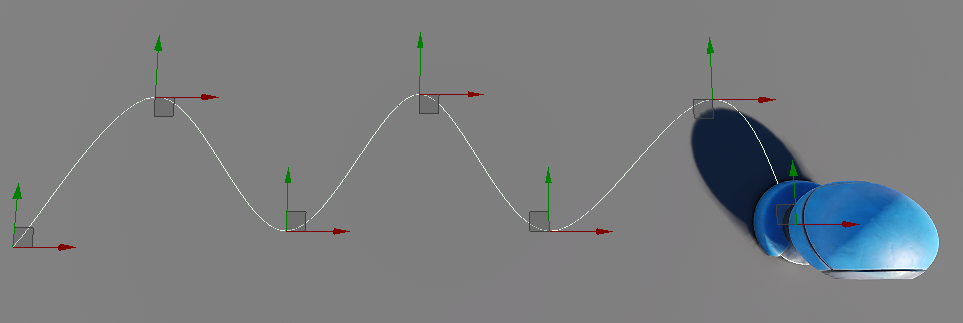
For each axis, you can specify a type of velocity of the node when it moves:Для каждой оси можно указать тип скорости ноды при ее перемещении:
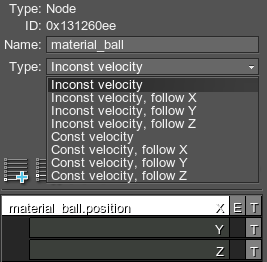
- Inconst velocity stands for the inconstant velocity of the node when it moves along the spline (as curves are passed faster).Inconst velocity обозначает непостоянную скорость ноды при ее движении по сплайну (поскольку кривые проходятся быстрее).
- Const velocity stands for the constant velocity of the node. It will move at the uniform speed throughout the whole spline.Const velocity обозначает постоянную скорость ноды. Она будет двигаться с одинаковой скоростью по всему сплайну.
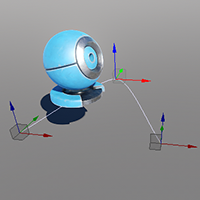
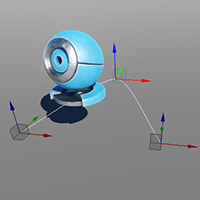
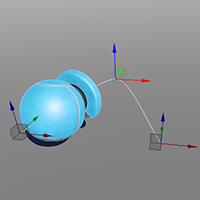
Also, you can specify the axis along which the node should be oriented when moving: choose follow X, Y or Z together with the type of velocity. Также можно указать ось, по которой должна ориентироваться нода при движении: выберите follow X, Y или Z вместе с типом скорости.
 |
 |
 |
Follow X Axis |
Follow Y Axis |
Follow Z Axis |
When you choose the axis to follow, you should also specify an Offset that specifies how far along the spline is the point by which the node is oriented.Когда вы выбираете ось, которой следует следовать, вы также должны указать Offset, который указывает, как далеко вдоль сплайна находится точка, по которой ориентирована нода.
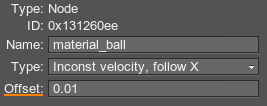
- By the default value of 0.01, the node faces the current spline point.При значении по умолчанию 0.01 нода обращена к текущей точке сплайна.
- By higher values, the node is oriented as if it has already moved further forward the spline.При более высоких значениях нода ориентируется так, как будто она уже продвинулась вперед по сплайну.
If you want to control the orientation of the node for the follow the axis mode, you can use a dummy node:Если вы хотите контролировать ориентацию ноды для режима follow the axis, вы можете использовать dummy node:
- Create a dummy node.Создайте dummy node.
- Add your node as its child.Добавьте свою ноду в качестве его дочернего элемента.
- Orient and position it relative the dummy however necessary.При необходимости сориентируйте и расположите ее относительно dummy node.
Rotating a NodeВращение ноды#
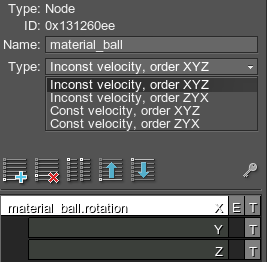
The rotation parameter allows you to rotate the node along X, Y or Z axes. For each axis, you can specify a type of velocity of the node when it rotates:Параметр rotation позволяет вращать ноду по осям X, Y или Z. Для каждой оси можно указать тип скорости ноды при ее вращении:
- Inconst velocity stands for the inconstant velocity of the node when it rotates (with acceleration).Inconst velocity обозначает непостоянную скорость ноды при ее вращении (с ускорением).
- Const velocity stands for the constant velocity of the node. It will rotate at the uniform speed.Const velocity обозначает постоянную скорость ноды. Она будет вращаться с постоянной скоростью.
Also, you can specify an order of rotations about the axes: choose order XYZ or order ZYX together with the type of velocity. For example, if rotating the sun (a world light source), the order should be ZYX.Также вы можете указать порядок вращения вокруг осей: выберите order XYZ или order ZYX вместе с типом скорости. Например, если вращается солнце (источник света World Light), порядок должен быть ZYX.
Node Reference TracksТреки NodeReference#
These tracks control the name parameter of NodeReferences. This parameter allows you to change the .node file, to which the node reference points. Thus, by using tracks, you can animate switching of the source node of the particular NodeReference.Эти треки управляют параметром name у NodeReferences. Этот параметр позволяет изменить файл .node, на который указывает NodeReference. Таким образом, используя треки, вы можете анимировать переключение корневой ноды конкретного NodeReference.
Fields TracksТреки полей (Fields)#
These tracks control parameters of spacer and animation fields (except the Field and Viewport Masks):Эти треки управляют параметрами полей Spacer и Animation (кроме Field и Viewport Masks):
- Field Spacer parametersПараметры Field Spacer
- Field Animation parametersПараметры Field Animation
Light Sources TracksТреки источников света#
These tracks control parameters of light sources:Эти треки управляют параметрами источников света:
- Common light parametersОбщие параметры источников света
- Omni light parametersПараметры источника света Omni
- Projected light parametersПараметры источника света Projected
- World light parametersПараметры источника света World
Objects-Related TracksТреки, связанные с объектами#
Objects-related tracks allow animating common and type-specific object settings.Треки, связанные с объектами, позволяют анимировать общие и специфичные для каждого типа параметры объектов.
Common Objects ParametersОбщие параметры объектов#
Common parameters of objects-related tracks allow you to toggle an object on and off, change a material or a property assigned to a surface of the object. You can also choose a specific parameter of the material or the property to animate.Общие параметры треков, связанных с объектами, позволяют включать и выключать объект, изменять материал или свойство, назначенное поверхности объекта. Вы также можете анимировать какой-либо параметр материала или свойства.
To change a material or a property set to an object surface, perform the following:Чтобы изменить материал или набор свойств поверхности объекта, выполните следующие действия:
-
- For the material, create the node -> object -> material track.Для материала создайте трек node -> object -> material.
- For the property, create the node -> object -> property track.Для свойства создайте трек node -> object -> property.
- Choose an object-related node in the Select Node window that opens.Выберите ноду, связанную с объектом, в открывшемся окне Select Node.
-
In the Surface field of the Track Info section, choose a surface to change the material or property for.В поле Surface секции Track Info выберите поверхность, для которой необходимо изменить материал или свойство.
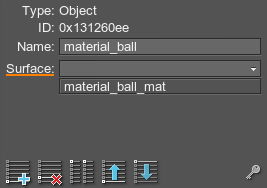
- Double-click the track line to select the material or property to be applied.Дважды щелкните линию трека, чтобы выбрать применяемый материал или свойство.
Skinned Mesh ParametersПараметры Skinned Mesh#
These parameters allow you to toggle playback of the skinned mesh animation on and off and also set animation from the .anim file.Эти параметры позволяют включать и выключать воспроизведение анимации Skinned Mesh, а также устанавливать анимацию из файла .anim.
Particle System ParametersПараметры системы частиц#
These tracks control parameters of particles (and their emitters).Эти треки управляют параметрами частиц (и их эмиттеров).
Water Mesh ParametersПараметры Water Mesh#
These tracks control parameters of water mesh waves.Эти треки управляют параметрами волн Water Mesh.
Volume Projected ParametersПараметры Volume Projected#
These tracks control parameters of volume projected objects.Эти треки управляют параметрами объектов Volume Projected.
Player TracksТреки Player#
These tracks allow you to set up cameras used for cut-scenes. All types of cameras can be used.Эти треки позволяют настроить камеры, используемые для кат-сцен. Можно использовать камеры любого типа.
Common parameters that available for all types of players allow you to animate the camera's viewing frustum parameters and post-process materials applied after all other post-processes.Общие параметры, доступные для всех типов Player, позволяют анимировать параметры пирамиды видимости и материалы постобработки, применяемые после всех других постобработок.
Moving a CameraПеремещение камеры#
To animate the camera movement, perform the following:Чтобы анимировать движение камеры, выполните следующие действия:
- Add the node -> position track.Добавьте трек node -> position.
- Select the camera you want to move in the Select Node window that opens. The position key frames will be automatically created at the track start based on the current position of the selected player.Выберите камеру, которую хотите переместить, в открывшемся окне Select Node. Ключевые кадры позиции будут автоматически созданы в начале трека на основе текущей позиции выбранного игрока.
- Choose the follow z mode.Выберите режим follow z.
- Disable the track and position the target camera.Отключите трек и позиция целевая камера.
- Create a snapshot of the current value of the camera position.Создайте снимок текущего значения положения камеры.
- Set the animating camera to be used in-game.Установите анимационную камеру для использования в игре.
Rotating a CameraВращение камеры#
To animate the camera rotation, perform the following:Чтобы анимировать вращение камеры, выполните следующие действия:
- Add the node -> position track.Добавьте трек node -> position.
- Select the camera you want to rotate in the Select Node window that opens. The rotation key frames will be automatically created at the track start based on the current orientation of the selected player.Выберите камеру, которую хотите повернуть, в открывшемся окне Select Node. Ключевые кадры вращения будут автоматически созданы в начале трека на основе текущей ориентации выбранного проигрывателя.
- Choose the follow z mode.Выберите режим follow z.
- Disable the track and rotate the target camera.Отключите трек и вращать целевая камера.
- Create a snapshot of the current value of the camera rotation.Создайте снимок текущего значения поворота камеры.
- Set the animating camera to be used in-game.Установите анимационную камеру для использования в игре.
For a persecutor player:Для Player Persecutor:
- Add the phiAngle and thetaAngle tracks.Добавьте треки phiAngle и thetaAngle.
- Select the camera you want to rotate in the Select Node window that opens.Выберите камеру, которую хотите повернуть, в открывшемся окне Select Node.
- Disable the tracks and rotate the target camera.Отключите треки и вращать целевая камера.
- Create a snapshot of the current value of the camera rotation.Создайте снимок текущего значения поворота камеры.
- Set the animating camera to be used in-game.Установите анимационную камеру для использования в игре .
Player Persecutor ParametersПараметры Player Persecutor#
A player persecutor has additional settings that can be animated, namely: a target that the persecutor follows, an anchor point, a distance between the persecutor and the target, phi and theta angles. У Player Persecutor есть дополнительные настройки, которые можно анимировать, а именно: цель, за которой следует Player Persecutor, точка привязки, расстояние до цели,углы фи и тета .
A position of the persecutor can be controlled in one of two ways:Позицией Player Persecutor можно управлять одним из двух способов:
- By setting the position of the target node (the node position parameter).Установив положение целевой ноды (параметр node position).
- By changing phi and theta angles for the persecutor. This variant is also used to rotate the persecutor.Путем изменения углов фи и тета для Player Persecutor. Этот вариант также используется для вращения Player Persecutor .
A player persecutor allows following a node with a camera:Player Persecutor позволяет следить камерой за нодой:
- Add the node -> player -> persecutor -> target track.Добавьте трек node -> player -> persecutor -> target.
- Select the player persecutor node in the Select Node window that opens.Выберите ноду Player Persecutor в открывшемся окне Select Node.
- Double-click the track line. In the dialog window that opens, choose a node that this player will follow.Дважды щелкните линию трека. В открывшемся диалоговом окне выберите ноду, за которой будет следовать этот Player Persecutor.
-
By default, the camera will focus on the center of coordinates of the node. You can change the point of focus:По умолчанию камера будет фокусироваться на центре координат ноды. Вы можете изменить точку фокусировки:
- Add the node -> player -> persecutor -> anchor track.Добавьте трек node -> player -> persecutor -> anchor.
- Double-click the track line to set anchor values: they change coordinates of the point of focus by X, Y and Z axes.Дважды щелкните линию трека, чтобы установить значения привязки: они изменяют координаты точки фокуса по осям X, Y и Z.
-
Adjust the distance between the node and the persecutor. For that, add the node -> player -> persecutor -> distance track.Отрегулируйте расстояние между нодой и Player Persecutor. Для этого добавьте трек node -> player -> persecutor -> distance.
ПримечаниеThe distance can only be within Min - Max distance range set for the persecutor.Расстояние может быть только в рамках Мин - Макс диапазона расстояний, установленного для Player Persecutor. - Set the camera to be used in-game.Установите камеру, которая будет использоваться в игре .
Sound Source TracksТреки источника звука#
These tracks control parameters of sound sources. For common sound parameters, see the chapter on Sound-Related Tracks.Эти треки управляют параметрами источников звука. Общие звуковые параметры см. в разделе о Звуковых треках.
Switching a Sound SourceПереключение источника звука#
To play a sound from a positional sound source:Чтобы воспроизвести звук от позиционного источника звука:
- Add node -> soundsource -> play track.Добавьте трек node -> soundsource -> play.
- Choose a sound source.Выберите источник звука.
- Double-click the track line to start or stop playback of the sound source.Дважды щелкните линию Трека, чтобы начать или остановить воспроизведение источника звука.
World Transform Path TracksТреки World Transform Path#
These tracks allow you to control playback of the transformation defined by the path: continue the playback if it is paused, or start it if stopped.Эти треки позволяют управлять воспроизведением преобразования, определяемого путем (World Transform Path): продолжить воспроизведение, если оно поставлено на паузу, или запустить его вновь, если оно остановлено.
Material-Related TracksТреки, связанные с материалом#
Material-related tracks allow you to change some material setting over time. Options, states, textures, and parameters of the material can be animated. Such tracks need to be bound to some specific user material.Треки, связанные с материалом, позволяют вам изменять некоторые настройки материала с течением времени. Так можно анимировать опции, состояния, текстуры и параметры материала. Такие треки должны быть привязаны к какому-то конкретному пользовательскому материалу .
Creating a Material-Related TrackСоздание трека, связанного с материалом#
To create a material-related track, perform the following:Чтобы создать трек, связанный с материалом, выполните следующие действия:
- Click
 to add a track that will animate some parameter. The Add Parameter window will open.
Нажмите
  , чтобы добавить трек, который будет анимировать какой-либо параметр. Откроется окно Add Parameter.
-
Choose a material in the list and then choose a parameter that should be animated:Выберите материал в списке, а затем выберите параметр, который необходимо анимировать:
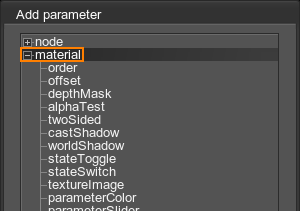
- If the parameter is one of the common material settings, you can add it straight away and go to the next step.Если параметр является одним из общих настроек материала, его можно добавить сразу и перейти к следующему шагу .
-
If the track should animate a state, texture, or parameter of the material, check the type of the target parameter and choose it in the list:Если трек должен анимировать состояние, текстуру или параметр материала, проверьте тип целевого параметра и выберите его в списке:
- For a material state with a checkbox, select stateToggle.Для состояния материала с флажком выберите stateToggle.
- For a material state with a drop-down list, select stateSwitch.Для состояния материала с выпадающим списком выберите stateSwitch.
- For a material parameter with a slider, select parameterSlider.Для параметра материала с ползунком выберите parameterSlider.
- For a parameter with a color picker, select parameterColor.Для параметра с палитрой цветов выберите parameterColor.
- For a material texture, select textureImage.Для текстуры материала выберите textureImage.
-
In the Select Material dialog window that opens, bind the track to a user material from the list and click Ok.В открывшемся диалоговом окне Select Material привяжите трек к пользовательскому материалу из списка и нажмите Ok.
ПримечаниеYou can later change the material bound to the track in the Name field of the Track Info section: double-click the field and choose a material in the list.Позже вы можете изменить материал, привязанный к треку, в поле Name секции Track Info: дважды щелкните поле и выберите материал в списке.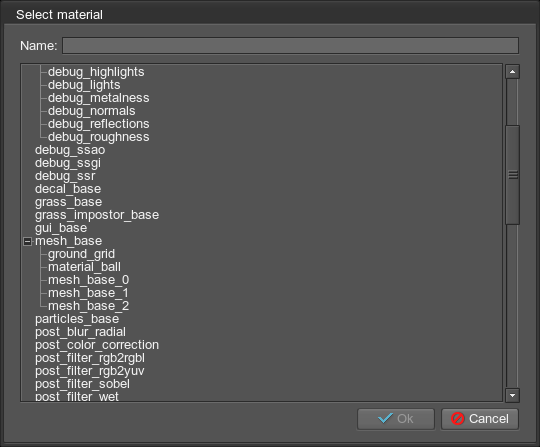
-
If the track animates a state, texture, or parameter of the material, specify its name in the State, Texture, or Parameter field of the Track Info section.Если трек анимирует состояние, текстуру или параметр материала, укажите его имя в поле State, Texture или Parameter секции Track Info.
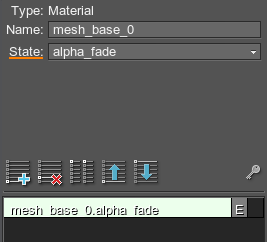 Track Info with State FieldИнформация о треке с полем состояния
 -
Compose a track by creating the required number of key frames:Создайте трек путем добавления необходимого количествя ключевых кадров:
- For one of the common material settings or stateToggle, double-click enables and disables the setting.Для одной из общих настроек материала или stateToggle двойной щелчок включает и отключает настройку.
For stateSwitch:Для stateSwitch:
- To set the 1st state value, set 0 as the track Value.Чтобы установить 1-е значение состояния, установите 0 в качестве Value.
- Track Value of 1 means the 2nd state value in the drop-down list. Value 1 для трека означает 2-е значение состояния в раскрывающемся списке.
- Track Value of 2 means the 3rd state value in the drop-down list, etc. Value 2 для трека означает 3-е значение состояния в раскрывающемся списке и т.д.
- For parameterSlider, set the Value.Для parameterSlider установите Значение .
- For parameterColor, pick a color.Для parameterColor выберите цвет.
- For textureImage, choose a file.Для textureImage выберите файл.
Property-Related TracksТреки, связанные со свойствами#
Property-related tracks allow you to change some property setting over time. Options, states, and parameters of a property can be animated. Such tracks need to be bound to some specific user property.Треки, связанные со свойствами, позволяют вам изменять некоторые настройки свойств с течением времени. Опции, состояния и параметры свойства можно анимировать. Такие треки должны быть привязаны к определенному пользовательскому свойству.
Creating a Property-Related TrackСоздание трека, связанного со свойством#
To create a property-related track, perform the following:Чтобы создать трек, связанный со свойством, выполните следующие действия:
- Click
 to add a track that will animate some parameter. The Add Parameter window will open.
Нажмите
  , чтобы добавить трек, который будет анимировать какой-либо параметр. Откроется окно Add Parameter.
Choose a property in the list and then choose a parameter that should be animated:Выберите свойство в списке, а затем выберите параметр, который необходимо анимировать:
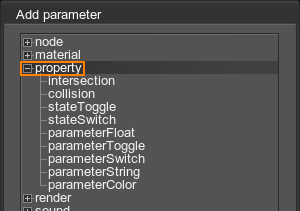
If the track should animate a parameter of the property, check the type of the target parameter and choose it from the list:Если трек должен анимировать параметр свойства, проверьте тип целевого параметра и выберите его из списка:
- For a parameter with a checkbox, select parameterToggle.Для параметра с флажком выберите parameterToggle.
- For a parameter with a drop-down list, select parameterSwitch.Для параметра с выпадающим списком выберите parameterSwitch.
- For a parameter with a slider, select parameterFloat.Для параметра с ползунком выберите parameterFloat.
- For a parameter with a text string, select parameterString.Для параметра с текстовой строкой выберите parameterString.
- For a parameter with a color picker, select parameterColor.Для параметра с палитрой цветов выберите parameterColor.
-
In the Select Property dialog window that opens, bind the track to a user property from the list and click Ok.В открывшемся диалоговом окне Select Property привяжите трек к пользовательскому свойству из списка и нажмите Ok.
ПримечаниеYou can later change the property bound to the track in the Name field of the Track Info section: double-click the field and choose a property in the list.Позже вы можете изменить свойство, привязанное к треку, в поле Name секции Track Info: дважды щелкните поле и выберите свойство в списке.
-
If the track animates a state or a parameter of the property, specify its name in the State, or Parameter field of the Track Info section.Если трек анимирует состояние или параметр свойства, укажите его имя в поле State или Parameter секции Track Info.
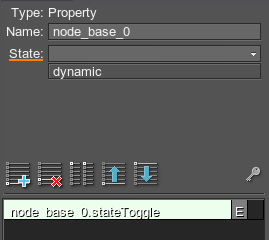 Track Info with State FieldИнформация о треке с полем состояния
 - Compose a track by creating the required number of key frames:
- For intersection, collision, stateToggle or parameterToggle, double-click to enable and disable the setting.For intersection, collision, stateToggle or parameterToggle, double-click to enable and disable the setting.
-
For stateSwitch or parameterSwitch:For stateSwitch or parameterSwitch:
- To set the 1st state or parameter value, set 0 as the track Value.To set the 1st state or parameter value, set 0 as the track Value.
- Track Value of 1 means the 2nd state or parameter value in the drop-down list.Track Value of 1 means the 2nd state or parameter value in the drop-down list.
- Track Value of 2 means the 3rd state or parameter value in the drop-down list, etc.Track Value of 2 means the 3rd state or parameter value in the drop-down list, etc.
- For parameterFloat, set the Value.For parameterFloat, set the Value.
- For parameterString, set a string.For parameterString, set a string.
- For parameterColor, pick a color.For parameterColor, pick a color.
- For intersection, collision, stateToggle or parameterToggle, double-click to enable and disable the setting.Для intersection, collision, stateToggle или parameterToggle дважды щелкните, чтобы включить или отключить параметр.
-
For stateSwitch or parameterSwitch:Для stateSwitch или parameterSwitch:
- To set the 1st state or parameter value, set 0 as the track Value.Чтобы установить 1-е состояние или значение параметра, установите 0 в качестве Value трека.
- Track Value of 1 means the 2nd state or parameter value in the drop-down list. Value 1 для трека означает 2-е состояние или значение параметра в раскрывающемся списке.
- Track Value of 2 means the 3rd state or parameter value in the drop-down list, etc. Value 2 для трека означает 3-е состояние или значение параметра в раскрывающемся списке и т.д.
- For parameterFloat, set the Value.Для parameterFloat установите Стоимость .
- For parameterString, set a string.Для parameterString установите строку.
- For parameterColor, pick a color.Для parameterColor выберите цвет.
Render-Related TracksТреки, связанные с рендерингом#
These tracks control render settings:Эти треки контролируют настройки рендера :
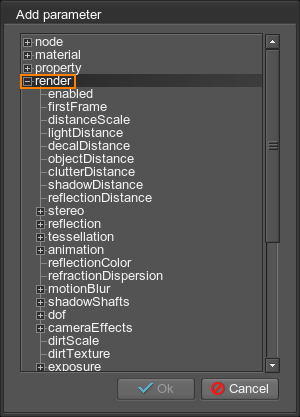
- Common settings.Общий настройки.
- Refraction dispersion for red, green, and blue channels.Преломление дисперсия для красного, зеленого и синего каналов.
- Stems and leaves animation settings.Настройки анимации стеблей и листьев.
- Amount of motion blur for moving physical bodies.Интенсивность эффекта Motion Blur для движущихся физических тел.
- Scene environment settings for each preset.Настройка окружающей среды для каждого пресета .
- Glare and specific camera effects such as exposure, tone mapping, bloom, cross flares, lens flares.Блики и специальные эффекты камеры, такие какэкспозиция ,тонмаппинг ,Bloom ,cross-flares , блики .
- DOF settings.Настройки DOF.
- Color correction settings.Настройкицветовой коррекции.
Render settings are applied to the screen image (i.e. all cameras both in the UnigineEditor and in the game).Настройки рендеринга применяются к изображению на экране (т.е. ко всем камерам как в UnigineEditor, так и в игре).
Also, a render-related track allows you to toggle rendering into the screen buffer on and off by using the enabled parameter, or to create smooth fade-in and fade-out effects by using the fadeColor parameter.Кроме того, трек, связанный с рендерингом, позволяет включать и выключать рендеринг в буфер экрана с помощью параметра enabled или создавать плавные эффекты появления и исчезновения с помощью параметра fadeColor.
Creating Fade-In and Fade-Out EffectsСоздание эффектов плавного появления и исчезновения#
To add fade-in or fade-out effects:Чтобы добавить эффекты плавного появления или исчезновения:
- Add a render -> fadeColor track.Добавьте трек render -> fadeColor.
- A key frame with 0 alpha will be automatically created.Ключевой кадр с альфа-каналом 0 будет создан автоматически.
- Double-click the created key. This color has 0 alpha value channel, which means it is absolutely transparent.Дважды щелкните созданный ключ. Этот цвет имеет альфа-канал 0, что означает, что он абсолютно прозрачен.
- Set alpha (A slider) to 255 to create a solid color (for example, black) and click Ok.Установите для альфы (ползунок A) значение 255, чтобы создать сплошной цвет (например, черный), и нажмите Ok.
- Double-click the track line to create another key frame. This color should have 0 alpha.Дважды щелкните линию трека, чтобы создать еще один ключевой кадр. Этот цвет должен иметь альфа-канал 0.
Key frame colors are smoothly interpolated from solid color to completely transparent one (revealing a screen image).Цвета ключевых кадров плавно интерполируются от сплошного цвета до полностью прозрачного (показывая изображение на экране).
- To create a fade-in effect, position a solid color key first and after that a transparent key frame.Чтобы создать эффект плавного исчезновения, поместите сначала ключ сплошного цвета, а затем ключевой кадр прозрачного цвета.
- To create a fade-out effect, position a transparent key frame first and after that a solid color key.Чтобы создать эффект плавного исчезновения, поместите сначала прозрачный ключевой кадр, а затем ключ сплошного цвета.
Sound-Related TracksЗвуковые треки#
These tracks control global sound settings that can be changed in the Sound section of the Settings window. The tracks also allow you to enable or disable the sounds in the scene and change its time scale. To create tracks for individual sound sources, use sound source parameters.Эти треки контролируют глобальные настройки звука это можно изменить в разделе Sound окна Settings. Треки также позволяют включать или отключать звуки в сцене и менять ее. шкала времени . Для создания треков для отдельных источников звука используйте параметры источников звука .
Creating a Sound-Related TrackСоздание звукового трека#
To create a sound-related track, perform the following:Чтобы создать звуковой трек, выполните следующие действия:
- Click
 to add a track that will animate some parameter. The Add Parameter window will open.Нажмите
  , чтобы добавить трек, которая будет анимировать какой-либо параметр. Откроется окно Add Parameter.
 -
Choose a sound in the list and then choose a parameter that should be animated:Выберите звук в списке, а затем выберите параметр, который необходимо анимировать:
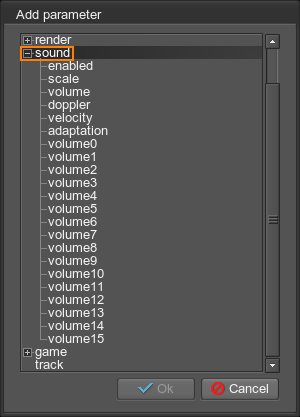
For example, to create a track that controls the volume of all sounds played in the world, choose the volume parameter. To switch on and off all sounds, choose the enable parameter.Например, чтобы создать трек, контролирующий громкость всех воспроизводимых в мире звуков, выберите параметр громкости . Чтобы включить или выключить все звуки, выберите параметр enable .
Game-Related TracksИгровые треки#
These tracks can be used to create and edit cut-scenes: switching between cameras, adding and changing postprocess effects.Эти треки можно использовать для создания и редактирования кат-сцен: переключения между камерами, добавления и изменения эффектов постобработки.
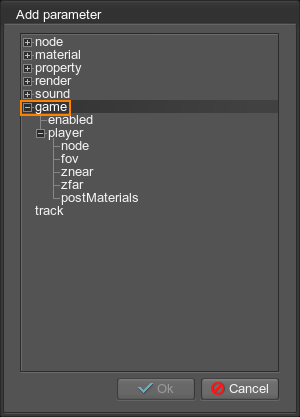
The common enabled parameter allows you to toggle the in-game camera on and off. The other parameters allow you to control the current in-game camera: choose a player used to render the screen image (the node parameter), change the FOV and the distance to the near/far clipping plane of the current player, animate postprocess materials.Общий параметр enabled позволяет включать и выключать внутриигровую камеру. Остальные параметры позволяют управлять текущей внутриигровой камерой: выбирать игрока, используемого для рендеринга изображения экрана (параметр node), изменять FOV и расстояние до ближней/дальней плоскости отсечения текущего игрока, анимировать материалы постобработки.
Switching Between CamerasПереключение между камерами#
To switch between the cameras that view the world in the game mode:Для переключения между камерами, смотрящими на мир в игровом режиме:
- Add the game -> player -> node track.Добавьте трек game -> player -> node.
- Double-click the track line to set the player to render the screen at the given time.Дважды щелкните линию трека, чтобы настроить проигрыватель на отображение экрана в заданное время.
- Choose one of the players on the list.Выберите одного из игроков в списке.
Changing Camera SettingsИзменение настроек камеры#
To set up players (change the field of view of cameras or their clipping plane distances), you can use one of the following ways:Для настройки камер (изменения угла обзора или расстояний до плоскостей отсечения) вы можете воспользоваться одним из следующих способов:
- Set up in-game player parameters. That is, they will be applied to the camera currently used in the game.Настройте внутриигровые параметры игрока. То есть они будут применены к камере, используемой в данный момент в игре.
- Set up player node parameters. These parameters control settings for each separate camera existing in the world.Настройте параметры ноды Player. Эти параметры управляют настройками для каждой отдельной камеры, существующей в мире.
Applying PostprocessesПрименение постпроцессов#
To apply postprocesses, you can choose one of the following ways:Для применения постобработки вы можете выбрать один из следующих способов:
- Add postprocesses for in-game player (the game -> player -> postMaterials track). When cameras are switched, the postprocess will still be applied to the current in-game camera.Добавьте постпроцессы для внутриигрового плеера (трек game -> player -> postMaterials). При переключении камер постобработка по-прежнему будет применяться к текущей внутриигровой камере.
- Add postprocesses via the render settings (the render -> postMaterials track). They are applied to the screen image (all cameras) and can be used together with players postprocess materials.Добавьте постпроцессы через настройки рендера (трек render -> postMaterials). Они применяются к экранному изображению (все камеры) и могут использоваться вместе с материалами постобработки плееров.
Track-Based TrackТрек на основе трека#
These tracks allow for convenient mixing between different complex tracks (i.e. saved *.track files with a number of tracks inside).Эти треки позволяют удобно микшировать разные сложные треки (например, сохраненные файлы *.track с несколькими треками внутри).
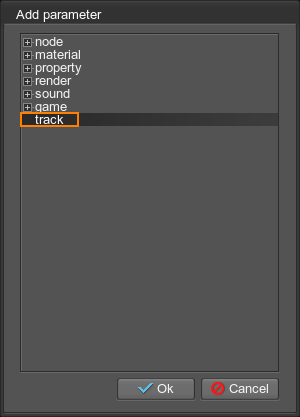
For example, if there are saved tracks files that control day-night shift and tracks that contain weather conditions (windy, cloudy and rainy weather, loading them as track tracks allow you to set the day time while controlling the amount of wind, rain, and cloudiness.Например, если есть сохраненные файлы треков, которые контролируют смену дня и ночи, и треки, которые содержат погодные условия (ветреная, облачная и дождливая погода), загрузка их в качестве треков треков позволяет установить дневное время, контролируя количество ветра, дождя, и облачность.
Mixing Different TracksМикширование разных треков#
- Add the track track.Добавьте трек track.
- Double-click the track line to create a key frame.Дважды щелкните линию трека, чтобы создать ключевой кадр.
- Choose a *.track file to load.Выберите файл *.track для загрузки.
-
Adjust the Time line of the track:Настройте шкалу трека Time:
- Double-click the Time line to create a key frame and set Time = 0 and Value = 0, so that all tracks will be played from the beginning.Дважды щелкните шкалу Time, чтобы создать ключевой кадр, и установите Time = 0 и Value = 0, чтобы все треки воспроизводились с начала.
- Create another key frame on the Time line with Time = 20 and Value = 20. Thus on the 20th time unit of the track, all internal tracks will also be at their 20th time unit.Создайте еще один ключевой кадр на временной шкале с Time = 20 и Value = 20. Таким образом, на 20-й отметке времени трека все внутренние треки также будут на своей 20-й отметке времени.
- Add another track track, load a *.track file for it and adjust the Time line as described above.Добавьте еще один трек track, загрузите для него файл *.track и настройте шкалу Time, как описано выше.
-
Adjust the Weight line of both tracks to specify when the first track is to be played and when the second track: double-click the Weight line to add its weight.Отрегулируйте шкалу Weight обоих треков, чтобы указать, когда должен воспроизводиться первый трек и когда второй: дважды щелкните шкалу Weight, чтобы добавить вес.
ПримечаниеTo create, for example, smooth transition between tracks, use weights to indicate when the track is played and when it is stopped.Чтобы создать, например, плавный переход между треками, используйте веса, чтобы указать, когда трек воспроизводится и когда он останавливается.
Информация, представленная на данной странице, актуальна для версии UNIGINE 2.20 SDK.
