Управление окнами
UNIGINE provides an advanced toolkit simplifying development of various visual tools, with a large number of widgets and capabilities.UNIGINE предоставляет расширенный набор инструментов, упрощающий разработку различных визуальных инструментов, с большим количеством виджетов и возможностей.
You can easily create and adjust window viewports and window groups, control their behavior and rendering order, stack them, handle events, check window intersections, and so on via API:Вы можете легко создавать и настраивать видовые экраны и группы окон, управлять их поведением и порядком рендеринга, стыковать их, обрабатывать события, проверять пересечения окон и так далее с помощью API:
- All window management operations are performed via the WindowManager class, enabling you to access any application window, group or stack windows, create various dialogs, and so on.Все операции по управлению окнами выполняются с помощью класса WindowManager, что позволяет вам получать доступ к любому окну приложения, группировать окна или стекировать их, создавать различные диалоговые окна и так далее.
- Window components, relations with other windows, size, position, order, window events and intersections are managed by the base EngineWindow class.Компоненты окна, взаимосвязь с другими окнами, размер, положение, порядок, события окна и пересечения управляются базовым классом EngineWindow.
- For window viewport creation, the EngineWindowViewport class is used. It inherits from EngineWindow class and allows managing window viewports: setting cameras, specifying engine tools available (console, profiler, visualizer, etc.), adding widgets to the client area.Для создания видового экрана окна используется класс EngineWindowViewport. Он наследуется от класса EngineWindow и позволяет управлять видовыми экранами окон: настраивать камеры, указывать доступные инструменты движка (консоль, профилировщик, визуализатор и т. д.), добавлять виджеты в клиентскую область.
- For window groups, there is the EngineWindowGroup class. It also inherits from EngineWindow class and allows implementing custom grouping logic.Для групп окон существует класс EngineWindowGroup. Он также наследуется от класса EngineWindow и позволяет реализовать пользовательскую логику группировки.
- Both a window viewport and a window group are engine windows.Как окно просмотра, так и группа окон являются окнами движка.
- Usually the engine windows stay available during the whole UNIGINE Engine runtime, so their creation and management should be implemented as a part of the System Logic.Обычно окна движка остаются доступными в течение всего времени выполнения UNIGINE Engine, поэтому их создание и управление должны быть реализованы как часть системной логики.
See AlsoСмотрите также#
- A set of SDK samples (samples/Api/WindowManager) demonstrating various usage aspects.Набор примеров SDK (samples/Api/WindowManager), демонстрирующих различные аспекты использования.
Creating a Window ViewportСоздание видового экрана окна#
To create the engine window viewport, one of the EngineWindowViewport class constructors is used.Для создания окна просмотра движка используется один из конструкторов класса EngineWindowViewport.
// create a window viewport of the specified size with the specified name
EngineWindowViewportPtr window = EngineWindowViewport::create("New Window", 580, 300);
// create the main window viewport of the specified size
EngineWindowViewportPtr main_window = EngineWindowViewport::create("Main Window", 580, 300, EngineWindow::FLAGS_MAIN);
When the window viewport is created, you can change its settings: specify the engine tools available, set the viewport as the main one, specify the camera the image from which is rendered into the viewport, and so on. All these operations are provided by the EngineWindowViewport class. For example:Когда окно просмотра создано, вы можете изменить его настройки: указать доступные инструменты движка, установить окно просмотра в качестве основного, указать камеру, изображение с которой выводится в окно просмотра, и так далее. Все эти операции предоставляются классом EngineWindowViewport. Например:
// set a window size
window->setSize(Math::ivec2(580, 300));

// enable the console, profiler and visualizer for the window
window->setConsoleUsage(true);
window->setProfilerUsage(true);
window->setVisualizerUsage(true);
You can also add widgets to the client area of the window:Вы также можете добавить виджеты в клиентскую область окна:
// add widgets to the client area of the window
window->addChild(WidgetLabel::create(window->getSelfGui(), String::format("This is %s window.", window->getTitle())));
window->addChild(WidgetButton::create(window->getSelfGui(), window->getTitle()), Gui::ALIGN_CENTER);To control window components, its behaviour, visual representaion, and style, use the EngineWindow class functionality. The corresponding article contains short samples that cover most of the available functions.Чтобы управлять компонентами окна, его поведением, визуальным представлением и стилем, используйте функциональность класса EngineWindow. Соответствующая статья содержит краткие примеры, которые охватывают большинство доступных функций.
Also UNIGINE SDK provides a set of samples (source/samples/Api/WindowManager) that allow you to try all settings in action. For example, in the WindowSandbox sample, you can create a window viewport and adjust it.Также UNIGINE SDK предоставляет набор примеров (source/samples/Api/WindowManager), которые позволяют вам попробовать все настройки в действии. Например, в примере WindowSandbox вы можете создать окно просмотра и настроить его.
Creating a Window GroupСоздание группы окон#
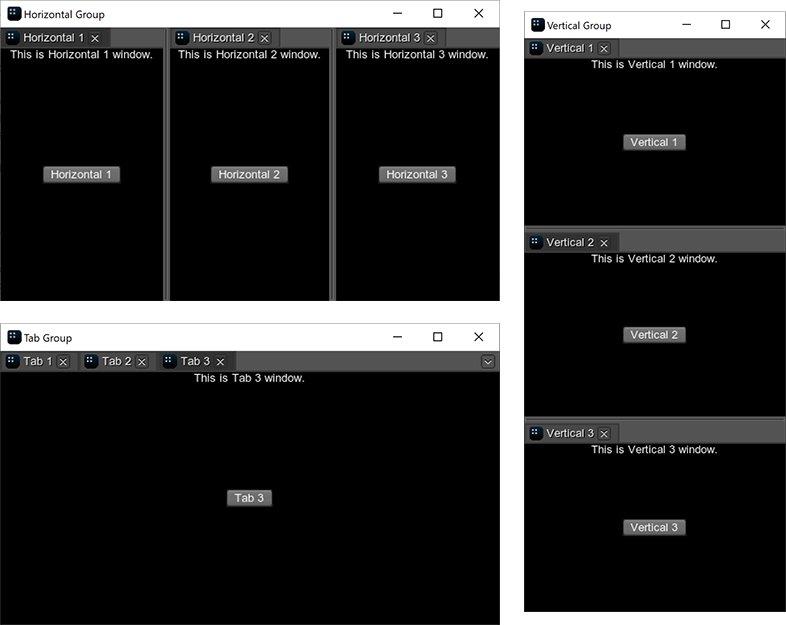
When the engine windows are grouped, a new window containing these windows is created. This new window is called a group, and the windows in the group - nested. The number of windows in the group is unlimited. Moreover, you can group both the separate engine windows and the existing window groups.Когда окна движка сгруппированы, создается новое окно, содержащее эти окна. Это новое окно называется группой, а окна в группе — вложенными. Количество окон в группе не ограничено. Более того, вы можете сгруппировать как отдельные окна движка, так и существующие группы окон.
There are three types of the window groups:Существует три типа групп окон:
- VerticalВертикальный
- HorizontalГоризонтальный
- Group of tabsГруппа вкладок
Within the group, all windows are stacked according to one of these types.Внутри группы все окна сгруппированы в соответствии с одним из этих типов.
Grouping via CodeГруппировка с помощью кода#
A window group is an instance of the EngineWindowGroup class that can be created in one of the following ways:Группа окон — это экземпляр класса EngineWindowGroup, который может быть создан одним из следующих способов:
-
You can create an empty group using one of the EngineWindowGroup class constructors and then add windows or other groups to it.Вы можете создать пустую группу, используя один из конструкторов класса EngineWindowGroup, а затем добавить в нее windows или другие группы.
Исходный код (C++)// create window viewports EngineWindowViewportPtr horizontal_1 = EngineWindowViewport::create("Horizontal 1", 580, 300); EngineWindowViewportPtr horizontal_2 = EngineWindowViewport::create("Horizontal 2", 580, 300); EngineWindowViewportPtr horizontal_3 = EngineWindowViewport::create("Horizontal 3", 580, 300); // create a horizontal window group EngineWindowGroupPtr horizontal_group = EngineWindowGroup::create(EngineWindowGroup::GROUP_TYPE_HORIZONTAL, "Horizontal Group", 565, 310); // add previously created windows to the group horizontal_group->add(horizontal_1); horizontal_group->add(horizontal_2); horizontal_group->add(horizontal_3);ПримечаниеThis approach implies that you implement custom grouping and ungrouping logic: check if the windows can be nested or produce a group, set the automatic deletion mode, and so on. The EngineWindow and EngineWindowGroup classes provide the required funtionality for controlling the engine windows stacking.Этот подход подразумевает, что вы реализуете пользовательскую логику группировки и разгруппировки: проверяете, могут ли окна быть вложенными или создавать группу, устанавливаете режим автоматического удаления и так далее. Классы EngineWindow и EngineWindowGroup обеспечивают необходимую функциональность для управления стыковкой окон движка. - You can stack windows using WindowManager class functionality. In this case, the manager will automatically validate windows before adding them to the group and manage the group after removing a window from it.Вы можете стыковать окна, используя функциональность класса WindowManager. В этом случае менеджер автоматически проверит окна перед добавлением их в группу и будет управлять группой после удаления из нее окна.
When the window group is created, you can adjust its elements: set titles and icons for tabs, change its width or height, adjust separators. All these operations are provided by the EngineWindowGroup class.Когда группа окон создана, вы можете настроить ее элементы: установить заголовки и значки для вкладок, изменить ее ширину или высоту, настроить разделители. Все эти операции предоставляются классом EngineWindowGroup.
For example, to change the first tab in the group, you can do the following:Например, чтобы изменить первую вкладку в группе, вы можете выполнить следующее:
// set a new tab name and icon
horizontal_group->setTabTitle(0, "New tab name");
horizontal_group->setTabIcon(0,"icons/tab_icon.jpg");
// change the tab width
horizontal_group->setHorizontalTabWidth(0, 10);
// update the position of the first tab separator
horizontal_group->setSeparatorPosition(0, 200);
UNIGINE SDK provides several samples (source/samples/Api/WindowManager) on the window groups: you can check different group types in the GroupTypes sample or create a new window group and try to adjust it in the WindowSandbox sample. Also the article on the EngineWindowGroup class contains short samples demonstrating the available functions.UNIGINE SDK предоставляет несколько примеров (source/samples/Api/WindowManager) для групп окон: вы можете проверить различные типы групп в примере GroupTypes или создать новую группу окон и попытаться настроить ее в примере WindowSandbox. Также статья о классе EngineWindowGroup содержит краткие примеры, демонстрирующие доступные функции.
Grouping Using the MouseГруппировка с помощью мыши#
While the application is running, you can group and ungroup the existing windows by using the mouse.Пока приложение запущено, вы можете группировать и разгруппировывать существующие окна с помощью мыши.
To group two separate windows, do the following:Чтобы сгруппировать два отдельных окна, выполните следующие действия:
- Hold the mouse button while moving the window to the destination one. The destination window will be divided into 9 sectors.Удерживая нажатой кнопку мыши, перемещайте окно в нужное место. Окно назначения будет разделено на 9 секторов.
- Choose the required sector and release the mouse button — the windows will be grouped.Выберите нужный сектор и отпустите кнопку мыши — окна будут сгруппированы.
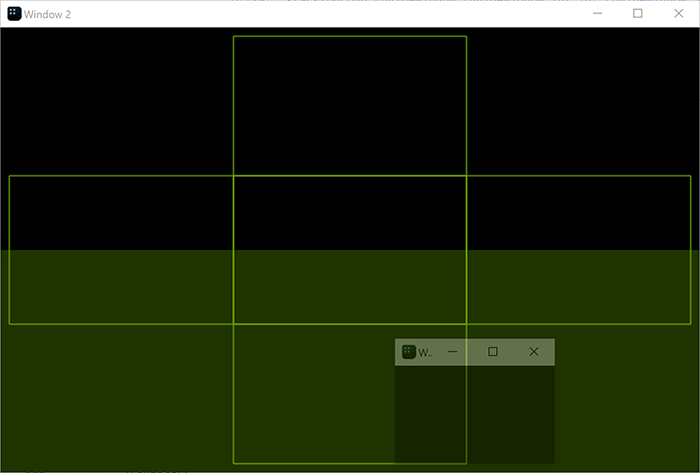
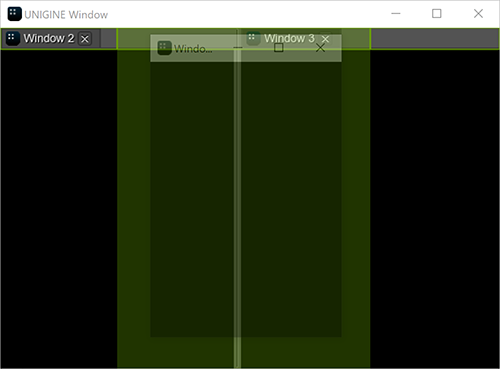
To add the window to the existing group, you should hold the mouse button while moving the window and release it in one of the following areas:Чтобы добавить окно в существующую группу, вам следует удерживать кнопку мыши при перемещении окна и отпустить ее в одной из следующих областей:
-
For the horizontal group:Для горизонтальной группы:
-
For the vertical group:Для вертикальной группы:
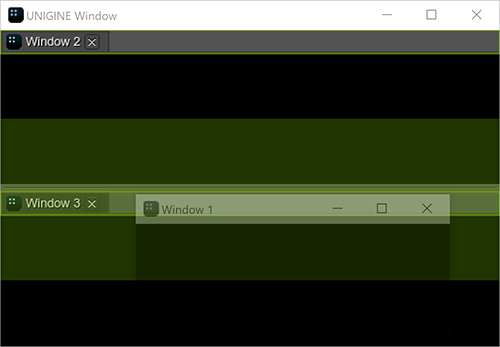
-
For the group of tabs:Для группы вкладок:
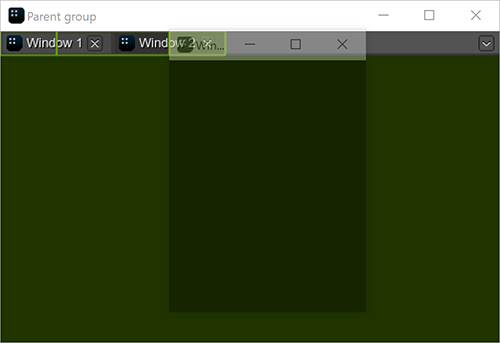
To ungroup the window, move it outside the group by dragging the title bar.Чтобы разгруппировать окно, переместите его за пределы группы, перетащив строку заголовка.
Accessing WindowsДоступ к окнам#
The engine window can be accessed via the getWindow() function of the WindowManager class.Доступ к окну движка можно получить с помощью функции getWindow() класса WindowManager.
// get the number of windows
int num = WindowManager::getNumWindows();
// check each window
for (int i = 0; i < num; i++)
{
	// get the window with the current index
	EngineWindowPtr window = WindowManager::getWindow(i);
	// change its position and size if it is main
	if (window->isMain())
	{
		window->setPosition(Math::ivec2(1020, 60));
		window->setSize(Math::ivec2(305, 670));
	}
}
There are also some functions (like getMainWindow()) that allow accessing the specific windows (the main, focused, fullscreen window and so on). For example:Существуют также некоторые функции (например, getMainWindow()), которые позволяют получать доступ к определенным окнам (основное окно, окно в фокусе, полноэкранное окно и так далее). Например:
// get the main window
EngineWindowPtr main_window = WindowManager::getMainWindow();
// change its position and size
if (main_window)
{
	main_window->setPosition(Math::ivec2(1020, 60));
	main_window->setSize(Math::ivec2(305, 670));
}
Managing Window GroupsУправление группами окон#
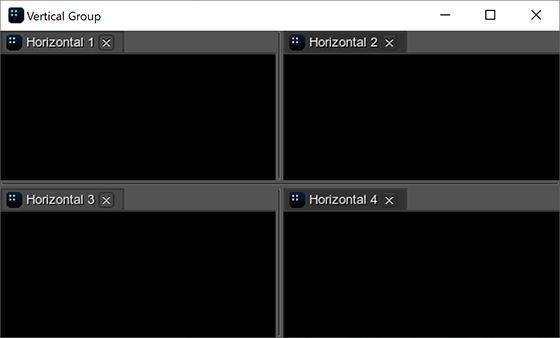
As it was mentioned above, you can implement custom logic for grouping and ungrouping windows or use functionality provided by the WindowManager class. Here we will consider the latter.Как было упомянуто выше, вы можете реализовать пользовательскую логику для группировки и разгруппировки окон или использовать функциональность, предоставляемую классом WindowManager. Здесь мы рассмотрим последнее.
In the WindowManager class, there are two main functions for grouping windows:В классе WindowManager есть две основные функции для группировки окон:
- WindowManager::stack() creates a group of two windows.WindowManager::stack() создает группу из двух окон.
- WindowManager::stackGroups() creates a group of two window groups.WindowManager::stackGroups() создает группу из двух групп окон.
// create separate windows
EngineWindowViewportPtr horizontal_1 = EngineWindowViewport::create("Horizontal 1", 512, 256);
EngineWindowViewportPtr horizontal_2 = EngineWindowViewport::create("Horizontal 2", 512, 256);
EngineWindowViewportPtr horizontal_3 = EngineWindowViewport::create("Horizontal 3", 512, 256);
EngineWindowViewportPtr horizontal_4 = EngineWindowViewport::create("Horizontal 4", 512, 256);

// create 2 horizontal window groups
EngineWindowGroupPtr horizontal_group_1 = WindowManager::stack(horizontal_1, horizontal_2, 1, EngineWindowGroup::GROUP_TYPE_HORIZONTAL);
EngineWindowGroupPtr horizontal_group_2 = WindowManager::stack(horizontal_3, horizontal_4, 1, EngineWindowGroup::GROUP_TYPE_HORIZONTAL);
// create a vertical group of 2 horizontal groups
EngineWindowGroupPtr vertical_group = WindowManager::stackGroups(horizontal_group_1, horizontal_group_2, EngineWindowGroup::GROUP_TYPE_VERTICAL);
// specify position, size, title of the verical window group
vertical_group->setPosition(Math::ivec2(50, 60));
vertical_group->setSize(Math::ivec2(565, 310));
vertical_group->setTitle("Vertical Group");
// render the window group
vertical_group->show();
Each window or window group has a state, so it changes after stacking.Каждое окно или группа окон имеет состояние, поэтому оно изменяется после стыковки.
There are also functions based on the stack() function that should be used in specific cases to avoid additional checking of arguments:Существуют также функции, основанные на функции stack(), которые следует использовать в конкретных случаях, чтобы избежать дополнительной проверки аргументов:
-
WindowManager::stackToParentGroup() stacks the second window to the parent group of the first window. In the result, both windows passed as arguments will be on the same level in the group hierarchy.WindowManager::stackToParentGroup() помещает второе окно в родительскую группу первого окна. В результате оба окна, переданные в качестве аргументов, будут находиться на одном уровне в иерархии групп.
Исходный код (C++)// stack 2 separate windows EngineWindowGroupPtr group_0 = WindowManager::stackWindows(window_1, window_2, EngineWindowGroup::GROUP_TYPE_HORIZONTAL); // stack a separate window to the parent group of "window_1" WindowManager::stackToParentGroup(window_1,window_3);
-
WindowManager::stackWithWindow() stacks the window to the other window. If the first argument is the separate window, a new window group is returned. If the first argument is the nested window, the window is added to its group.WindowManager::stackWithWindow() стыкует одно окно с другим. Если первым аргументом является отдельное окно, возвращается новая группа окон. Если первым аргументом является вложенное окно, то окно добавляется в эту группу.
Исходный код (C++)// create a group of 2 windows EngineWindowGroupPtr group_1 = WindowManager::stack(window_1, window_2, 1, EngineWindowGroup::GROUP_TYPE_HORIZONTAL); // stack a separate window to the window from the window group WindowManager::stackToWindow(window_1, window_3, EngineWindowGroup::GROUP_TYPE_VERTICAL);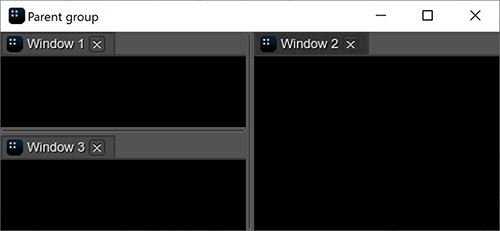
- WindowManager::stackWindows() creates a group of the separate/nested windows. The windows are stacked in the default order.WindowManager::stackWindows() создает группу отдельных/вложенных окон. Окна расположены в порядке, установленном по умолчанию.
- WindowManager::stackToGroup() stacks the window or window group to another window group.WindowManager::stackToGroup() помещает окно или группу окон в другую группу окон.
For ungrouping, the WindowManager::unstack() function is used: it removes the window or the window group from the parent group. If only one window remains in the group, it is automatically removed from the group and the group is deleted.Для разгруппировки используется функция WindowManager::unstack(): она удаляет окно или группу окон из родительской группы. Если в группе остается только одно окно, оно автоматически удаляется из группы, а сама группа удаляется.
Working with DialogsРабота с диалоговыми окнами#
To create a dialog window, use the corresponding functions of the class. For example:Чтобы создать диалоговое окно, используйте соответствующие функции класса. Например:
// event handler function
int AppSystemLogic::onButtonClicked()
{
	// show the message dialog
	WindowManager::dialogMessage("Message", "The button has been pressed.");

	return 1;

}

int AppSystemLogic::init()
{
	// create a window with widgets in the client area
	auto create_window = [](const char *name)
	{
		EngineWindowPtr window = EngineWindow::create(name, 512, 256);

		window->addChild(WidgetLabel::create(window->getSelfGui(), String::format("This is a {0}.", name)), Gui::ALIGN_TOP);
		window->addChild(WidgetButton::create(window->getSelfGui(), name), Gui::ALIGN_CENTER);

		return window;

	};

	{
		// create a window
		EngineWindowPtr window = create_window("Window");
		// get the child widget of the window
		WidgetPtr button = window->getChild(1);
		// add a callback for this widget
		button->addCallback(Gui::CLICKED, MakeCallback(this, &AppSystemLogic::onButtonClicked));
		// show the window
		window->setPosition(Math::ivec2(50, 60));
		window->show();
	}

	return 1;

}
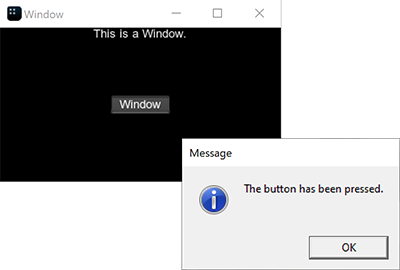
If you press the button in the client area of the created window, the following dialog will be shown:Если вы нажмете кнопку в клиентской области созданного окна, будет показано следующее диалоговое окно:
