Абстрактные материалы
To simplify shaders programming and hide the implementation complexity of various features, Abstract Materials were added. Like abstract classes in object-oriented programming, they serve as a template definition of certain parameters and functionality.Чтобы упростить программирование шейдеров и скрыть сложность реализации различных фич, были добавлены Абстрактные материалы. Подобно абстрактным классам в объектно-ориентированном программировании, они служат шаблоном определения определенных параметров и функций.
An abstract material itself cannot be assigned to objects, it is used to inherit other abstract and base materials from it, extending its functionality, which gives you a lot of flexibility.Сам абстрактный материал не может быть назначен объектам, он используется для наследования от него других абстрактных и базовых материалов, расширяя его функциональность, что дает вам большую гибкость.
You can create your own custom abstract material or use the ones provided "out of the box" Mesh / Mesh Transparent /Mesh Unlit with or without tessellation to create a custom base material.Вы можете создать свой собственный абстрактный материал или использовать готовые Mesh / Mesh Transparent /Mesh Unlit с тесселяцией или без нее для создания собственного базового материала.
Inheritance and OverrideНаследование и переопределение#
By inheriting from an abstract material you can override any values and add some other components to the child material:Наследуя от абстрактного материала, вы можете переопределить любые значения и добавить некоторые другие компоненты к дочернему материалу:
AbstractMaterial A
{
		Slider t = 0.5
}

BaseMaterial B <parent = A>
{
		Slider t = 1.0
		Slider t2 = 2.0
}When the child material implements the shader with the same name, the source code of the parent and the child shader is merged (the parent shader code precedes the child one):Когда дочерний материал реализует одноименный шейдер, происходит слияние исходного кода родительского и дочернего шейдера (код родительского шейдера предшествует дочернему):
AbstractMaterial A
{
		Shader example =
		#{
				// A_fragment
		}#
}

AbstractMaterial B <parent = A>
{
		Shader example =
		#{
				// B_fragment
		}#
}

// the result example shader for the abstract material B will look like this:
Shader example =
#{
		// A_fragment
		// B_fragment
#}
You can expand and include the code of another shader by using inheritance and the marker #shader shader_name.Вы можете расширить и включить код другого шейдера, используя наследование и маркер #shader shader_name.
AbstractMaterial A
{
		// including the different shader code
		Shader a =
		#{
				// shader code A
				#shader b
		}#

		Shader b =
		#{
				// shader code B1
		}#
}

AbstractMaterial B <parent = A>
{
		// expanding the parent shader code
		Shader b =
		#{
				// shader code B2
		}#
}

// the resulting example shader for the abstract material B will look like this:
Shader a =
#{
		// shader code A
		// shader code B1
		// shader code B2
#}
The same rules apply to the Script code (use #script script_name as a marker).Те же правила применяются к Скрипт код (используйте #script script_name в качестве маркера).
Elements in parent and child materials' Groups with the same name can be merged. Both groups should have the merge_group argument set to true. The first group entry defines the place in the Editor’s UI where all the elements of this group are positioned (parent and child):Элементы в родительских и дочерних материалах Группы с тем же именем могут быть объединены. Обе группы должны иметь аргумент merge_group, установленный на true. Первая запись группы определяет место в пользовательском интерфейсе редактора, где расположены все элементы этой группы (родительский и дочерний):
AbstractMaterial A
{
		Group A1
		{
				Slider T1

				Group example <merge_group=true>
				{
					   Slider T2
				}
		}
}

BaseMaterial B <parent = A>
{
		Group B1
		{
				Slider T3

				Group example <merge_group=true>
				{
					   Slider T4
				}
		}
}

// the result grouping for the BaseMaterial B will look like this ("example" in the BaseMaterial B is merged with the parent example group):
Group A1
{
		Slider T1

		Group example
		{
			   Slider T2
			   Slider T4
		}
}

Group B1
{
		Slider T3
}Comparison with Traditional Base Material logicСравнение с традиционной логикой базового материала#
Abstract materials generalize internal logic and provide the simplified input and output interface for derived base materials. The traditional approach involves a lot of repetitive work to create materials with different shading for the same types of objects. Therefore it is recommended to use the abstract and base material mix. See the following examples that help achieve the same modified SSAO effect.Абстрактные материалы обобщают внутреннюю логику и обеспечивают упрощенный интерфейс ввода и вывода для производных базовых материалов. Традиционный подход включает в себя много повторяющейся работы по созданию материалов с разными оттенками для одних и тех же типов объектов. Поэтому рекомендуется использовать смесь абстрактного и базового материала. См. следующие примеры, которые помогают добиться такого же модифицированного эффекта SSAO.
Combination of Abstract and Base MaterialСочетание абстрактного и базового материала#
This example demonstrates how the Abstract and the Base Material are combined.Этот пример демонстрирует, как объединяются абстрактный и базовый материалы.
my_abstract.abstmat
AbstractMaterial <preview_hidden=true var_prefix=var texture_prefix=tex>
{
	Texture2D color <source=procedural>

	Shader base_shader=
	#{
		#include <core/materials/shaders/render/common.h>

		STRUCT_FRAG_BEGIN
			INIT_COLOR(float4)
		STRUCT_FRAG_END

		#shader common

		MAIN_FRAG_BEGIN(FRAGMENT_IN)
			#shader fragment
		MAIN_FRAG_END
	#}

	Pass post
	{
		Fragment=base_shader
	}

	Expression RENDER_CALLBACK_END_POST_MATERIALS=
	#{
		Texture source = engine.render.getTemporaryTexture(engine.render_state.getScreenColorTexture());

		source.copy(engine.render_state.getScreenColorTexture());
		setTexture("color", source);
		renderPassToTexture("post", engine.render_state.getScreenColorTexture());

		engine.render.releaseTemporaryTexture(source);
	#}
}
my_base.basemat
BaseMaterial <parent=my_abstract>
{
	Texture2D normal <source=gbuffer_normal>
	Texture2D scene_depth <source=current_depth>
	Texture2D modulation = "core/textures/common/checker_d.dds"
	Texture2D <source=ssao>

	Slider global_scale = 2

	Shader common=
	#{
		float3 triplanar_sample(float2 uv, float depth_in)
		{
			float3 normal_ws = mul3(s_imodelview, unpackGBufferNormal(TEXTURE(tex_normal, uv).rgb));
			float3 position_ws = s_camera_position + mul3(s_imodelview, nativeDepthToPositionVS(depth_in, uv));

			float4 texcoord = position_ws.xyyz * var_global_scale;
			float3 weight = triplanarWeightFast(normal_ws, 0.5f);

			return TEXTURE_TRIPLANAR(tex_modulation, texcoord, weight).rgb;
		}

		float4 final(float2 uv, float depth_in)
		{
			float4 base = TEXTURE(tex_color, uv);
			float ssao = TEXTURE(tex_ssao, uv).r;

			float3 effect = triplanar_sample(uv, depth_in);
			return float4(lerp(base.rgb * effect, base.rgb, ssao), base.a);
		}
	#}

	Shader fragment=
	#{
		float depth = TEXTURE(tex_scene_depth, IN_UV).r;
		if (depth == 0.0f || depth == 1.0f)
			discard;

		OUT_COLOR = final(IN_UV, depth);
	#}
}
Only Base MaterialТолько основной материал#
This example demonstrates the same use case as above but using Base Material only.Этот пример демонстрирует тот же вариант использования, что и над но с использованием только базового материала.
my_single_base.basemat
BaseMaterial <preview_hidden=true var_prefix=var texture_prefix=tex>
{
	Texture2D color <source=procedural>
	Texture2D normal <source=gbuffer_normal>
	Texture2D scene_depth <source=current_depth>
	Texture2D modulation = "core/textures/common/checker_d.dds"
	Texture2D <source=ssao>

	Slider global_scale = 2

	Shader base_shader=
	#{
		#include <core/materials/shaders/render/common.h>

		STRUCT_FRAG_BEGIN
			INIT_COLOR(float4)
		STRUCT_FRAG_END

		float3 triplanar_sample(float2 uv, float depth_in)
		{
			float3 normal_ws = mul3(s_imodelview, unpackGBufferNormal(TEXTURE(tex_normal, uv).rgb));
			float3 position_ws = s_camera_position + mul3(s_imodelview, nativeDepthToPositionVS(depth_in, uv));

			float4 texcoord = position_ws.xyyz * var_global_scale;
			float3 weight = triplanarWeightFast(normal_ws, 0.5f);

			return TEXTURE_TRIPLANAR(tex_modulation, texcoord, weight).rgb;
		}

		float4 final(float2 uv, float depth_in)
		{
			float4 base = TEXTURE(tex_color, uv);
			float ssao = TEXTURE(tex_ssao, uv).r;

			float3 effect = triplanar_sample(uv, depth_in);
			return float4(lerp(effect, base.rgb, ssao), base.a);
		}

		MAIN_FRAG_BEGIN(FRAGMENT_IN)
			float depth = TEXTURE(tex_scene_depth, IN_UV).r;
			if (depth == 0.0f || depth == 1.0f)
				discard;

			OUT_COLOR = final(IN_UV, depth);
		MAIN_FRAG_END
	#}

	Pass post
	{
		Fragment=base_shader
	}

	Expression RENDER_CALLBACK_END_POST_MATERIALS=
	#{
		Texture source = engine.render.getTemporaryTexture(engine.render_state.getScreenColorTexture());

		source.copy(engine.render_state.getScreenColorTexture());
		setTexture("color", source);
		renderPassToTexture("post", engine.render_state.getScreenColorTexture());

		engine.render.releaseTemporaryTexture(source);
	#}
}
Creating And Using Your Own MaterialСоздание и использование собственного материала#
Let's create a material from scratch. For this example, we will go with a basic abstract material for post process effects.Давайте создадим материал с нуля. В этом примере мы возьмем базовый абстрактный материал для эффектов постобработки.
1. Creating a Parent Abstract Material1. Создание родительского абстрактного материала#
Create a new text file with the *.abstmat extension. The file name is used as material name, let's call it my_abstract.Создайте новый текстовый файл с расширением *.abstmat. В качестве имени материала используется имя файла, назовем его my_abstract.
The abstract material contains all basic parameters that are inherited by all child materials, as well as basic shader code. These basic things are declared as follows:Абстрактный материал содержит все основные параметры, которые наследуются всеми дочерними материалами, а также базовый код шейдера. Эти основные вещи объявляются следующим образом:
AbstractMaterial <preview_hidden=true var_prefix=var texture_prefix=tex>
{

	// Let's add a screen texture, we will use it later in BaseMaterial
	Texture2D color <source=procedural>


	// Here comes the core of our fragment shader:
	Shader base_shader= // Declare the shader node for further use
	#{
		#include <core/materials/shaders/render/common.h> //Base UUSL include

		// We render to a single texture with 4 channels
		STRUCT_FRAG_BEGIN
			INIT_COLOR(float4)
		STRUCT_FRAG_END

		// Here we'll add code from inherited materials
		#shader common

		// Declare the main fragment function
		MAIN_FRAG_BEGIN(FRAGMENT_IN)
			// Here we'll add code from inherited materials
			#shader fragment
		MAIN_FRAG_END
	#}
}
Now we need to add a rendering pass because a single shader doesn't render anything by itself. As we're implementing a post-effect material, we should add the post pass and specify shaders to be used for it (we'll use our base_shader as a fragment shader).Теперь нам нужно добавить проход рендеринга, потому что один шейдер сам по себе ничего не рендерит. Поскольку мы реализуем материал пост-эффекта, мы должны добавить проход post и указать шейдеры, которые будут использоваться для него (мы будем использовать наш base_shader как фрагментный шейдер).
Pass post

{
	Fragment=base_shader
}
UNIGINE supports the Scriptable Materials functionality enabling you to execute expressions (fragments of code) at certain stages of the rendering sequence, and we are going to use it.UNIGINE поддерживает Скриптовые материалы функциональность, позволяющая выполнять выражения (фрагменты кода) на определенных этапах последовательность рендеринга , и мы собираемся использовать его.
// Let's subscribe our USC expression to render callback after all Engine's post-effects
Expression RENDER_CALLBACK_END_POST_MATERIALS=
#{
	// Make a copy of the screen texture
	Texture source = engine.render.getTemporaryTexture(engine.render_state.getScreenColorTexture());
	source.copy(engine.render_state.getScreenColorTexture());

	// Set it as the source texture for the post-effect
	setTexture("color", source);

	// Render the pass "post" directly to the screen
	renderPassToTexture("post", engine.render_state.getScreenColorTexture());

	// Since we won't use a newly requested texture, we can tell the engine that anyone else can use it.
	engine.render.releaseTemporaryTexture(source);
#}
Putting it all together we get the complete code of our abstract material that you can copy and paste to your text editor and save it as my_abstract.abstmat file to your project's data folder:Собрав все вместе, мы получаем полный код нашего абстрактного материала, который вы можете скопировать и вставить в свой текстовый редактор и сохранить как файл my_abstract.abstmat в папке data вашего проекта:
my_abstract_base1.basemat
AbstractMaterial <preview_hidden=true var_prefix=var texture_prefix=tex>
{

	// Let's add a screen texture, we will use it later in BaseMaterial
	Texture2D color <source=procedural>


	// Here comes the core of our fragment shader:
	Shader base_shader= // Declare the shader node for further use
	#{
		#include <core/materials/shaders/render/common.h> //Base UUSL include

		// We render to a single texture with 4 channels
		STRUCT_FRAG_BEGIN
			INIT_COLOR(float4)
		STRUCT_FRAG_END

		// Here we'll add code from inherited materials
		#shader common

		// Declare the main fragment function
		MAIN_FRAG_BEGIN(FRAGMENT_IN)
			// Here we'll add code from inherited materials
			#shader fragment
		MAIN_FRAG_END
	#}

	// Adding a post pass to render our effect
	Pass post

	{
		Fragment=base_shader
	}

	// Let's subscribe our USC expression to render callback after all Engine's post-effects
	Expression RENDER_CALLBACK_END_POST_MATERIALS=
	#{
		// Make a copy of the screen texture
		Texture source = engine.render.getTemporaryTexture(engine.render_state.getScreenColorTexture());
		source.copy(engine.render_state.getScreenColorTexture());

		// Set it as the source texture for the post-effect
		setTexture("color", source);

		// Render the pass "post" directly to the screen
		renderPassToTexture("post", engine.render_state.getScreenColorTexture());

		// Since we won't use a newly requested texture, we can tell the engine that anyone else can use it.
		engine.render.releaseTemporaryTexture(source);
	#}
}
2. Inheriting a Base Material from the Abstract One2. Наследование базового материала от абстрактного#
Now we are going to inherit a base material from the created abstract one (my_abstract.abstmat) to extend its functionality.Теперь мы собираемся наследовать базовый материал от созданного абстрактного (my_abstract.abstmat), чтобы расширить его функциональность.
To begin with, we'll implement a simple color filter post-effect.Для начала мы реализуем простой пост-эффект цветового фильтра.
Create a new file with the *.basemat extension. Again, the file name is used as the base material name.Создайте новый файл с расширением *.basemat. Опять же, имя файла используется в качестве имени основного материала.
Describe the base material specify that it has the abstract material my_abstract as a parent:Опишите базовый материал, указав, что он имеет абстрактный материал my_abstract в качестве родителя:
BaseMaterial <parent=my_abstract>
{

	// Add the color parameter that will define the optical filter color
	Color my_color = [0.5 0.5 0.5 1]

	// All shader variables that are defined in the material should have a prefix to be referred to in shaders
	// For sliders, colors, and other basic parameters, it is defined with var_prefix currently set as 'var'
	// For textures, it is texture_prefix currently set as 'tex'
	Shader fragment=
	#{
		// Sample screen texture
		float4 sample = TEXTURE(tex_color, IN_UV);

		// Multiply the screen texture by specified color
		OUT_COLOR = sample * var_my_color;
	#}
}All shader variables defined in the material should have a prefix so that they can be referred to in shaders:Все переменные шейдера, определенные в материале, должны иметь префикс, чтобы на них можно было ссылаться в шейдерах:
- The prefix for slider, color, and other basic parameters is set using the var_prefix argument.Префикс для slider, color и других основных параметров задаются с помощью аргумента var_prefix.
- The prefix for textures is set using the texture_prefix argument.Префикс для текстур задается с помощью аргумента texture_prefix.
For example:Например:
// Setting prefixes
AbstractMaterial <preview_hidden=true var_prefix=var texture_prefix=tex>

/*...*/

// Adding the parameter
Color my_color = [0.5 0.5 0.5 1]

/*...*/

// Refering to a variable
OUT_COLOR = sample * var_my_color;
Save your base material as my_abstract_base1.basemat to your project's data folder.Сохраните базовый материал как my_abstract_base1.basemat в папку data вашего проекта.
That's it. What we have written is enough to create a simple post-processing effect.Вот и все. То, что мы написали, достаточно для создания простого эффекта постобработки.
3. Adding Another Derived Material3. Добавление другого производного материала#
Now we are going to derive another, more complex material, from our abstract one.Теперь мы собираемся вывести другой, более сложный материал из нашего абстрактного.
This material shall use triplanar mapping to apply a specified modulation texture with the specified intensity in the occluded areas (according to SSAO map)Этот материал должен использовать трехплоскостное отображение для применения указанной текстуры modulation с указанным intensity в закрытых областях (согласно карте SSAO).
Let's create a new base material file and set the same abstract material (my_abstract.abstmat) as its parent.Давайте создадим новый файл базового материала и установим тот же абстрактный материал (my_abstract.abstmat) в качестве его родителя.
Here is the complete code of our second base material (save it as my_abstract_base2.basemat to your project's data folder):Вот полный код нашего второго базового материала (сохраните его как my_abstract_base2.basemat в папке data вашего проекта):
my_abstract_base2.basemat
BaseMaterial <parent=my_abstract>
{
	// For this example more scene textures are required
	Texture2D normal <source=gbuffer_normal>
	Texture2D scene_depth <source=current_depth>
	Texture2D <source=ssao>

	// Modulation texture, UV scale, and effect intensity
	Texture2D modulation = "core/textures/common/checker_d.dds"
	Slider global_scale = 2
	Slider power = 10 <min=0 max=3>

	Shader common=
	#{
		float3 triplanar_sample(float2 uv, float depth_in)
		{
			float3 normal_ws = mul3(s_imodelview, unpackGBufferNormal(TEXTURE(tex_normal, uv).rgb));
			float3 position_ws = s_camera_position + mul3(s_imodelview, nativeDepthToPositionVS(depth_in, uv));

			float4 texcoord = position_ws.xyyz * var_global_scale;
			float3 weight = triplanarWeightFast(normal_ws, 0.5f);

			return TEXTURE_TRIPLANAR(tex_modulation, texcoord, weight).rgb;
		}

		float4 final(float2 uv, float depth_in)
		{
			float4 base = TEXTURE(tex_color, uv);
			float ssao = TEXTURE(tex_ssao, uv).r;

			float3 effect = triplanar_sample(uv, depth_in);
			return float4(lerp(base.rgb * effect * var_power, base.rgb, ssao), base.a);
		}
	#}

	Shader fragment=
	#{
		// Sample depth texture
		float depth = TEXTURE(tex_scene_depth, IN_UV).r;
		if (depth == 0.0f || depth == 1.0f)
		   discard;

		OUT_COLOR = final(IN_UV, depth);
	#}
}
4. Inheriting User Materials from Base Ones and Using Them4. Наследование пользовательских материалов от базовых и их использование#
The values of parameters declared in base materials can be modified in real time only in inherited user materials. Therefore, you need to inherit user materials from base materials for your projects and adjust them as required (assign and change parameter values, etc.).Значения параметров, заявленные в базовых материалах, могут быть изменены в режиме реального времени только в унаследованных пользовательских материалах. Следовательно, вам необходимо наследовать пользовательские материалы от базовых материалов для ваших проектов и корректировать их по мере необходимости (назначать и изменять значения параметров и т. д.).
In order to test our first post-effect do the following:Чтобы протестировать наш первый пост-эффект, сделайте следующее:
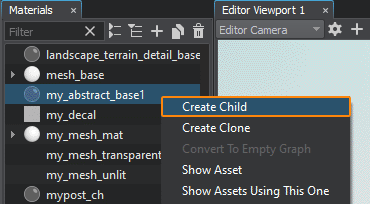
- Find the my_abstract_base1.basemat in the Materials window, right-click it, choose Create Child, and rename your new material as my_color_filter.
Найдите my_abstract_base1.basemat вMaterialsщелкните его правой кнопкой мыши, выберите Create Child и переименуйте новый материал в my_color_filter.

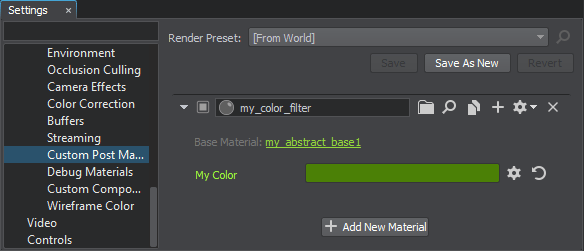
- As it is a post-effect, to apply the material globally we should open the Settings -> Render -> Custom Post MaterialsПоскольку это пост-эффект, для глобального применения материала мы должны открыть файл Settings -> Render -> Scriptable Materials.
- Click Add New Material and specify the my_color_filter material. After shis you can change the filter color.
Нажмите Add New Scriptable Material и укажите материал my_color_filter. После этого вы можете изменить цвет фильтра.

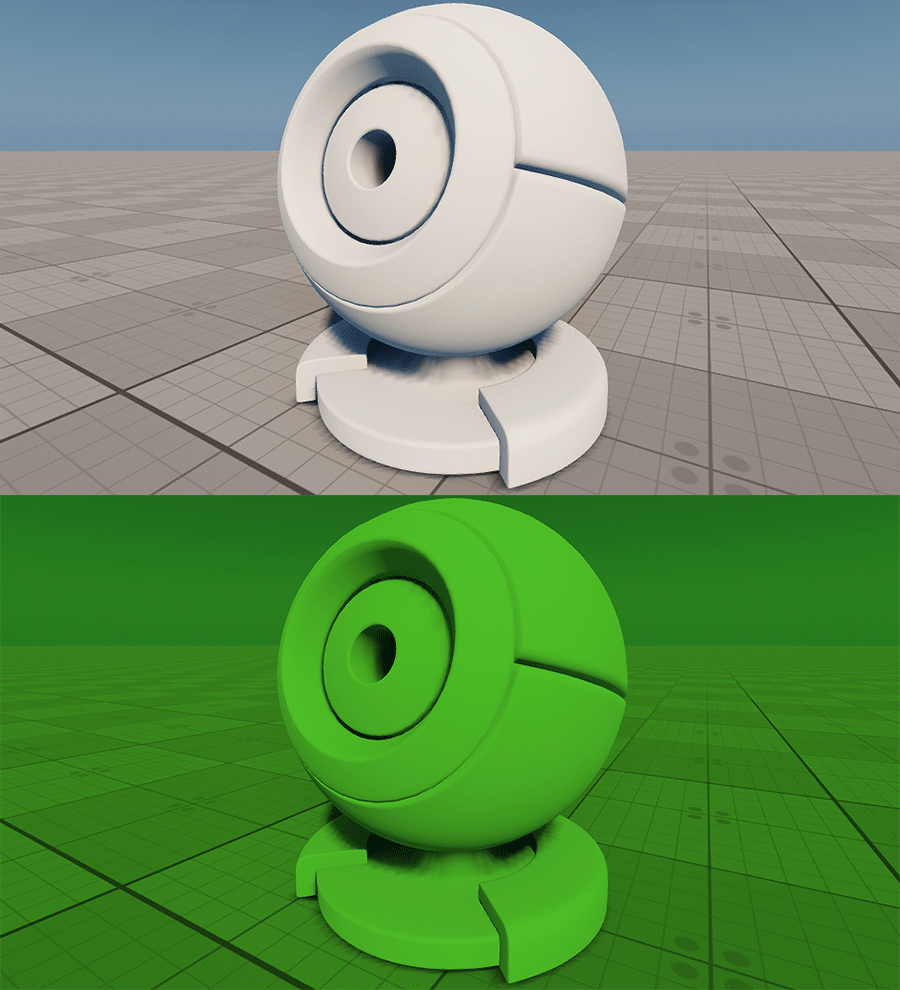
Here is the final image with our first post-material applied.Вот финальное изображение с нашим первым пост-материалом.

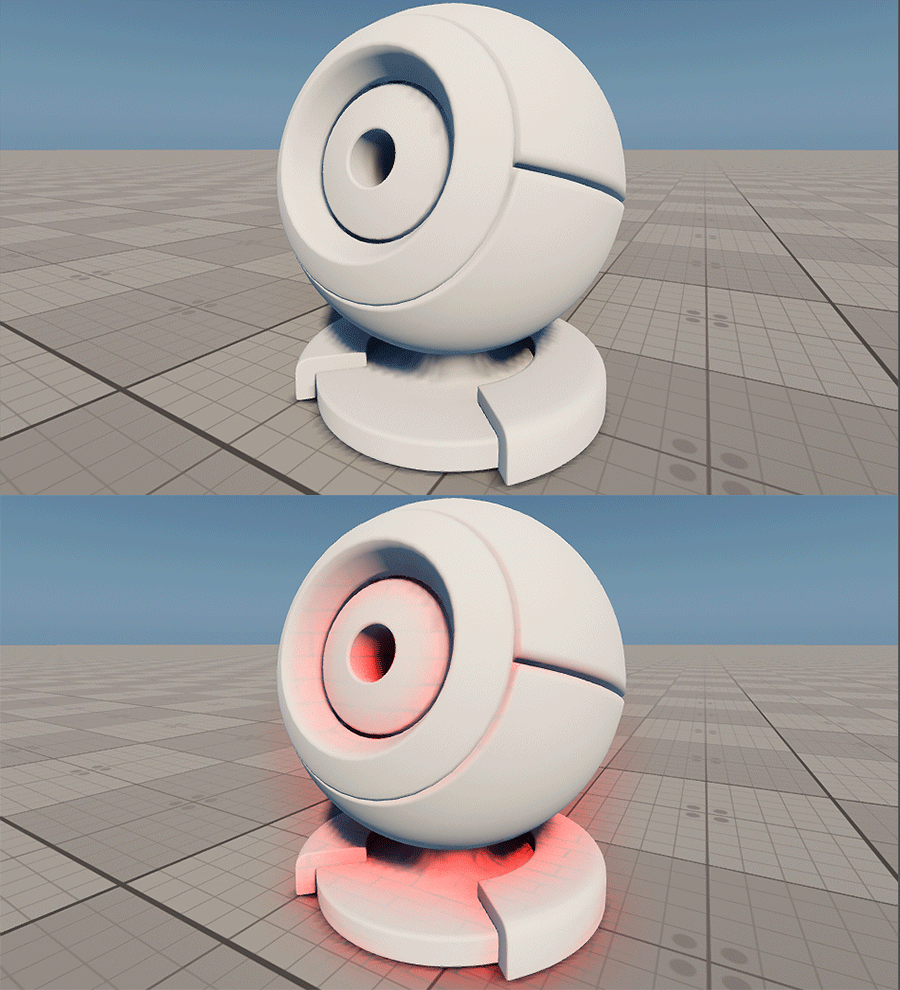
Repeat the steps above for the my_abstract_base2.basemat base material to test the second post-effect. Here is what it may look like:Повторите описанные выше шаги для базового материала my_abstract_base2.basemat, чтобы протестировать второй пост-эффект. Вот как это может выглядеть:

