Работа с проектами
 A project is an independent entity that contains all data on your application content organized in a set of directories. The .project file containing metadata is associated with the project. Проект - это независимый объект, который содержит все данные о содержимом вашего приложения, организованные в наборе каталогов. Файл .project, содержащий метаданные, связан с проектом.
Creating New ProjectСоздание нового проекта#
Before starting to create new projects you should have an SDK installed. Once you have the required version of the SDK, you can create a new project as follows:Перед тем, как начать создавать новые проекты, вы должны установить SDK . Когда у вас будет необходимая версия SDK, вы можете создать новый проект следующим образом:
-
Open the Projects tab in the SDK browser.Откройте вкладку Projects в браузере SDK.
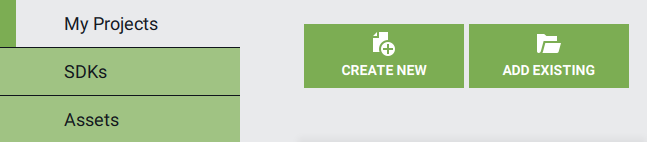
- Click Create New. The new project creation window will be opened.Нажмите Create New. Откроется окно создания нового проекта.
-
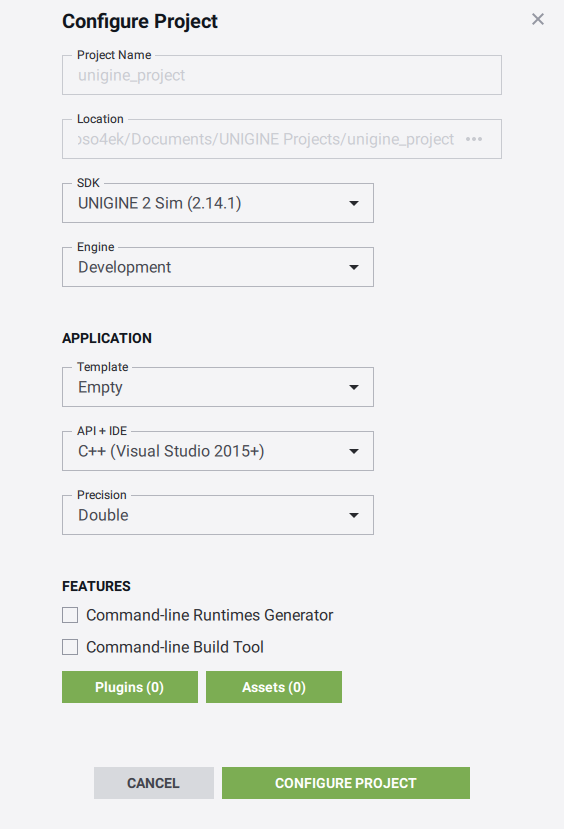
Define the name of the project, choose a path to store project files, specify the SDK and UNIGINE Engine build to be used.Укажите имя проекта, выберите путь для хранения файлов проекта, укажите SDK и сборку UNIGINE Engine, которая будет использоваться.
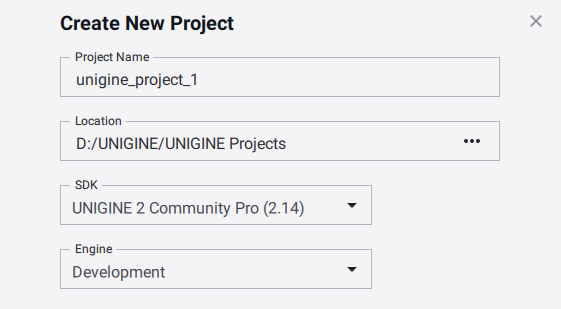 The project will be created in the <project path>/<unigine_project> folder.Проект будет создан в папке <project path>/<unigine_project>.
 - Specify the required application and general settings.Укажите необходимые настройки приложения и общие настройки .
- Specify the assets to be added (optional).Укажите надстройки , которые нужно добавить (необязательно).
- Click Create New Project. The project will appear in the projects list.
Нажмите Create New Project. Проект появится в списке проектов.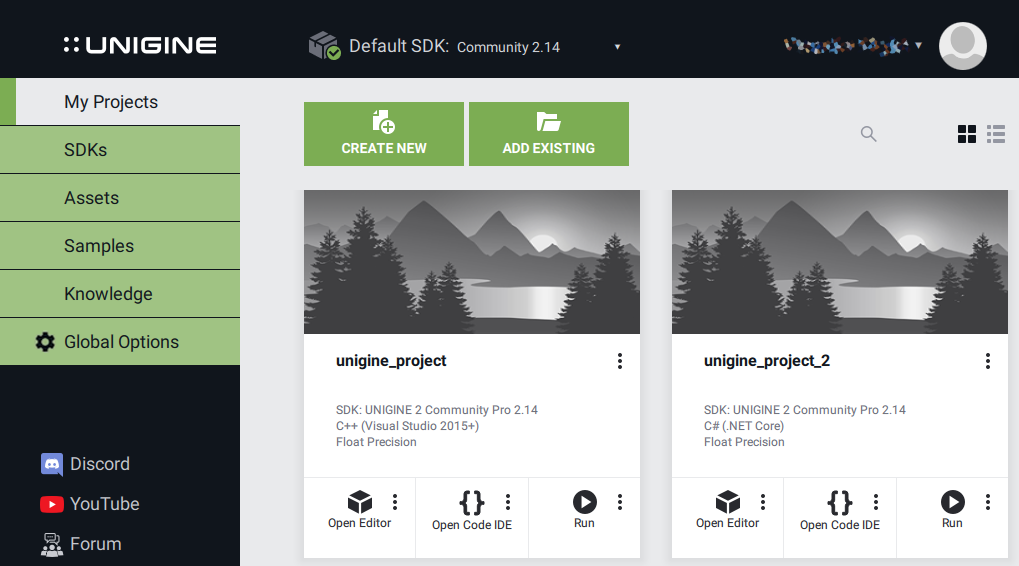
Application SettingsНастройки приложения#
The project can be created with the following application settings:Проект может быть создан со следующими настройками приложения:
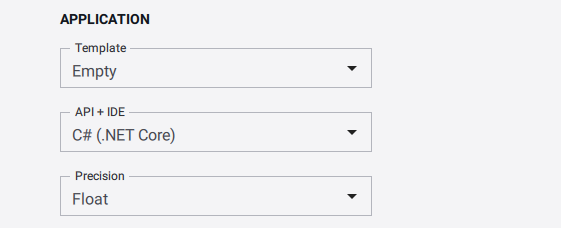
| Template |
|
|---|---|
| API+IDE |
|
| Precision |
|
FeaturesОбщие настройки#
The project can be created with the following features:Проект может быть создан со следующими общими настройками:
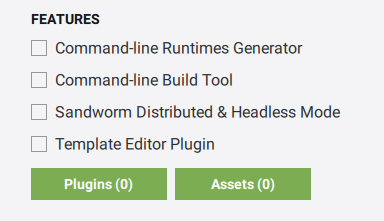
| Command-line Runtimes Generator | Enables Command-line Runtimes Generator for the project.Включает генератор времени выполнения через командную строку для проекта. |
|---|---|
| Command-line Build Tool | Enables the Command-line Build Tool for the project.Включает инструмент сборки через командную строку для проекта. |
| Sandworm Distributed & Headless Mode | Enables creation of the console application required on Worker computers for distributed computing and headless generation of terrain using the Sandworm tool for the project.Позволяет создать консольное приложение, необходимое на компьютерах Worker для распределенных вычислений и генерации рельефа с помощью инструмента Sandworm для проекта. |
| Editor Plugin Template |
|
The Plugins (0) button opens the list of available plugins:Кнопка Plugins (0) открывает список доступных плагинов:
| STEREO 3D | |
| Oculus support (Oculus plugin) | Create project with the Oculus Rift virtual display support.Создание проекта с поддержкой виртуального дисплея Oculus Rift . |
|---|---|
| Dual output stereo 3D (Separate plugin) | Output 2 separate images for each eye.
Примечание
The Separate supports DirectX 11 only.Вывод отдельных изображений для каждого глаза.
The Separate supports DirectX 11 only.The Separate supports DirectX 11 only.Примечание
The Separate supports DirectX 11 only.Плагин Separate поддерживает только DirectX 11. |
| Varjo support (Varjo plugin) | Create project with the Varjo output support.Создание проекта с поддержкой Varjo output. |
| HTC Vive support (OpenVR plugin) | Create project with the HTC Vive/OpenVR output support.Создание проекта с поддержкой HTC Vive/OpenVR output . |
| MULTI-MONITOR | |
| 3-monitor output (Surround plugin) | Render the application across 3 monitors simultaneously.Визуализация приложения на 3 мониторах одновременно . |
| Monitor wall (Wall plugin) |
Render the application into the configurable number of monitors.Рендеринг приложения на настраиваемое количество мониторов . |
| PROJECTIONS | |
| EasyBlend support (EasyBlend plugin) | Create a project with the EasyBlend plugin.Создание проекта с помощью плагина EasyBlend. |
| Multi-projector setups (Projection plugin) |
Create a project with the Projection plugin. All necessary files are copied and the launcher with the corresponding settings is generated.Создание проекта с помощью плагина Projection. Копируются все необходимые файлы и генерируется файл запуска с соответствующими настройками. |
| NETWORK | |
| ARTTracker plugin | Create a project with the ARTTracker plugin.Создание проекта с плагином ARTTracker . |
| SSLSocket plugin | Create a project with the SSLSocket plugin.Создание проекта с подключаемым модулем SSLSocket . |
| Steam plugin | Create a project with the plugin for Steam integration.Создание проекта с плагином для интеграции со Steam. |
| Syncker plugin | Create a project with the Syncker plugin for multi-channel rendering synchronization.Создание проекта с плагином Syncker для синхронизации многоканального рендеринга. |
| VRPN Client plugin | Create a project with the VRPN Client plugin.Создание проекта с плагином VRPN Client. |
| SPECIALS | |
| GPU Monitor plugin | Enable GPU frequencies and temperature monitoring for your project.Включение мониторинг частоты и температуры графического процессора для вашего проекта. |
| Interface plugin | Create a project with the Interface plugin.Создание проекта с плагином Interface. |
| Kinect2 Plugin | Create a project with the Kinect2 plugin.Создание проекта с плагином Kinect2 . |
| Leap Motion plugin | Tracking hands and fingers with Leap Motion.Отслеживание рук и пальцев с помощью Leap Motion |
| TeslaSuit plugin | Creating sensations, tracing the body motions, and capturing the user's biometrics with Teslasuit.Создание ощущений, отслеживание движений тела и снятие биометрических данных пользователя с помощью Teslasuit. |
| GEODETIC | |
| Geodetics plugin | Plugin that allows translating GPS latitude, longitude, and altitude coordinates to X, Y, and Z and vice versa.Плагин, позволяющий переводить GPS-координаты широты, долготы и высоты в координаты X, Y и Z и наоборот. |
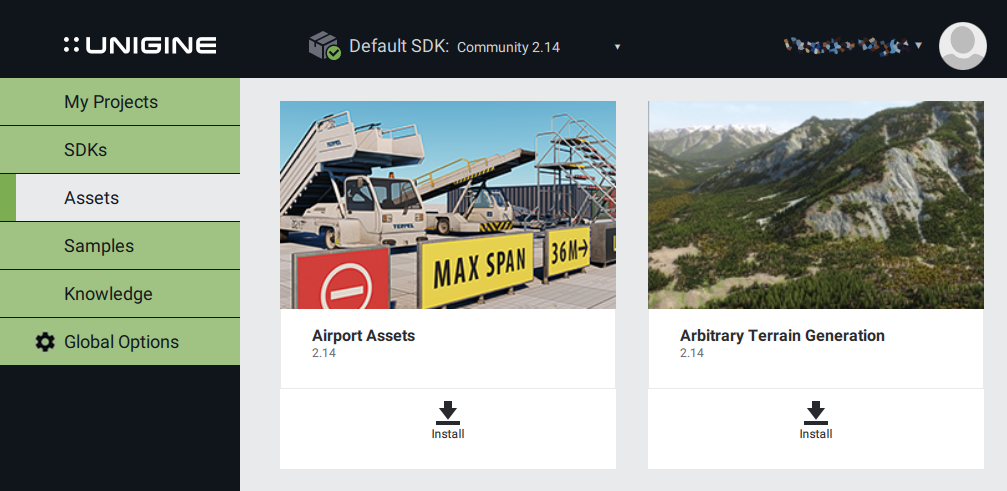
AssetsАссеты#
The project can be created including any asset available in the Assets tab. All required assets can be added both on and after project's creation.В проект можно добавить любые ассеты, доступные во вкладке Assets. Все необходимые ассеты могут быть добавлены при создании проекта или позже.
Specifying Assets on Project's CreationУказание надстроек при создании проекта#
To create the project with an asset:Чтобы создать проект с ассетами:
- Download the required asset in the Assets tab by clicking Install.
 ПримечаниеAny amount of assets could be added to a project afterwards.Загрузите необходимые ассеты во вкладке Assets, нажав Install.Any amount of assets could be added to a project afterwards.Any amount of assets could be added to a project afterwards.
ПримечаниеAny amount of assets could be added to a project afterwards.Позже к проекту можно добавить любое количество ассетов.
ПримечаниеAny amount of assets could be added to a project afterwards.Загрузите необходимые ассеты во вкладке Assets, нажав Install.Any amount of assets could be added to a project afterwards.Any amount of assets could be added to a project afterwards.
ПримечаниеAny amount of assets could be added to a project afterwards.Позже к проекту можно добавить любое количество ассетов. - On the project creation, specify the assets to be included by clicking the Assets (0) button.
При создании проекта укажите ассеты, которые нужно добавить, нажав кнопку Assets (0).
- Drag and drop the required assets from the Available field to In Use. You can add any amount of assets to the project. After all assets are dropped, click Add.
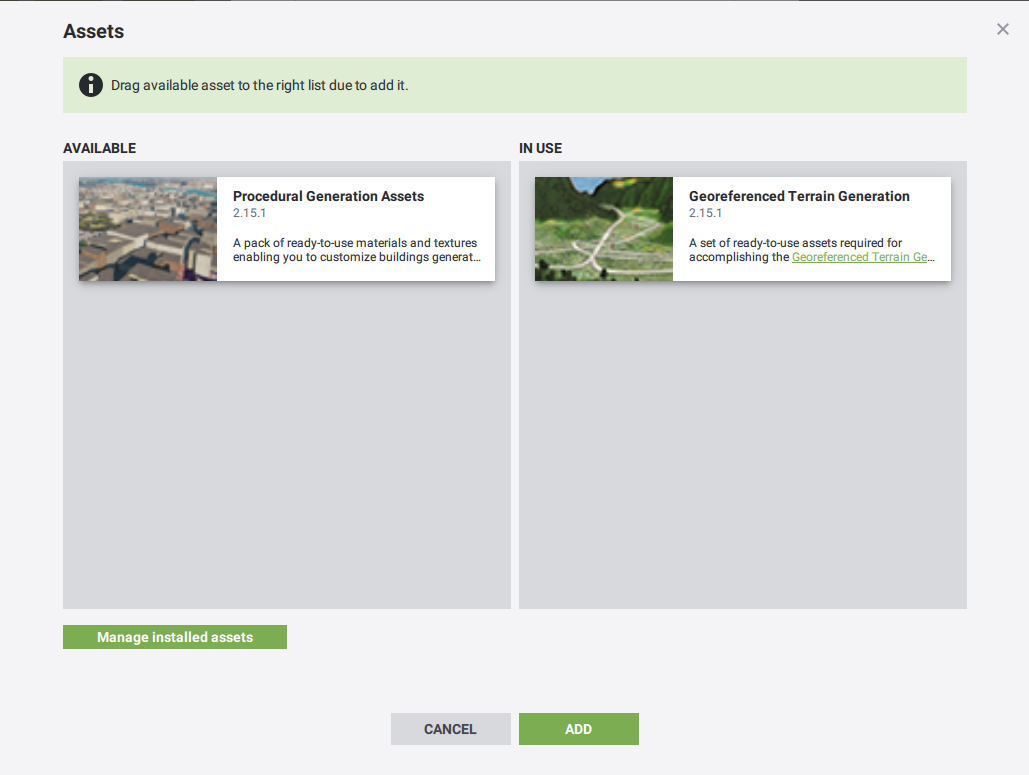 ПримечаниеIf you haven't downloaded the asset, click Manage installed assets. You will be redirected to the page with available assets.Перетащите необходимые ассеты из поля Available в In Use. Вы можете добавить в проект любое количество ассетов. После добавления всех ассетов нажмите Ok.If you haven't downloaded the asset, click Manage installed assets. You will be redirected to the page with available assets.If you haven't downloaded the asset, click Manage installed assets. You will be redirected to the page with available assets.
ПримечаниеIf you haven't downloaded the asset, click Manage installed assets. You will be redirected to the page with available assets.Если вы еще не скачали необходимый ассет, щелкните Manage installed assets. Вы будете перенаправлены на страницу со списком доступных ассетов.
ПримечаниеIf you haven't downloaded the asset, click Manage installed assets. You will be redirected to the page with available assets.Перетащите необходимые ассеты из поля Available в In Use. Вы можете добавить в проект любое количество ассетов. После добавления всех ассетов нажмите Ok.If you haven't downloaded the asset, click Manage installed assets. You will be redirected to the page with available assets.If you haven't downloaded the asset, click Manage installed assets. You will be redirected to the page with available assets.
ПримечаниеIf you haven't downloaded the asset, click Manage installed assets. You will be redirected to the page with available assets.Если вы еще не скачали необходимый ассет, щелкните Manage installed assets. Вы будете перенаправлены на страницу со списком доступных ассетов. - Click Create New Project. To enable added assets in the project, you should follow instructions on each asset.Нажмите Create New Project. Чтобы включить добавленные ассеты в проект, вы должны следовать инструкциям для каждого ассета .
Specifying Assets for Existing ProjectДобавление ассетов в существующий проект#
To extend an existing project with assets:Чтобы добавить ассеты в существующий проект:
- Download the required asset in the Assets tab by clicking Install.
Загрузите необходимые ассеты во вкладке Assets, нажав Install.
- Click Other Actions -> Configure Project.
 Нажмите Other Actions -> Configure Project.
- Click the Assets (0) button and drag and drop the required assets from the Available field to In Use.
ПримечаниеIf you haven't downloaded the asset, click Manage installed assets. You will be redirected to the page with available assets.Нажмите кнопку Assets (0) и перетащите нужные надстройки из поля Available в In Use.If you haven't downloaded the asset, click Manage installed assets. You will be redirected to the page with available assets.If you haven't downloaded the asset, click Manage installed assets. You will be redirected to the page with available assets.
ПримечаниеIf you haven't downloaded the asset, click Manage installed assets. You will be redirected to the page with available assets.Если вы еще не скачали необходимый ассет, щелкните Manage installed assets. Вы будете перенаправлены на страницу со списком доступных ассетов.
- Click Add and then click Update Configuration.Нажмите Ok, а затем нажмите Update Configuration.
Adding Existing ProjectДобавление существующего проекта#
To add an existing project to the browser:Чтобы добавить существующий проект в браузер:
- Click Add Existing in the Projects tab.
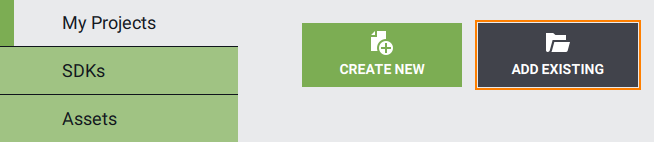 Нажмите Add Existing на вкладке Projects.
- In the file dialog window that opens, specify the path to the project folder and click Apply. The project will appear in the projects list.
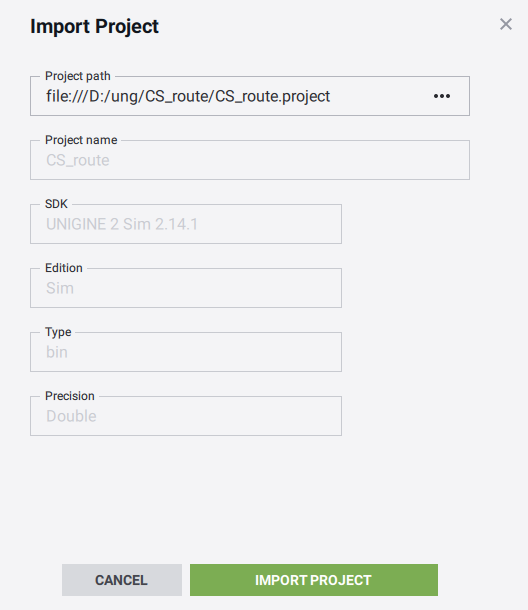 В открывшемся диалоговом окне файла укажите путь к папке проекта и нажмите Apply. Проект появится в списке проектов.
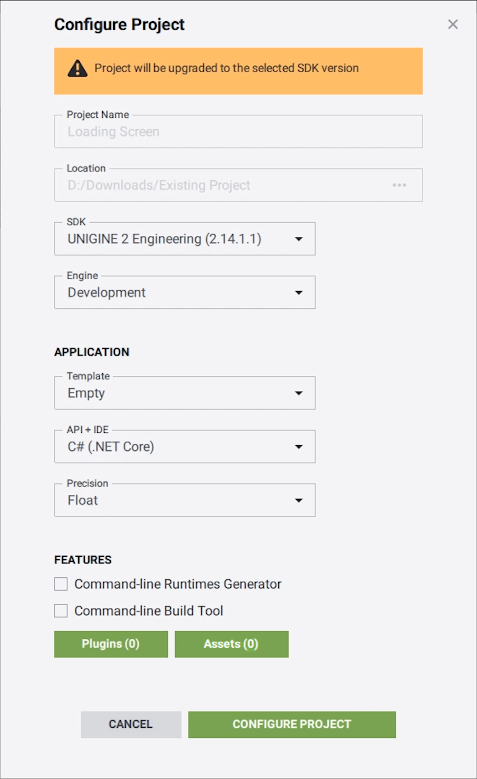
Upgrading Existing ProjectОбновление существующего проекта#
Projects that require upgrade are marked with the Upgrade label: Проекты, требующие обновления, отмечены меткой Upgrade:
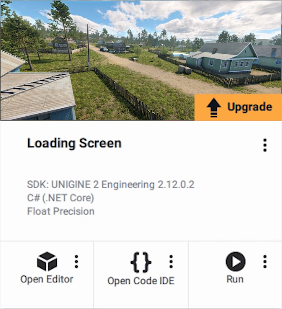
To upgrade your project to the newest installed version of UNIGINE SDK:Чтобы обновить свой проект до последней установленной версии UNIGINE SDK:
-
Click the Upgrade label on the project image or Other Actions -> Configure. The following form will open:Щелкните по метке Upgrade на изображении проекта или Other Actions -> Configure. Откроется следующая форма:
- Choose the newest installed version of the SDK and click CONFIGURE PROJECT.
Выберите самую последнюю установленную версию SDK и нажмите Update Configuration.
- Specify a path to the backup folder into which the original project will be copied. Keep Migrate Content checked and click UPGRADE PROJECT.
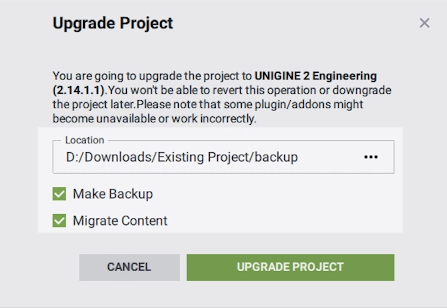 Укажите путь к папке резервного копирования, в которую будет скопирован исходный проект. Оставьте Migrate Content отмеченным и нажмите UPGRADE PROJECT.
The project will be upgraded automatically. You can also manually upgrade the project by running the upgrade script. In both cases, the same script will be used.Проект будет обновлен автоматически. Вы также можете обновить проект вручную, запустив сценарий обновления . В обоих случаях будет использоваться один и тот же сценарий.
The source code should be upgraded manually by using the Migration Guide.Исходный код следует обновить вручную с помощью Руководства по миграции .Running a ProjectЗапуск проекта#
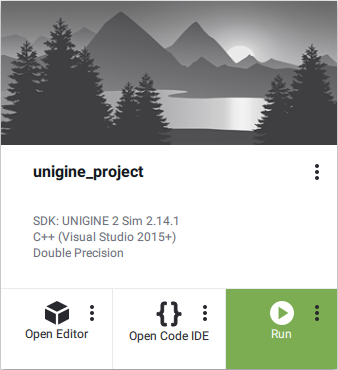
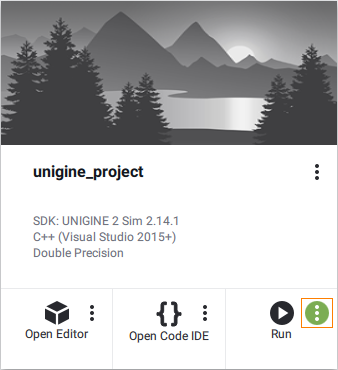
To run the actual compiled binary of the project with default settings, click the Run button:Чтобы запустить проект с пользовательскими настройками, нажмите значок с тремя точками на кнопке Run:
You can also use launchers created by default in the project folder:Вы также можете использовать файлы запуска , созданные по умолчанию в папке проекта:
-
 launch_debug — the launcher of the project's debug version.
launch_debug - файл запуска отладочной версии проекта.
launch_debug — the launcher of the project's debug version.
launch_debug - файл запуска отладочной версии проекта. -
launch_editor — the launcher of the project's with the loaded editor.
launch_editor - файл запуска проекта с загруженным редактором.
-
launch_release — the launcher of the project's release version.
launch_release - файл запуска релизной версии проекта.ПримечаниеTo use the release launcher, you should reconfigure your project to the Release binaries first.Чтобы использовать файл запуска релизной версии, вы должны сначала перенастроить свой проект на двоичные файлы Release.
Running Project with Custom SettingsЗапуск проекта с пользовательскими настройками#
To run the project with custom settings, click an ellipsis on the Run button:Чтобы запустить проект с пользовательскими настройками, нажмите значок с тремя точками на кнопке Выполнить:
The Customize Run Options form will open. Откроется форма Customize Run Options.
Depending on the value of the Application option, different sets of options are available:В зависимости от значения параметра Application доступны разные наборы параметров:
-
Default — the default main application (<project_name>_x*.exe) will be run:Default - будет запущено основное приложение по умолчанию (<project_name>_x*.exe):
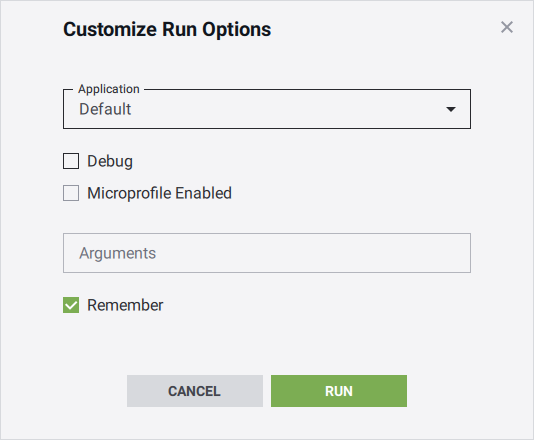 The default main application should be used when only UnigineScript is used to implement the project. In this case, the following options can be customized:Главное приложение по умолчанию следует использовать, если для реализации проекта используется только UnigineScript . В этом случае можно настроить следующие параметры:
Debug Indicates whether debug or release version of the application should be run.Указывает, следует ли запускать отладочную или релизную версию приложения.Microprofile Enabled Run the application with the Microprofile tool enabled.Запуск приложения с включенным инструментом Microprofile .Arguments Start-up command-line options. Параметры командной строки запуска .Remember Indicates whether to remember the specified custom settings for the future run.Указывает, следует ли запоминать указанные пользовательские настройки для будущего запуска. -
Custom — a custom main application will be run:Custom - будет запущено пользовательское основное приложение:
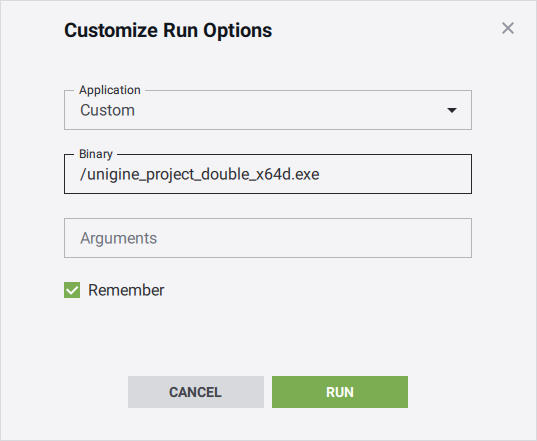 This option should be chosen if the C++ or C# API is used to implement the project (besides UnigineScript). In this case, the following options can be customized:Этот вариант следует выбрать, если для реализации проекта используется C++ or C# API(помимо UnigineScript). В этом случае можно настроить следующие параметры:
Binary Name of the custom main application. Here the name of the compiled binary executable located in the bin folder of the project should be specified. If the binary executable is located outside this folder, a path to it relative to the bin folder should be specified.Имя пользовательского основного приложения. Здесь необходимо указать имя скомпилированного двоичного исполняемого файла, расположенного в папке bin проекта. Если исполняемый двоичный файл находится за пределами этой папки, необходимо указать путь к нему относительно папки bin.Arguments Start-up command-line options. Параметры командной строки запуска .Remember Indicates whether to remember the specified custom settings for future run.Указывает, следует ли запоминать указанные пользовательские настройки для будущего запуска.
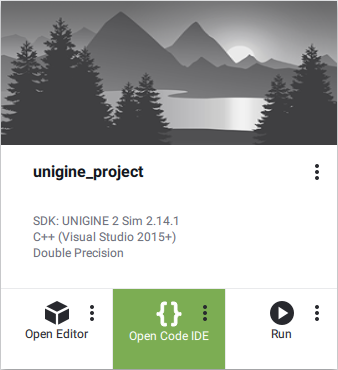
Editing a ProjectРедактирование проекта#
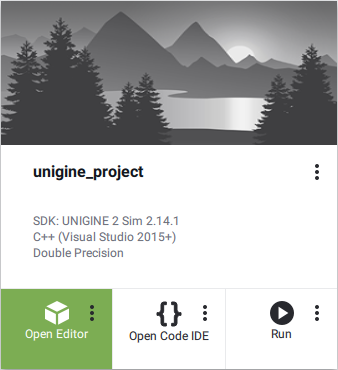
The project content is edited via UNIGINE Editor, code is edited via IDE.Содержимое проекта редактируется в UNIGINE Editor, код редактируется с помощью IDE.
-
To edit the project content, click Open Editor. Чтобы отредактировать содержимое проекта, нажмите Open Editor.
-
To edit the source code use Open Code IDE. The IDE selected as the default one will be used to open code.Для редактирования исходного кода используйте Open Code IDE. Для открытия кода будет использоваться среда IDE, выбранная по умолчанию.
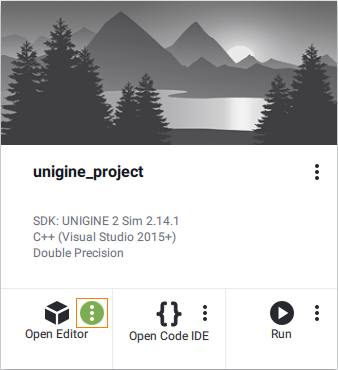
The project editing tools can also be run in a customized mode.Инструменты редактирования проекта также могут быть запущены в пользовательском режиме.
Customizing UNIGINE Editor OptionsНастройка параметров UnigineEditor#
Customize the UNIGINE Editor running options by clicking an ellipsis on the Open Editor button:Настройте параметры запуска редактора UNIGINE, нажав значок с тремя точками на кнопке Open Editor:
In the Customize UNIGINE Editor Options form that opens, set the required values and click Edit.В открывшейся форме Customize UNIGINE Editor Options задайте необходимые значения и нажмите Edit.
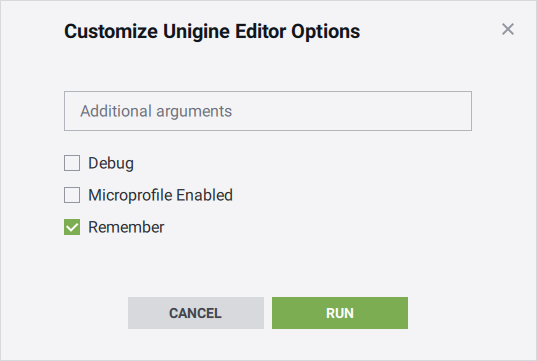
| Additional arguments | Start-up command-line options. Параметры командной строки запуска . |
|---|---|
| Debug | The editor version (debug or release) that will be used for project's editing.Версия редактора (отладочная или релизная), которая будет использоваться для редактирования проекта. |
| Microprofile Enabled | Run the application with the Microprofile tool enabled.Запустите приложение с включенным инструментом Microprofile . |
| Remember | Indicates whether to remember the specified custom settings for a future run or not.Указывает, следует ли запоминать указанные пользовательские настройки для будущего запуска или нет. |
Customizing IDE OptionsНастройка параметров IDE#
To change a tool, do the following:Чтобы сменить инструмент, выполните следующие действия:
-
On Windows, click an ellipsis on the Open Code IDE button. The following form will open:В Windows нажмите значок с тремя точками на кнопке Open Code IDE. Откроется следующая форма:
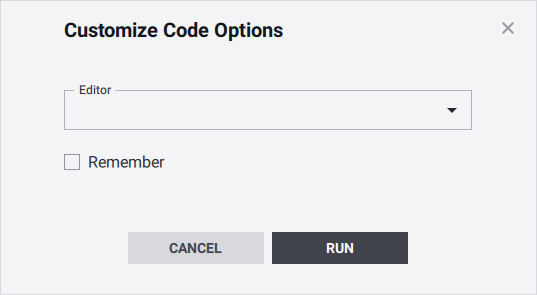 Choose Custom in the drop-down list and specify a path to a custom tool (e.g. IDE or editor) with required arguments:В раскрывающемся списке выберите Custom и укажите путь к настраиваемому инструменту (например, IDE или редактору) с необходимыми аргументами:
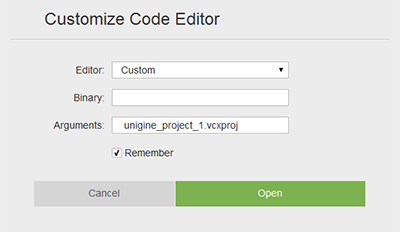
-
On Linux, click Open Folder and then edit code in an associated tool.В Linux нажмите Open folder и затем редактируйте код в соответствующем инструменте.
Смотрите также
- Articles in the Programming Overview section to learn how to edit the opened projectСтатьи в разделе Обзор программирования , чтобы узнать, как редактировать открытый проект.
- The video tutorial demonstrating how to change the IDE Видеоурок , демонстрирующий, как сменить IDE.
Release and Development BuildsСборки для выпуска и разработки#
You can choose the Development or Release build of UNIGINE Engine:Вы можете выбрать сборку Development или Release для UNIGINE Engine:
- The Development build includes additional features that can be useful for project's development (Microprofile, etc.)Сборка Development включает дополнительные функции, которые могут быть полезны при разработке проекта (Microprofile и т.д.)
- The Release build allows checking the final performance of the application.Сборка Release позволяет проверить конечную производительность приложения.
By default, the project is configured to use Development Engine binaries that contain additional debugging tools. Development binaries of the Engine require a running SDK Browser instance, just the same way as for the UnigineEditor.По умолчанию проект настроен на использование бинарных файлов версии Development движка, которые содержат дополнительные инструменты отладки. Бинарные файлы Development движка требуют запущенного экземпляра SDK Browser, точно так же, как и UnigineEditor.
You can run your application without running SDK Browser via the launch_release file in the project folder, but first, you should reconfigure the project to use the Release binaries.Вы можете запустить свое приложение без SDK Browser с помощью файла launch_release в папке проекта, но сначала необходимо перенастроить проект на использование бинарных файлов Release.
To reconfigure the project:Чтобы изменить конфигурацию проекта:
- Click Other Actions -> Configure.Нажмите Other Actions -> Configure.
- Select the Release option in the Engine drop-down.Выберите опцию Release в раскрывающемся списке Engine.
- Click the Update Configuration button at the bottom of the configuration window to save the configuration.Нажмите кнопку Update Configuration в нижней части окна настроек, чтобы сохранить конфигурацию.
As soon as the project has been reconfigured to the Release build, it can be run without SDK Browser — run the launch_release file in the project folder.Как только проект будет перенастроен на сборку Release, его можно запускать без SDK Browser — запустите файл launch_release в папке проекта.
The Release binaries should be used in the final build of the project.Бинарные файлы Release должны быть использованы в финальной сборке проекта.
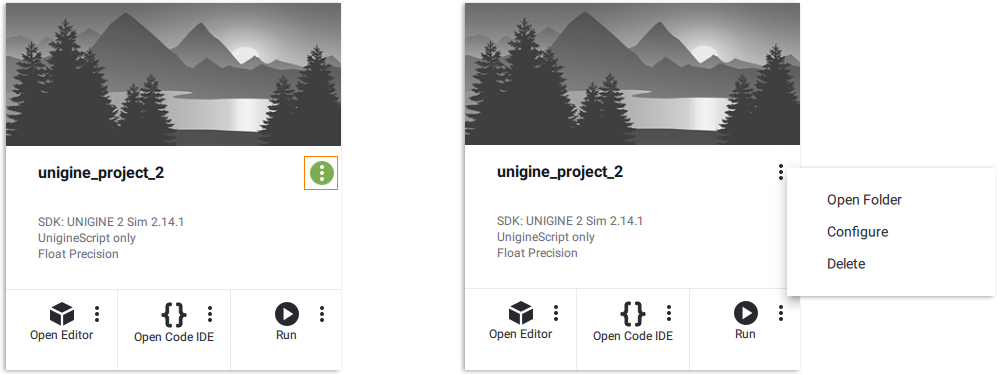
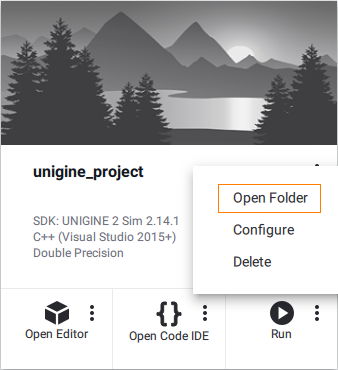
Other ActionsДругие действия#
When clicking the Other Actions button, the following options are available:При нажатии на кнопку Other Actions доступны следующие опции:
| Configure | Change project settings. Изменить настройки проекта. |
|---|---|
| Open Folder | Open the project folder.Открыть папку проекта. |
| Delete | Delete the project.Удалить проект. |
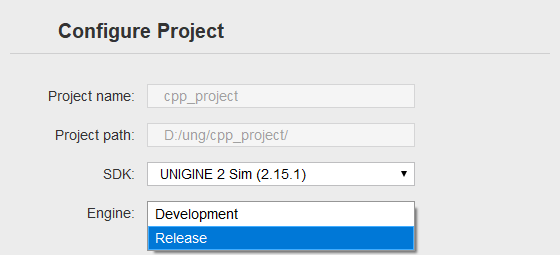
Updating Project ConfigurationОбновление конфигурации проекта#
When clicking Other Actions -> Configure, the following form opens: При нажатии Other Actions -> Configure открывается следующая форма:
Via this form, you can change settings of an existing project: the UNIGINE Engine build used for the project, the version of the release application, the coordinates precision, and the general settings. This option should also be used when you need to upgrade the existing project to the newest SDK version.С помощью этой формы вы можете изменить настройки существующего проекта: сборка UNIGINE Engine , используемая для проекта, версия релизного приложения, точность координат и общие настройки . Эту опцию также следует использовать, когда вам нужно обновить существующий проект до последней версии SDK.
Moreover, you can restore the project's files that were corrupted, missed, or mistakenly modified. For this, you should leave settings in the form unchanged and press the Update Configuration button. In this case, the following files of the project will be restored (they will be copied from the SDK):Кроме того, вы можете восстановить файлы проекта, которые были повреждены, пропущены или по ошибке изменены. Для этого следует оставить настройки в форме без изменений и нажать кнопку Update Configuration. В этом случае будут восстановлены следующие файлы проекта (они будут скопированы из SDK):
- Бинарные файлы
- core.ung, editor.ung and scripts.ung
- Файлы запуска (Launchers)
If some of the files listed above are changed, the .modified postfix is added to names of such files. At that, the files from the SDK will also be copied.Если некоторые из файлов, перечисленных выше, изменены, к именам таких файлов добавляется постфикс .modified. При этом также будут скопированы файлы из SDK.