This page has been translated automatically.
Видеоуроки
Interface
Essentials
Advanced
Подсказки и советы
Основы
Программирование на C#
Рендеринг
Professional (SIM)
Принципы работы
Свойства (properties)
Компонентная Система
Рендер
Физика
Редактор UnigineEditor
Обзор интерфейса
Работа с ассетами
Настройки и предпочтения
Работа с проектами
Настройка параметров ноды
Setting Up Materials
Настройка свойств
Освещение
Использование инструментов редактора для конкретных задач
Расширение функционала редактора
Встроенные объекты
Ноды (Nodes)
Объекты (Objects)
Эффекты
Декали
Источники света
Geodetics
World-ноды
Звуковые объекты
Объекты поиска пути
Players
Программирование
Основы
Настройка среды разработки
Примеры использования
C++
C#
UnigineScript
UUSL (Unified UNIGINE Shader Language)
Плагины
Форматы файлов
Materials and Shaders
Rebuilding the Engine Tools
Интерфейс пользователя (GUI)
Двойная точность координат
API
Containers
Common Functionality
Controls-Related Classes
Engine-Related Classes
Filesystem Functionality
GUI-Related Classes
Math Functionality
Node-Related Classes
Objects-Related Classes
Networking Functionality
Pathfinding-Related Classes
Physics-Related Classes
Plugins-Related Classes
IG Plugin
CIGIConnector Plugin
Rendering-Related Classes
Работа с контентом
Оптимизация контента
Материалы
Визуальный редактор материалов
Сэмплы материалов
Material Nodes Library
Miscellaneous
Input
Math
Matrix
Textures
Art Samples
Tutorials
Внимание! Эта версия документация УСТАРЕЛА, поскольку относится к более ранней версии SDK! Пожалуйста, переключитесь на самую актуальную документацию для последней версии SDK.
Внимание! Эта версия документации описывает устаревшую версию SDK, которая больше не поддерживается! Пожалуйста, обновитесь до последней версии SDK.

Generating the Terrain and Objects

Warning
The functionality described in this article is not available in the Community SDK edition.
You should upgrade to Engineering / Sim SDK edition to use it.

As soon as you have added imagery and/or elevation, you are ready to generate a terrain.

The Generation Settings panel is behind the Parameters panel and is accessible by switching the tabs.

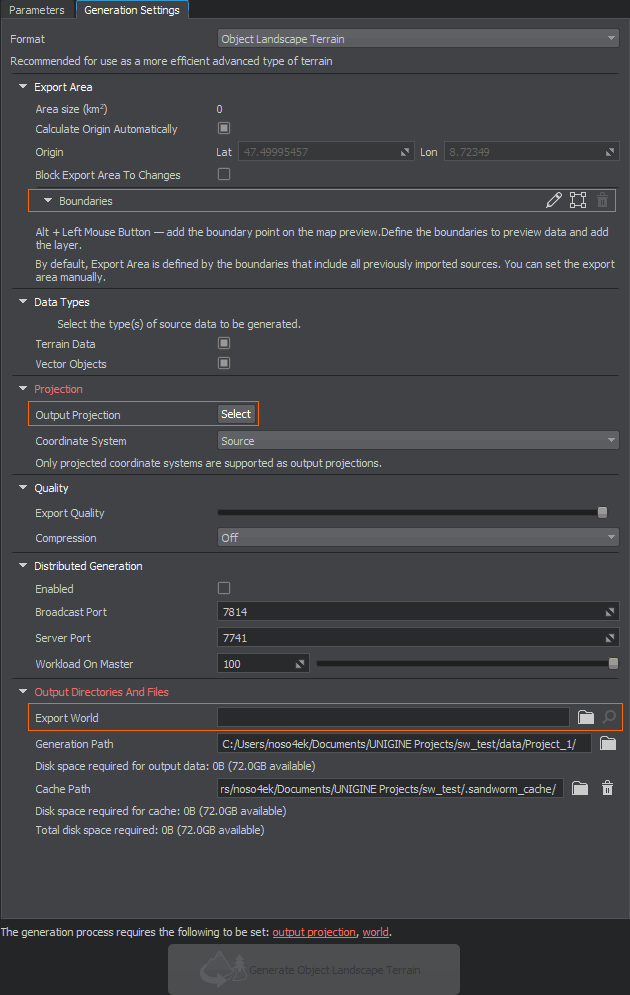
The items required to be set in order to start the terrain generation process, are highlighted red and displayed as clickable links at the bottom.

Export Area#

By default, all imported data are used to generate a terrain. It might take some time depending on the scope of your data.

You can set boundaries for the export area to limit the generated terrain area.

Output Projection#

As you click the Select button for Output Projection, the following window will open:

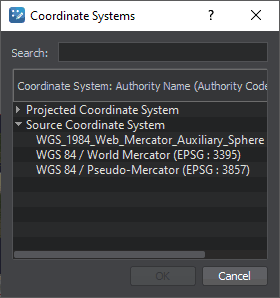
To begin with, double click the Source Coordinate System line and select EPSG:3857 — this is a projection widely used by such services as Google, OpenStreetMap, Navitel, etc. This projection fits almost all georeferenced data except poles.

For more details, see the setting description and the relevant FAQ section.

Export World#

Export World is a world where your terrain will be generated. If you have a world open in UNIGINE Editor, it would be set as the export world automatically. Otherwise, you'll need to (create and) set the world manually.

Generating a Terrain#

If you don't have any issues highlighted red, click the Generate button below and wait until the generation process is finished. A generated terrain is available in the world.

Notice
You can also generate only the selected type of data.

Switch to Sandworm Camera generated with a terrain to immediately observe the created terrain.

Generating Once Again#

Generate the terrain once again if you changed or added the data. You can also regenerate only the selected type of data.

If you changed anything in the generated assets manually (directly in UNIGINE Editor) and then regenerate them, all manual changes will be lost.

What Else#

Last update: 10.10.2022
Build: ()