Organizing Materials
UNIGINE materials are organized in a hierarchy and managed via the Materials Hierarchy window.
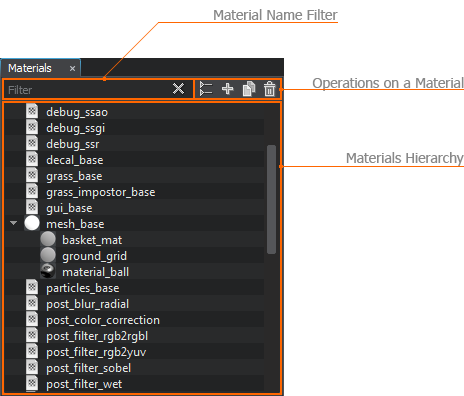
The Materials Hierarchy window provides access to all materials of the project and allows filtering them by names, collapsing materials hierarchy (i.e., showing only the base materials and hiding the user ones), inheriting, cloning, renaming, and deleting materials.
All materials in the hierarchy are linked to the .basemat and .mat material files stored in the assets folder of the project and available via the Asset Browser. So, any operation on a material via the UnigineEditor interface updates the corresponding asset.
To open the Materials Hierarchy window, choose Windows -> Toggle Materials Hierarchy in the Menu Bar or press M.
See Also#
- Materials article to know basics of the material system used in UNIGINE
- Hierarchy and Inheritance article to know more about how materials are organized
- Materials Files section to know more about the base and user material files
Creating a Material#
A material can be created via UnigineEditor in one of the following ways:
- By inheriting or cloning the existing material via the Materials Hierarchy window.
- By creating or importing a material via the Asset Browser. Usually, materials are imported together with a 3D model or a scene of one of the supported formats.
The new material is automatically added to the materials hierarchy and displayed in the Materials Hierarchy window. The asset, to which the new material links, is also created and becomes available via the Asset Browser.
Basic Operations on a Material#
The Materials Hierarchy window allows the following basic operations on a material.
Renaming a Material#
To rename a material, right-click it and choose Rename in the drop-down list.
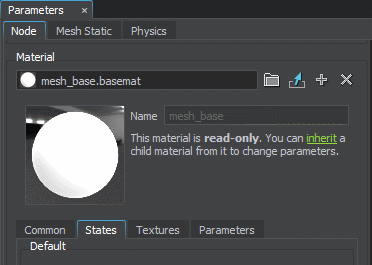
You can also rename a material via the Parameters window by editing the Name field.
If you rename a material asset via the Asset Browser, the material that links to it will be renamed as well.
Cloning a Material#
To clone a material, right-click it and choose Clone in the drop-down list.

Another way to clone a material is to select it and click  to the left of the material name filter.
The new material will be created at the same hierarchy level as the original one. Note that the child materials won't be cloned.
If you copy a material file via the Asset Browser, the material that links to it will be cloned.
Deleting a Material#
To delete a material, right-click it, choose Delete in the drop-down list and confirm deletion in the dialog window that opens:
Another way to delete a material is to select it and click  to the left of the material name filter. If you delete a parent material, all its child materials will be deleted as well.
If you delete a material file via the Asset Browser, the material that links to it will be deleted as well.
Setting Up Materials Inheritance#
In UNIGINE, materials are organized in a hierarchy, like nodes, but are completely independent of the nodes hierarchy. Each material (parent material) can have multiple children (child materials). The parent material can be both the base or user material; the child material is always a user material.
To collapse or expand the list of child materials, click the arrow to the left of the parent material. You can also collapse all child materials in the Materials Hierarchy window by clicking  .
.
Inheriting a Material#
Inheriting one material from another allows forming the materials hierarchy. To inherit a new material from the existing one, right-click the desired parent material and choose Create Child in the drop-down list.

Another way to inherit a material is to select a material and click  to the right of the material name filter.
You can also inherit a new material via the Parameters window: select a surface, go to the Material section and click right to the field with the material name. The inherited material will be assigned to the currently selected surface automatically.
Inheriting via Asset Browser#
To inherit a material via the Asset Browser, select the material asset, right-click it and choose Create Child in the drop-down list. The new material will be added to the Materials Hierarchy window and linked to the created asset.
Reparenting a Material#
To change the parent material (reparent), select the target material in the hierarchy and drag it with the left mouse button pressed to the desired parent.

The parent material, to which the child material will be added, is highlighted with the white frame:

You can also move the material to a position alongside the child materials of the desired parent: the material will be added as a child to this parent material in alphabetical order. The position in the hierarchy is highlighted with the white line during moving.

Assigning a Material#
A material can be assigned to the entire node (i.e., to all its surfaces), several surfaces or a single surface of the node.
To assign a material to a surface (or surfaces) of a node, select the node, select the target surface (surfaces) and perform one of the following:
-
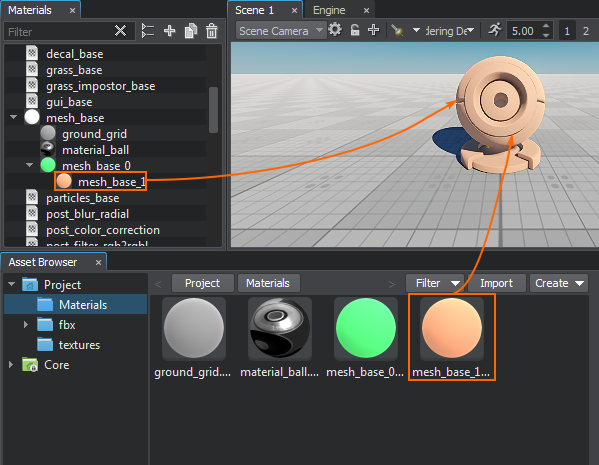
Drag the material from the Materials Hierarchy window or the icon of the material asset from the Asset Browser to the field with the material asset name in the Parameters window.

-
Drag the material from the Materials Hierarchy window or the icon of the material asset from the Asset Browser to the target surface in the Editor Viewport.
-
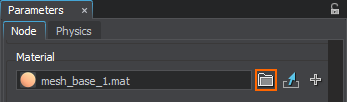
Use the button next to the field with the material asset name in the Parameters window (the Node tab) to choose the desired material asset.
-
Type the name of the material asset to the field with the material asset name in the Parameters window (the Node tab) manually. If an asset with the specified name exists in the project, it will be shown in the drop-down list while typing.