Начало работы с VR
 The article reviews the creation of C++ VR projects only. В статье рассматривается создание только проектов C ++ VR.
 This article is for anyone who wants to start developing Virtual Reality projects in UNIGINE and is highly recommended for all new users. We're going to look into the VR Sample demo to see what's inside and learn how to use it to create our own project for VR. We're also going to consider some simple examples of making modifications and extending the basic functionality of this sample. Эта статья предназначена для всех, кто хочет начать разработку проектов виртуальной реальности в UNIGINE, и настоятельно рекомендуется всем новым пользователям. Мы собираемся изучить демонстрацию VR Sample, чтобы увидеть, что внутри, и узнать, как использовать ее для создания нашего собственного проекта для VR. Мы также рассмотрим несколько простых примеров внесения изменений и расширения основных функций этого примера.
So, let's get started! Итак, приступим!
VR SampleVR Sample#
Thinking about VR developers we created the VR Sample demo enabling you to jump straight in and start creating projects of your own. It supports Oculus Rift, HTC Vive / Vive Pro out-of-the-box. Думая о разработчиках виртуальной реальности, мы создали демо-версию VR Sample, позволяющую сразу приступить к созданию собственных проектов. Он поддерживает Oculus Rift, HTC Vive / Vive Pro "из коробки".
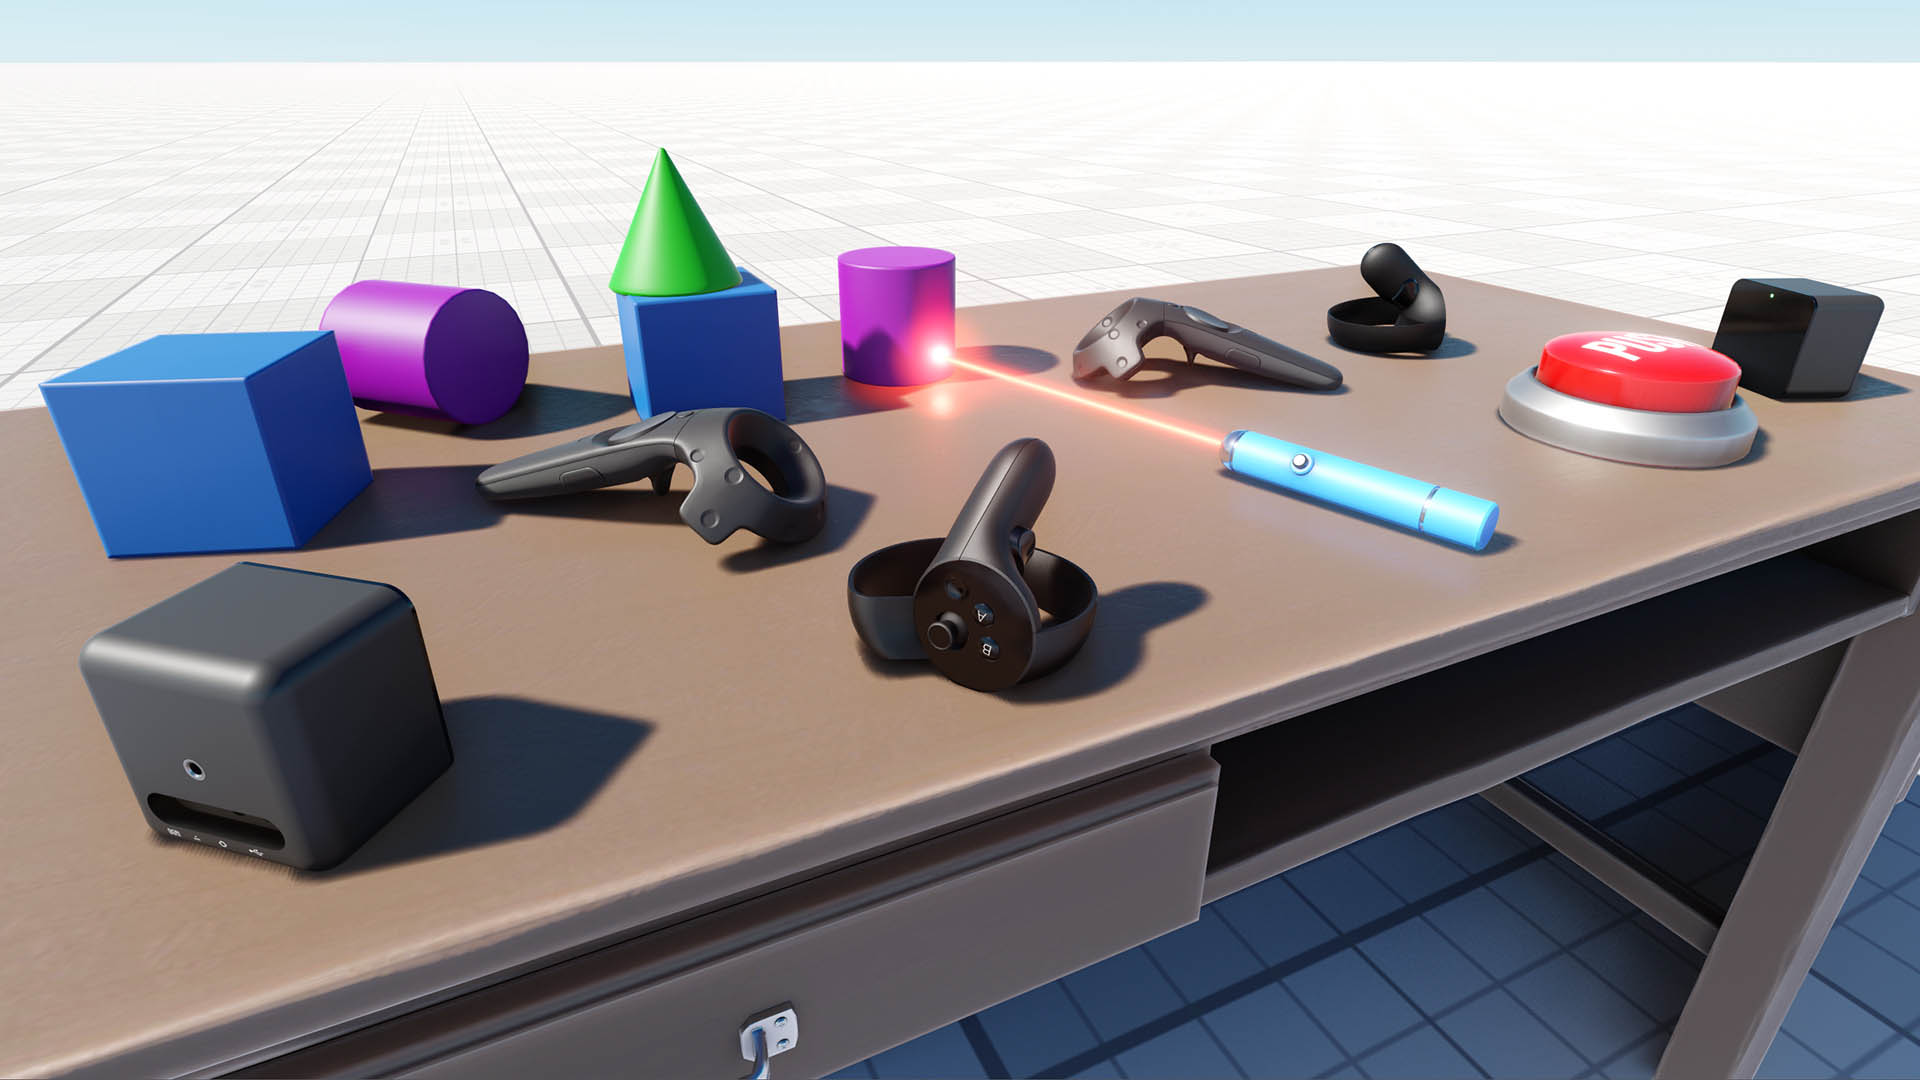
We recommend to use this demo as a basis for your VR project. Here you'll find a set of 3D models of all popular VR controllers, as well as implementation of basic mechanics such as grabbing and trowing objects, pressing buttons, opening/closing drawers and a lot more. Рекомендуем использовать эту демонстрацию как основу для вашего VR-проекта. Здесь вы найдете набор 3D-моделей всех популярных контроллеров VR, а также реализацию основных механик, таких как захват и толкание объектов, нажатие кнопок, открытие / закрытие ящиков и многое другое.
The world in this sample project has its settings optimized for best performance in VR and includes a .render asset that can be loaded at any time by simply double-clicking on it in the Asset Browser to reset any changes you made to default optimized values. Мир в этом образце проекта имеет свои настройки, оптимизированные для лучшей производительности в VR, и включает ресурс .render, который можно загрузить в любое время, просто дважды щелкнув его в Asset Browser для сброса любые изменения, внесенные вами в оптимизированные значения по умолчанию. The sample project is created using the Component System, so the functionality of each object is determined by the components attached. Пример проекта создается с использованием Component System , поэтому функциональность каждого объекта определяется присоединенными компонентами.
You can extend object's functionality simply by adding more components to it. For example, the laser pointer object has the following components attached: Вы можете расширить функциональность объекта, просто добавив к нему дополнительные компоненты. Например, к объекту лазерной указки прикреплены следующие компоненты:
- ObjMovable - enables grabbing and trowing an object ObjMovable - позволяет хватать и бросать объект
- ObjLaserPointer - enables casting a ray of light by the object ObjLaserPointer - позволяет отбрасывать луч света на объект.
1. Making a Template Project1. Создание шаблонного проекта#
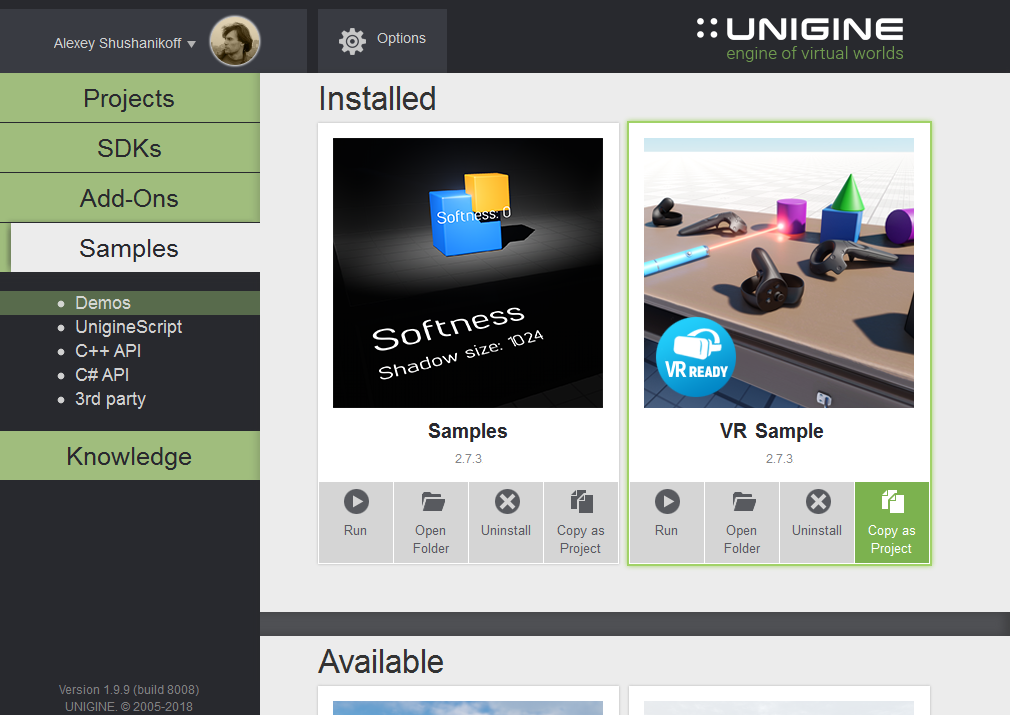
So, ok we have a cool demo with some stuff inside, but how do we use it as a template? It's simple - just open your SDK Browser go to the Samples tab and select Demos. Итак, у нас есть классная демонстрация с некоторыми вещами внутри, но как нам использовать ее в качестве шаблона? Это просто - просто откройте свой SDK Browser, перейдите на вкладку Примеры и выберите Демо .
Find the VR Sample in the Available section and click Install. After installation the demo will appear in the Installed section, and you can click Copy as Project to create a project based on this sample. Найдите VR Sample в разделе Available и щелкните Install. После установки демоверсия появится в разделе Installed, и вы можете нажать Copy as Project, чтобы создать проект на основе этого образца.
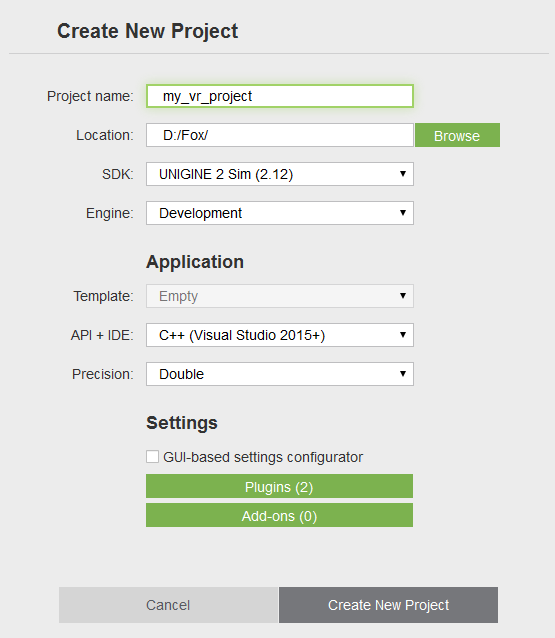
In the Create New Project window, that opens, enter the name for your new VR project in the corresponding field and click Create New Project. В открывшемся окне Create New Project введите имя вашего нового проекта VR в соответствующее поле и нажмите Create New Project.
2. Setting Up a Device and Configuring Project2. Настройка устройства и настройка проекта.#
Suppose you have successfully installed your Head-Mounted Display (HMD) of choice (please visit Oculus Rift Setup or HTC Vive Setup in case you did not). In case you are having difficulties getting your HTC Vive to work, this Troubleshooting guide might be helpful. Предположим, вы успешно установили выбранный головной дисплей (HMD) (пожалуйста, посетите Oculus Rift Setup или HTC Vive Setup , если вы этого не сделали). Если у вас возникли проблемы с началом работы HTC Vive, может оказаться полезным это руководство по устранению неполадок .
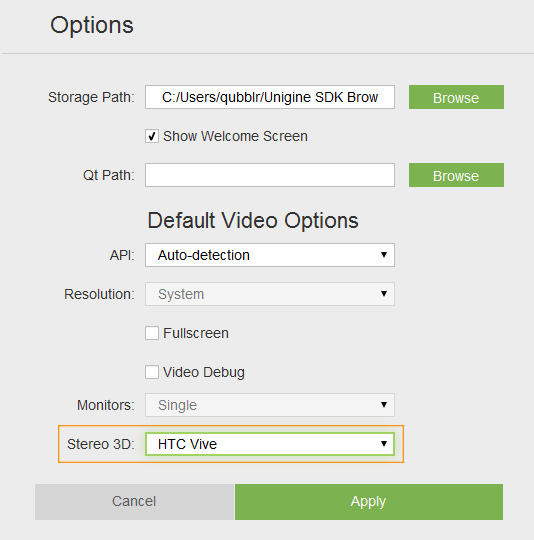
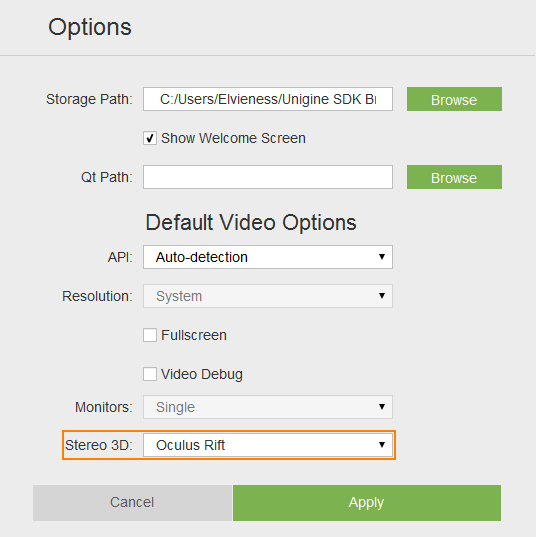
Major VR devices are supported out-of-the-box so the only thing you should do is to make sure that the correct plugin is loaded for your HMD. Основные устройства виртуальной реальности поддерживаются "из коробки", поэтому единственное, что вам нужно сделать, это убедиться, что для вашего HMD загружен правильный плагин.
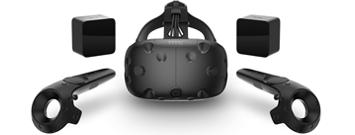
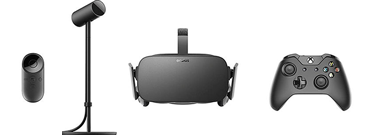
| HTC Vive | Oculus Rift |
|---|---|
 |
 |
|
Shell-команды
|
Shell-команды
|
 You can also specify the plugin to be loaded for your application via the Customize Run Options. Вы также можете указать плагин, который будет загружен для вашего приложения, через Customize Run Options.
 3. Open Project's Source3. Откройте исходный код проекта.#
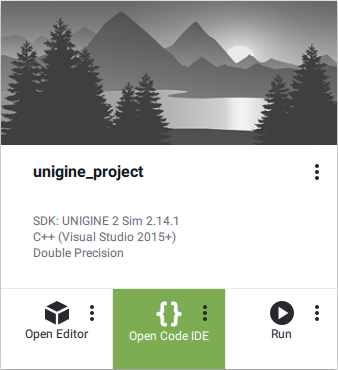
To open your VR project in an IDE select it on the Projects tab of the UNIGINE SDK Browser and click Open Code IDE. Чтобы открыть проект VR в среде IDE, выберите его на вкладке Projects в браузере UNIGINE SDK и нажмите Open Code IDE.
As the IDE opens, you can see, that the project contains a lot of different classes. This brief overview will give you a hint on what are they all about. Когда откроется IDE, вы увидите, что проект содержит много разных классов. Этот краткий обзор даст вам представление о том, о чем они все.
Don't forget to set the appropriate platform and configuration settings for your project before compiling your code in Visual Studio. Не забудьте установить соответствующую платформу и параметры конфигурации для вашего проекта перед компиляцией кода в Visual Studio.

Now, we can try and build our application for the first time. Теперь мы можем попробовать собрать наше приложение в первый раз.
Build your application in Visual Studio (BUILD -> Build Solution) or otherwise, and launch it by selecting the project on the Projects tab of the UNIGINE SDK Browser and clicking Run. Создайте свое приложение на Visual Studio (BUILD -> Build Solution) или другом языке и запустите его, выбрав проект на вкладке Projects в браузере UNIGINE SDK и нажав Run.
Before running your application via the UNIGINE SDK Browser make sure, that appropriate Customize Run Options (Debug version and x64 architecture in our case) are selected, by clicking an ellipsis under the Run button. Перед запуском вашего приложения через браузер UNIGINE SDK убедитесь, что выбран соответствующий Customize Run Options (версия Debug и архитектура x64 в нашем случае), щелкнув многоточие под кнопкой Run.

4. Attaching Objects to HMD4. Присоединение объектов к HMD#
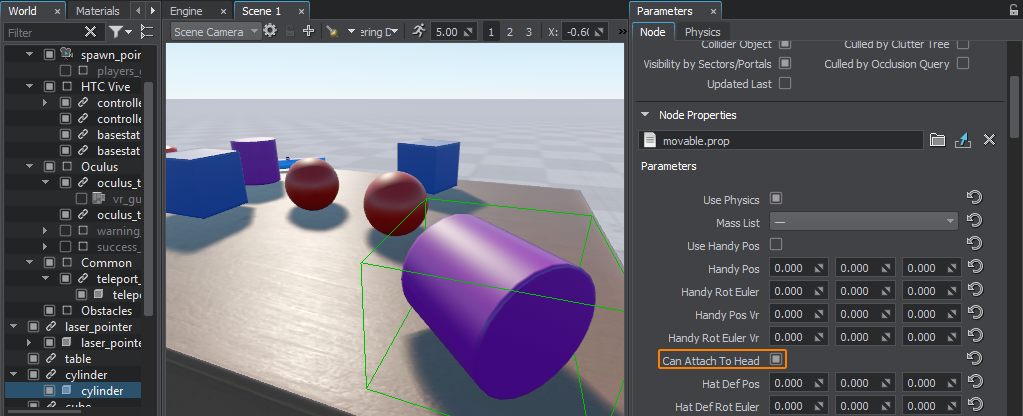
Sometimes it might be necessary to attach some object to the HMD to follow it (e.g. a hat). All movable objects (having the movable.prop property assigned) have a switch enabling this option. Иногда может потребоваться прикрепить к HMD какой-нибудь предмет (например, шляпу). Все подвижные объекты (с назначенным свойством movable.prop) имеют переключатель, включающий эту опцию.
For example, if you want to make a cylinder on the table attachable to the HMD, just select the corresponding node named "cylinder" in the World Hierarchy click Edit in the Reference section and enable the Can Attach to Head option. Например, если вы хотите сделать цилиндр на столе, присоединяемым к HMD, просто выберите соответствующий узел с именем "цилиндр" в поле World Hierarchy, щелкните Edit в разделе Reference и включите параметр Can Attach to Head.
Then select the parent node reference, and click Apply. Затем выберите ссылку на родительский узел и нажмите Apply.
The same thing can be done via code at run time: То же самое можно сделать с помощью кода во время выполнения:
// retrieving a NodeReference named "cylinder" and getting its reference node
NodePtr node = checked_ptr_cast<NodeReference>(World::getNodeByName("cylinder"))->getReference();

// checking if this node is a movable object by trying to get its ObjMovable component
ObjMovable *obj = ComponentSystem::get()->getComponent<ObjMovable>(node);
if (obj != nullptr)
{
	// making the object attachable to the HMD
	obj->can_attach_to_head = 1;
}
5. Adding a New Interaction5. Добавление нового взаимодействия#
Suppose we want to extend the functionality of the laser pointer in our project, that we can grab, throw and use (turn on) for now, by adding an alternative use action (change material of the object being pointed at, when certain button is pressed). Предположим, мы хотим расширить функциональность лазерной указки в нашем проекте, чтобы мы могли захватить , бросить и использовать (включите ) на данный момент, добавив действие альтернативного использования (изменение материала объекта, на который указывает при нажатии определенной кнопки).
So, we're going to add a new altUseIt() method to the VRInteractable class for this new action and map it to the state of a certain controller button. Итак, мы собираемся добавить новый метод altUseIt() в класс VRInteractable для этого нового действия и сопоставить его с состоянием определенной кнопки контроллера.
VRInteractable.h
#pragma once
#include <UnigineNode.h>
#include <UniginePhysics.h>
#include "../Framework/ComponentSystem.h"
#include "Players/VRPlayer.h"

using namespace Unigine;
using namespace Math;

class VRPlayer;

class VRInteractable : public ComponentBase
{
public:
	// ...

	// interact methods
	virtual void grabIt(VRPlayer* player, int hand_num) {}
	virtual void holdIt(VRPlayer* player, int hand_num) {}
	virtual void useIt(VRPlayer* player, int hand_num) {}
	virtual void altuseIt(VRPlayer* player, int hand_num) {} //<-- method for new alternative use action
	virtual void throwIt(VRPlayer* player, int hand_num) {}
};
Declare and implement an override of the altUseIt() method for our laser pointer in the ObjLaserPointer.h and ObjLaserPointer.cpp files respectively: Объявите и реализуйте переопределение метода altUseIt() для нашей лазерной указки в файлах ObjLaserPointer.h и ObjLaserPointer.cpp соответственно:
ObjLaserPointer.h
#pragma once
#include <UnigineWorld.h>
#include "../VRInteractable.h"

class ObjLaserPointer : public VRInteractable
{
public:
	// ...

	// interact methods
	// ...
	// alternative use method override
	void altuseIt(VRPlayer* player, int hand_num) override;

	// ...

private:
	// ...
	int change_material;	//<-- "change material" state

	// ...
};
ObjLaserPointer.cpp
// ...

void ObjLaserPointer::init()
{
  	// setting the "change material" state to 0
	change_material = 0;

    // ...
}

void ObjLaserPointer::update()
{
	if (laser->isEnabled())
	{
      	// ...
      		// show text

		if (hit_obj && hit_obj->getProperty() && grabbed)
		{
			//---------CODE TO BE ADDED TO PERFORM MATERIAL SWITCHING--------------------
			if (change_material)// if "alternative use" button was pressed
			{
				// change object's material to mesh_base
				hit_obj->setMaterial("mesh_base", "*");
			}
			//---------------------------------------------------------------------------
			// ...
		}
		else
			obj_text->setEnabled(0);
	}
	// unsetting the "change material" state
	change_material = 0;
}

// ...

// alternative use method override
void ObjLaserPointer::altuseIt(VRPlayer* player, int hand_num)
{
	// setting the "change material" state
	change_material = 1;
}

// ...
Now, we're going to map this action to the state of the YB controller button. For this purpose we should modify the VRPlayer class (which is the base class for all VR players) by adding the following code to its postUpdate() method: Теперь мы собираемся сопоставить это действие с состоянием кнопки контроллера YB . Для этого мы должны изменить класс VRPlayer (который является базовым классом для всех VR-плееров), добавив следующий код к его методу postUpdate():
VRPlayer.cpp
// ...

void VRPlayer::postUpdate()
{
	for (int i = 0; i < getNumHands(); i++)
	{
		int hand_state = getHandState(i);
		if (hand_state != HAND_FREE)
		{
			auto &components = getGrabComponents(i);

            // ...
            //-------------CODE TO BE ADDED--------------------------
			// alternative use of the grabbed object
			if (getControllerButtonDown(i, BUTTON::YB))
			{
				for (int j = 0; j < components.size(); j++)
					components[j]->altuseIt(this, i);
				// add callback processing if necessary
			}
            //--------------------------------------------------------
		}
	}
	update_button_states();
}

// ...
6. Changing Default Look of VR Controllers6. Изменение внешнего вида контроллеров VR по умолчанию#
In your VR Application you might want to display hands instead of standard controllers included in the sample (e.g. for HTC Vive). В своем приложении VR вы можете захотеть отображать руки вместо стандартных контроллеров, включенных в образец (например, для HTC Vive).
This is simple - just perform the following steps: Это просто - выполните следующие действия:
- Open the world in the UnigineEditor Откройте мир в UnigineEditor
- Select VR -> spawn_point (a Dummy Player node with the VRPlayerSpawner component) in the World Hierarchy window and go the the Node Properties section in the Parameters window.
ПримечаниеBasic VR Player settings (the look of controllers and teleport points, teleport ray color, hand force multiplier for physical interactions, spawn point location, etc.) can be customized via the VRPlayerSpawner component or the fields of corresponding vr_player_spawner.prop property.Выберите VR -> spawn_point (узел Dummy Player с компонентом VRPlayerSpawner) в окне World Hierarchy и перейдите в раздел Node Properties в окне Parameters.Basic VR Player settings (the look of controllers and teleport points, teleport ray color, hand force multiplier for physical interactions, spawn point location, etc.) can be customized via the VRPlayerSpawner component or the fields of corresponding vr_player_spawner.prop property.Basic VR Player settings (the look of controllers and teleport points, teleport ray color, hand force multiplier for physical interactions, spawn point location, etc.) can be customized via the VRPlayerSpawner component or the fields of corresponding vr_player_spawner.prop property.ПримечаниеBasic VR Player settings (the look of controllers and teleport points, teleport ray color, hand force multiplier for physical interactions, spawn point location, etc.) can be customized via the VRPlayerSpawner component or the fields of corresponding vr_player_spawner.prop property. Основные настройки VR Player (внешний вид контроллеров и точек телепорта, цвет луча телепорта, множитель силы рук для физических взаимодействий, местоположение точки появления и т. д.) можно настроить с помощью компонента VRPlayerSpawner или полей соответствующего свойства vr_player_spawner.prop.
- Drag the desired node for each hand from the World Nodes Hierarchy window or Editor Viewport to the corresponding field of the vr_player_spawner.prop property.
For example, we can make Vive controllers look like Oculus Touch by dragging oculus_touch_left and oculus_touch_right nodes to Vive Left Controller and Vive Right Controller fields respectively.
Перетащите требуемый узел для каждой руки из окна иерархии World Nodes или Editor Viewport в соответствующее поле свойства vr_player_spawner.prop. Например, мы можем сделать контроллеры Vive похожими наOculus Touchперетаскивая узлы oculus_touch_left и oculus_touch_right в поля Vive Left Controller и Vive Right Controller соответственно.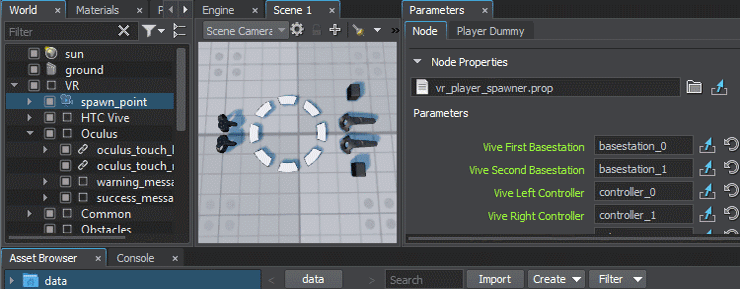
- Save the world and launch your VR application, your Vive controllers will look like Oculus Touch in VR. Сохраните мир и запустите свое приложение VR, ваши контроллеры Vive будут выглядеть как Oculus Touch в VR.
The same thing can be done via code at run time: То же самое можно сделать с помощью кода во время выполнения:
This code should be executed before the VR Player is spawned. So, it should be put to the AppWorldLogic::init(). Этот код должен быть выполнен перед созданием VR Player. Значит, его следует поместить в AppWorldLogic::init(). // AppWorldLogic.cpp
NodeReferencePtr left_hand_node; // node reference to be used for the left controller
NodeReferencePtr right_hand_node; // node reference to be used for the right controller
// ...
int AppWorldLogic::init()
{
// getting the "spawn_point" node
NodePtr player_node = World::getNodeByName("spawn_point");
// creating nodes to replace default Vive controllers (you can use custom *.node files for left and right hand)
left_hand_node = NodeReference::create("/vr_template/oculus/oculus_touch_left.node");
right_hand_node = NodeReference::create("/vr_template/oculus/oculus_touch_right.node");
// checking if this node is a spawn point by trying to get its VRPlayerSpawner component
VRPlayerSpawner *player_spawner = ComponentSystem::get()->getComponent<VRPlayerSpawner>(player_node);
if (player_spawner != nullptr)
{
// setting new nodes to visualize Vive controllers
player_spawner->vive_controller_0 = left_hand_node->getNode();
player_spawner->vive_controller_1 = right_hand_node->getNode();
}
// ...
}7. Adding a New Interactable Object7. Добавление нового интерактивного объекта#
The next step in extending the functionality of our VR Sample is adding a new interactable object. Следующим шагом в расширении функциональности нашего VR Sample является добавление нового интерактивного объекта.
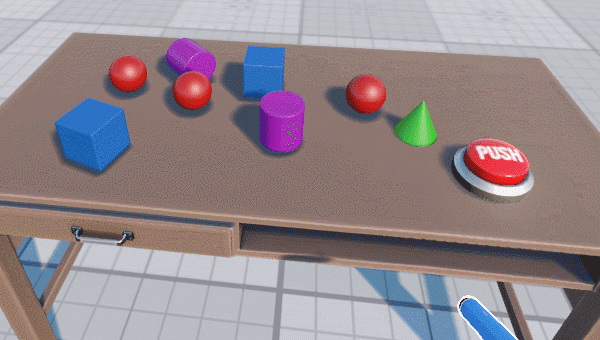
Let's add a new type of interactable object, that we can grab, hold and throw with an additional feature: object will change its form (to a certain preset) when we grab it, and restore it back, when we release it. It will also display certain text in the console, if the corresponding option is enabled. Давайте добавим новый тип взаимодействующего объекта, который мы можем захватывать, удерживать и бросать с дополнительной функцией: объект изменит свою форму (до определенной предустановки), когда мы захватим его, и восстановим его, когда мы его отпустим. . Он также будет отображать определенный текст в консоли, если соответствующая опция включена.
![]()
So, we're going to use the following components: Итак, мы собираемся использовать следующие компоненты:
- ObjMovable - to enable basic grabbing and trowing functionality ObjMovable - для включения основных функций захвата и метания
- new ObjTransformer component to enable form changing and log message printing functionality новый компонент ObjTransformer для включения функции изменения формы и печати сообщений журнала
The following steps are to be performed: Необходимо выполнить следующие шаги:
- Add a new ObjTransformer class inherited from the VRInteractable. In Visual Studio we can do it by choosing Project → Add Class from the main menu, clicking Add, specifying class name and base class in the window that opens, and clicking Finish:
Добавьте новый класс ObjTransformer, унаследованный отVRInteractable. ВVisual Studioмы можем сделать это, выбрав Проект → Добавить класс в главном меню, нажав Добавить , указав имя класса и базовый класс в в открывшемся окне и нажав Готово :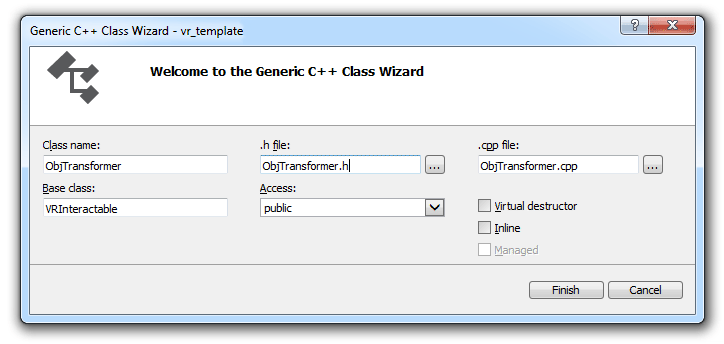
- Implement functionality of transformation to the specified node on grabbing, and restoring previous form on releasing a node
Below you'll find header and implementation files for our new ObjTransformer class:Below you'll find header and implementation files for our new ObjTransformer class:
ObjTransformer.h
Исходный код (C++)#pragma once #include <UnigineNode.h> #include "Components/VRInteractable.h" #include "Framework/Utils.h" class ObjTransformer : public VRInteractable { public: ObjTransformer(const NodePtr &node, int num) : VRInteractable(node, num) {} virtual ~ObjTransformer() {} // property name UNIGINE_INLINE static const char* getPropertyName() { return "transformer"; } // parameters PROPERTY_PARAMETER(Toggle, show_text, 1); // Flag indicating if messages are to be printed to the console PROPERTY_PARAMETER(String, text, "TRANSFORMATION"); // Text to be printed to the console when grabbing or releasing the node PROPERTY_PARAMETER(Node, target_object); // Node to be displayed instead of the transformer-node, when it is grabbed // interact methods void grabIt(VRPlayer* player, int hand_num) override; // override grab action handler void throwIt(VRPlayer* player, int hand_num) override; // override trow action handler void holdIt(VRPlayer* player, int hand_num) override; // override hold action handler protected: void init() override; };Below you'll find header and implementation files for our new ObjTransformer class:Реализовать функциональность преобразования в указанный узел при захвате и восстановление предыдущей формы при освобождении узлаObjTransformer.cpp
Исходный код (C++)#include "ObjTransformer.h" REGISTER_COMPONENT( ObjTransformer ); // macro for component registration by the Component System // initialization void ObjTransformer::init(){ // hiding the target object (if any) if (target_object){ target_object->setEnabled(0); } } // grab action handler void ObjTransformer::grabIt(VRPlayer* player, int hand_num) { // if a target object is assigned, showing it, hiding the original object and displaying a message in the log if (target_object){ target_object->setEnabled(1); // hide original object's surfaces without disabling components ObjectPtr obj = checked_ptr_cast<Object>(node); for (int i = 0; i < obj->getNumSurfaces(); i++) obj->setEnabled(0, i); if (show_text) Log::message("\n Transformer's message: %s", text.get()); } } // throw action handler void ObjTransformer::throwIt(VRPlayer* player, int hand_num) { // if a target object is assigned, hiding it, and showing back the original object if (target_object){ target_object->setEnabled(0); // show original object's surfaces back ObjectPtr obj = checked_ptr_cast<Object>(node); for (int i = 0; i < obj->getNumSurfaces(); i++) obj->setEnabled(1, i); } } // hold action handler void ObjTransformer::holdIt(VRPlayer* player, int hand_num) { // changing the position of the target object target_object->setWorldPosition(player->getHandNode(hand_num)->getWorldPosition()); }Below you'll find header and implementation files for our new ObjTransformer class: Ниже вы найдете файлы заголовков и реализации для нашего нового класса ObjTransformer: ObjTransformer.h
Исходный код (C++)#pragma once #include <UnigineNode.h> #include "Components/VRInteractable.h" #include "Framework/Utils.h" class ObjTransformer : public VRInteractable { public: ObjTransformer(const NodePtr &node, int num) : VRInteractable(node, num) {} virtual ~ObjTransformer() {} // property name UNIGINE_INLINE static const char* getPropertyName() { return "transformer"; } // parameters PROPERTY_PARAMETER(Toggle, show_text, 1); // Flag indicating if messages are to be printed to the console PROPERTY_PARAMETER(String, text, "TRANSFORMATION"); // Text to be printed to the console when grabbing or releasing the node PROPERTY_PARAMETER(Node, target_object); // Node to be displayed instead of the transformer-node, when it is grabbed // interact methods void grabIt(VRPlayer* player, int hand_num) override; // override grab action handler void throwIt(VRPlayer* player, int hand_num) override; // override trow action handler void holdIt(VRPlayer* player, int hand_num) override; // override hold action handler protected: void init() override; };ObjTransformer.cpp
Исходный код (C++)#include "ObjTransformer.h" REGISTER_COMPONENT( ObjTransformer ); // macro for component registration by the Component System // initialization void ObjTransformer::init(){ // hiding the target object (if any) if (target_object){ target_object->setEnabled(0); } } // grab action handler void ObjTransformer::grabIt(VRPlayer* player, int hand_num) { // if a target object is assigned, showing it, hiding the original object and displaying a message in the log if (target_object){ target_object->setEnabled(1); // hide original object's surfaces without disabling components ObjectPtr obj = checked_ptr_cast<Object>(node); for (int i = 0; i < obj->getNumSurfaces(); i++) obj->setEnabled(0, i); if (show_text) Log::message("\n Transformer's message: %s", text.get()); } } // throw action handler void ObjTransformer::throwIt(VRPlayer* player, int hand_num) { // if a target object is assigned, hiding it, and showing back the original object if (target_object){ target_object->setEnabled(0); // show original object's surfaces back ObjectPtr obj = checked_ptr_cast<Object>(node); for (int i = 0; i < obj->getNumSurfaces(); i++) obj->setEnabled(1, i); } } // hold action handler void ObjTransformer::holdIt(VRPlayer* player, int hand_num) { // changing the position of the target object target_object->setWorldPosition(player->getHandNode(hand_num)->getWorldPosition()); } - Build your application and launch it as we did earlier, a new property file (transformer.prop) will be generated for our new component. Создайте приложение и запустите его, как мы это делали ранее , для нашего нового компонента будет создан новый файл свойств (transformer.prop).
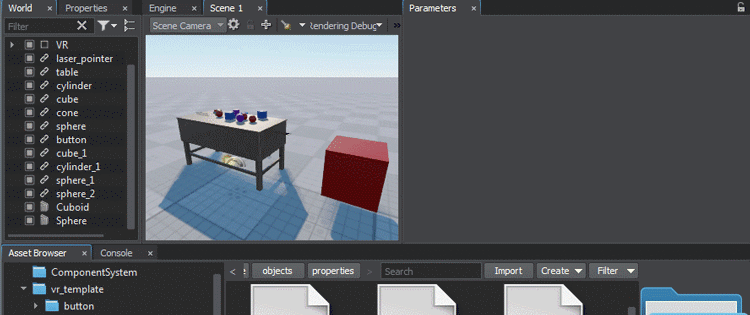
- Open the world in the UnigineEditor, create a new box primitive (Create -> Primitive -> Box), and place it somewhere near the table, create a sphere primitive (Create -> Primitive -> Box) to be used for transformation. Откройте мир в UnigineEditor , создайте новый примитив блока (Create -> Primitive -> Box) и поместите его где-нибудь рядом с таблицей, создайте примитив сферы (Create -> Primitive -> Box), который будет использоваться для преобразования.
-
To add components to the box object select it and click Add New Property in the Node Properties section, then drag the movable.prop property to the new empty field that appears. Repeat the same for the transformer.prop property, and drag the sphere from the World Hierarchy window to the Target Object field. Чтобы добавить компоненты к объекту коробки, выберите его и щелкните Add New Property в разделе Node Properties, затем перетащите свойство movable.prop в появившееся новое пустое поле. Повторите то же самое для свойства transformer.prop и перетащите сферу из окна World Hierarchy в поле Target Object.
- Save your world and close the UnigineEditor. Сохраните свой мир и закройте UnigineEditor.
- Launch your application. Запустите приложение.
8. Restricting Teleportations8. Ограничение телепортации.#
By default it is possible to teleport to any point on the scene. To avoid user interaction errors in VR (e.g. teleporting into walls or ceiling) you can restrict teleportation to certain areas only. To do so perform the following: По умолчанию можно телепортироваться в любую точку сцены. Чтобы избежать ошибок взаимодействия с пользователем в VR (например, телепортации в стены или потолок), вы можете ограничить телепортацию только определенными областями. Для этого выполните следующие действия:
- Create a mesh defining the area you want to restrict user teleportation to; Создайте сетку, определяющую область, в которую вы хотите ограничить телепортацию пользователя;
- Set an intersection mask to the desired surface(s) of this mesh either in the UnigineEditor or using the setIntersectionMask() method:
Исходный код (C++)Установитьintersection maskк желаемой поверхности (ям) этой сетки либо в UnigineEditor, либо с помощьюsetIntersectionMask()метод:
// defining the teleportation mask as a hexadecimal value (e.g. with only the last bit enabled) int teleport_mask = 0x80000000; // setting the teleportation mask to the MyAreaMesh object's surface with the num index MyAreaMesh->setIntersectionMask(num, teleport_mask);Исходный код (C++)// defining the teleportation mask as a hexadecimal value (e.g. with only the last bit enabled) int teleport_mask = 0x80000000; // setting the teleportation mask to the MyAreaMesh object's surface with the num index MyAreaMesh->setIntersectionMask(num, teleport_mask); - Set the same intersection mask for the teleport ray using the following method: VRPlayerVR::setTeleportationMask(teleport_mask).
Установите такую же маску пересечения для луча телепорта, используя следующий метод: VRPlayerVR::setTeleportationMask(teleport_mask).
Multiple meshes can be used to define teleportation area. Для определения области телепортации можно использовать несколько сеток. Where to Go From HereКуда пойти отсюда#
Congratulations! Now, you know how to create your own VR project on the basis of the VR Sample demo, and extend its functionality. So, you can continue developing it on your own. There are some recommendations for you, that might be useful: Поздравляю! Теперь вы знаете, как создать свой собственный VR-проект на основе демо VR Sample и расширить его функциональность. Так что вы можете продолжить разработку самостоятельно. Вот несколько рекомендаций, которые могут быть полезны:
- Try to analyse the source code of the sample further and figure out how it works, use it to write your own. Попытайтесь проанализировать исходный код примера и выяснить, как он работает, используйте его, чтобы написать свой собственный.
- Read the Virtual Reality Best Practices article for more information and useful tips on preparing content for VR and making user experience better. Прочтите статью Virtual Reality Best Practices для получения дополнительной информации и полезных советов по подготовке контента для VR и улучшению взаимодействия с пользователем.
- Read the Component System article for more information on working with the Component System. Прочтите статью Component System для получения дополнительной информации о работе с Component System.
- Check out the Component System Usage Example for more details on implementing logic using the Component System. Ознакомьтесь с Примером использования системы компонентов для получения более подробной информации о реализации логики с использованием системы компонентов.
You can select the VR project template when creating a new application via the SDK Browser to create an empty VR application from scratch (having demo content and code stripped off). Вы можете выбрать шаблон проекта VR при создании нового приложения через SDK Browser , чтобы создать пустое VR-приложение с нуля (с удаленным демонстрационным контентом и кодом).