Организация нод
In Unigine, nodes are organized in a hierarchy that can be managed via the World Nodes window. В Unigine ноды организованы в виде иерархии, которой можно управлять через окно World Nodes.
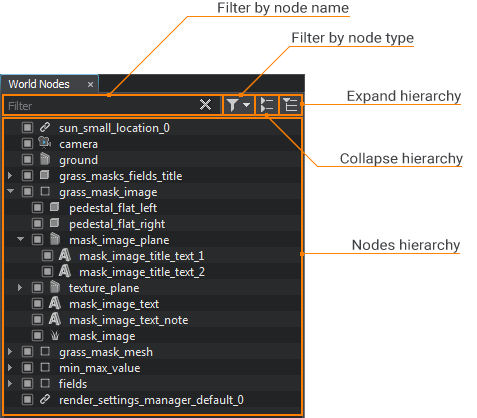
This window contains all nodes existing in the current world. Some nodes can be instances of the asset files: meshes, sounds, terrains, instanced nodes, or nodes stored in the *.node files. Это окно содержит все ноды, существующие в текущем мире. Некоторые ноды могут быть экземплярами ассет-файлов : меши, звуки, ландшафты, экземпляры нод или ноды, хранящиеся в файлах *.node.
When you add a new node to the scene via the Menu Bar (the Create menu) or by dragging it from the Asset Browser, this node is automatically added to the nodes hierarchy and displayed in the World Nodes window. Когда вы добавляете новую ноду в сцену через Меню (меню Create) или перетаскивая его из Asset Browser, эта нода автоматически добавляется в иерархию и отображается в окне World Nodes.
The World Nodes window allows filtering nodes by name and by type, collapsing nodes hierarchy (showing only the parent nodes and hiding the child ones), expanding nodes hierarchy (showing all nodes added to the world), rearranging, reparenting, cloning, renaming, deleting, and grouping the nodes. Окно World Nodes позволяет фильтровать ноды по имени и по типу, сворачивать иерархию (показывать только родительские ноды и скрывать дочерние), расширять иерархию нод (показывать все ноды, добавленные в мир), переупорядочивать , изменять родительско-дочерние связи , клонировать, переименовывать, удалять, а также группировать ноды.
To open the World Nodes window, choose Windows -> Toggle World Hierarchy in the Menu. Чтобы открыть окно World Nodes, выберите Windows -> Toggle World Hierarchy в Меню.
Toggling NodesВключение/выключение нод#
To toggle a node on and off, left-click the checkbox next to it. If the flag is unchecked, the node will not be rendered.Чтобы включить или выключить ноду, щелкните левой кнопкой мыши флажок рядом с ней. Если флажок снят, нода не будет отображаться.
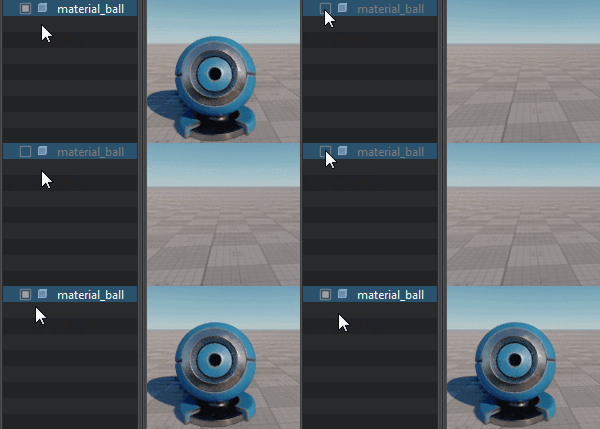
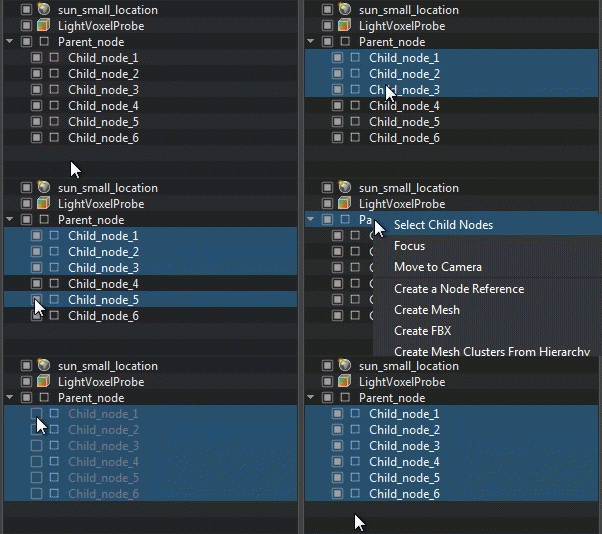
You can also enable and disable a group of selected nodes:Вы также можете включать и отключать группу выбранных нод:
A node can also be disabled and enabled in the Parameters window.Ноду также можно отключить и включить в окне Parameters.
Renaming NodesПереименование нод#
To rename a node, select it in the World Nodes and left-click it once again (slow double-clicking) to enter a new name.Чтобы переименовать ноду, выберите ее в World Nodes и еще раз щелкните по ней левой кнопкой мыши (медленный двойной щелчок), чтобы ввести новое имя.
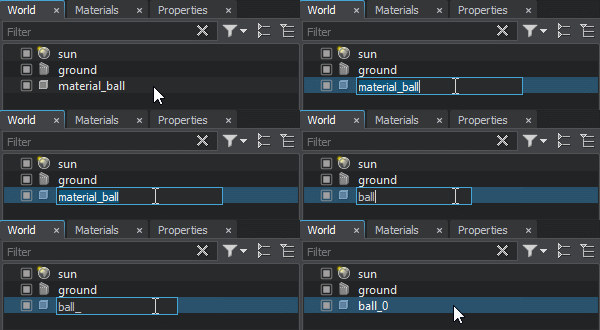
You can also right-click a node, choose Rename in the drop-down list, and type a new name. Вы также можете щелкнуть по ноде правой кнопкой мыши, выбрать Rename в раскрывающемся списке и ввести новое имя.
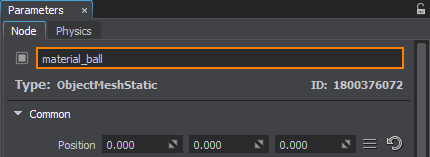
A node can also be renamed in the Parameters window: Ноду также можно переименовать в окне Parameters:
Rearranging NodesПереупорядочение нод#
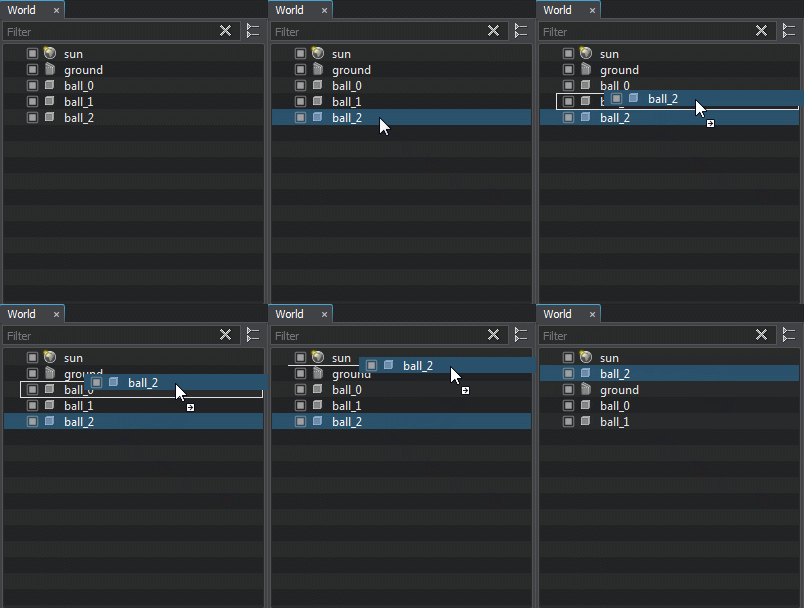
To move a node to a specific position in the hierarchy, drag it with the left mouse button pressed. Чтобы переместить ноду в определенную позицию в иерархии, перетащите ее с нажатой левой кнопкой мыши .
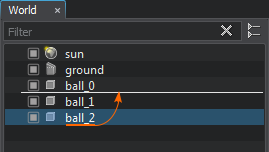
The position in the hierarchy, where the node will be placed, is highlighted with the white line:Положение в иерархии, где будет размещен нода, выделено белой линией :
Setting Up Nodes InheritanceНастройка наследования нод#
Nodes in the scene have hierarchical arrangement: each node (parent node) can have multiple children (child nodes). It allows you, for example, to change the transformation of several nodes only by transforming the parent node. Ноды в сцене имеют иерархическое расположение: каждая нода ( родительская ) может иметь несколько дочерних нод. Это позволяет вам, например, изменить трансформации нескольких нод только путем преобразования родительской ноды.
To collapse or expand the list of child nodes, click the arrow to the left of the parent node.
You can also collapse all child nodes in the World Nodes window by clicking  , or expand the list to see all nodes in the World Nodes by clicking
  .
Чтобы свернуть или развернуть список дочерних нод, щелкните стрелку слева от родительской ноды.
Вы также можете свернуть все дочерние ноды в окне World Nodes, нажав  , или развернуть список, чтобы увидеть все ноды в World Nodes, нажав
  .
.
By default, a new node added to the scene is positioned at the root level of the nodes hierarchy. You can set up its inheritance in one of the ways described below. По умолчанию новая нода, добавленная в сцену, располагается на корневом уровне иерархии нод. Вы можете настроить ее наследование одним из способов, описанных ниже.
Making a Parent NodeСоздание родительской ноды#
To make one node a parent for the other node (or several nodes), select both the parent and the desired child nodes, right-click the parent node, and choose Make Parent in the drop-down list: Чтобы сделать одну ноду родительской для другой ноды (или нескольких нод), выберите родительскую и будущую дочернюю ноды, щелкните правой кнопкой мыши по родительской и выберите Make Parent:
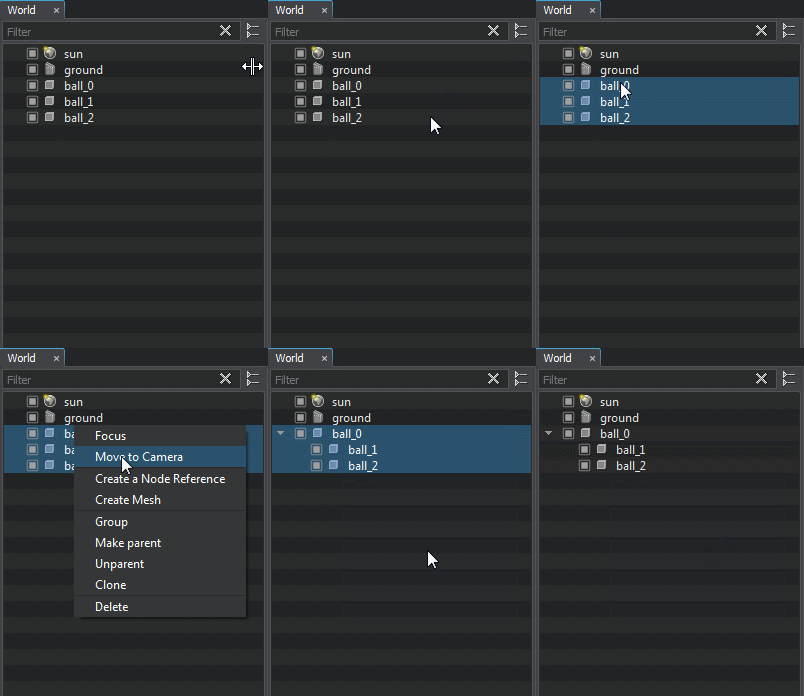
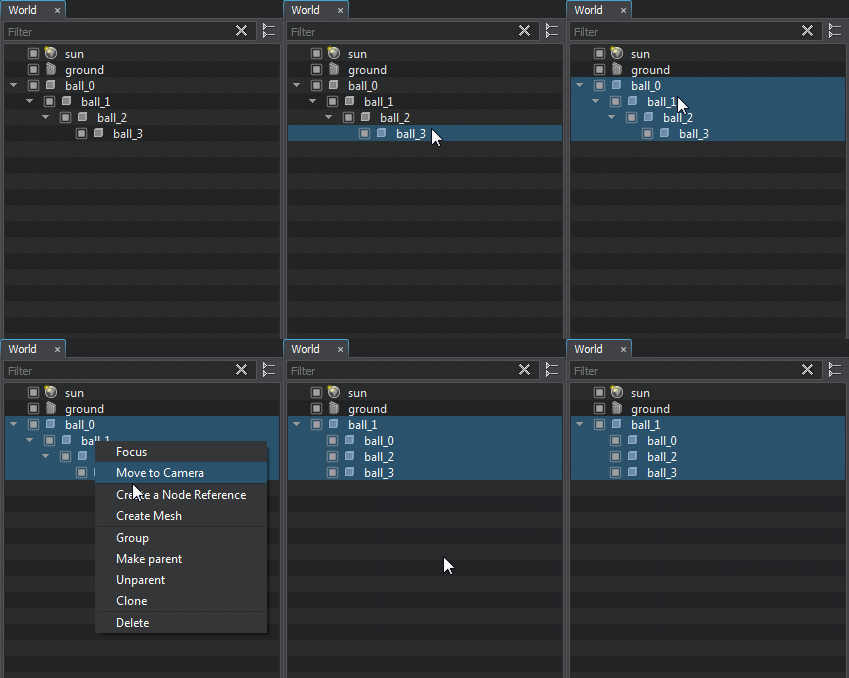
By using this option, you can perform reparenting for the hierarchy tree branch: select the target branch, right-click the desired parent node and choose Make Parent in the drop-down list. It produces the following: Используя этот параметр, вы можете выполнить изменить родительско-дочерние связи для ветви дерева иерархии: выберите целевую ветвь, щелкните правой кнопкой мыши нужную родительскую ноду и выберите Make Parent в раскрывающемся списке. Выдает следующее:
- The new-made parent is always placed at the root level of the hierarchy.Созданный родительский элемент всегда размещается на корневом уровне иерархии.
- The child nodes positioned at the different hierarchy levels are placed at the same level.Дочерние ноды, расположенные на разных уровнях иерархии, размещаются на одном уровне.
Making a Child NodeСоздание дочерней ноды#
To add one node as a child to the other in the hierarchy, or reparent a node, drag it holding the left mouse button to the desired parent node. Чтобы добавить одну ноду в качестве дочерней к другой в иерархии или изменить родительский элемент ноды, перетащите его, удерживая левую кнопку мыши,на желаемую родительскую ноду.
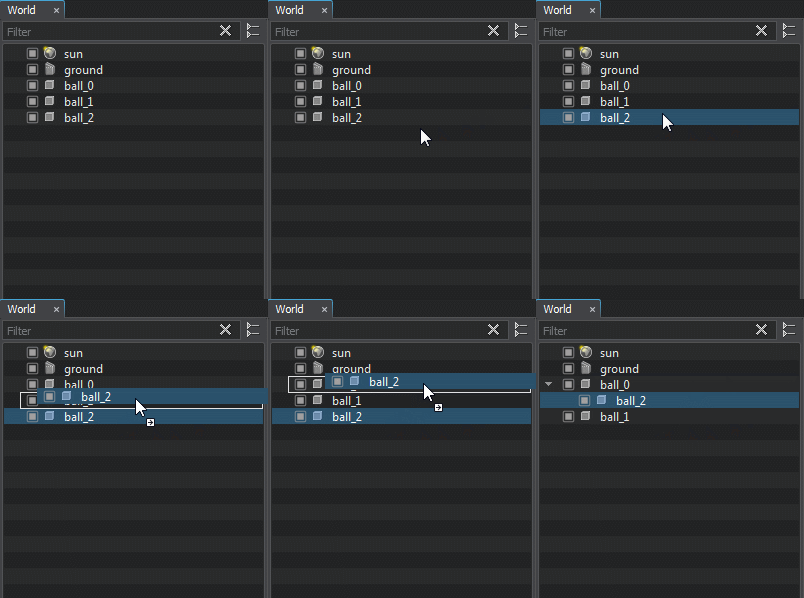
The parent node to which the node will be added, is highlighted with the white frame:Родительская нода, к которой будет добавлена дочерняя, выделена белой рамкой :
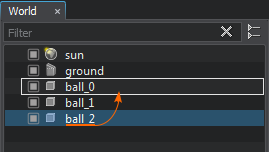
You can also move a node to a specific position alongside the child nodes of the desired parent: the node will be added as a child to this parent node.Вы также можете перетащить ноду в определенную позицию рядом с дочерними нодами желаемого родителя: ноды будет добавлена как дочерняя к этой родительской ноде.

Unparenting a NodeУдаление родительской ноды#
To detach a node from its parent, right-click it and choose Unparent in the drop-down list:Чтобы отделить ноду от ее родителя, щелкните по ней правой кнопкой мыши и выберите Unparent в раскрывающемся списке:
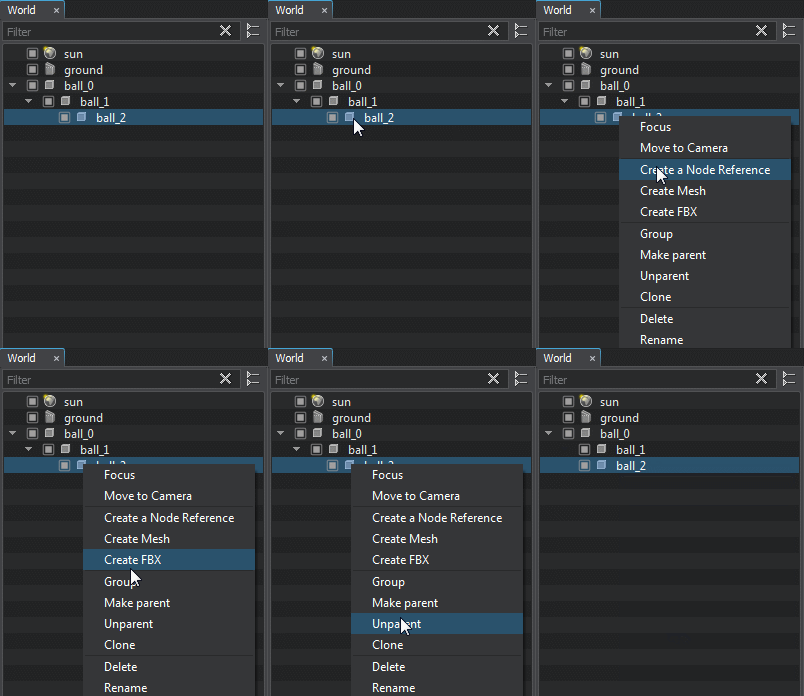
To reset inheritance of a child node (i.e., detach it from all parents and place at the root level of the hierarchy), simply drag it to the corresponding position in the hierarchy. Чтобы сбросить наследование дочерней ноды (т.е. отсоединить его от всех родителей и разместить на корневом уровне иерархии), просто перетащите ее на соответствующую позицию в иерархии.
Cloning a NodeКлонирование ноды#
To clone a node, right-click it and choose Clone in the drop-down list: Чтобы клонировать ноду, щелкните по нему правой кнопкой мыши и выберите Clone в раскрывающемся списке:
You can also select the node and press Ctrl+D to perform the same operation. The new node will be created at the same hierarchy level as the original one, and have the same transformation. If the original node has children, they will be cloned as well. Вы также можете выбрать ноду и нажать Ctrl+D, чтобы выполнить ту же операцию. Новая нода будет создан на том же уровне иерархии, что и исходная, и будет иметь такую же трансформацию. Если у исходной ноды есть дочерние элементы, они также будут клонированы.
Another way to clone a node is to select it, press Shift and drag the node's arrow manipulator. Другой способ клонировать ноду - выбрать ее, нажать Shift и перетащить стрелку-манипулятор ноды.
Deleting a NodeУдаление ноды#
To delete a node from the hierarchy, right-click it and choose Delete in the drop-down list: Чтобы удалить ноду из иерархии, щелкните по ней правой кнопкой мыши и выберите Delete в раскрывающемся списке:
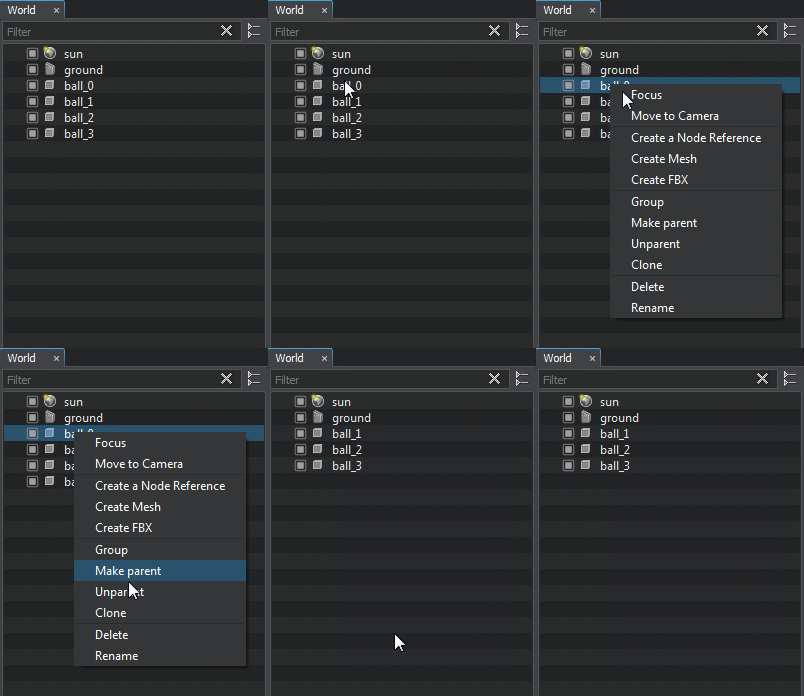
You can also select a node and press DELETE to perform the same operation.Вы также можете выбрать ноду и нажать DELETE, чтобы выполнить ту же операцию.
Deleting a node doesn't lead to deleting the asset it is linked to (if any).Удаление ноды не приводит к удалению ресурса, с которым она связана (если таковой имеется).
Filtering NodesФильтрация нод#
Filtering nodes simplifies managing nodes in a large world.Фильтрация упрощает управление нодами в большом мире.
You can select which node types to display in the World Nodes window: click  and choose the required node types.Вы можете выбрать, какие типы нод отображать в окне World Nodes: щелкните
  и выберите требуемые типы нод.
You can temporary show all objects by clicking Enable All. At that, the current filter settings will be preserved.Вы можете временно показать все объекты, нажав Enable All. При этом текущие настройки фильтра будут сохранены.
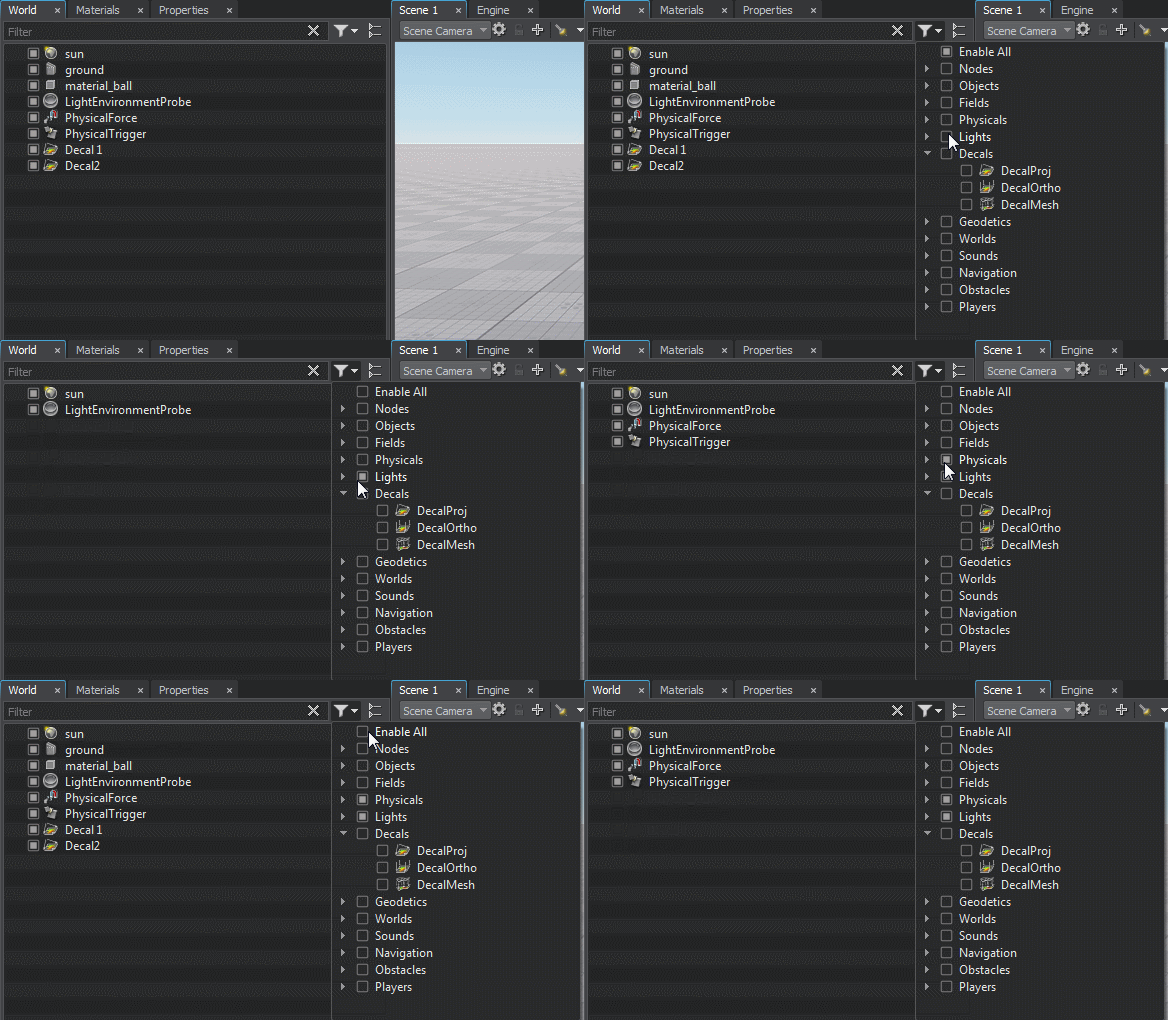
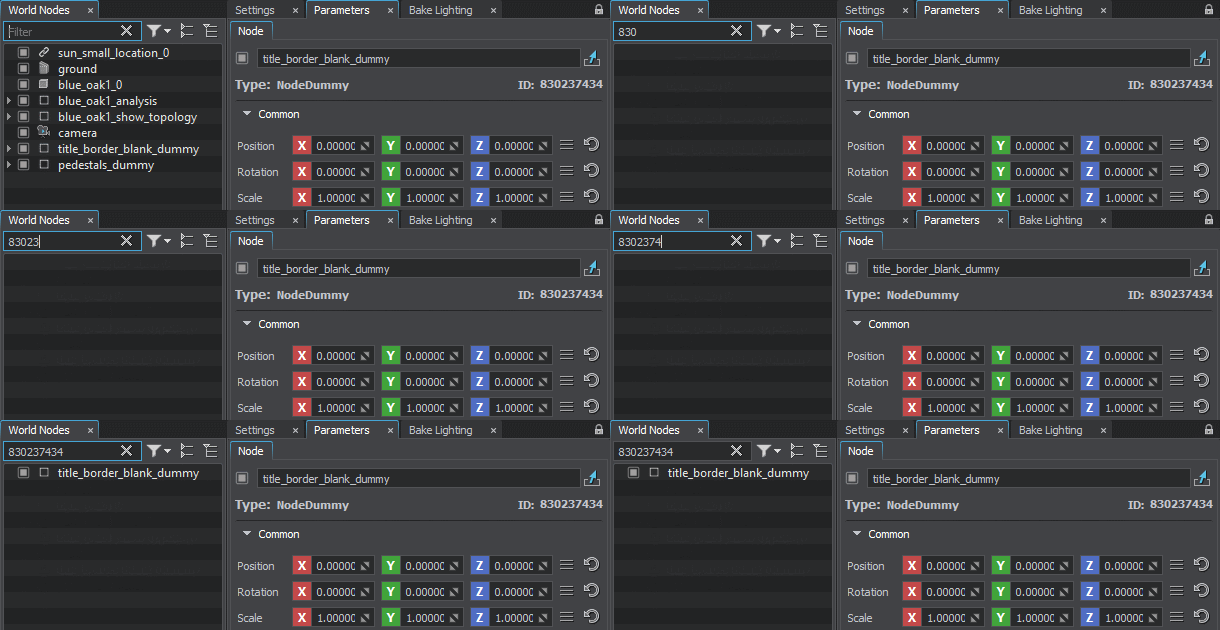
Nodes can be filtered by name or by ID (should be typed in full). Type the node name or ID in the corresponding field.Ноды можно фильтровать по имени или по идентификатору (следует вводить полностью). Введите имя или идентификатор ноды в соответствующее поле.
Grouping NodesГруппировка нод#
Grouping nodes allows managing several nodes simultaneously. The grouped nodes can be transformed as a single node relative to a pivot point Группировка нод позволяет управлять несколькими нодами одновременно. Сгруппированные ноды можно трансформировать как единую ноду относительно заданной точки (pivot)
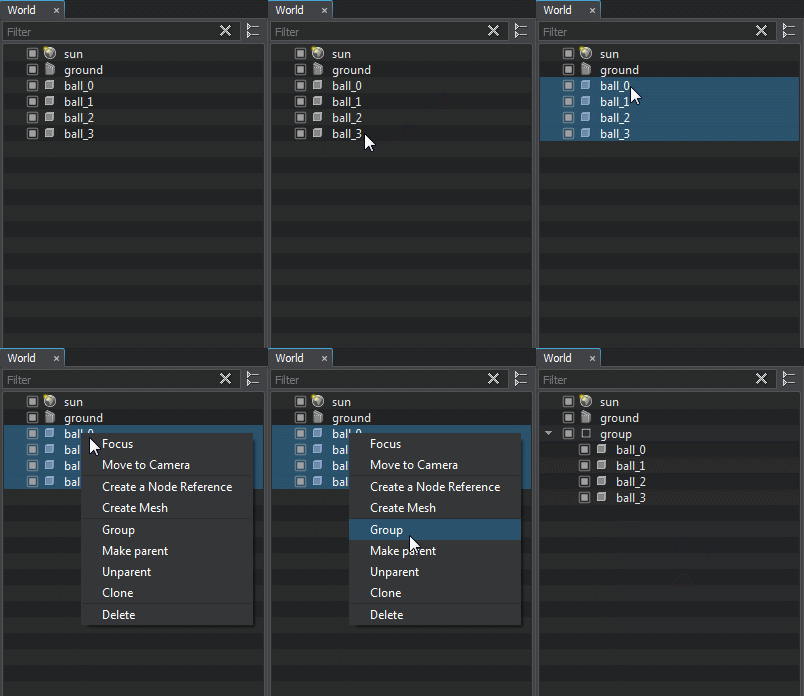
When grouping nodes, a new Dummy Node is created, and all selected nodes become its children. At that, the hierarchy of grouped nodes persists. При группировании нод создается новая нода Dummy Node, и все выбранные ноды становятся ее дочерними элементами. При этом сохраняется иерархия сгруппированных нод.
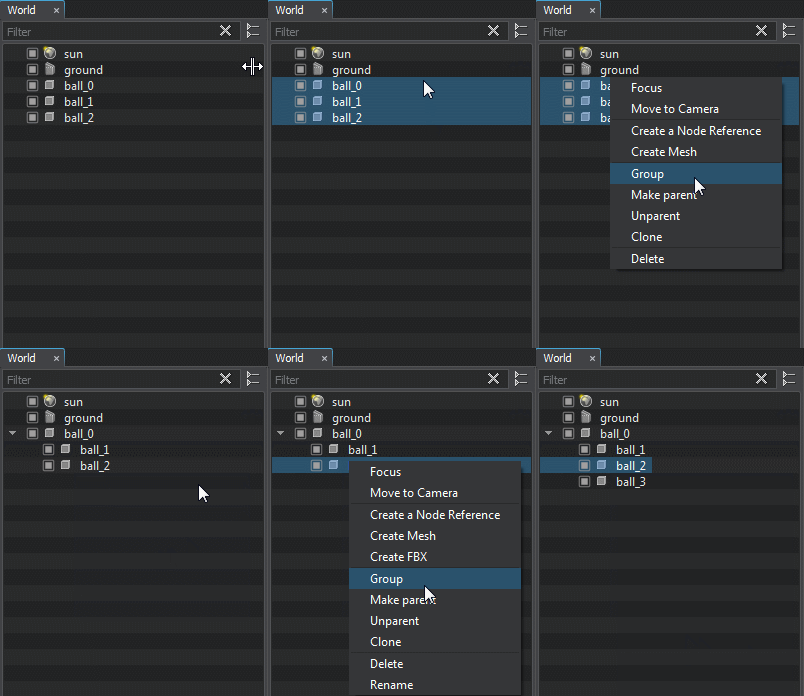
To group nodes, select them, right-click, and choose Group in the drop-down list or press Ctrl+G: Чтобы сгруппировать ноды, выделите их, затем щелкните правой кнопкой мыши и выберите Group в раскрывающемся списке или нажмите Ctrl+G:
The grouped nodes can be selected and transformed as a single node: Сгруппированные ноды можно выбрать и преобразовать как одну ноду:
