VR Best Practices
Virtual Reality (VR) is an immersive medium creating the sensation of being entirely transported into a virtual or digitally reproduced real three-dimensional world. It can provide a lot more convincing experience than screen-based media, and has its peculiarities that should be taken into account.
The best practices described in this article are intended to highlight some key points to be aware of when developing a VR project and help you produce content ensuring a safe and enjoyable VR experience for users.
VR Templates#
Thinking about VR developers, we created two VR templates for C++ and C# and made the VR Sample demo available for C++ (for C# there is a dedicated sample called vr_sample embedded right into the C# VR Template), enabling you to jump straight in and start creating projects of your own.
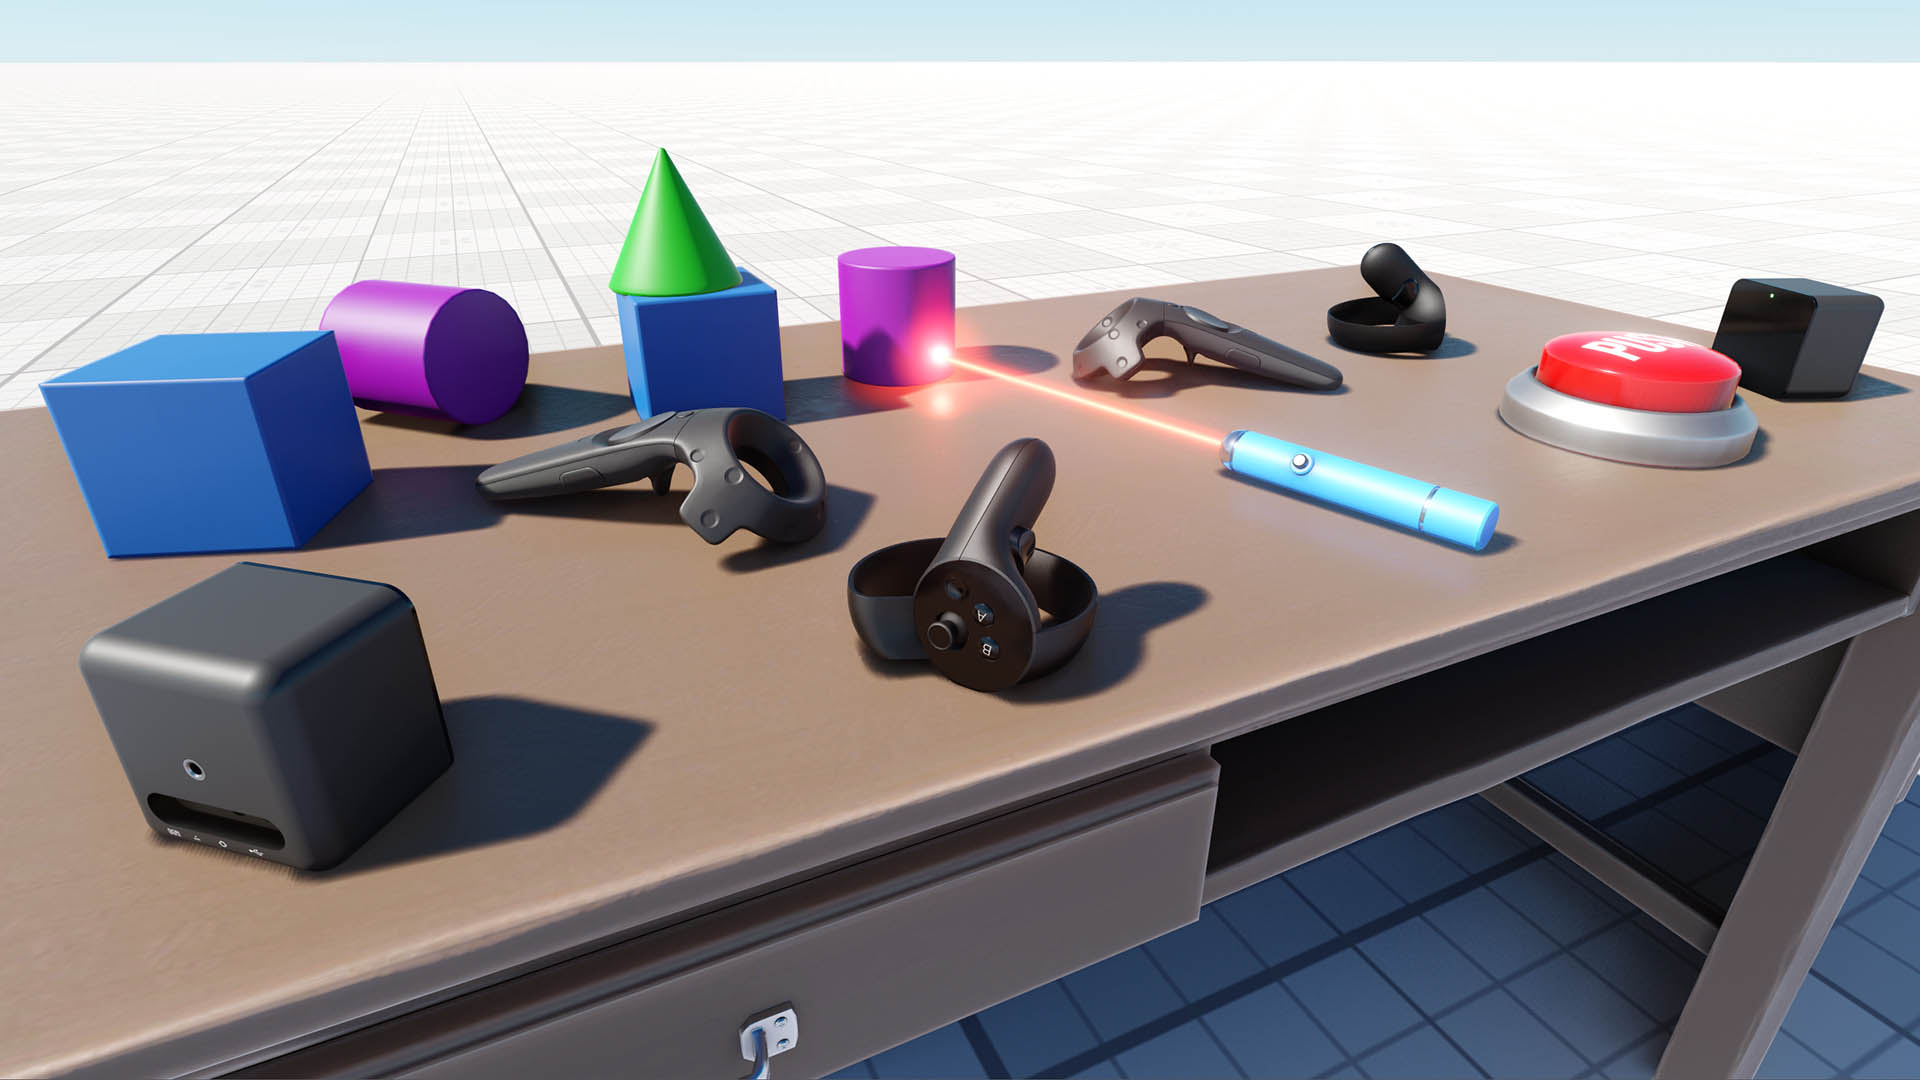
We recommend to use this demo as a basis for your C++ VR project (if you use C# - grab the embedded vr_sample). Here you'll find a set of 3D models of all popular VR controllers, as well as implementation of basic mechanics such as grabbing and trowing objects, pressing buttons, opening/closing drawers and a lot more.
The worlds in the demo-project and embedded sample have their settings optimized for best performance in VR and include a .render asset that can be loaded at any time by simply double-clicking on it in the Asset Browser to reset any changes you made to default optimized values.
Assets Size#
Perception of scale of objects around you is likely to be the key point that makes the difference between VR and a flat picture on the screen. Your models might look "right" on the screen, but in VR you'll surely notice if a table has somewhat unusual height, the size of your chair as well as sizes of objects on your table are wrong.
To deliver the best user experience in VR you must ensure that everything in your world has a correct scale. Failing to meet this requirement may lead to all kinds of sensory issues for users, and could even result in Virtual Reality Sickness.
You can use the following tips to avoid mistakes mentioned above:
- Create all your models keeping their scale as close to real as possible. For example, you should measure the height of your table, windowsill and chair. Having just these parameters and using them as a base to determine the size of your models, will make them realistic.
- Remember, that UNIGINE's unit, like in many other engines, is equal to 1 meter, while in many Digital Content Creation tools it is equal to 1 cm by default for convenience. You can adjust the scale of your 3D models if necessary when importing them by setting the scale factor in geometry import parameters greater or less than 1.
- Test your content in VR. This approach is useful in any case, as we are not just creating virtual copies of existing objects, sometimes it may be necessary to create something new, something that doesn't exist. Such new created objects may require additional scale adjustments to ensure realistic look. It is recommended to create a dummy model first, put it into your world and check it in VR, to ensure that all dimensions are ok. As you're done with the dummy, you may proceed to your 3D model. This approach will help you to avoid painful adjustment of your 3D model's proportions at the final stage.
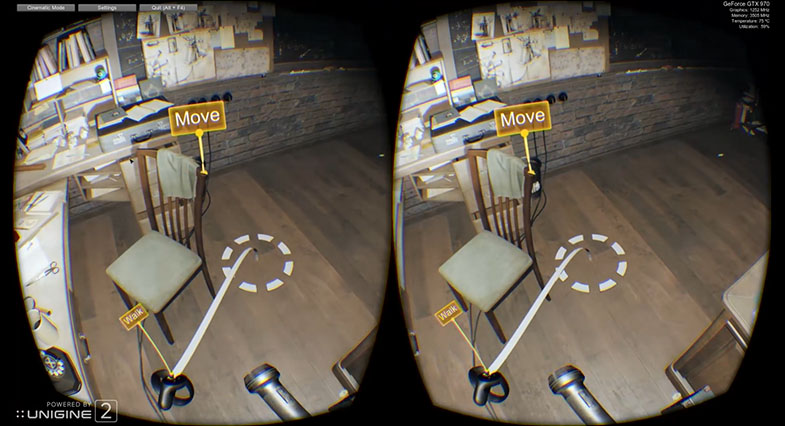
- You can use VR controllers as references for measurement. Imagine, you have a Vive controller in your hand and see its size relative to other objects around you. The 3D model of this controller in your virtual world has the exact scale of the original, So, you can import this model to a DCC tool (3DS Max, Maya, etc.) and use it as a reference when creating other objects.
Please keep in mind that objects in VR are viewed best when they are in a range between 0.75 and 3.5 meters from the player's camera.
Virtual Reality Sickness#
Virtual Reality Sickness is quite similar to motion sickness, it occurs when using VR headsets. It can significantly affect or even ruin user's VR experience, and may be a barrier to the effective use of VR training tools.
Follow the recommendations given below to reduce the risk of VR Sickness and ensure that your users will have a pleasant VR experience:
- You must maintain framerate equal to or greater than the HMD's display refresh rate. Ideally, it should be kept a little bit higher to make sure you always stay above. Lags and dropped frames produce judder which is discomforting in VR. So, make sure to optimize your project as much as possible.
- The worst thing you can do to your user in VR is to display cinematic cutscenes or take control of camera movement in conflict with the user’s real-world self-motion. So, don't do that.
- The Field of View (FOV) must match the physical geometry of the headset and lenses. Otherwise, the world will look warped as you turn your head, which may cause discomfort and nausea. So, FOV value should be set automatically via the device's SDK and internal configuration. Avoid overriding it manually yourself and do not let users change it.
- Avoid using camera bobbing effect to simulate walking (typical for the most first person games). Moving the camera up and down is annoying, it breaks VR experience and causes VR Sickness.
- Zooming in or out with the camera is not recommended, as it can induce VR Sickness, particularly if doing so causes head and camera movements to fall out of 1-to-1 correspondence with each other.
- Remember, that any acceleration creates a mismatch among your visual, vestibular, and proprioceptive senses. The term acceleration here refers to any change in the motion of the user, whether in direction or speed. Slowing down or stopping, turning while moving or standing still, and stepping or getting pushed sideways are all forms of acceleration. Make such conflicts as short (preferably instantaneous) and infrequent as you can. Have accelerations initiated and controlled by the user whenever possible.
- Shaking, jerking, or bobbing the camera will be uncomfortable for the player. So, do not shake the camera to emphasize an event (e.g. a grenade explosion), it may make sense in a screen-based media, but not in VR.
- Avoid stairs, use lifts instead, as moving quickly up and down the stairs can be very disorienting for the player.
- Developers are often used to using VR devices and may not notice or feel something that other person would. So, to make sure that your application does not cause VR Sickness you should check it as much as possible, engaging as many different people as you can.
Please note that the points listed above do not consitute a complete list of root causes for VR Sickness. It is intended to give you a basic idea of what might cause users of your VR application to feel sick.
Render Settings#
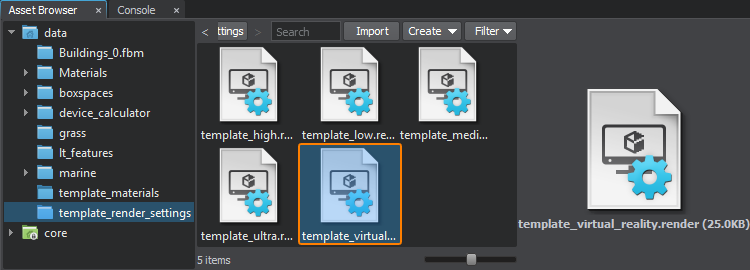
For your convenience, in the data/template_render_settings folder of each new created project there is a ready-to-use template_virtual_reality.render asset with all settings optimized for best performance in VR (this asset contains the same settings as the one used in the VR Sample). You can load and apply these settings by simply double-clicking on the asset in the Asset Browser. You can also double-click on this asset to reset any changes you made to default optimized values.
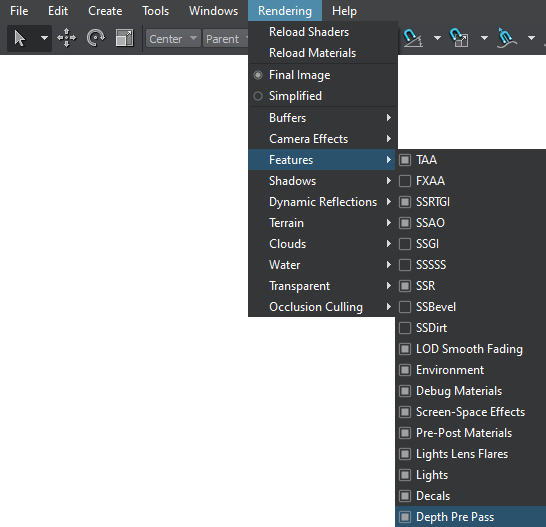
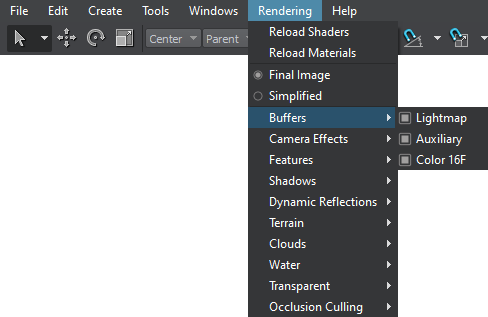
For your project it may also be useful to enable the Depth Pre Pass. It is available either in the Buffers settings or in the Render -> Features menu:
After enabling this option, check if the performance has increased.
It is also recommended to disable other buffers if they are not used:
Screen-Space Effects#
All screen-space effects in VR are very expensive, as their performance is strongly dependent on rendering resolution. Here are some basic recommendations:
- Turn screen-space effects off and don't use them at all whenever possible. This is the best option for performance.
- Use only the ones that provide significant visual improvement of the final image, such as Tone Mapping, SSAO, and Bloom. Just these three effects can provide a very good visual result.
- Use Quad, or maximum Half resolution whenever possible. This parameter is available for both SSAO and Bloom effects.
- Using Screen Space Reflections, Screen Space Shadows and SSRTGI effects in VR is not recommended for mid-range GPUs, as these effects use screen-space ray tracing which is very performance consuming at high resolutions.
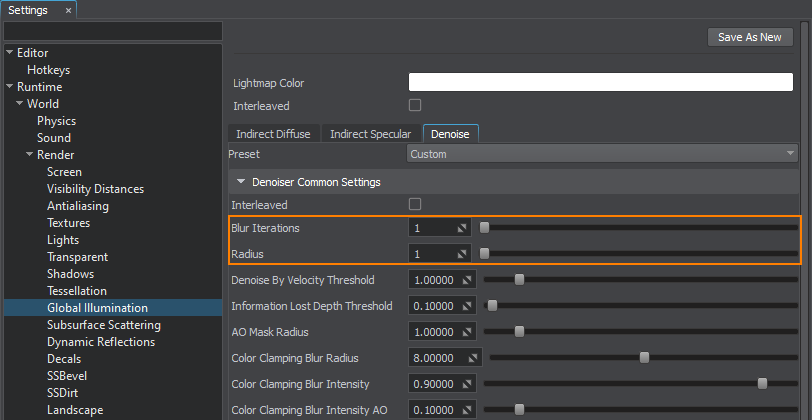
-
Disable Denoise (a preferable option), or set Blur Iterations and Radius to 1:
Antialiasing#
Antialiasing plays a very important role in VR, as the majority of popular HMDs have a wider FOV than monitors do. Thus, regardless of high resolution, aliasing is still very noticeable. It gets even worse as having your head always moving in VR results in flickering and jagged edges of objects. Things get especially bad for round glossy objects, where aliasing is extremely rough.
Recommendations here are as follows:
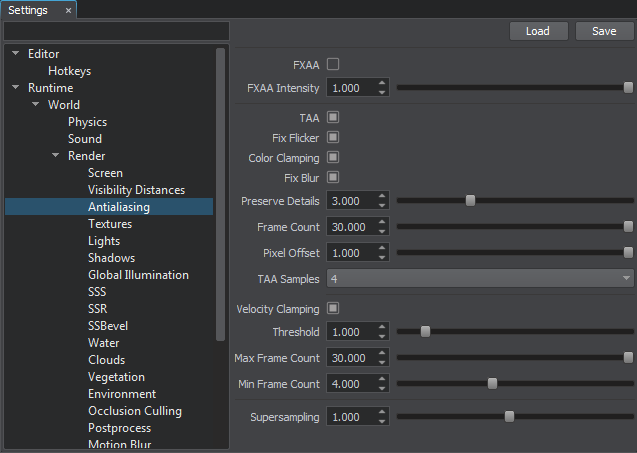
- Use Temporal Antialiasing, as it is good at fighting flickering and jagged edges. Flexible TAA settings, such as Pixel Offset and Preserve Details, make it possible to avoid blurring the final image. Recommended settings for VR are as follows: Pixel Offset = 1.0 and Preserve Details = 3. However, these values may vary depending on your scene, so we advice to adjust them for the clearest, flicker-free picture quality.
- It is not recommended to use FXAA, as it only adds blur in VR and does not remove jagged edges, when your head moves.
Lighting#
Lighting in VR is probably the most expensive operation, especially dynamic lighting. Add to this real-time calculation of shadows and think how many FPS you are going to lose.
So, in your VR project you should always use pre-baked lighting and reflections as this is the cheapest option to render. Bake all your lighting and reflections to Voxel / Environment Probes respectively. Take note, that additive blending mode enables you to combine the advantages of baked lighting with flexible control typical for dynamic one.
Basically, there are the following options (ordered from the lightest to the heaviest):
- Not to use any light sources in your world at all. This is the fastest and cheapest option.
- Use a single Voxel Probe with all lighting baked into it. To increase performance you can disable the Specular option.
- Use a Voxel Probe with Reflections disabled for diffuse lighting and Environment Probe for reflections.
- Use static lighting and shadows, or at least mixed mode.
- A more costly option is to use real light sources (World, Omni, Projected) but without shadows (e.g. for dynamic objects that emit light). Shadows significantly affect performance in a VR application, especially if the Penumbra mode is enabled in the Shadows Settings (Settings -> Render -> Shadows). So, better don't switch it on, if you don't need it.
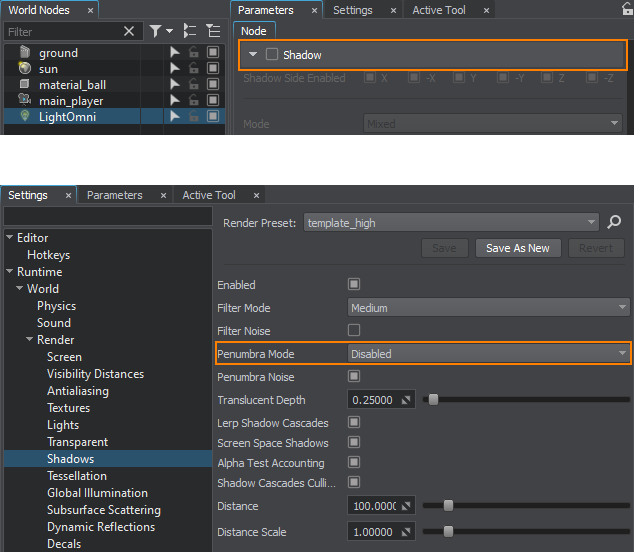 Disabled shadows for a light source and disabled Penumbra Mode in the Rendering Settings
 - Use real light sources with shadows, but configure the shadow mode to be static or mixed. For example, if you have some static objects in your room, that are not under direct sunlight, it seems reasonable to make their shadows static as well.
- Use real light sources with shadows as is. This is the best-looking and simple option, but keep in mind that you'll have to sacrifice something else to gain performance. For example, you can reduce the number of polygons of your objects, as it directly affects performance of shadows.
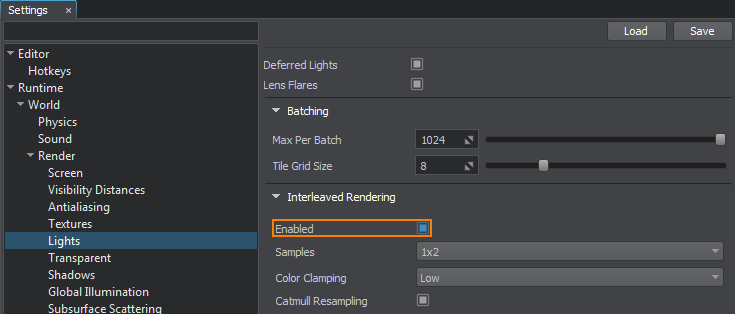
One more option that can boost performance is interleaved lights rendering, which allows reducing rendering load, while keeping the image quality high. You can enable interleaved rendering mode for lights and adjust its parameters via the Lights section of the Settings window (Window -> Settings -> Render -> Lights).
Make sure to use dimmer lights and colors than you normally would. Strong and vibrant lighting and highly saturated colors in VR can cause VR Sickness.
Decals#
If you can use polygonal geometry instead of decals, use it! Decals in VR should be used only if there are no other options, it is better not to use them at all!
In case if you need to use a semi-transparent analogue of a decal it is recommended to use the mesh_base material with Alpha Test mode and Jitter Transparency option enabled.
Transparency#
Rendering transparency can be very costly, as it has to be re-evaluated per-frame in order to ensure that nothing has changed. It's a case when cost wipes out all benefits. If you use Alpha Blend mode of the mesh_base material, in the Light Passes group you should enable only the ones that are required, as it significantly affects performance.
![]()
Clouds and Sky#

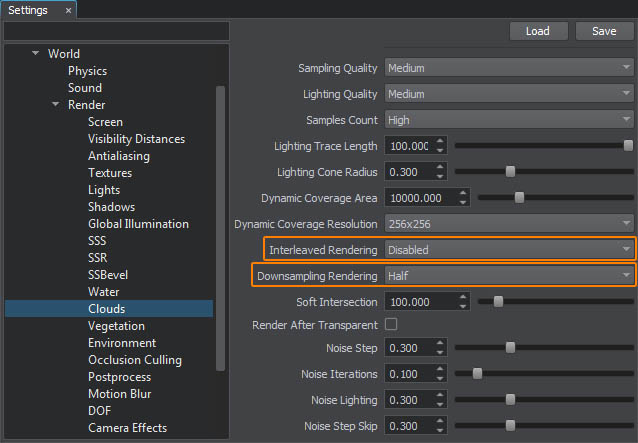
Avoid using volumetric clouds (Cloud Layer objects), unless there is no other option and it is a critical requirement for your project. They are very expensive at high resolutions as they simulate realistic lighting and shape of the clouds in real-time. If you still need to use volumetric clouds, it is recommended to set the Downsampling Rendering parameter to Quarter or Half. It is also recommended to enable Interleaved Rendering mode, when clouds are viewed from the ground, or from above (at significant distance), but be aware that quick and sudden movements may result in noticeable cloud graininess.
When volumetric clouds are not required, it is better to use one of the following options:
-
Just set an HDRI panorama via the Environment settings.
If your project requires changing the time of the day, this can be done by blending Environment Presets, and thus smoothly replacing one HDRI texture (for the day-time sky) with another (for the evening).
-
Use a Sky object with an HDRI texture and 2D clouds option enabled.
Dynamic procedural environment, although being performance friendly, does not come completely for free. You can disable it via Rendering -> Features -> Environment in the main menu and use a Sky object with an HDRI texture instead. This will actually look better and give you a bit more performance, however, in this case you'll have no haze at the horizon, as it is a part of Environment.
Terrain#
It is recommended to use Landscape Terrain instead of Global Terrain, as it is rendered faster for higher resolutions.
Geometry#
You should keep in mind, that ideally your VR application should maintain target frame rate at 90 FPS, this means that a single frame should be rendered in just 11.1 milliseconds. Not so much, taking into account the stereo mode and approximately 4x resolution.
All faces that will never be seen in VR should be removed to avoid rendering them. For example, a back of a cupboard standing against a wall. However, in VR applications, users have a lot more freedom to look around. So, when deciding to remove a certain face you should double check whether it can be seen or not. Simplify your meshes as much as possible.
Monitoring Performance#
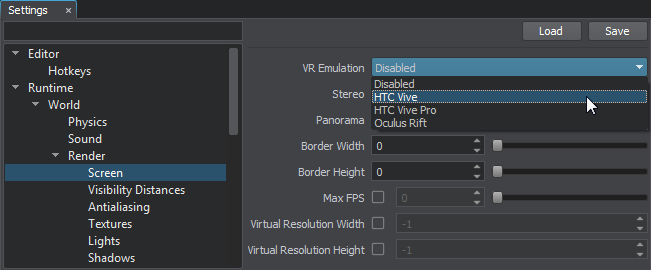
You can enable VR emulation to monitor your application's performance directly in the Editor. Just select the desired VR Emulation mode in the Screen settings (Settings -> Render -> Screen), e.g. when you select HTC Vive Pro, you get exactly the same stereo image, that is rendered for this HMD, with the FPS counter displaying actual performance.
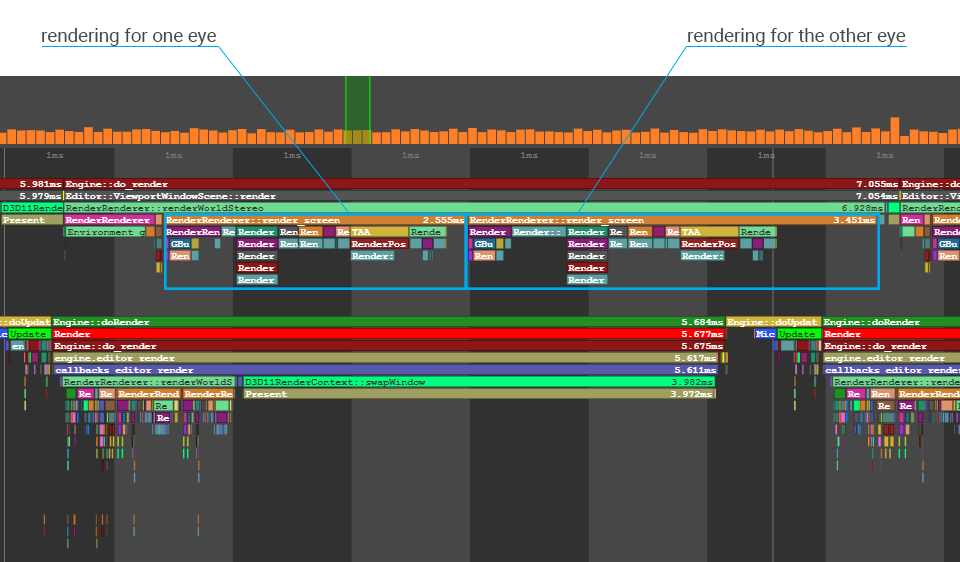
If you want a more detailed performance analysis, open the Microprofile tool. It'll show you where exactly the bottlenecks are, so you could fix them.
The information on this page is valid for UNIGINE 2.20 SDK.