Content Migration
You can upgrade content of your project to UNIGINE 2.19 in the automatic or manual mode.
If your project contains at least one file with a higher version, upgrade to this version will be skipped, as the migration script would consider that the project is already upgraded to that version. Let's review an example case:
- Your project is v. 2.14.1
- It contains a v. 2.15 node.
- You plan to upgrade the project to 2.16.
When you start the upgrade process, the following will happen:
- Upgrading to v. 2.15 is skipped as you have one v. 2.15 node, and the script assumes the whole project is already using this version.
- Upgrading to v. 2.15.1 is successful.
- Upgrading to v. 2.16 is successful.
Thus, for a correct migration, follow this recommendation: ensure that the project does not contain assets with a version higher than the project version. This can be done by checking the number of the target version througout all project files. In the example above, you should check if any of your project files contains the text version="2.15" before starting the migration process.
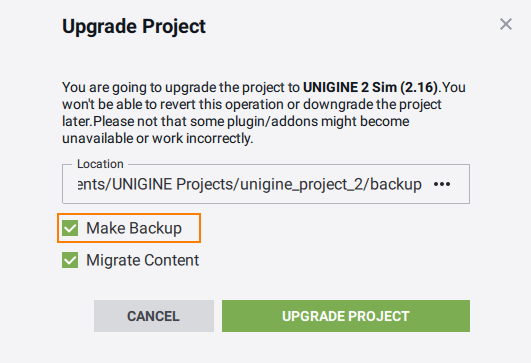
Another way is to keep the Make Backup option enabled. In this case the project is automatically copied for reference, and if automatic migration goes wrong (i.e. it is stopped halfway and you see a message like "Skip migration to version "2.15" File: "D:/ProjectFolder/data/.../example_file.node in the migration log) you can fix the problem files manually.

Automatic Upgrade#
Automatic upgrade of the project's content can be performed via UNIGINE SDK Browser.
As a result, the binary executable and configuration files, meshes, terrains, worlds, nodes, splines, materials, properties, tracks, settings files will be upgraded to new formats (if any). The <unigine_project>/migration.log.html log file will be opened in the web browser. However, you can uncheck Migrate Content during automatic upgrading and perform content upgrading manually. In this case, only binary executable files will be upgraded.
Manual Upgrade#
To upgrade the project's content in the manual mode, do the following:
- Put the binary executable <UnigineSDK>/bin/usc_x64.exe to the <UnigineSDK>/utils/upgrade folder that contains the upgrade script.
NoticeUse usc_x64.exe from the SDK version you are migrating to.
- In the command prompt, run the upgrade.usc with the required options:
Shell commandsIf you have unchecked Migrate Content during automatic upgrading, add the path to the project's data folder to the list of arguments passed to the upgrade script. For example:
usc_x64.exe upgrade.usc path/to/additional_content_1 path/to/additional_content_2 ...Shell commandsHere:usc_x64.exe upgrade.usc <unigine_project>/data path/to/additional_content_1 path/to/additional_content_2 ...- path/to/additional_content_* - paths to folders with content stored outside the /data folder.
As a result, you will get your meshes, terrains, worlds, nodes, splines, materials, properties, tracks, configuration and settings files upgraded.
As soon as migration is completed, run the Editor to have the project assets "indexed".
Migration of Materials With Upscaling#
In the materials that used the Screen Coord node for FETCH sampling of buffers (except for the buffers current_depth, opacity_depth, color), use Screen Coord Before Upscale instead.
The information on this page is valid for UNIGINE 2.19.1 SDK.