打包用于发布的最终版本
Before your project can be distributed to users, it must be properly built. Packing a final build ensures that all content and code, including all necessary libraries, is up to date, in the proper format, and placed to a proper location to run on the desired target platform.在将项目分发给用户之前,必须正确地构建项目。打包最终版本可以确保所有内容和代码(包括所有必要的库)都是最新的,格式正确,并放置在合适的位置,以便在所需的目标平台上运行。
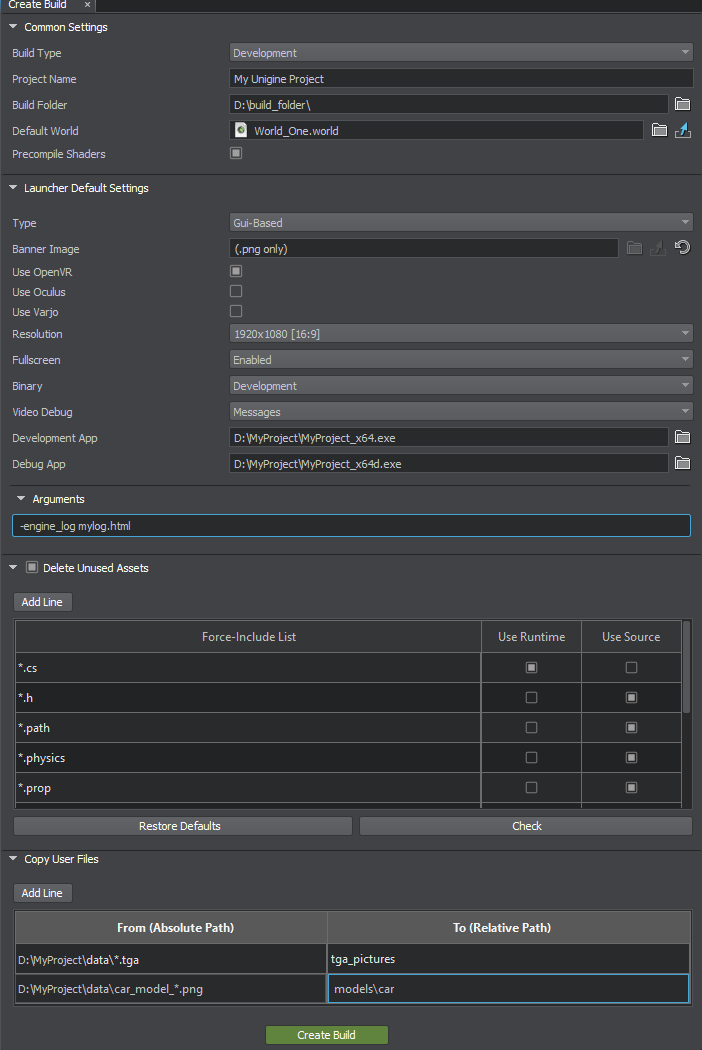
To create a final build for your project via UnigineEditor, perform the following:要通过UnigineEditor创建项目的最终构建,请执行以下步骤:
- In UnigineEditor, select File -> Create Build. The Create Build window will open.
 在UnigineEditor中,选择File -> Create Build。 Create Build窗口将打开。

- Specify the required settings and click Create Build.指定所需的设置,然后单击Create Build。
For building C# Component System projects, Component System should be initialized successfully.对于构建 C#组件系统项目,应成功初始化组件系统。
另请参阅
- Video tutorial How To Create a Final Build for a C# Project视频课为C#项目创建最终版本
- Video tutorial How To Create a Final Build for a C++ Project视频课为C++项目创建最终版本
- Video tutorial How To Delete Unused Assets from the Final Build视频课从最终构建版本中删除未使用的资源
Build Content建立内容#
By default, the build includes the following:默认情况下,该版本包括以下内容:
- Binaries二进制文件
- core.ung and scripts.ungcore.ung 和 scripts.ung
- *.cache files*.cache 文件
- Plugins added via SDK browser
注意If plugins are added via code, they should be added to the build as user files.通过SDK浏览器添加的 插件If plugins are added via code, they should be added to the build as user files.If plugins are added via code, they should be added to the build as user files.注意If plugins are added via code, they should be added to the build as user files.如果插件是通过代码添加的,则应将它们作为用户文件添加到构建中。
- Assets and/or their runtimes from the data folder and from all mount points are added to the build in accordance with the specified Force-Include List
注意Runtimes are copied together with their *.meta (json) files.根据指定的Force-Include List,来自data文件夹和所有挂装点的资源和/或它们的运行时文件将添加到最终版本中。Runtimes are copied together with their *.meta (json) files.Runtimes are copied together with their *.meta (json) files.注意Runtimes are copied together with their *.meta (json) files.运行时文件将与其*.meta(json)文件一起复制。
- Texture cache from the data/.cache_textures folderdata/.cache_textures文件夹中的纹理缓存
- guids.db file stored in the data/ folder存储在data/文件夹中的guids.db文件
- Sound library声音库
- Launcher file or files启动器文件
- Main executable files主要可执行文件
- Files added by user用户添加的文件
Build Settings构建设置#
Common Settings常用设定#

| Build Type (config) |
Type of the build that defines which binaries are copied:
注意
Release — optimized binary without any additional debug info.
For the Development build, two binaries are copied:
If the project's SDK is unavailable, this option is unavailable, as well. In this case, Build Type is defined by the build of UNIGINE Engine selected at the project creation.If the project's SDK is unavailable, this option is unavailable, as well. In this case, Build Type is defined by the build of UNIGINE Engine selected at the project creation.
注意
If the project's SDK is unavailable, this option is unavailable, as well. In this case, Build Type is defined by the build of UNIGINE Engine selected at the project creation.如果项目的SDK不可用,则此选项也将不可用。在这种情况下,“构建类型”由在项目创建时选择的UNIGINE Engine的构建定义。 |
| Project Name (name) |
Name of the output executable or .bat/.sh file. This name shall also be displayed as the Launcher's title and a title of the application window as well.输出可执行文件或.bat / .sh文件的名称。此名称也应显示为启动器的标题和应用程序窗口的标题。 |
| Build Folder (path) |
Path to the output folder where the build is going to be stored
警告
You shouldn't create this folder inside your project folder, as it may significantly increase its size.Build folder should be empty, otherwise, its contents will be deleted!将要存储内部版本的输出文件夹的路径
警告
|
| Default World (world) |
The world that is loaded when the application is started. If no world is selected, the User shall be responsible for loading worlds via code, otherwise, a black screen will be displayed when running the application.启动应用程序时加载的世界。如果未选择任何世界,则用户应负责通过代码加载世界,否则,在运行应用程序时将显示黑屏。 |
| Precompile Shaders (precompile) |
If enabled, generates shaders for the current Video API. Shader cache increases performance and reduces spikes and freezes in the release application, which makes it very important for the release build. If the shaders have already been precompiled, selecting this box won't affect the build time. 注意
You may require forced shader compilation in specific cases.This option is always enabled for Release builds.如果启用,则为当前的Video API生成着色器。
着色器缓存可提高性能,减少发布应用程序中的峰值和冻结,这对于发布版本非常重要。 如果着色器已经预先编译,则选择此框不会影响构建时间。 注意
|
Launcher Default Settings启动器默认设置#
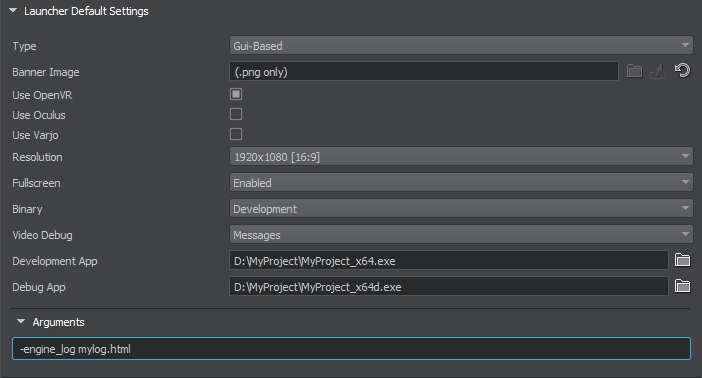
These settings are used as default (pre-selected) launcher settings. The launcher for the Development build displays more settings than for the Release build.这些设置用作默认(预选)启动器设置。 Development构建的启动器显示的设置比Release构建的启动器显示的设置更多。

Below are the settings used by the tool to generate a launcher for your application.以下是该工具用于为您的应用程序生成启动器的设置。

| Type (launcher) |
Type of the launcher:
In case of the Development build with the project's SDK available, two files are created: <project_name>_development.bat (or .sh for Linux) and <project_name>_debug.bat (or .sh for Linux).启动器的类型:
|
| Banner Image (banner) |
The image to be displayed in the launcher. Available for GUI-based launcher only. To assign an image, drag it from the Asset Browser. 注意
Only PNG images can be used. Window height is restricted to 600px, so images are automatically shrinked or enlarged to fit this height (proportions are kept).要在启动器中显示的图像。仅适用于基于GUI的启动器。Only PNG images can be used. Window height is restricted to 600px, so images are automatically shrinked or enlarged to fit this height (proportions are kept).Only PNG images can be used. Window height is restricted to 600px, so images are automatically shrinked or enlarged to fit this height (proportions are kept). 要分配图像,请将其从资源浏览器中拖动。 注意
Only PNG images can be used. Window height is restricted to 600px, so images are automatically shrinked or enlarged to fit this height (proportions are kept).只能使用PNG图像。窗口高度限制為600 像素,因此圖像會自動縮小或放大以適應此高度(保持比例)。 |
| Use OpenVR | Check this box, if your project is intended for OpenVR. This will enable OpenVR mode selection in the application launcher.如果您的项目适用于OpenVR,请选中此框。这将在应用程序启动器中启用OpenVR模式选择。 |
| Use Oculus | Check this box, if your project is intended for Oculus. This will enable Oculus mode selection in the application launcher.如果您的项目适用于Oculus,请选中此框。这将在应用程序启动器中启用Oculus模式选择。 |
| Use Varjo | Check this box, if your project is intended for Varjo. This will enable Varjo mode selection in the application launcher.如果您的项目用于Varjo,请选中此框。这将在应用程序启动器中启用Varjo模式选择。 |
|
注意
Necessary VR modes (three options above) for the console mode are specified in the configuration file as follows (list the ones you need):
源代码
控制台模式所需的VR模式(上面的三个选项)在配置文件中指定如下(列出所需的模式):
源代码
|
|
| Resolution (selected_res) |
The resolution of the application screen. Multiple resolutions can be selected. The resolution that is clicked upon is set as default.
注意
Multiple resolutions for the console mode are specified in the configuration file via the resolutions parameter (list the ones you need):
Multiple resolutions for the console mode are specified in the configuration file via the resolutions parameter (list the ones you need):
源代码
Multiple resolutions for the console mode are specified in the configuration file via the resolutions parameter (list the ones you need):
源代码
源代码
应用程序屏幕的分辨率。可以选择多种分辨率。单击的分辨率设置为默认值。
注意
Multiple resolutions for the console mode are specified in the configuration file via the resolutions parameter (list the ones you need):
源代码
通过配置文件在配置文件中指定了控制台模式的多种分辨率。resolutions参数(列出您需要的参数):
源代码
|
| Fullscreen (fullscreen) |
Fullscreen mode:全屏模式:
|
| Binary (binary) |
Type of the binary to be selected by default in the launcher, if the selected build type is Development build:
|
| Video Debug (vdebug) |
Toggling the debug context of the Graphics API. Available for the Development build type only. 切换Graphics API的调试上下文。仅适用于Development 版本类型。 |
| Release App / Development App / Debug App (main_release / main_dev / main_debug) |
Path to the corresponding binary to be run. The binary depends on the type of build.要运行的相应二进制文件的路径。二进制文件取决于构建类型。 注意
This option is for the projects that do not use C# Component System.此选项适用于不使用 C#组件系统的项目。 Note that the binary is defined automatically, if it remains located in the bin/ folder. If it has been moved elsewhere or rearranged in some other way, the path to the file is to be set manually.请注意,如果二进制文件仍位于bin/文件夹中,则会自动定义。如果已将其移动到其他位置或以其他方式重新排列,则该文件的路径将手动设置。 |
| Arguments (args) |
Additional start-up command-line options.其他启动命令行选项。 |
UnigineEditor creates the <project_name>.lconfig file that Launcher uses to run the app. If a user changes any parameters and runs the app, the changes are saved in <project_name>.lconfig. Closing Launcher without running it discards any changes.UnigineEditor创建Launcher用于运行应用程序的<project_name>.lconfig文件。如果用户更改任何参数并运行应用程序,则更改将保存在<project_name>.lconfig中。在不运行启动器的情况下关闭它会丢弃所有更改。
Delete Unused Assets删除未使用的资源#
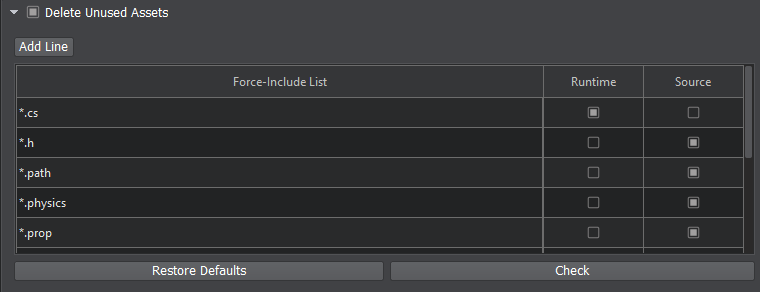
This feature enables you to delete all unused assets from the final build. To turn it on, check the option near the Delete Unused Assets section heading. 本部分使您可以指定要包含在最终版本中的资源。外观如下:

The Build tool scans all assets of the types specified as wildcards (including location) in the Force-Include list (*.world, *.cs, *.fbx, *.prop, etc.), automatically resolving all dependencies (an FBX asset shall be checked for all meshes, meshes shall be checked for materials assigned to their surfaces and so on...). Thus, all assets in your project that are used by the assets of the specified types are collected and included in the final build.Build Tool工具扫描Force-Include列表中指定为通配符(包括位置)的所有类型的资源(*.world, *.cs, *.fbx, *.prop等),自动解决所有依赖性(FBX资源应 检查所有网格,检查网格中分配给其表面的材质,等等...)。 因此,将收集项目中指定类型的资源所使用的所有资源,并将其包括在最终版本中。

You can add more asset types to the list or remove existing ones by simply right-clicking on the desired line (a new line shall be inserted after the one you clicked on). You can also click Restore Defaults to reset the list to its initial state.您可以在列表中添加更多资源类型,或通过右键单击所需的行来删除现有的资源类型(在您单击的行之后应插入新行)。您也可以单击Restore Defaults将列表重置为其初始状态。
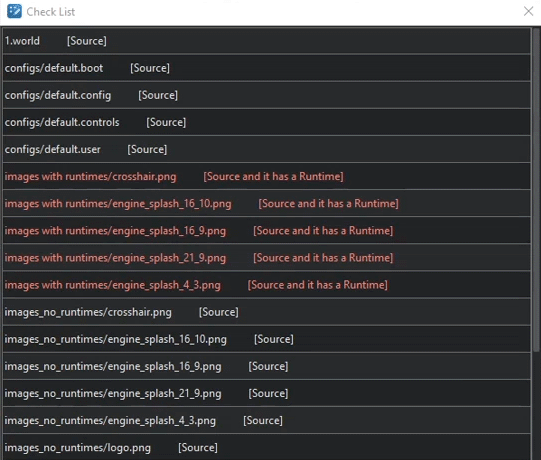
For each type of assets in the list you can specify whether to include runtime or source file. But be careful, as checking only Runtime for .png textures will result in ignoring the ones with the Unchanged option enabled (i.e. having no runtime), they simply won't be included. To check your list against such cases click Check, the following Check List window will open:对于列表中的每种资源类型,您可以指定是包含runtime还是source文件。但请注意,由于仅检查Runtime中的.png纹理会导致忽略启用Unchanged选项(即没有运行时文件)的纹理,因此根本不会包括它们。要检查这种情况下的列表,请单击Check,将打开以下Check List窗口:

In this window all files found in the process of scanning are listed. The ones in white are ok, but the ones in red require your attention, for example, you may mistakenly choose to include source for an asset that has a runtime. So, be sure to look through red ones. The following options are possible:在此窗口中列出了在扫描过程中找到的所有文件。白色的可以,但是红色的需要引起您的注意,例如,您可能错误地选择为具有运行时文件的资源包括源。所以,一定要检查红色突出显示的文件。以下选项是可能的:
- [Source and Runtime] - both boxes are checked (both source and runtime files shall be added).[Source and Runtime]-选中两个框(应同时添加source和runtime文件)。
- [Source] - when Source is checked and the asset has no runtime (only the source shall be added).[Source]-选中Use Source并且资源没有运行时文件(仅应添加source)。
- [Source and it has a Runtime] (shown in red) - when Source is checked, but the asset has a runtime (only the source shall be added).[Source and it has a Runtime](以红色显示)-选中Use Source,但资源具有运行时文件(仅应添加source)。
- [Runtime] - when Runtime is checked, and the asset has a runtime (only the runtime shall be added).[Runtime]-选中Use Runtime且资源具有运行时文件(仅应添加runtime)。
- [No Runtime] (shown in red) - when Runtime is checked, but the asset has no runtime (nothing shall be added).[No Runtime](以红色显示)-选中Use Runtime,但资源没有运行时文件(应添加无)。
"delete_unused": [
{
"pattern": "",
"source": "",
"primary": ""
}
]"delete_unused": [
{
"pattern": "",
"source": "",
"primary": ""
}
]Copy User Files复制用户文件#

User files are added to the build folder by filling in the table with two columns:通过在表中填充两列将用户文件添加到构建文件夹:
- From (Absolute Path) — an absolute path to a source file or folder. Folders can be specified using wildcards.From (Absolute Path) —源文件或文件夹的绝对路径。可以使用通配符指定文件夹。
- To (Relative Path) — path to the destination folder that is relative of the Build Folder. It can be a folder name where the file or files are copied to, or a folder and a file name, i.e. the copied file can be renamed as well.To (Relative Path) —相对于Build Folder的目标文件夹的路径。它可以是一个或多个文件要复制到的文件夹名称,也可以是文件夹和文件名,即复制的文件也可以重命名。
There are some rules for adding user files to the build folder:将用户文件添加到构建文件夹有一些规则:
| From (Absolute Path) | To (Relative Path) | 评论 |
|---|---|---|
| C:\test\<folder_name> | <another_folder_name>, or \<another_folder_name>, or \<another_folder_name>\<another_folder_name>或 \<another_folder_name>或 \<another_folder_name>\ |
All files and folders inside <folder_name> will be recursively copied. Thus, it doesn't matter if you use slashes or not.<folder_name>内部的所有文件和文件夹将被递归复制。因此,是否使用斜杠都没有关系。 |
| C:\Pictures\screenshot_alb.png | \folder_with_pictures\, or folder_with_pictures\folder_with_pictures\或 folder_with_pictures |
One file with the name indicated in the From column will be copied into <output_folder>\folder_with_pictures\发件人列中指定名称的一个文件将被复制到<output_folder>\folder_with_pictures\ |
| C:\Pictures\screenshot_alb.png | \folder_with_pictures\123.png But: 123.jpg (or 123.png)\folder_with_pictures\123.png 但是:123.jpg(或123.png) |
The file will be renamed. However, if the target file extension is written incorrectly (differs from the actual file extension), a new folder with such name will be created instead, i.e. the resulting path of the example destination files will be: <output_folder>\<folder_with_pictures>\<123.jpg>\screenshot_alb.png该文件将被重命名。 但是,如果目标文件扩展名写得不正确(与实际文件扩展名不同),则会创建一个具有该名称的新文件夹,即该文件的结果路径。目标文件示例为: <output_folder>\<folder_with_pictures>\<123.jpg>\screenshot_alb.png |
"rules": [
{
"from": "",
"to": ""
}
]"rules": [
{
"from": "",
"to": ""
}
]When files with the same name are copied to one folder, their content is checked. If it's the same file, it would be copied once without any warning. However, if names are the same but the files are different, the dialog window will pop up to request which file should be copied.将具有相同名称的文件复制到一个文件夹时,将检查其内容。如果是同一文件,它将被复制一次,而不会发出任何警告。但是,如果名称相同但文件不同,则将弹出对话框,要求复制哪个文件。
Wildcards can also be used to define the rules for copying user files.通配符也可以用于定义复制用户文件的规则。
| From (Absolute Path) | To (Relative Path) | 评论 |
|---|---|---|
| C:\test\<folder_name>\*.tga | <tga_pictures> | All files with the indicated extension from the selected folder will be copied to the specified folder.所选文件夹中具有指定扩展名的所有文件将被复制到指定文件夹。 |
| C:\test\<folder_name>\ab*z.png | <another_folder_name> | All files with the name starting from ab and ending with z.png from the selected folder will be copied to the specified folder.所选文件夹中所有名称以ab开头并以z.png结尾的文件都将被复制到指定的文件夹中。 |
| C:\test\<folder_name>\nn* | <another_folder_name> | All files with the name starting from nn from the selected folder will be copied to the specified folder.所选文件夹中所有名称从nn开始的文件都将被复制到指定的文件夹。 |
| C:\*.ung | ///\\\/one\\\\\\////two\\/// | Slashes work differently for Windows and Linux. Windows: slashes are transformed to backslashes, all backslashes are merged into one. <output_folder>\one\two\ Linux: all slashes are merged into one, but backslashes are not transformed to slashes. <output_folder>/\\\/one\\\\\\/two\\/ 对于Windows和Linux,斜杠的工作方式有所不同。 Windows: 斜杠转换为反斜杠,所有反斜杠合并为一个。 <output_folder>\one\two\ Linux: 所有的斜杠都合并为一个,但反斜杠不会转换为斜杠。 <output_folder>/\\\/one\\\\\\/two\\/ |
Encryption加密#
Project files can be encrypted using the UNIGINE-native UNG archive format. UNG files are transparent to the engine, and their content is handled as not packed. To save your files in UNG format, use the Archiver tool.可以使用UNIGINE本机UNG存档格式对项目文件进行加密。 UNG文件对引擎是透明的,并且其内容被视为未打包。要将文件保存为UNG格式,请使用Archiver工具。
Console Build控制台构建#
To simplify continuous integration (CI) and batch processing the Build Tool supports console-based management. In the console mode all build options (see descriptions above) can be configured via the dedicated file. By default the file has the following path: <data_path>.editor2/.assemblytool. Default values of configuration parameters are taken from this file (see the example below), but you can change them at your disposal. There are no specific requirements to the name and extension of this file, but it should be in JSON format.为了简化持续集成(CI)和批处理,构建工具支持基于控制台的管理。在控制台模式下,可以通过专用文件配置所有构建选项(请参见上面的描述)。默认情况下,文件具有以下路径:<data_path>.editor2/.assemblytool。配置参数的默认值来自此文件(请参见下面的示例),但是您可以随意更改它们。该文件的名称和扩展名没有特殊要求,但应为JSON格式。
Config File Example (.assemblytool)配置文件示例(.assemblytool)
{
"binary": "Debug",
"config": "Development",
"fullscreen": 0,
"launcher": "BinaryFile",
"precision": "Float",
"precompile": false,
"resolutions": [
{
"d": 9,
"n": 16,
"w": 960
},
{
"d": 9,
"n": 16,
"w": 1024
},
{
"d": 9,
"n": 16,
"w": 1280
},
{
"d": 9,
"n": 16,
"w": 1366
},
{
"d": 9,
"n": 16,
"w": 1600
},
{
"d": 9,
"n": 16,
"w": 1920
},
{
"d": 9,
"n": 16,
"w": 2560
},
{
"d": 9,
"n": 16,
"w": 3840
},
{
"d": 10,
"n": 16,
"w": 960
},
{
"d": 10,
"n": 16,
"w": 1024
},
{
"d": 10,
"n": 16,
"w": 1280
},
{
"d": 10,
"n": 16,
"w": 1440
},
{
"d": 10,
"n": 16,
"w": 1680
},
{
"d": 10,
"n": 16,
"w": 1920
},
{
"d": 10,
"n": 16,
"w": 2560
},
{
"d": 3,
"n": 4,
"w": 800
},
{
"d": 3,
"n": 4,
"w": 1024
},
{
"d": 3,
"n": 4,
"w": 1280
},
{
"d": 3,
"n": 4,
"w": 1600
},
{
"d": 3,
"n": 4,
"w": 2048
},
{
"d": 4,
"n": 5,
"w": 2560
}
],
"rules": [
{
"from": "",
"to": ""
}
],
"selected_res": 0,
"vapi": "Auto",
"vdebug": "Disabled",
"vrmodes": [
    "OpenVR",
    "Oculus",
    "Varjo"
]
}The syntax of running the tool with command-line options is as follows: the full name of the binary executable (64-bit development or release version) followed by necessary CLI-options:使用命令行选项运行该工具的语法如下:二进制可执行文件的全名(64位开发或发行版本),后跟必要的CLI选项:
BuildTool_x64* --bt_option1 "argument" --bt_option2 "argument" ...The list of available options includes the following:可用选项列表包括:
| 名称 | 描述 | 争论 |
|---|---|---|
| -?, -h, --help | Displays the help information on all commands available.显示有关所有可用命令的帮助信息。 | |
| --bt_output_directory | Path to the output folder where the build is going to be stored.
警告
This folder shouldn't be inside your project's folder, as it may significantly increase its size.Build folder should be empty, otherwise, the Console Build tool shall not start.将要存储内部版本的输出文件夹的路径。
警告
|
The argument can be passed as follows:
|
| --bt_release_main_file | Path to the Release binary to run.要运行的Release二进制文件的路径。 | The argument can be passed as follows:
|
| --bt_development_main_file | Path to the Development binary to run.要运行的Development二进制文件的路径。 | The argument can be passed as follows:
|
| --bt_debug_main_file | Path to the Debug binary to run.要运行的Debug二进制文件的路径。 | The argument can be passed as follows:
|
| --bt_user_options_file | Path to the user configuration file (by default: <data_path>/.editor2/.assemblytool). In case the file is missing the Console Build tool will shut down with an error. 用户配置文件的路径(默认情况下:<data_path>/.editor2/.assemblytool)。如果文件丢失,控制台构建工具将关闭并显示错误。 | The argument can be passed as follows:
|
| --bt_configuration | Type of the build that defines which binaries are to be copied (see below):
|
|
| --bt_binary | Type of the binaries.二进制文件的类型。 |
|
本页面上的信息适用于 UNIGINE 2.19.1 SDK.

