在运行时制作截图
This article provides the code sufficient to create a screenshot making component configurable via Editor and making screenshots at runtime.本文提供了足够的代码来创建一个屏幕截图,使组件可以通过Editor进行配置,并在运行时制作屏幕截图。
Component Code组件代码#
In your IDE, create a component and insert this code into its header:在你的IDE中,创建一个组件并将下面的代码插入到它的头文件中:
#pragma once

#include <UnigineComponentSystem.h>
#include <UnigineViewport.h>

class ScreenshotMaker : public Unigine::ComponentBase
{
	enum Format
	{
		tga = 0,
		png,
		jpg
	};

	enum State
	{
		STATE_START = 0,
		STATE_WARMUP,
		STATE_SAVE,
		STATE_DONE,
	};

public:
	COMPONENT_DEFINE(ScreenshotMaker, Unigine::ComponentBase);

	PROP_PARAM(String, name_prefix, "screenshot");
	PROP_PARAM(IVec2, size, Unigine::Math::ivec2(640, 480));
	PROP_PARAM(Switch, format, 0, "tga,png,jpg");
	PROP_PARAM(Toggle, alpha_channel, false);

	COMPONENT_INIT(init);
	COMPONENT_UPDATE(update);

private:
	Unigine::TexturePtr texture;
	Unigine::ViewportPtr viewport;
	int count = 0;

	int state = STATE_DONE;
	const int warmup_frames = 30;
	int warm_up_count = 0;

	void init();
	void update();

};
Insert this code into the *.cpp file of the component:将这段代码插入到组件的*.cpp文件中:
#include "ScreenshotMaker.h"
#include <UnigineConsole.h>
#include <UnigineInput.h>
#include <UnigineGame.h>

REGISTER_COMPONENT(ScreenshotMaker);

using namespace Unigine;

void ScreenshotMaker::init()
{
	texture = Texture::create();
	viewport = Viewport::create();
	viewport->setSkipFlags(Viewport::SKIP_VISUALIZER);

	Console::setOnscreen(1);
	Console::onscreenMessageLine(Math::vec4_green, "Screenshot component is initialized.");
}

void ScreenshotMaker::update()
{
	auto player = Game::getPlayer();
	if (!player)
	{
		state = STATE_DONE;
		Console::onscreenMessageLine(Math::vec4_red, "No active camera.");
		return;
	}

	if (state == STATE_DONE && Input::isKeyPressed(Input::KEY_T))
	{
		warm_up_count = 0;
		state = STATE_WARMUP;
		Console::onscreenMessageLine(Math::vec4_green, "Trying to take a screenshot...");
	}

	if (state == STATE_WARMUP)
	{
		viewport->setMode(Render::getViewportMode());

		if (warm_up_count == 0)
		{
			// First frame we render with velocity buffer turned off to avoid temporal effects artifacts
			viewport->appendSkipFlags(Viewport::SKIP_VELOCITY_BUFFER);
			viewport->renderTexture2D(player->getCamera(), texture, size.get().x, size.get().y);
			viewport->removeSkipFlags(Viewport::SKIP_VELOCITY_BUFFER);
		}
		else
		{
			// We temporarily set exposure adaptation time to 0, otherwise the final image may be too dark
			float exposure_adaptation = Render::getExposureAdaptation();
			Render::setExposureAdaptation(0.0f);
			viewport->renderTexture2D(player->getCamera(), texture, size.get().x, size.get().y);
			Render::setExposureAdaptation(exposure_adaptation);
		}

		warm_up_count++;
		if (warm_up_count == warmup_frames)
			state = STATE_SAVE;
	}

	if (state == STATE_SAVE)
	{
		Render::asyncTransferTextureToImage(
			nullptr,
			MakeCallback([this](ImagePtr image)
				{
					if (!alpha_channel.get() || format.get() == Format::jpg)
					{
						if (image->getFormat() == Image::FORMAT_RGBA8)
							image->convertToFormat(Image::FORMAT_RGB8);
						else if (image->getFormat() == Image::FORMAT_RGBA16F)
							image->convertToFormat(Image::FORMAT_RGB16F);
					}

					if (!Render::isFlipped())
						image->flipY();

					auto str_formats = String::split("tga,png,jpg", ",");

					String fullName = String::format("%s_%d.%s", name_prefix.get(), count, str_formats[format.get()]);
					image->save(fullName.get());
					Console::onscreenMessageLine(Math::vec4_green, "%s saved.", fullName.get());

				}),
			texture);

		count++;
		state = STATE_DONE;
	}
}
Add the following into AppSystemLogic to initialize the Component System.将以下代码添加到AppSystemLogic中以初始化组件系统。
int AppSystemLogic::init()
{
	Unigine::ComponentSystem::get()->initialize();
	// Write here code to be called on engine initialization.
	return 1;
}
Then run your application to have the component registered in the Component System.然后运行应用程序,在组件系统中注册该组件。
Making Screenshots使屏幕截图#
Now you have a component in your project. To be able to make screenshots, you need to do the following:现在您的项目中有了一个组件。为了能够截图,您需要做以下操作:
-
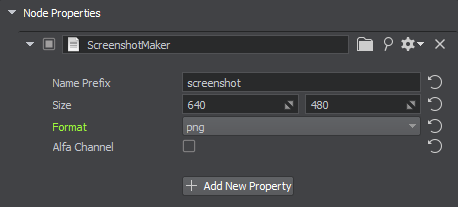
Assign the ScreenshotMaker component to any node in the Editor (or create a Node Dummy and assign the component to it).将 ScreenshotMaker组件分配给编辑器中的任何节点(或创建一个Node Dummy并将组件分配给它)。

-
Adjust settings as necessary.根据需要调整设置。
Name Prefix The prefix used in the file name.文件名中使用的前缀。 Size Width and height of the saved screenshot image.保存的截图图像的宽度和高度。 Format Format of the saved screenshot image.保存的截图格式。 Alpha Channel If enabled, transparent areas are cut off.如果启用,透明区域将被切断。 - Run your app and take screenshots.运行应用程序并截图。
- Check the data/ folder of your project.检查项目的data/文件夹。
本页面上的信息适用于 UNIGINE 2.19.1 SDK.
