Руководство по импорту CAD
CAD assets are imported into UNIGINE as any other asset. The following CAD formats are supported:CAD ассеты импортируются в UNIGINE как любой другой ассет . Поддерживаются следующие форматы САПР:
- IGES
- STEP
- STL
- BREP
Importing CAD AssetИмпорт CAD ассетов#
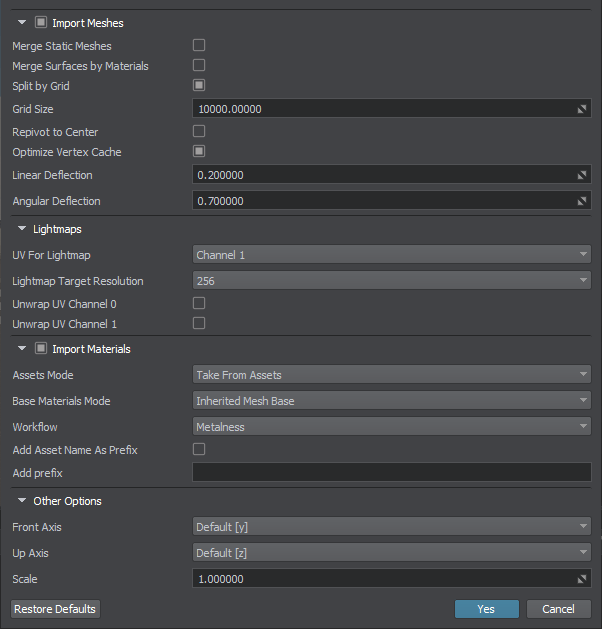
When you import a CAD asset, the import settings window appears:Когда вы импортируете CAD ассет, появляется окно настроек импорта:

The list of available import options includes the following:Список доступных вариантов импорта включает следующее:
Mesh Import OptionsПараметры импорта геометрии#
| Import Meshes | Import geometry meshes from the file.Импорт геометрии (мешей) из файла. |
|---|---|
| Merge Static Meshes | Merges all children static meshes in one (names it after the parent mesh). All of the meshes surfaces will be copied and shown in the Surfaces hierarchy.Объединяет все дочерние статические меши в один (используется имя родительского меша). Все поверхности мешей будут скопированы и показаны в иерархии Surfaces. |
| Merge Surfaces by Materials | Enables merging surfaces that have the same materials.Позволяет объединять поверхности с одинаковыми материалами. |
| Split by Grid |
Enables splitting of imported meshes. Too large models having sizes, that exceed 10000 units may have various artefacts (jitter, etc.) associated with positioning errors. You can eliminate such artefacts by splitting your mesh into multiple separate meshes. To do so, just enable this option and set the size of the grid cell (see the Grid Size parameter below) to be used for mesh splitting.Включает разделение импортированных мешей. Слишком большие модели, имеющие размеры, превышающие 10000 единиц, могут иметь различные артефакты (дрожание и т.д.), Связанные с ошибками позиционирования. Вы можете устранить такие артефакты, разделив ваш меш на несколько отдельных мешей. Для этого просто включите эту опцию и установите размер ячейки сетки (см. Параметр Grid Size ниже), который будет использоваться для разделения меша. Примечание
This option does not split surfaces.Эта опция не разделяет поверхности. |
| Grid Size | Size of the grid cell to split imported meshes, in units.Размер ячейки сетки для разделения импортированных мешей в единицах. |
| Repivot to Center | Places a pivot of generated mesh to its center. Can be used for meshes having their geometry located too far from their pivot, as this may lead to various artefacts (jitter, etc.) associated with positioning errors.Помещает ось созданного меша в его центр. Может использоваться для мешей, геометрия которых расположена слишком далеко от точки поворота, так как это может привести к различным артефактам (дрожание и т.д.), связанным с ошибками позиционирования. |
| Optimize Vertex Cache | Enables vertex cache optimization. This option reorders an indexed triangle list to improve vertex cache utilization at runtime. It can be turned off to accelerate saving process; however, it should always be turned on if saving the final version.Включает оптимизацию кэша вершин. Эта опция переупорядочивает список проиндексированных треугольников для улучшения использования кэша вершин во время выполнения. Его можно отключить, чтобы ускорить процесс сохранения; однако его всегда следует включать при сохранении окончательной версии. |
| Linear Deflection | Limits the distance between triangles and the original surface. It is used to define triangulation of the imported model together with the Angular Deflection.Ограничивает расстояние между треугольниками и исходной поверхностью. Он используется для определения триангуляции импортированной модели вместе с файлом Angular Deflection. |
| Angular Deflection | Limits the angle between adjacent triangles generated from a surface. It is used to define triangulation of the imported model together with the Linear Deflection.Ограничивает угол между соседними треугольниками, созданными на поверхности. Он используется для определения триангуляции импортированной модели вместе с файлом Linear Deflection. |
Lightmaps OptionsПараметры создания UV карт освещения#
Material Import OptionsПараметры импорта материалов#
| Import Materials | Enables importing materials from the file. Materials are stored in the .step, .stp and .iges, .igs files. When importing, only the albedo (diffuse) color is copied. Other material parameters should be set up after the model is added to the scene.Позволяет импортировать материалы из файла. Материалы хранятся в файлах .step, .stp и .iges, .igs. При импорте копируется только цвет альбедо (диффузный). Другие параметры материала следует настроить после добавления модели в сцену. |
|---|---|
| Assets Mode |
Enables to choose whether to use existing materials or to overwrite them with the ones imported. Available options:Позволяет выбрать, использовать ли существующие материалы или заменить их импортированными. Доступные Варианты:
|
| Base Materials Mode | Enables to choose the base material for the imported materials. Available options:Позволяет выбрать базовый материал для импортируемых материалов. Доступные Варианты:
|
| Workflow |
Provides an interface to choose a workflow for the imported physically-based materials (if any). Available options:Предоставляет интерфейс для выбора workflow для импортируемых физически-корректных материалов (при наличии). Доступные варианты:
|
| Add Asset Name as Prefix | Appends the name of the imported asset as a prefix to the imported materials names.Добавляет имя импортированного актива в качестве префикса к именам импортированных материалов. |
| Add Prefix |
Appends the specified prefix for the imported materials names to avoid name collisions.Позволяет добавить префикс для импортируемых материалов, чтобы избежать коллизии имен. Примечание
If multiple CAD models are imported together this feature does not guarantee that all materials with the same names will be preserved, as only one prefix is used for all of them (if two models have different materials named black, only one of them shall remain with the specified prefix). To avoid such cases, models should be imported sequentially with different prefixes.Если несколько моделей САПР импортируются вместе, эта функция не гарантирует, что все материалы с одинаковыми именами будут сохранены, поскольку для всех них используется только один префикс (если две модели имеют разные материалы с именем black, только один из них останется с указанный префикс). Во избежание таких случаев модели следует импортировать последовательно с разными префиксами. |
Other Import OptionsДругие параметры импорта#
| Front Axis | Provides an interface to choose an axis to be considered as the forward vector of the World Coordinate System.Предоставляет интерфейс для выбора оси, которая будет рассматриваться как вектор "вперед" мировой системы координат. |
|---|---|
| Up Axis | Provides an interface to choose an axis to be considered as the up vector of the World Coordinate System.Предоставляет интерфейс для выбора оси, которая будет рассматриваться как вектор "вверх" мировой системы координат. |
| Scale |
Geometry scale multiplier.Множитель масштаба геометрии. Примечание
The default unit of length for CAD models can be millimeter, inch, etc. On model importing, it is transferred to meter used in UNIGINE. So, you may need to scale the model on importing to get the appropriate size. The specified value doesn't affect scale of the model added to the world.Единицей длины по умолчанию для CAD-моделей может быть миллиметр, дюйм и т.д. При импорте модели она конвертируется в метр, используемый в UNIGINE. Таким образом, вам может потребоваться масштабировать модель при импорте, чтобы получить соответствующий размер. Указанное значение не влияет на масштаб модели добавленной в мир. |
Hierarchy OptionsПараметры иерархии#
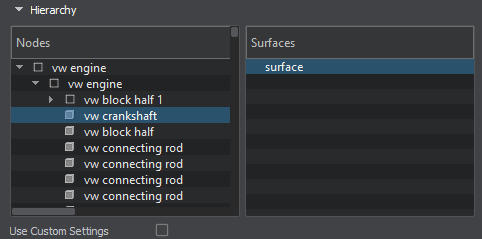
This auxiliary section is available in the Parameters window when selecting an imported CAD asset in the Asset Browser. It enables you to preview the content of the CAD asset imported with the current Mesh Import Options.Этот вспомогательный раздел доступен в окне Parameters при выборе импортированного актива CAD в обозревателе активов. Это позволяет вам предварительно просмотреть содержимое актива САПР, импортированного с текущим Параметры импорта сетки .

| Nodes | List of nodes obtained from the CAD asset.Список узлов, полученных из актива САПР. |
|---|---|
| Surfaces | List of surfaces of the selected node.Список поверхностей выбранного узла. |
| Use Custom Settings | Enables custom Lightmaps options for the selected surface(s).Включает пользовательские Карты освещения опции для выбранной(ых) поверхности(ей). |
Asset PreviewПредварительный просмотр актива#
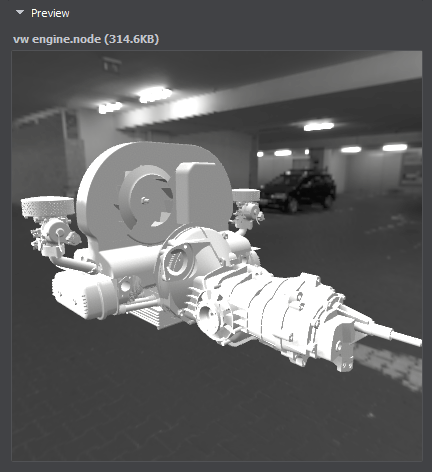
This section is available in the Parameters window when selecting an imported CAD asset in the Asset Browser. It allows you to preview the imported model.Этот раздел доступен в окне Parameters при выборе импортированного актива CAD в окне Asset Browser. Это позволяет вам просмотреть импортированную модель.

GeometryГеометрия#
CAD model can be represented as a single detail or as an assembly. If parts of the assembly are stored in separate files, you should specify all of them on the assembly import.CAD-модель может быть представлена как отдельная деталь или как сборка . Если части сборки хранятся в отдельных файлах, вы должны указать их все при импорте сборки.
To import 3D geometry data contained in a CAD model, you should enable the Import Meshes option. When you add the imported geometry to the scene, it will be available in the World Hierarchy as a Dummy Node:Чтобы импортировать данные трехмерной геометрии, содержащиеся в CAD-модели, необходимо включить параметр Import Meshes. Когда вы добавляете импортированную геометрию в сцену, она будет доступна в World Hierarchy как Dummy Node:
- If the imported CAD asset stores a detail, a single static mesh will be a child of the Dummy Node.Если импортированный CAD ассет хранит деталь, одиночная статический меш будет дочерним по отношению к Dummy Node.
- If the imported CAD asset stores an assembly, the Dummy Node will have a hierarchy of child nodes representing parts of the assembly.Если импортированный CAD ассет хранит сборку, Dummy Node будет иметь иерархию дочерних узлов, представляющих части сборки.

By default, the surfaces of each detail of the CAD model that have the same material are merged resulting in a single surface for each detail in most cases.По умолчанию поверхности каждой детали CAD-модели, которые имеют один и тот же материал, объединяются, в результате чего в большинстве случаев получается одна поверхность для каждой детали.
If you enable the Merge Static Meshes option, all child meshes will be combined into a single one. At that, all surfaces of child meshes will be copied to the single parent mesh and will appear in its Surfaces hierarchy.Если вы включите опцию Merge Static Meshes, все дочерние меши будут объединены в одну. При этом все поверхности дочерних мешей будут скопированы в единственный родительский меш и появятся в ее иерархии Surfaces.
You can also merge the surfaces of the CAD model having the same material assigned by enabling the Merge Surfaces by Materials option.Вы также можете объединить поверхности CAD-модели с одинаковым материалом, включив параметр Merge Surfaces by Materials.
Usually, the unit of length of the CAD models differs from meters. When importing a model into UNIGINE, it is transferred to meters. It may lead to improper size of the imported model: to adjust the scale of the imported geometry, you can use the Scale parameter.Обычно единица длины моделей САПР отличается от метров . При импорте модели в UNIGINE единицами становятся метры . Это может привести к неправильному размеру импортируемой модели: для настройки масштаба импортируемой геометрии можно использовать параметр Scale.
It is also possible to optimize the vertex cache when importing geometry. To do so, use the Optimize Vertex Cache option.Также можно оптимизировать кеш вершин при импорте геометрии. Для этого используйте опцию Optimize Vertex Cache.
MaterialsМатериалы#
A CAD model can also store materials assigned to surfaces of the details. To import materials from a CAD model, enable the Import Materials option. In this case, the surfaces of the imported model will have the corresponding materials assigned.Модель CAD также может хранить материалы, назначенные поверхностям деталей. Чтобы импортировать материалы из CAD-модели, включите параметр Import Materials. В этом случае поверхностям импортированной модели будут назначены соответствующие материалы.
When the Import Materials option is disabled, all surfaces of the model will have the default mesh_base material assigned.Когда опция Import Materials отключена, всем поверхностям модели будет назначен материал по умолчанию mesh_base.
When importing materials, you might have a situation when a material with a given name already exists in the project. You can choose whether to overwrite existing materials (the corresponding assets will be overwritten) or not. For this purpose, the Overwrite Assets option is used. When unchecked, the existing materials will be used.При импорте материалов может возникнуть ситуация, когда материал с заданным именем уже существует в проекте. Вы можете выбрать, перезаписывать ли существующие материалы (соответствующие ресурсы будут перезаписаны) или нет. Для этого используется опция Overwrite Assets. Если этот флажок не установлен, будут использоваться существующие материалы.
Also you can choose the base material for the imported materials: it can be an autoselected/autogenerated graph-based material or the built-in mesh_base material.Также вы можете выберите базовый материал для импортируемых материалов: это может быть автоматически выбранный/автогенерированный на основе графа материал или встроенный mesh_base материал.
If the Base Materials Mode is set to Inherited Mesh Base, you should use the Workflow option to set the desired one. UNIGINE supports two workflows for PBR materials: Metalness and Specular.Если Base Materials Mode установлено на Inherited Mesh Base, вы должны использовать опцию Workflow, чтобы установить желаемое значение. UNIGINE поддерживает два рабочих процесса для материалов PBR: Metalness и Specular.
Adding Imported CAD Asset to the WorldДобавление импортированных ресурсов САПР в сцену#
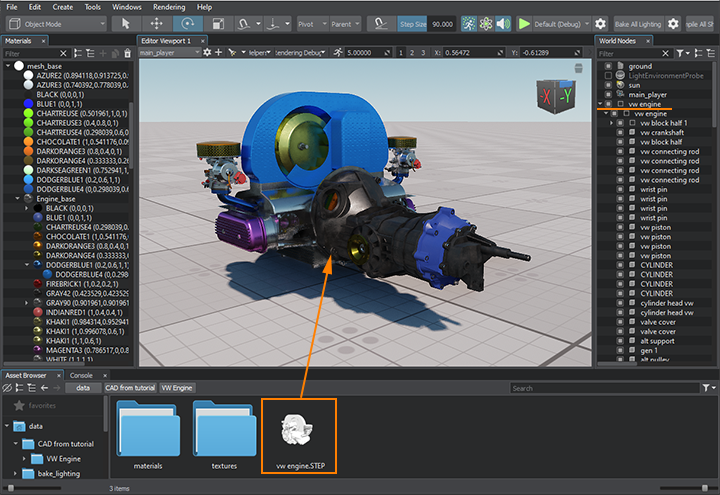
To add an imported CAD asset to the scene, drag it from the Asset Browser to the Viewport window. The corresponding node will be created and displayed in the World Hierarchy window. This node will have the same name as the imported CAD asset and a hierarchy of child nodes representing separate objects contained in the model.Чтобы добавить импортированный CAD ассет в сцену, перетащите его из Asset Browser в окно Viewport. Соответствующий узел будет создан и отображен в окне World Hierarchy. Этот узел будет иметь то же имя, что и импортированный CAD ассет, и будет иметь иерархию дочерних узлов, представляющих отдельные объекты, содержащиеся в модели.

If you double-click the imported CAD asset in the Asset Browser, the .mesh and .node files generated in run-time and stored in the CAD container will be displayed.Если дважды щелкнуть импортированный CAD ассет в браузере ресурсов, отобразятся файлы .mesh и .node, созданные во время выполнения и сохраненные в контейнере САПР.
Информация, представленная на данной странице, актуальна для версии UNIGINE 2.18.1 SDK.
