Плагин Syncker
Syncker is a multi-node rendering system that makes it easy to create an immersive CAVE system or a large-scale visualization wall on a computer cluster synchronized over the network in real-time.Syncker - это многоканальная система визуализации, которая упрощает создание иммерсивной системы CAVE или крупномасштабной видеостены на базе компьютерного кластера, синхронизированной по сети в режиме реального времени.
THIS IS NOT A MULTIPLAYER SOLUTION!ЭТО НЕ MULTIPLAYER РЕШЕНИЕ!
To create a multiplayer application, currently a third-party solution should be used.Для создания многопользовательского приложения в настоящее время следует использовать стороннее решение.
Simply connect multiple computers into one high-resolution seamless display using LAN. And it does not matter if these computers are running on Windows and Linux at the same time, as Syncker works even across different platforms. Moreover, created virtual environments can have any monitor configuration, since all viewports are fully configurable and multi-monitor grids on Slave computers are supported.Просто подключите несколько компьютеров к одному бесшовному дисплею с высоким разрешением по локальной сети. И не имеет значения, работают ли эти компьютеры на Windows и Linux одновременно, поскольку Syncker работает даже на разных платформах. Более того, созданные виртуальные среды могут иметь любую конфигурацию монитора, поскольку все вьюпорты полностью настраиваются и поддерживаются сетки с несколькими мониторами на компьютерах Slave.
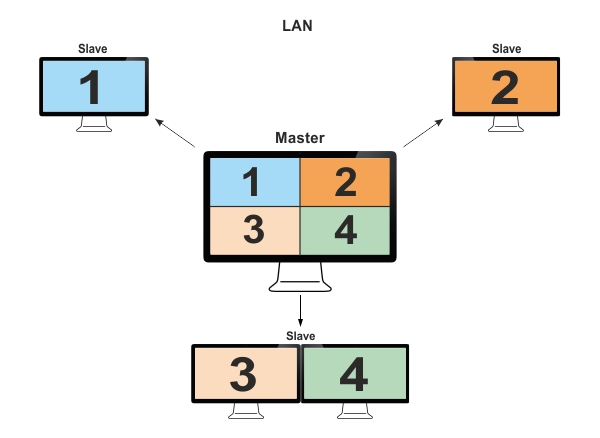
Moreover, Syncker offers you a flexible customization of the whole synchronization process, based on custom user messages. Instead of sending the whole bunch of transformation data for objects that can only be rotated or sending huge amounts of transformation data for all parts of complex objects, when their positions can be determined using just a handful of simple parameters, you can send a single quaternion or a set of parameters.Более того, Syncker предлагает вам гибкую настройку всего процесса синхронизации на основе пользовательских сообщений . Вместо отправки всего набора данных трансформаций для объектов, которые можно только повернуть, или отправки огромных объемов данных трансформаций для всех частей сложных объектов, когда их положение можно определить с помощью всего лишь нескольких простых параметров, вы можете отправить один кватернион или набор параметров.
See AlsoСмотрите также#
- The Running Syncker for a custom project article for more details on Syncker initialization and synchronization code.Статью Запуск Syncker для пользовательского проекта для более подробной информации о коде инициализации и синхронизации Syncker.
- The Syncker-specific options article for more details on Syncker command-line options and console commands.Статью Параметры Syncker для более подробной информации о параметрах командной строки Syncker и консольных командах.
- The Video Wall Output with Wall Plugin article for more details on using the Wall plugin for multi-monitor Slave configurations.Статью Вывод на видеостены с подключаемым модулем Wall статья для более подробной информации об использовании плагина Wall для многомониторных конфигураций Slave.
Syncker API:
- The Manager interface article for more details on managing Syncker via code (C++, C#, UnigineScript).Подробнее об управлении Syncker с помощью кода (C ++, C #, UnigineScript) см. В статье об интерфейсе Manager.
- The Master interface article for more details on managing Syncker Master via code (C++, C#, UnigineScript).Подробнее об управлении Syncker Master с помощью кода (C ++, C #, UnigineScript) см. В статье об интерфейсе Master.
- The Slave interface article for more details on managing Syncker Slave via code (C++, C#, UnigineScript).Подробнее об управлении Syncker Slave с помощью кода (C ++, C #, UnigineScript) см. В статье об интерфейсе Slave.
Structure and PrinciplesСтруктура и принципы#
Syncker allows you to render a world across different computers synchronized over LAN. These computers can be of two types:Syncker позволяет отображать мир на разных компьютерах, синхронизированных по локальной сети. Эти компьютеры могут быть двух типов:
| Master |
Master application is an application running on the main computer. In addition to rendering, it also performs animations and calculations of physics, and controls Slave applications.Приложение Master - это приложение, работающее на главном компьютере. Помимо рендеринга, он также выполняет анимацию и вычисления физики, а также управляет приложениями Slave. Примечание
The main computer should have the most advanced hardware configuration, as it performs most calculations.Главный компьютер должен иметь самую мощную конфигурацию оборудования, так как он выполняет оснувную часть вычислений.
All other applications are synchronized with Master.Все остальные приложения синхронизируются с Master. |
|---|---|
| Slave |
Slave applications are all other applications running on computers connected over the network. There can be an unlimited number of Slave applications connected to one Master (as long as the network bandwidth allows). The purpose of such applications is to render all nodes that are seen in their viewports.Приложения Slave - это все остальные приложения, работающие на компьютерах, подключенных к сети. К одному Master может быть подключено неограниченное количество приложений Slave (если позволяет пропускная способность сети). Цель таких приложений - визуализировать все узлы, которые видны в их вьюпортах.
Configuration of Slave is set up to fit the configuration of monitors.Конфигурация Slave настроена так, чтобы соответствовать конфигурация мониторов . |
Launching OrderПорядок запуска#
The order of launching Master and Slave applications does not matter: you can launch several Slave apps, then Master, and then the remaining Slave apps — synchronization will start automatically. Master starts the session as soon as all Slave apps are connected.Порядок запуска приложений Master и Slave значения не имеет: вы можете запустить несколько приложений Slave, затем Master, а затем остальные приложения Slave - синхронизация начнется автоматически. Master запускает сеанс, как только все приложения Slave подключены.
In case only Master is present (-sync_count 1) and connection of additional Slave applications on the fly is enabled (-sync_allow_extra_slaves 1), the session starts immediately and lasts forever (until Master is on).Если присутствует только Master (-sync_count 1) и включено подключение дополнительных приложений Slave на лету (-sync_allow_extra_slaves 1), сеанс начинается немедленно и продолжается пока включен Master.
SynchronizationСинхронизация#
Syncker works in Asynchronous mode providing synchronization between the channels by means of reconstruction using the data of previous frames. In asynchronous mode all computers draw their own frames, each with its own frame rate. So, in this mode we synchronize time.Syncker работает в асинхронном режиме , обеспечивая синхронизацию между каналами посредством реконструкции с использованием данных предыдущих кадров. В асинхронном режиме все компьютеры рисуют свои собственные кадры, каждый со своей частотой кадров. Итак, в этом режиме мы синхронизируем время.
In case there are a lot of Slave applications used, resulting in significant growth of the network load, it is recommended to try and reduce load by enabling broadcast or multicast addressing modes. If changing the addressing mode does not solve the problem, you are recommended to adjust send rate, interpolation/extrapolation parameters.В случае, если используется много приложений Slave, что приводит к значительному увеличению нагрузки на сеть, рекомендуется попытаться снизить нагрузку, включив режимы адресации broadcast или multicast. Если изменение режима адресации не решает проблему, рекомендуется настроить скорость отправки, параметры интерполяции / экстраполяции.
UNIGINE Syncker uses Interpolated Snapshots (IS) to tackle with the problem of lost packets between Master and Slave. It works by taking two old, but known positions and interpolating the object between them. It is accomplished by having a buffer of received positions and rotations, along with the time they represent. We usually take our current local time minus some predefined amount — interpolation period (40 ms by default), then go into our buffer, find the two indices that are just before and just after this time and interpolate.UNIGINE Syncker использует Interpolated Snapshots (IS) для решения проблемы потери пакетов между Master и Slave. Он работает, беря две старые, но известные позиции и интерполируя объект между ними. Это достигается за счет наличия буфера полученных позиций и поворотов, а также времени, которое они представляют. Обычно мы берем наше текущее местное время за вычетом некоторой предопределенной величины - периода интерполяции (по умолчанию 40 мс), затем заходим в наш буфер, находим два индекса, которые находятся непосредственно перед и сразу после этого времени, и интерполируем.
If we don't have a received position and rotation for the time we're looking for, the extrapolation (guessing) is used. It also has a limited time — extrapolation period (200 ms by default). If the extrapolation period is over but there are still no packets received, all objects will freeze.Если у нас нет полученной позиции и поворота на время, которое мы ищем, используется экстраполяция (предположение). Он также имеет ограниченный период экстраполяции по времени (по умолчанию 200 мс). Если период экстраполяции закончился, но пакеты все еще не получены, все объекты «заморозятся».
In most cases, this method provides a very accurate representation of the world to each Slave, as in general only already known positions of remote objects are rendered and in rare cases the system will try to extrapolate (guess) where an object is. This, however, comes at a cost, as we always render 40 ms (interpolation period) behind current time, so that new packets have time to arrive with data.В большинстве случаев этот метод обеспечивает очень точное представление мира для каждого Slave, поскольку обычно отображаются только уже известные положения удаленных объектов, и в редких случаях система будет пытаться экстраполировать (угадать), где находится объект. Однако за это приходится платить, так как мы всегда отображаем на 40 мс (период интерполяции) отстает от текущего времени, так что новые пакеты успевают прибыть с данными.
Two-Way CommunicationДвусторонняя связь#
Slave is not silent, it can send messages to Master, it can even control Master as well as other Slave applications (e.g., run the profiler on all computers or shutdown all applications) by sending the sync command.Slave не молчит, он может отправлять сообщения в Master, он может даже управлять Master, а также другими приложениями Slave (например, запускать профилировщик на всех компьютерах или закрывать все приложения), отправляя команду sync.
For sending and receiving messages between Master and Slave, Syncker uses a single UDP socket with the following five technologies:Для отправки и получения сообщений между Master и Slave, Syncker использует один сокет UDP со следующими пятью технологиями:
- Reliable — guarantees packet delivery using the so-called acknowledge packets. When Master sends a message, Slave reports that the message is received. In case Slave does not reply in a certain period of time, Master tries to re-send the message.Reliable - гарантирует доставку пакетов с использованием так называемых пакетов подтверждения. Когда Master отправляет сообщение, Slave сообщает, что сообщение получено. В случае, если Slave не отвечает в течение определенного периода времени, Master пытается повторно отправить сообщение.
- Sequenced — guarantees that all packets are received in the right order, finding all duplicates. Each packet has a number and until Slave receives the packet, Master shall not send next ones to it (with greater numbers).Sequenced - гарантирует получение всех пакетов в правильном порядке с обнаружением всех дубликатов. У каждого пакета есть номер, и пока Slave не получит пакет, Master не будет отправлять ему следующие (с большими номерами).
- Merged — small messages are combined into a greater one instead of sending them all one right after the other (send a single 100-bytes packet rather than sending 10 packets 10-bytes each). This makes sending acknowledge packets to the sender simpler and faster.Merged - маленькие сообщения объединяются в большее, вместо того, чтобы отправлять их все одно за другим (отправьте один 100-байтовый пакет, вместо 10 пакетов по 10 байтов каждый). Это упрощает и ускоряет отправку пакетов подтверждения отправителю.
- Fragmented — a large message exceeding the MTU size (Maximum Transmission Unit), shall be split into several packets having the MTU size. This ensures delivery of all packets protecting Slave from buffer overflow caused by a single large packet.Fragmented - большое сообщение, превышающее размер MTU (Maximum Transmission Unit), должно быть разбито на несколько пакетов, имеющих размер MTU. Это обеспечивает доставку всех пакетов, защищая Slave от переполнения буфера, вызванного одним большим пакетом.
- Compressed — all messages are compressed using the LZ4 algorithm before sending. This reduced network load, but slightly increases the load on the computer itself.Compressed - все сообщения перед отправкой сжимаются по алгоритму LZ4. Это снижает нагрузку на сеть, но немного увеличивает нагрузку на сам компьютер.
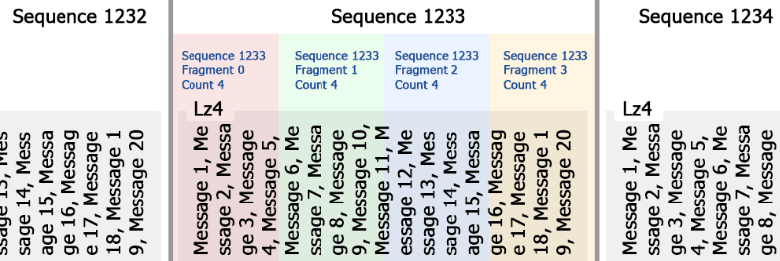
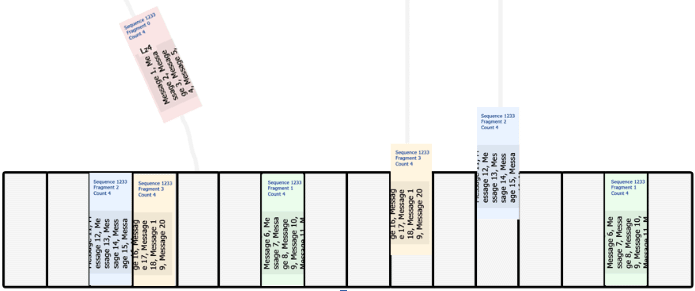
So, here's how the packets are delivered:Итак, вот как доставляются пакеты:
- During the frame up to the Data Sync Point, Master prepares messages for sending and places them to a queue. This "big message" is compressed, split into parts according to the MTU size, wrapped into packets with the following three numbers specified for each of them: sequence number (packet group), fragment number, and total number of fragments in this sequence.Во время кадра до точки синхронизации данных Master подготавливает сообщения к отправке и помещает их в очередь. Это «большое сообщение» сжимается, разбивается на части в соответствии с размером MTU, упаковывается в пакеты со следующими тремя числами, указанными для каждого из них: порядковый номер (группа пакетов), номер фрагмента и общее количество фрагментов в этой последовательности.
- The packets are sent.Пакеты отправлены.
- Upon receiving any of the packets, Slave changes the size of its sliding window in accordance with the number of fragments and adds the received fragment to this window.При получении любого из пакетов Slave изменяет размер своего скользящего окна в соответствии с количеством фрагментов и добавляет полученный фрагмент в это окно.
- In case of missing/lost packets, Slave adds the corresponding information on the missing part it requests to be sent again to the acknowledge packet dispatched to Master.В случае пропущенных / потерянных пакетов Slave добавляет соответствующую информацию об отсутствующей части, которую он запрашивает для повторной отправки, в пакет подтверждения, отправленный на Master.
Delivery ModesРежимы доставки#
Basically, you can use the following delivery modes for sending/receiving messages:В принципе, вы можете использовать следующие режимы доставки для отправки / получения сообщений:
- Reliable — Reliable and sequenced mode, enabled by default. All packets shall be delivered to the recipient in the exact order they were sent.Reliable - Надежный и последовательный режим, включен по умолчанию. Все пакеты должны быть доставлены получателю в том порядке, в котором они были отправлены.
-
Unreliable — Pure UDP. Packets may be lost, duplicated, or received in an order that differs from the one they were sent. Packets are not compressed, fragmented, or merged. Everything is sent "as is". This mode is the fastest one as it requires no additional time for processing. You can use this mode for sending timestamped auxiliary data (e.g., for interpolation) having the size close to MTU. Unreliable - Чистый UDP. Пакеты могут быть потеряны, дублированы или получены в порядке, отличном от того, в котором они были отправлены. Пакеты не сжимаются, не фрагментируются и не объединяются. Все отправляется «как есть». Этот режим самый быстрый, так как не требует дополнительного времени на обработку. Вы можете использовать этот режим для отправки вспомогательных данных с отметками времени (например, для интерполяции), имеющих размер, близкий к MTU.
Example: sending 10 times a second positions of 10 aircrafts with the information on the current time, status of flaps, slats, ailerons, landing gears, etc.Пример : отправка 10 раз в секунду позиций 10 самолетов с информацией о текущем времени, состоянии закрылков, предкрылков, элеронов, шасси и т.д.
-
Sequenced — Packets may be lost, but never duplicated, they arrive in the exact order they were sent. This mode can be used for sending auxiliary data having the size close to MTU.Sequenced — Packets may be lost, but never duplicated, they arrive in the exact order they were sent. This mode can be used for sending auxiliary data having the size close to MTU.
Example: sending each frame positions of 10 aircrafts with the information on the status of flaps, slats, ailerons, landing gears, etc.Example: sending each frame positions of 10 aircrafts with the information on the status of flaps, slats, ailerons, landing gears, etc.
Sequenced — Packets may be lost, but never duplicated, they arrive in the exact order they were sent. This mode can be used for sending auxiliary data having the size close to MTU.Example: sending each frame positions of 10 aircrafts with the information on the status of flaps, slats, ailerons, landing gears, etc.Sequenced — Packets may be lost, but never duplicated, they arrive in the exact order they were sent. This mode can be used for sending auxiliary data having the size close to MTU.Sequenced - Пакеты могут быть потеряны, но никогда не дублируются, они прибывают в том порядке, в котором были отправлены. Этот режим можно использовать для отправки вспомогательных данных размером, близким к MTU.
Example: sending each frame positions of 10 aircrafts with the information on the status of flaps, slats, ailerons, landing gears, etc.Пример : отправка каждого кадра положения 10 самолетов с информацией о состоянии закрылков, предкрылков, элеронов, шасси и т.д.
Multiple systems may use the Syncker's network simultaneously (e.g. IG and a user's App application). For convenience, all messages are sent and received via named channels. If the specified channel does not exist, it shall be created.Несколько систем могут использовать сеть Syncker одновременно (например, IG и приложение пользователя App). Для удобства все сообщения отправляются и принимаются по именованным каналам. Если указанный канал не существует, он должен быть создан.
Addressing ModesРежимы адресации#
The following addressing modes for communication are available:Доступны следующие режимы адресации для связи:
Depending on your project's requirements, you can choose the one that fits best: ensures the lowest possible load, or provides additional features like easy testing on a single PC or communication between hosts from different subnets using different ports.В зависимости от требований вашего проекта вы можете выбрать тот, который лучше всего подходит: обеспечивает минимально возможную нагрузку или предоставляет дополнительные функции, такие как простое тестирование на одном ПК или обмен данными между хостами из разных подсетей с использованием разных портов.
Network LoadСетевая нагрузка#
Summarizing the information from the table above as related to the network traffic load:Обобщая информацию из приведенной выше таблицы в отношении нагрузки сетевого трафика:
- The Multicast mode generates the minimum network traffic, as compared to other modes, thus creating the least load on the router and wi-fi.Режим Multicast генерирует минимальный сетевой трафик по сравнению с другими режимами, таким образом создавая наименьшую нагрузку на роутер и Wi-Fi.
- The Broadcast mode can be more consuming, because the packets are sent to all network PCs, including those that are not Slave (if any). If you don't have any other PCs in your network except for Slave ones, then the traffic amount will be the same as in the Multicast mode.Режим Broadcast может быть более затратным, потому что пакеты отправляются на все сетевые ПК, включая те, которые не имеют Slave (если есть). Если в вашей сети нет других компьютеров, кроме Slave, то объем трафика будет таким же, как в режиме Multicast.
- The Unicast mode generates amount of network traffic that can be calculated as Multicast * number of Slave PCs.Режим Unicast генерирует объем сетевого трафика, который можно рассчитать как Multicast * количество ПК Slave .
To further optimize the traffic load, you can increase the time intervals for packets sending:Для дальнейшей оптимизации загрузки трафика вы можете увеличить временные интервалы отправки пакетов:
//On the Master
	master->setSendRate(15.0f); // send packets 15 times per second

	//Both on the Master and all Slaves
	syncker->setInterpolationPeriod(0.1f); // 100 ms delay
In this example, packets will be sent only 15 times per second, thus the lag will make 100 ms.В этом примере пакеты будут отправляться только 15 раз в секунду, поэтому задержка составит 100 мс.
To avoid visual jittering, the following condition must be fulfilled:Во избежание визуального дрожания необходимо выполнение следующего условия:
interpolation period > (1 / send rate)
Consequently, reducing the lag (interpolation period) requires increasing the send rate, which will affect the network load:Следовательно, уменьшение лага (периода интерполяции) требует увеличения скорость отправки , что повлияет на загрузку сети:
//On the Master
	master->setSendRate(30.0f); // send packets 30 times per second

	//Both on the Master and all Slaves
	syncker->setInterpolationPeriod(0.05f); // 50 ms delay
Multiple Cameras and Multi-Monitor SlavesНесколько камер и Slave с несколькими мониторами#
Syncker allows synchronizing views from multiple cameras. There are two types of cameras:Syncker позволяет синхронизировать виды с нескольких камер. Есть два типа камер:
-
Main master camera — a single camera that corresponds to the main viewer's position. The screen configuration determines viewports relative to this camera. Основная мастер-камера - отдельная камера, соответствующая положению основного зрителя. В конфигурация экрана определяет вьюпорты относительно этой камеры.
Example: a camera in the plane's cockpit, corresponding the pilot's point of view.Пример: камера в кабине самолета, соответствующая точке зрения пилота.
-
Auxiliary camera — an additional camera (static or dynamic) that can be set anywhere in the scene. You can have as many cameras of this type as necessary.Вспомогательная камера - дополнительная камера (статическая или динамическая), которую можно установить в любом месте сцены. Вы можете иметь столько камер этого типа, сколько необходимо.
Example: a ground-based surveillance camera or a thermal imaging camera mounted on the plane's wing.Пример: наземная камера наблюдения или тепловизионная камера, установленная на крыле самолета.
By default, the main master camera is used. You can create auxiliary cameras and specify their viewports to be displayed by selected Slave apps. Such cameras are synchronized automatically.По умолчанию используется основная мастер-камера. Вы можете создать дополнительные камеры и указать их вьюпорты, которые будут отображаться выбранными приложениями Slave. Такие камеры синхронизируются автоматически.
Syncker offers you an extreme flexibility of viewport configuration. You can use up to 6 monitors on a single Slave, each having it own viewport assigned. For this purpose, you should use the Wall plugin.Syncker предоставляет исключительную гибкость конфигурации вьюпортов. Вы можете использовать до 6 мониторов на одном Slave, каждому из которых назначено собственный вьюпорт. Для этого следует использовать плагин Wall.
Screen ConfigurationsКонфигурации экрана#
You can set up the desired screen/projection configuration for Syncker in the screen/projection setup mode. To activate this mode, use the syncker_setup console command from Master or Slave:Вы можете настроить желаемую конфигурацию экрана / проекции для Syncker в режим настройки экрана / проекции . Чтобы активировать этот режим, используйте консольную команду syncker_setup из Master или Slave:
syncker_setup 1Screen configuration for Syncker has to meet the requirements.Конфигурация экрана для Syncker должна соответствовать требованиям .
Two types of configuration can be used:Можно использовать два типа конфигурации:
-
A multi-monitor setup formed by displays, where each Slave renders its viewport on the corresponding monitor (or several monitors).Установка с несколькими мониторами, состоящая из дисплеев , где каждый Slave отображает свое окно просмотра на соответствующем мониторе (или нескольких мониторах).
ПримечаниеProjection and modelview matrices are automatically calculated on the basis of the viewer's position.Матрицы проекции и обзора модели автоматически рассчитываются на основе положения зрителя.The following picture shows the screen configuration for the multi-monitor setup, where each Slave renders its viewport to a single monitor.На следующем рисунке показана конфигурация экрана для настройки с несколькими мониторами, где каждый Slave отображает свой вьбпорт на одном мониторе.
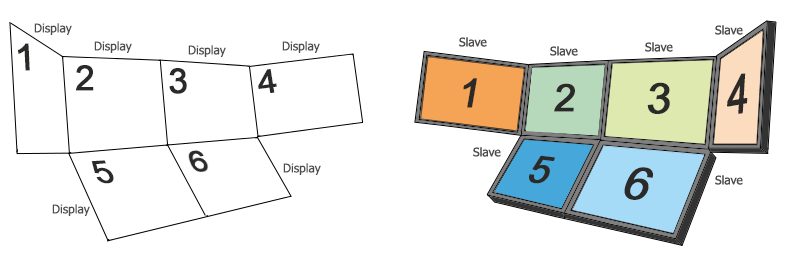 Screen Configuration (the left picture) for Multi-Monitor Setup (the right picture)Конфигурация экрана (левое изображение) для настройки нескольких мониторов (правое изображение)
 -
A multi-projector setup formed by projectors, where each Slave renders its viewport via the corresponding projector. By default, the projectors display images as seen from the viewer's position.Мультипроекторная установка, состоящая из проекторы , где каждый Slave отображает свое окно просмотра через соответствующий проектор. По умолчанию проекторы отображают изображения, видимые с позиции зрителя.
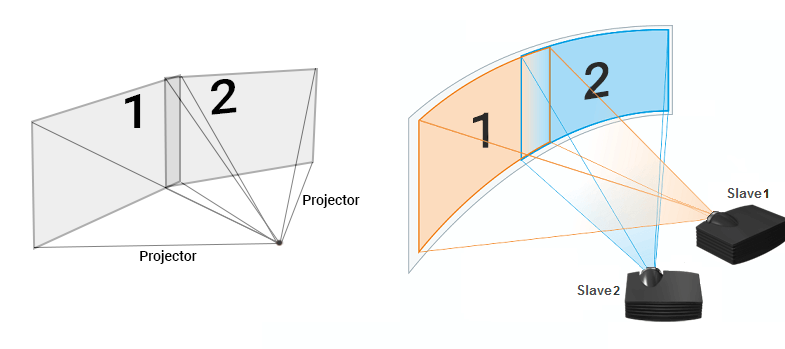 Projector Configuration (the left picture) for Multi-Projector Setup (the right picture)Конфигурация проектора (левый рисунок) для настройки нескольких проекторов (правый рисунок)ПримечаниеProjection and modelview matrices are automatically calculated on the basis of the viewer's position.Матрицы проекции и обзора модели автоматически рассчитываются на основе положения зрителя.
A special case of the multi-projection setup is CAVE (Cave Automatic Virtual Environment): Особым случаем настройки нескольких проекций является CAVE (автоматическая виртуальная среда пещеры):
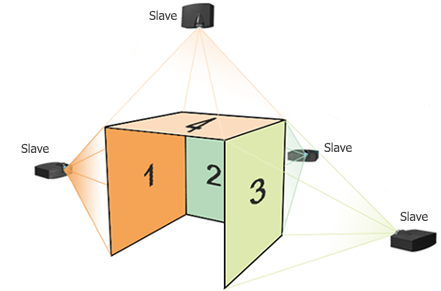 Projection Configuration for CAVEКонфигурация проекции для CAVE
Syncker PipelineКонвейер Syncker#
Basically Syncker has 4 states:Обычно Syncker имеет 4 состояния:
- Wait for connections — waiting until all Slave PCs are connected.Wait for connections - ожидание подключения всех Slave ПК.
- Starting... — MTU calculation and startup synchronization of all hosts.Starting... - расчет MTU и стартовая синхронизация всех хостов.
- Session Started — the session is started.Session Started - сессия запущена.
- Session Finished — the session is over, all Slave PCs are disconnected.Session Finished - сессия окончена, все ПК Slave отключены.
Let us consider Syncker running using broadcast addressing with Master and a single Slave:Давайте рассмотрим работу Syncker с использованием широковещательной адресации с Master и одним Slave:
- After being launched, Master opens the port (-sync_port), and starts listening to it. Syncker status is switched to "Wait for connections".После запуска Master открывает порт (-sync_port) и начинает его слушать. Статус Syncker переключается на "Wait for connections".
- Slave gets the list of all available network adapters (Wifi, Ethernet), finds a broadcast address for each of them, and periodically sends connection request packets (broadcast mode). The Syncker status is "Wait for connections".Slave получает список всех доступных сетевых адаптеров (Wifi, Ethernet), находит широковещательный адрес для каждого из них и периодически отправляет пакеты запросов на соединение (режим broadcast). Статус Syncker равен "Wait for connections".
- Master receives the connection request packet, registers Slave and sends a connection response packet (unicast mode), where it indicates the currently loaded world. When all Slave PCs are connected, the Syncker status is switched to "Starting..." and Master sends projection settings to all of them.Master принимает пакет запроса на соединение, регистрирует Slave и отправляет пакет ответа на соединение (режим unicast), где указывает загруженный в данный момент мир. Когда все ПК Slave подключены, статус Syncker переключается на "Starting...", и Master отправляет настройки проекции всем им.
- As soon as Slave receives the confirmation from Master the status is switched to "Starting..." and starts loading the world from Master.Как только Slave получает подтверждение от Master, статус переключается на "Starting..." и начинается загрузка мира с Master.
- While the Syncker status remains "Starting...", both Master and Slave are trying to find the maximum possible MTU value (currently limited to 1432 bytes).Пока статус Syncker остается "Starting...", и Master, и Slave пытаются найти максимально возможное значение MTU (в настоящее время ограничено 1432 байтами).
- Upon completion Slave sends a message to Master that it is ready to continue. After receiving such messages from all Slave PCs (and finding an MTU for each Slave), Master changes the status to "Session Started" notifying all hosts.По завершении Slave отправляет сообщение Master, что он готов к продолжению. После получения таких сообщений от всех компьютеров Slave (и нахождения MTU для каждого Slave), Master изменяет статус на "Session Started", уведомляя все хосты.
- The session has started, everything is ready for work.Сессия началась, все готово к работе.
Using SynckerИспользование Syncker#
Simple Synchronized DemonstrationПростая синхронизированная демонстрация#
Suppose, you have prepared a "static" project (meaning that no new objects are created in it and no existing ones are deleted or moved) with some cinematics. This corresponds to the majority of archviz projects or various types of demonstrations.Предположим, вы подготовили «статический» проект (это означает, что в нем не создаются новые объекты и не удаляются и не перемещаются существующие) с некоторой кинематикой. Это соответствует большинству проектов Archviz или различным типам демонстраций.
Suppose, you'd like to demonstrate this project using a wall or a CAVE system. Syncker should do the job here, but there is nothing in your project about it, not a single line of code! Well, you don't need it, simply use a special system script that launches Syncker! That's all you should do, as the only thing moving during the cinematic sequence is the camera (which is synchronized automatically) with all other objects being static (no need to sync them).Предположим, вы хотите продемонстрировать этот проект с помощью стены или системы CAVE. Здесь должен работать Syncker, но в вашем проекте об этом нет ничего, ни единой строчки кода! Что ж, вам это не нужно, просто используйте специальный системный скрипт, который запускает Syncker! Это все, что вам нужно сделать, поскольку единственное, что движется во время кинематографического эпизода, - это камера (которая синхронизируется автоматически), а все остальные объекты статичны (нет необходимости их синхронизировать).
This is the simplest mode, you don't have to know IP addresses or ports neither do you have to write any code. All you need to know is:Это самый простой режим, вам не нужно знать IP-адреса или порты, и вам не нужно писать какой-либо код. Все, что вам нужно знать, это:
- Who shall be Master.Кто должен быть Master.
- What is the number of Slave PCs.Какое количество ПК Slave.
Then you simply do the following:Затем вы просто делаете следующее:
-
Run the Master application substituting the System Runtime Script with the special one (core/systems/syncker/unigine.cpp) and providing necessary startup command-line options to define it as Master and set the total number of host computers:Запустите приложение Master, подставив Системный сценарий выполнения со специальным (core/systems/syncker/unigine.cpp) и обеспечивающим необходимый запуск параметры командной строки чтобы определить его как Master и установить общее количество хост-компьютеров:
Shell-команды<your_app> -system_script core/systems/syncker/unigine.cpp -extern_plugin "UnigineSyncker" -sync_master 1 -sync_count 2-sync_count here sets the total number of computers (Slave PCs + Master). In this simplest case -sync_count 2 — means a single Master and a single Slave.-sync_count здесь устанавливает общее количество компьютеров (Slave ПК + Master). В этом простейшем случае -sync_count 2 - означает одиночный Master и единственный Slave.
-
Run each Slave application using the same system script and indicating that the host is Slave (not Master):Запустите каждое приложение Slave, используя один и тот же системный скрипт и указав, что хост - это Slave (а не Master):
Shell-команды<your_app> -system_script core/systems/syncker/unigine.cpp -extern_plugin "UnigineSyncker" -sync_master 0
That's it! Run Master and Slave(s) in any order (it doesn't matter). Slave shall automatically find Master in the network and connect to it.И все! Запускайте Master и Slave (s) в любом порядке (это не имеет значения). Slave автоматически найдет Master в сети и подключится к нему.
Basic WorkflowБазовый порядок действий#
The basic workflow is as follows:Базовый порядок действий выглядит следующим образом:
- Implement Syncker logic for your Master and Slave applications (you can use the same application on both Master and Slave sides).Реализуйте логику Syncker для ваших приложений Master и Slave (вы можете использовать одно и то же приложение для сторон Master и Slave).
-
Prepare your environment.Подготовьте свое окружение .
It is recommended to use a 100 Mb LAN. Otherwise, you may experience network lags (see Troubleshooting section).Рекомендуется использовать LAN 100 Мб. В противном случае могут возникнуть задержки в сети (см. Поиск проблемы раздел).
All applications you use must have access to all Unigine files and project data. So, you should copy your project to all computers. If some nodes are missing in the world file on a local computer, they will not be rendered.Все используемые вами приложения должны иметь доступ ко всем файлам Unigine и данным проекта. Итак, вы должны скопировать свой проект на все компьютеры. Если некоторые узлы отсутствуют в мировом файле на локальном компьютере, они не будут отображаться.
-
Run the Master application.Запустите приложение Master.
To run a Master application provide necessary startup command-line options, e.g.:Для запуска приложения Master необходимо обеспечить необходимый запуск параметры командной строки , например:
Shell-команды<your_app> -extern_plugin "UnigineSyncker" -sync_master 1 -sync_view <display_name> -sync_count <number_of_hosts>ПримечаниеThe order of launching Master and Slave applications does not matter.Порядок запуска приложений Master и Slave значения не имеет. -
Run a Slave application.Запустите приложение Slave.
To run a Slave application provide necessary startup command-line options, e.g.:Для запуска приложения Slave необходимо обеспечить необходимый запуск параметры командной строки , например:
Shell-команды<your_app> -extern_plugin "UnigineSyncker" -sync_master 0 -sync_view <display_name>If you want a Slave with a multi-monitor configuration to render several viewports, you should use the Wall plugin and assign viewports to monitors via the sync_view_n options, e.g.:Если вы хотите, чтобы Slave с конфигурацией с несколькими мониторами отображал несколько окон просмотра, вы должны использовать плагин Wall и назначить окна просмотра для мониторов с помощью параметров sync_view_n, например:
Shell-команды<your_app> -extern_plugin "UnigineWall,UnigineSyncker" -sync_master 0 -sync_view_0 <display_0> -sync_view_1 <display_1>ПримечаниеThe order of plugins in the list matters: Wall must be specified before Syncker.Порядок плагинов в списке имеет значение: Wall должен быть указан перед Syncker. - Set up screen/projection configuration. This step is performed when all Syncker hosts are successfully connected and working.Настройте конфигурации экранов / проекций . Этот шаг выполняется, когда все хосты Syncker успешно подключены и работают.
Debug WindowОкно отладки (Debug)#
Syncker's debug window enables you to monitor the hierarchy of objects at run time. The whole hierarchy means all objects (not only the ones registered in the Editor) including objects in cache, internal structure of node references, etc. When a node is selected, all necessary debug information is displayed. This information is updated each frame.Окно отладки Syncker позволяет вам контролировать иерархию объектов во время выполнения. Под всей иерархией понимаются все объекты (не только зарегистрированные в Редакторе), включая объекты в кеше, внутреннюю структуру ссылки на узлы и т.д. Когда узел выбран, отображается вся необходимая отладочная информация. Эта информация обновляется каждый кадр.
The Search option allows you to find any node by its name or ID (on Master or Slave), so a faulty node can be found quickly.Параметр Search позволяет найти любой узел по его имени или идентификатору (на Master или Slave), поэтому неисправный узел можно найти быстро.
To open the debug window, run the syncker_debug console command from Master or Slave as follows:Чтобы открыть окно отладки, запустите консольную команду syncker_debug из Master или Slave следующим образом:
syncker_debug 1The debug window can also be opened via the System Menu:Окно отладки также можно открыть через System Menu:
- Open the System Menu by pressing Esc.Откройте System Menu, нажав Esc.
-
Enable the Show debug window option:Включите опцию Show debug window:
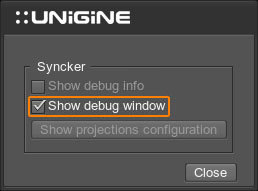
The debug window will open:Откроется окно отладки:
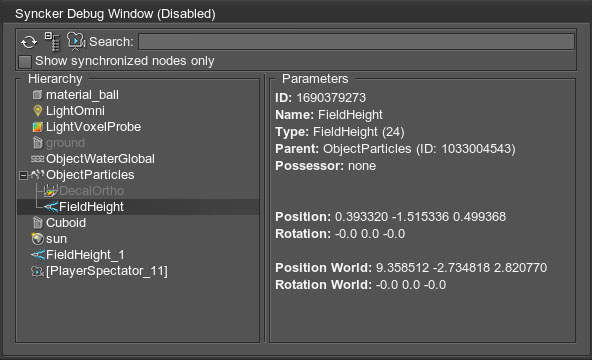
TroubleshootingПоиск и устранение неполадок#
Slave Cannot Connect to MasterSlave не может подключиться к Master#
The console shall look like this:Консоль должна выглядеть так:
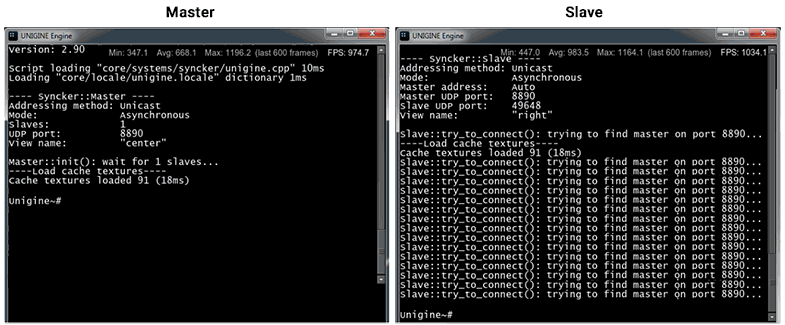
Slave periodically sends broadcast messages when trying to find Master that responds, but there's no reply. Messages do not reach Master.Slave периодически отправляет широковещательные сообщения при попытке найти отвечающий Master, но ответа нет. Сообщения не доходят до Master.
Solutions:Решения:
- Make sure that the port used by Slave for sending/receiving messages (Slave UDP port) is not blocked by the firewall on Master. Try disabling firewalls on Master and all Slave PCs.Убедитесь, что порт, используемый Slave для отправки / получения сообщений (Slave UDP port), не заблокирован брандмауэром на Master. Попробуйте отключить брандмауэры на Master и всех ПК с Slave.
- Make sure that broadcast/multicast messages are not blocked by the router/switch. It is unlikely, but still possible.Убедитесь, что широковещательные / многоадресные сообщения не блокируются маршрутизатором / коммутатором. Маловероятно, но все же возможно.
-
Try to explicitly specify Master's IP address via the sync_master_address command, for example:Попробуйте явно указать IP-адрес Master с помощью команды sync_master_address, например:
Исходный код-sync_master_address 192.168.0.1In this case Slave shall skip the phase of searching for Master via broadcast messages and use unicast mode for direct connection.В этом случае Slave должен пропустить фазу поиска Master через широковещательные сообщения и использовать одноадресный режим для прямого подключения.
- Make sure that Master really waits for new connections. Check the sync_count value, is it greater than 1?Убедитесь, что Master действительно ждет новых подключений. Проверьте значение sync_count, оно больше 1?
Master Cannot Reply to SlaveMaster не может ответить Slave#
In this case the console shall look like this:В этом случае консоль будет выглядеть так:
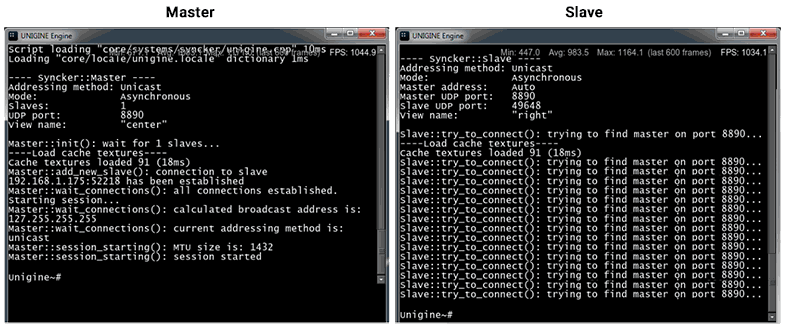
Connection requests from Slave were received by Master, the connection was opened and the session was started, but connection response did not reach Slave.Запросы на соединение от Slave были получены Master, соединение было открыто и сеанс был запущен, но ответ соединения не достиг Slave.
Solutions:Решения:
- Make sure that the port used by Slave for sending/receiving messages (Slave UDP port) is not blocked by the firewall. Try disabling firewalls on Master and all Slave PCs.Убедитесь, что порт, используемый Slave для отправки / получения сообщений (Slave UDP port), не заблокирован брандмауэром. Попробуйте отключить брандмауэры на Master и всех ПК с Slave.
- Make sure that broadcast/multicast messages are not blocked by the router/switch. It is unlikely, but still possible.Убедитесь, что сообщения broadcast/multicast не блокируются маршрутизатором / коммутатором. Маловероятно, но все же возможно.
-
Try using a unicast connection:Попробуйте использовать одноадресное соединение:
Исходный код-sync_method unicast -
Check that the broadcast address found is valid, try setting up a broadcast channel for all hosts:Убедитесь, что найденный широковещательный адрес действителен, попробуйте настроить широковещательный канал для всех хостов:
Исходный код-sync_broadcast_address 255.255.255.255 - Try setting another multicast address on the Master and Slave PCs via the sync_multicast_address command.Попробуйте установить другой адрес многоадресной рассылки на ПК Master и Slave с помощью команды sync_multicast_address.
- Check IP/port of the Slave connected to Master. Is this the right Slave, or maybe there is another instance of Slave looking for Master on the same port? Try changing port number on Master and Slave (e.g., -sync_port 25100) and restart applications.Проверьте IP / порт Slave, подключенного к Master. Это правильный Slave, или, может быть, есть другой экземпляр Slave, который ищет Master на том же порту? Попробуйте изменить номер порта на Master и Slave (например, -sync_port 25100) и перезапустите приложения.
Network LatencyЗадержка в сети#
If the network latency is too large despite 1Gb bandwidth or higher, it can be caused by a 100 Mb or 10 Mb device connected to a network. Data exchange rate will drop down to the maximum rate supported by such device, slowing down Syncker connection speed.Если задержка в сети слишком велика, несмотря на пропускную способность 1 ГБ или выше, это может быть вызвано подключением к сети устройства на 100 или 10 МБ. Скорость обмена данными упадет до максимальной скорости, поддерживаемой таким устройством, замедляя скорость соединения Syncker.
- Some 100 Mb or 10 Mb devices can have a working network interface when they are turned off.Некоторые устройства на 100 или 10 МБ могут иметь рабочий сетевой интерфейс в выключенном состоянии.
- It is also possible that when turned off, 1 Gb devices have a network interface working at 100 Mb rate, which slows down connection in the LAN.Также возможно, что в выключенном состоянии устройства на 1 Гб имеют сетевой интерфейс, работающий на скорости 100 Мб, что замедляет соединение в локальной сети.
Integration with the Microprofile tool enables you to monitor performance, detect bottlenecks, and eliminate them.Интеграция с инструментом Microprofile позволяет отслеживать производительность, обнаруживать узкие места и устранять их.
Useful ToolПолезный инструмент#
If you have a source SDK, you can use a simple and useful tool to monitor the network messages exchange speed. It is server.usc found in source/tools/Interpreter/scripts/network/.Если у вас есть исходный SDK, вы можете использовать простой и полезный инструмент для отслеживания скорости обмена сетевыми сообщениями. Это server.usc, найденное в source/tools/Interpreter/scripts/network/.
Problem DevicesПроблемные устройства#
Testing and operation revealed that the Syncker plugin may have issues when used with the following equipment:Тестирование и эксплуатация показали, что плагин Syncker может иметь проблемы при использовании со следующим оборудованием:
- 3COM OfficeConnect Switch 5
- D-Link DES-1005D
If any issues arise, try switching to other equipment.Если возникнут проблемы, попробуйте переключиться на другое оборудование.
Информация, представленная на данной странице, актуальна для версии UNIGINE 2.18.1 SDK.
