Шаблон приложения IG
The Image Generator (IG) renders scenes of the virtual world, providing an immersive view of the simulation, it can be thought of as a viewport into the virtual world of simulation. A simulator may have one or more IG channels rendering an "out-the-window" view and might have several additional views representing various sensors: electro-optical (EO), infrared (IR), and night vision (NV); and sometimes radar. The way these views are displayed may vary from a simple desktop monitor to a multiple projector dome display.Image Generator (IG) визуализирует сцены виртуального мира, обеспечивая симуляцию с высокой степенью погружения, его можно рассматривать как окно в виртуальном мире симуляции. Симулятор может иметь один или несколько каналов IG, передающих вид «из окна», и может иметь несколько дополнительных видов, представляющих различные датчики: электрооптические (EO), инфракрасные (IR) и ночного видения (NV); а иногда и радар. Способ отображения этих видов может варьироваться от простого настольного монитора до многопроекторного купольного дисплея.
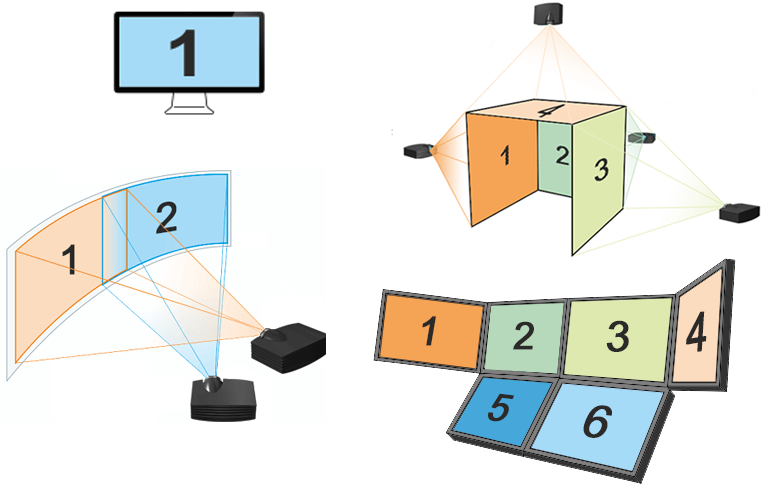
The IG uses the terrain database and a set of entities (aircrafts, vehicles, etc.) to render a scene, along with sky, weather and visual effects, from the specified perspective, and sends a video signal to the appropriate display within the user interface.IG использует базу данных ландшафта и набор сущностей (entities) (самолеты, транспортные средства и т.д.) Для визуализации сцены вместе с небом, погодой и визуальными эффектами с указанной точки зрения и отправляет видеосигнал на соответствующий дисплей в пределах интерфейса пользователя.
The IG receives updates and events from all the other hosts from the network, be it a vehicle/aircraft simulation host, instructor operator station (IOS), physical simulation host, etc. The IG also responds to requests from other hosts to check for intersections with the terrain to determine if the vehicle/aircraft bumps into anything or has a line-of-sight to another entity(ies).IG получает обновления и события от всех других узлов сети, будь то узел моделирования транспортного средства / самолета, станция оператора-инструктора (IOS), узел физического моделирования и т.д. IG также отвечает на запросы от других узлов для проверки пересечений. с рельефом местности, чтобы определить, врезается ли автомобиль / самолет в что-либо или имеет ли прямую видимость для другого объекта (объектов).
The simulator and the IG can be integrated into a single application, where the simulator uses API calls to control the IG. Or, the simulator can be connected to the IG via a network connection and communicate by sending/receiving messages specified by an interface control document such as CIGI (Common Image Generator Interface). Or, they can be connected using the distributed simulation network and pass messages using communication protocols such as DIS or HLA.Симулятор и IG могут быть интегрированы в одно приложение, где симулятор использует вызовы API для управления IG. Или симулятор может быть подключен к IG через сетевое соединение и обмениваться данными, отправляя / получая сообщения, указанные в документе управления интерфейсом, таком как CIGI (Common Image Generator Interface). Или они могут быть подключены с помощью распределенной сети моделирования и передавать сообщения с использованием таких протоколов связи, как DIS или HLA .
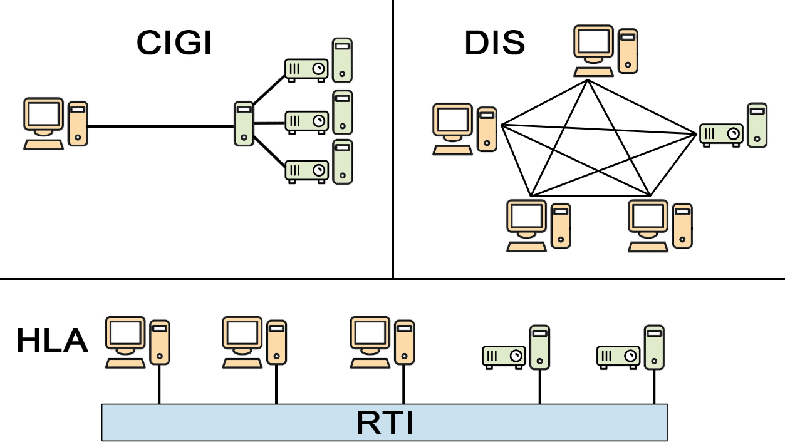
HLA is a standard for interoperability among simulations. Rather than a networking protocol (wire standard) like DIS, HLA defines an architecture with a set of Application Programmer’s Interface (API) Standards. Simulation applications (known as federates) communicate by making calls to the HLA APIs. A piece of software known as the Runtime Infrastructure (RTI) implements the HLA API, and is responsible for transporting data from one federate to another.HLA - это стандарт взаимодействия симуляций. Вместо сетевого протокола (стандарт проводной связи), такого как DIS, HLA определяет архитектуру с набором стандартов интерфейса прикладного программиста (API). Приложения моделирования (известные как федеративные) взаимодействуют, выполняя вызовы API HLA. Часть программного обеспечения, известная как Runtime Infrastructure (RTI), реализует HLA API и отвечает за передачу данных от одного федеративного устройства к другому.
An Entity is a static or dynamic simulation object that can be created, manipulated, and destroyed by the host. The virtual world is filled with entities, they represent certain objects of the real world (e.g. aircrafts, vehicles, ships, etc.)Entity - это статический или динамический объект моделирования, который может быть создан, обработан и уничтожен хостом. Виртуальный мир наполнен сущностями, они представляют определенные объекты реального мира (например, самолеты, транспортные средства, корабли и т.д.)
A Terrain Database (or simply Database) is a virtual model of the landscape where the simulation takes place. Its character, quality, and content defines what can be done in the simulation environment. The resolution and level of detail of the terrain database content define the fidelity of interactions possible within the environment. UNIGINE supports double-precision coordinates enabling you to extend geographic coverage of the terrain, that defines the size of the area where the simulation can take place, up to the whole Earth's surface.Terrain Database (или просто Database) - это виртуальная модель ландшафта, на котором происходит симуляция. Его характер, качество и содержание определяют, что можно делать в среде моделирования. Разрешение и уровень детализации содержимого базы данных ландшафта определяют точность взаимодействия, возможного в среде. UNIGINE поддерживает координаты двойной точности , позволяя расширить географический охват местности, определяющий размер области, где может происходить моделирование, вплоть до всей поверхности Земли.
There’s more in a scene than the terrain database and the entities moving around – sky, atmosphere, and water. Drawing these ethereal parts of the environment is the IG’s responsibility too. Since their appearance varies dramatically depending on the weather and the time of day, several models are implemented to simulate the environment:В сцене есть нечто большее, чем база данных ландшафта и объекты , которые перемещаются - небо, атмосфера и вода . Рисование этих неземных частей окружающей среды - тоже обязанность IG. Поскольку их внешний вид сильно меняется в зависимости от погоды и времени суток, для имитации окружающей среды реализовано несколько моделей:
- An ephemeris model determines the position of the sun and moon, which both cast light into the scene, depending on given coordinates and date/time. Модель эфемерид определяет положение солнца и луны, которые излучают свет на сцену, в зависимости от заданных координат и даты / времени.
- A weather model, either in the IG or supplied by an external weather simulation, provides the cloud coverage, and a global wind concept with direction and strength, affecting vegetation animation and the environment. Модель погоды , либо в IG, либо предоставленная имитацией внешней погоды, обеспечивает покрытие облаков и глобальную концепцию ветра с направлением и силой, влияющими на анимацию растительности и окружающую среду.
UNIGINE's IG is designed to be simple, easy to use and extensible via its plug-in based architecture. The main framework plugin, that manipulates systems, entities, articulated parts, component templates and so on, is the IG Plugin, it operates in terms of the UNIGINE Engine (Nodes, NodeReferences, etc.) and is not bound to any specific communication protocol. The IG plugin has a set of additional plugins, called connectors, that are used to link IG terminology with that of each specific protocol (e.g. CIGI, HLA, DIS). Basically, the architecture looks as follows:IG UNIGINE спроектирован так, чтобы быть простым, легким в использовании и расширяемым за счет архитектуры на основе плагинов. Основной подключаемый модуль фреймворка, который управляет системами, объектами, сочлененными частями, шаблонами компонентов и т.д., - это IG Plugin , он работает в терминах UNIGINE Engine (узлы, NodeReferences и т.д.) И не привязан к какому-либо конкретному протоколу связи. Плагин IG имеет набор дополнительных плагинов, называемых коннекторами , которые используются для связывания терминологии IG с терминологией каждого конкретного протокола (например, CIGI, HLA, DIS). В основном архитектура выглядит следующим образом:
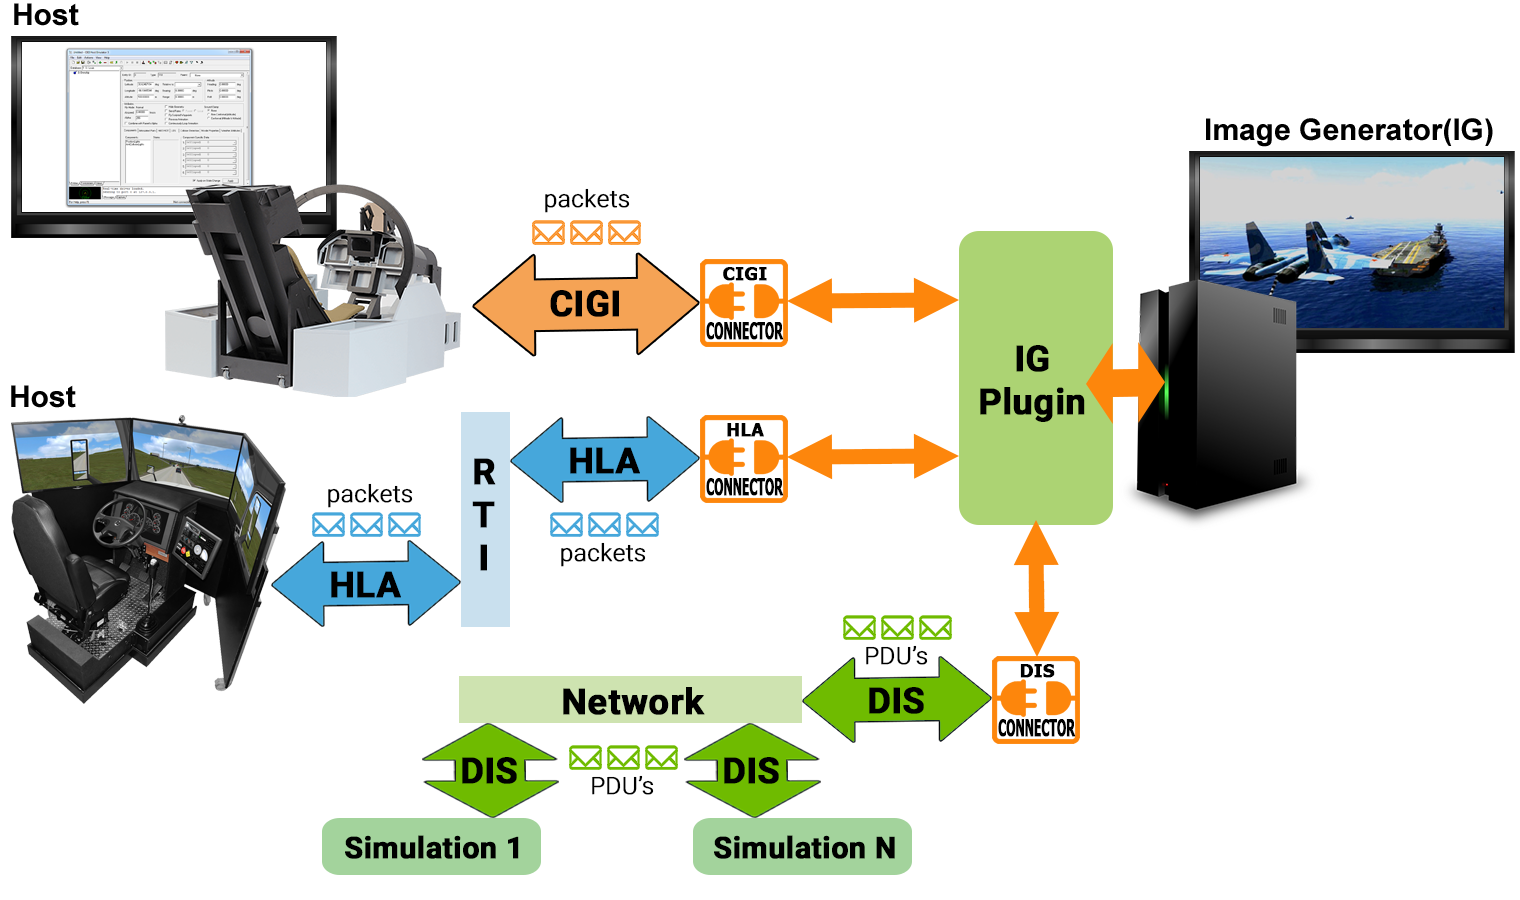
Within the IG, all entities, lights, databases, etc. are referred to via IDs. Simple articulation of entities' parts is performed based on XML definition and does not require a modeler to prepare any animations.В IG все объекты, источники света, базы данных и т.д. Упоминаются через идентификаторы. Простая артикуляция частей сущностей выполняется на основе определения XML и не требует от моделиста подготовки каких-либо анимаций.
UNIGINE IG is currently implemented as IG Template.UNIGINE IG в настоящее время реализован как шаблон IG .
Currently supported CIGI packets Поддерживаемые в настоящее время пакеты CIGI
| Type | Supported | Not Supported |
|---|---|---|
| ig_control | FULL | |
| entity_control | Extrapolation/Interpolation Enable | Alpha |
| entity_clamped_control | FULL | |
| component_control | Component classes: ENTITY, VIEW, GROUP |
SENSOR, REG_WATER, REG_TERRAIN, REG_WEATHER, GLOBAL_WATER, GLOBAL_TERRAIN, GLOBAL_WEATHER, ATMOSPHERE, CELESTIAL, EVENT, SYSTEM, SYMBOL_SURFACE, SYMBOL |
| component_short_control | Component classes: ENTITY, VIEW, GROUP |
SENSOR, REG_WATER, REG_TERRAIN, REG_WEATHER, GLOBAL_WATER, GLOBAL_TERRAIN, GLOBAL_WEATHER, ATMOSPHERE, CELESTIAL, EVENT, SYSTEM, SYMBOL_SURFACE, SYMBOL |
| articulated_control | FULL | |
| articulated_short_control | FULL | |
| rate_control | FULL | |
| celestial_control | FULL | |
| atmosphere_control | FULL | |
| environment_control | FULL | |
| weather_control | FULL (except for Weather Entities) | |
| maritime_control | FULL | |
| wave_control |
SUPPORTED: Waveheight (Beaufort level, not in meters), Direction. Примечание
Other parameters such as Wavelength, Phase Offset, Leading, and others are automatically calculated on the basis of the current Beaufort value to ensure realistic simulation. |
|
| terrestrial_control | NOT SUPPORTED | |
| view_control | FULL | |
| sensor_control | NOT SUPPORTED | |
| tracker_control | NOT SUPPORTED | |
| earth_model_def | NOT SUPPORTED | |
| trajectory_def | NOT SUPPORTED | |
| view_def | FULL | |
| segment_def | FULL | |
| volume_def | FULL | |
| hat_hot_request | FULL, with Extended Response and Update Period parameter | |
| los_segment_request | PARTIAL, with Extended Response and Update Period parameter | Alpha Threshold, Color |
| los_vector_request | PARTIAL, with Extended Response and Update Period parameter | Alpha Threshold |
| position_request | FULL, with Update Period parameter | |
| environment_request | Weather Conditions Request: wind(sum), humidity(max), barometric(max), visibility(minimum), temperature(average) | Maritime Surface Conditions, Terrestrial Surface Conditions |
| symbol_surface_def | PARTIAL | |
| symbol_text_def | PARTIAL | |
| symbol_circle_def | PARTIAL | |
| symbol_line_def | PARTIAL | |
| symbol_clone | NOT SUPPORTED | |
| symbol_control | PARTIAL | |
| symbol_short_control | PARTIAL | |
Interpolation and ExtrapolationИнтерполяция и экстраполяция#
Unigine IG uses Interpolated Snapshots (IS) to tackle with the problem of lost packets between the IG and hosts. It works by taking two old, but known positions and interpolating the object between them. It is accomplished by having a buffer of received positions and rotations, along with the time they represent. We usually take our current local time minus some predefined amount — interpolation period (40 ms by default), then go into our buffer, find the two indices that are just before and just after this time and interpolate.Unigine IG использует Interpolated Snapshots (IS) для решения проблемы потери пакетов между IG и хостами. Он работает, беря две старые, но известные позиции и интерполируя объект между ними. Это достигается за счет наличия буфера полученных позиций и поворотов, а также времени, которое они представляют. Обычно мы берем текущее местное время за вычетом некоторого предопределенного значения - период интерполяции ( 40 мс по умолчанию), затем заходим в наш буфер, находим два индекса, которые находятся непосредственно перед и сразу после этого времени и интерполировать.
If we don't have a received position and rotation for the time we're looking for, the extrapolation (guessing) is used. It also has a limited time — extrapolation period (200 ms by default). If the extrapolation period is over but there are still no packets received, all objects will freeze.Если у нас нет полученного положения и поворота для искомого времени, используется экстраполяция (предположение). Он также имеет ограниченное время - период экстраполяции (по умолчанию 200 мс). Если период экстраполяции закончился, но пакеты все еще не получены, все объекты «заморозятся».
In most cases, this method provides a very accurate representation of the world to each slave, as in general only already known positions of remote objects are rendered and in rare cases the system will try to extrapolate (guess) where an object is. This, however, comes at a cost, as we always render 40 ms (interpolation period) behind current time, so that new packets have time to arrive with data.В большинстве случаев этот метод обеспечивает очень точное представление мира для каждого Slave, так как обычно отображаются только уже известные положения удаленных объектов, а в редких случаях система пытается экстраполировать (угадывать), где находится объект. Однако за это приходится платить, так как мы всегда отображаем 40 мс (период интерполяции) от текущего времени, так что новые пакеты успевают прибыть с данными.
See AlsoСмотрите также#
- The IG plugin API section for more details on managing IG via code (C++).Раздел IG plugin API для получения дополнительных сведений об управлении IG с помощью кода (C ++).
- The Setting Up Properties article for more details on adjusting properties for new entities.В статье Настройка свойств для получения дополнительных сведений о настройке свойств для новых сущностей.
- The IG Configuration article for more details on setting up your IG.В статье IG Configuration для получения дополнительных сведений о настройке IG.
- The Environment Settings article for more details on configuring sky and weather parameters.Подробнее о настройке параметров неба и погоды см. В статье Environment Settings .
Using the IG TemplateИспользование шаблона IG#
The basic workflow is as follows:Базовый рабочий процесс выглядит следующим образом:
-
Open the SDK Browser, go the the Projects tab, and create a new project using the IG Template.Откройте браузер SDK, перейдите на вкладку Проекты и создайте новый проект , используя шаблон IG .
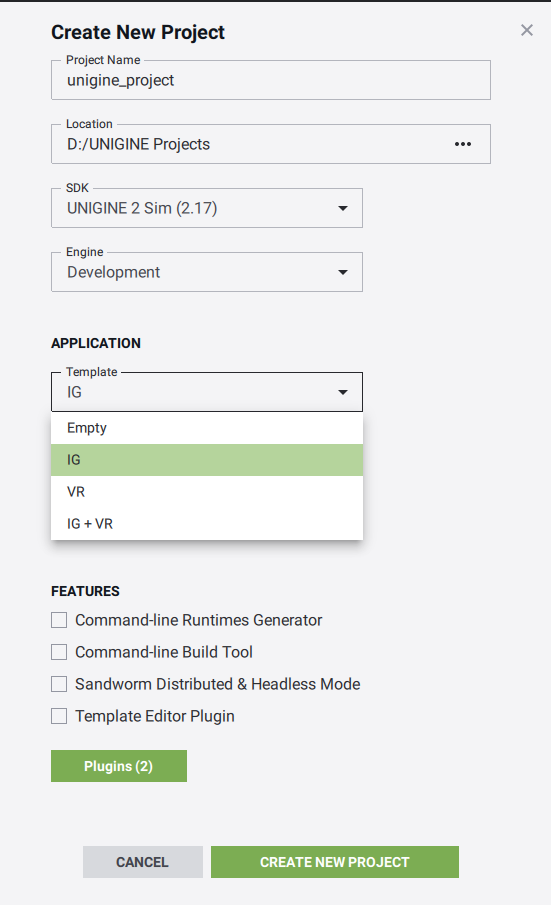
You can also select the IG + VR Template to create a VR-based simulator. The newly created project will support both VR and IG features out of the box.Вы также можете выбрать шаблон IG + VR для создания симулятора виртуальной реальности. Созданный проект обеспечивает встроенную поддержку функционала VR и IG.
- Open the world in UnigineEditor by clicking Open Editor.
Откройте мир в UnigineEditor, нажав Открыть редактор .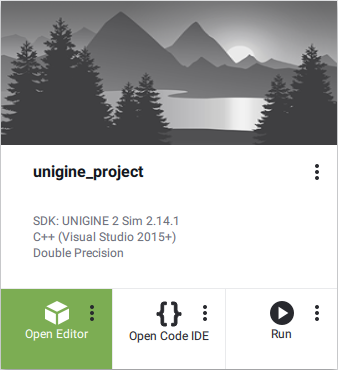

- Use the Sandworm Tool to generate a terrain.
Используйте инструмент Sandworm , чтобы создать ландшафт .

- Add models (as node references) to represent entities used in your simulation (aircrafts, vehicles, etc.). Assign properties (lights, landing gears, wheels, controllers, effects, etc.) to the corresponding nodes and adjust their parameters as required.
Добавьте модели (как ссылки на узлы ) для представления объектов, используемых в вашей симуляции (самолеты, транспортные средства и т.д.). Назначьте свойства (огни, шасси, колеса, контроллеры, эффекты и т.д.) соответствующим узлам и при необходимости отрегулируйте их параметры.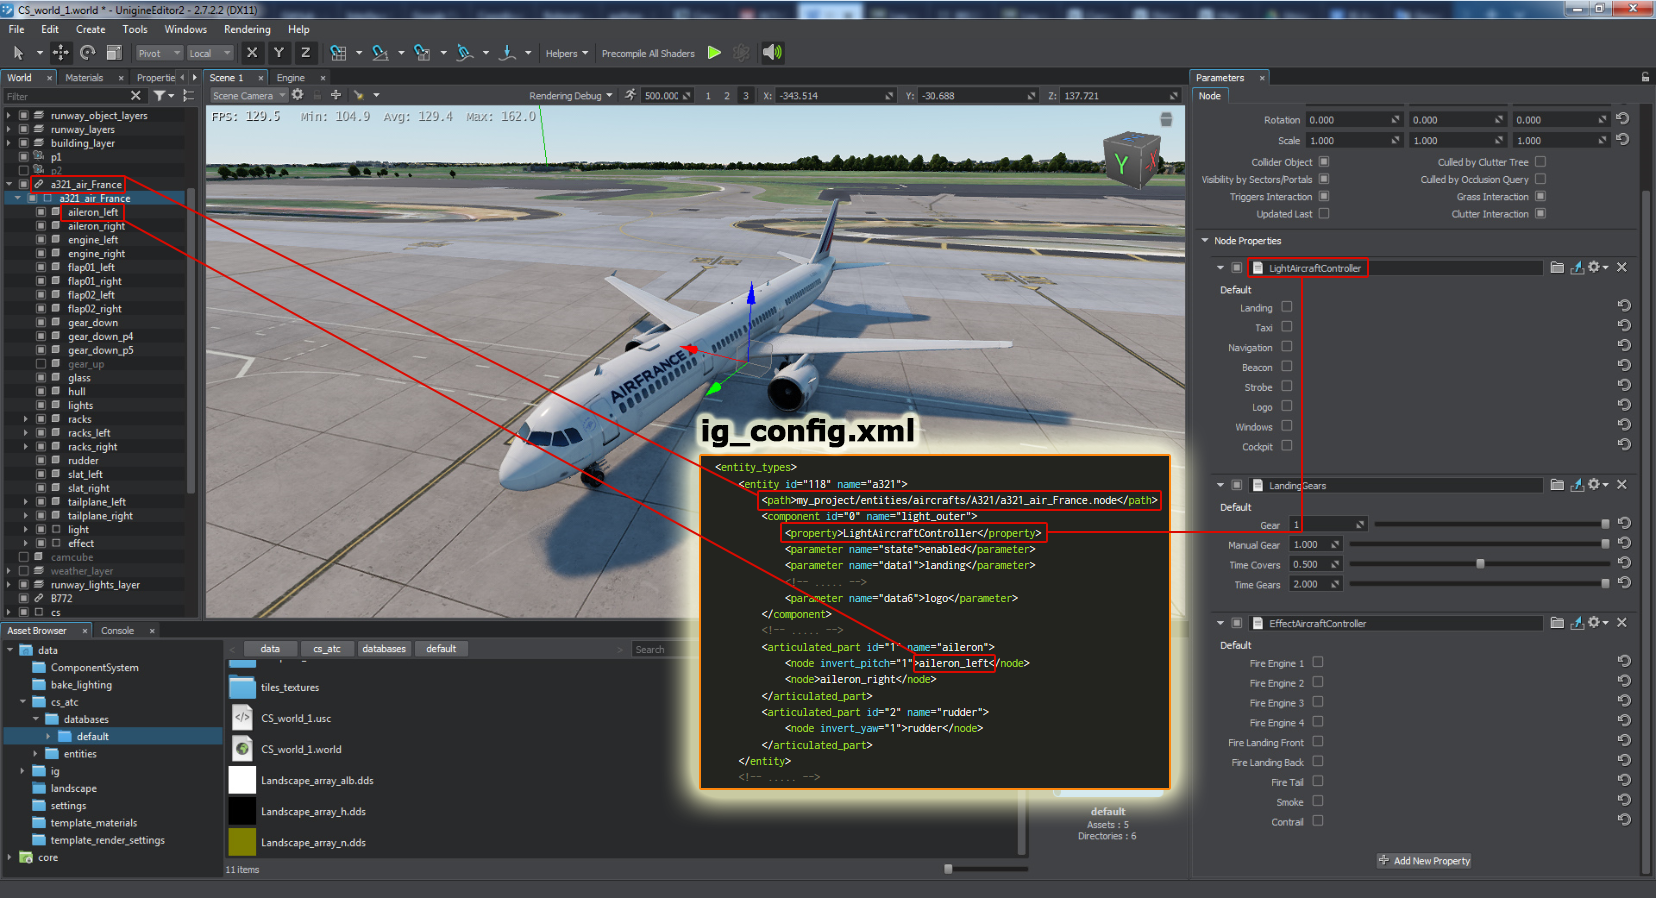

- Save your world and close Unigine Editor.Сохраните свой мир и закройте редактор Unigine.
- Open the configuration file (ig_config.xml) and add definitions for all your entities, specify necessary system settings and connector parameters.
Откройте файл конфигурации (ig_config.xml) и добавьте определения для всех ваших сущностей, укажите необходимые системные настройки и параметры коннектора.

- Launch your IG application by clicking Run.
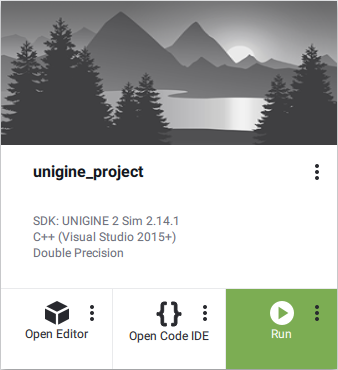 ПримечаниеBy default your application will launch with IG, CIGIConnector plugins. If you want to change this, please modify the startup options after clicking an ellipsis under the Run button for your project on the Projects tab of the SDK Browser.Запустите приложение IG, нажав Выполнить .By default your application will launch with IG, CIGIConnector plugins. If you want to change this, please modify the startup options after clicking an ellipsis under the Run button for your project on the Projects tab of the SDK Browser.By default your application will launch with IG, CIGIConnector plugins. If you want to change this, please modify the startup options after clicking an ellipsis under the Run button for your project on the Projects tab of the SDK Browser.
 ПримечаниеBy default your application will launch with IG, CIGIConnector plugins. If you want to change this, please modify the startup options after clicking an ellipsis under the Run button for your project on the Projects tab of the SDK Browser.По умолчанию ваше приложение запускается с плагинами IG, CIGIConnector . Если вы хотите изменить это, измените параметры запуска после нажатия многоточия под кнопкой Выполнить для вашего проекта на вкладке Проекты в Браузер SDK.
 - Launch your host application or a CIGI Host Emulator to communicate with your IG.
Запустите хост-приложение или хост-эмулятор CIGI для связи с вашим IG.

IG Synchronization SystemСистема синхронизации IG#
The IG has its own synchronization system with the Syncker plugin initialized automatically. To use a Multi-IG configuration, you should specify additional startup command-line arguments. There are common arguments used for both Master and Slave, and specific ones. The list of all available arguments for IG network configuration is given in the Syncker-Specific Options article.IG имеет свою собственную систему синхронизации с подключаемым модулем Syncker , который инициализируется автоматически. Чтобы использовать конфигурацию Multi-IG , вы должны указать дополнительные аргументы командной строки запуска. Есть общие аргументы, используемые как для Master и Slave, так и для конкретных. Список всех доступных аргументов для конфигурации сети IG приведен в статье Параметры, специфичные для Syncker .
IG launching order does not matter (you can run the Master and then Slaves, or vice versa). What is important is that you should specify the proper number of IGs for the Master via the -sync_count argument. Please note, that it is the total number of IG hosts, not the number of Slaves (e.g.: if you have 1 Master and 2 Slaves, you should specify: -sync_count 3).Порядок запуска IG не имеет значения (вы можете запустить Master, а затем Slaves, или наоборот). Важно то, что вы должны указать правильное количество IG для Master с помощью аргумента -sync_count . Обратите внимание, что это общее количество хостов IG, а не количество подчиненных (например, если у вас есть 1 главного и 2 подчиненных, вы должны указать: -sync_count 3 ).
IG uses the only port (the one used by Syncker): UDP 8890IG использует единственный порт (тот, который используется Syncker): UDP 8890 .
This means that two messages reporting successful connections must appear in the Console.Это означает, что в консоли должны появиться два сообщения об успешном подключении.
For a Slave it looks as follows:Для Slave это выглядит следующим образом:
IG::Manager::on_ig_connected(): Connection to "IG Master" (ip:port) has been established //< - message from IG
Syncker::Slave::connect_to_master(): connection to "ip" accepted in 0.00 seconds //<- message from Syncker
For the Master it looks as follows:Для Master это выглядит следующим образом:
IG::Manager::on_ig_connected(): Connection to "IG Slave" (ip:port) has been established <- from IG
Syncker::Master::check_new_connections(): connection from "ip" "slave" accepted in 0.00 seconds <- from Syncker
IG::Manager::on_ig_connected(): all connections established. Session started <- from IG
The last message means that the Master has established all necessary connections and is ready to work.Последнее сообщение означает, что Master установил все необходимые подключения и готов к работе.
If the IG is launched with a connector, the latter starts using IG API immediately, without waiting for all connections. Therefore, the Master switches to blocking mode (the window is not refreshed) with the following message printed to the Console:Если IG запускается с коннектором, последний сразу начинает использовать IG API, не дожидаясь всех подключений. Таким образом, Master переключается в режим блокировки (окно не обновляется), и на Консоль выводится следующее сообщение:
IG::Manager::wait_for_all_connections(): waiting for all connections within a minute…Thus, you have one minute to connect all IGs. If no hosts are connected the IG during this period the Master will shut down reporting to the Console that connections were not established.Таким образом, у вас есть одна минута на подключение всех IG. Если в течение этого периода к IG не подключены никакие хосты, Master отключит, сообщая Console , что соединения не были установлены.
So, the minimum number of arguments required to launch IG on two computers looks as follows:Итак, минимальное количество аргументов, необходимое для запуска IG на двух компьютерах, выглядит следующим образом:
Master: -extern_plugin "UnigineSpiderVision,UnigineIG,UnigineCIGIConnector" -sync_master 1 -sync_count 2
-extern_plugin "UnigineSpiderVision,UnigineIG,UnigineCIGIConnector" -sync_master 1 -sync_count 2Slave: -extern_plugin "UnigineSpiderVision,UnigineIG" -sync_master 0
-extern_plugin "UnigineSpiderVision,UnigineIG" -sync_master 0Please note, that there are no IP addresses explicitly specified the IG will try to define addresses automatically.Обратите внимание, что IP-адреса не указаны явно, IG попытается определить адреса автоматически.
Here is a typical number of arguments when launching IG hosts:Вот типичное количество аргументов при запуске хостов IG:
Master:
-extern_plugin "UnigineSpiderVision,UnigineIG,UnigineCIGIConnector" -sync_master 1 -sync_count 3 -computer_name leftSlave 1:
-extern_plugin "UnigineSpiderVision,UnigineIG" -sync_master 0 -computer_name centerSlave 2:
-extern_plugin "UnigineSpiderVision,UnigineIG" -sync_master 0 -computer_name rightExtending Template's FunctionalityРасширение функциональности шаблона#
UNIGINE's IG provides the following opportunities for customization:IG UNIGINE предоставляет следующие возможности для настройки:
- IG can be built into a Qt/WinForm/WPF application and have a custom interface (e.g., switching between cameras in the simplest case).IG может быть встроен в приложение Qt / WinForm / WPF и иметь настраиваемый интерфейс (например, переключение между камерами в простейшем случае).
- A host can have several IGs connected, and each running IG can be programmed to have its own logic, if necessary.К хосту может быть подключено несколько IG, и при необходимости каждый работающий IG может быть запрограммирован на использование собственной логики.
- Secondary static objects (such as a billboard on a building or a ship following a certain route) can be animated, and their position, rotation, or other specific parameters can be requested via CIGI/HLA.Вторичные статические объекты (например, рекламный щит на здании или корабль, следующий определенным маршрутом) можно анимировать, а их положение, вращение или другие конкретные параметры можно запросить через CIGI / HLA.
- New visual effects can be created to create a more realistic picture.Можно создавать новые визуальные эффекты для создания более реалистичного изображения.
- Users can add their own custom components and process them by modifying the ig_config.xml file.Пользователи могут добавлять свои собственные настраиваемые компоненты и обрабатывать их, изменяя файл ig_config.xml .
- You can extend IG functionality to support other protocols (e.g. ALSP, TENA, CTIA, etc. ), for this purpose you'll have to write your own connectors.Вы можете расширить функциональность IG для поддержки других протоколов (например, ALSP, TENA, CTIA и т.д.), Для этого вам придется написать свои собственные коннекторы .
Adding a Custom ConnectorДобавление настраиваемого коннектора#
A connector is actually a custom C++ Plugin used to communicate messages between the host and the IG. This plugin reads packages and calls the corresponding methods of the IG Plugin (listed in include/plugins/Unigine/IG/UnigineIG.h).Коннектор - это на самом деле настраиваемый плагин C ++ , используемый для передачи сообщений между хостом и IG. Этот плагин считывает пакеты и вызывает соответствующие методы IG Plugin (перечисленных в include / plugins / UnigineIG.h ).
Files listed below can be used as a template for your custom connector:Перечисленные ниже файлы можно использовать в качестве шаблона для вашего настраиваемого коннектора:
Plugin include file to be put to the include/plugins folder:Включаемый файл плагина, который нужно поместить в папку include/plugins:
CUSTOMConnectorInterface.h CUSTOMConnectorInterface.h
Исходный код (C++)#ifndef __CUSTOM_CONNECTOR_INTERFACE_H__ #define __CUSTOM_CONNECTOR_INTERFACE_H__ namespace IG { namespace CUSTOM { class ConnectorInterface { public: virtual ~ConnectorInterface() {} // client initialization virtual int init(/*initialization parameters*/) = 0; // client shutdown virtual int shutdown() = 0; // other methods // ... // callbacks //virtual void setConnectCallback(Unigine::CallbackBase* func) = 0; //virtual Unigine::CallbackBase* getConnectCallback() const = 0; // ... }; } } #endif /* __CUSTOM_CONNECTOR_INTERFACE_H__ */Plugin source files to be put to the source/custom_connector folder:Исходные файлы плагина, которые нужно поместить в папку source/custom_connector:
CUSTOMConnectorPlugin.cpp CUSTOMConnectorPlugin.cpp
Исходный код (C++)#include <UniginePlugin.h> #include "CUSTOMConnector.h" #include "CUSTOMConnectorInterpreter.h" using namespace Unigine; ////////////////////////////////////////////////////////////////////////// // CUSTOMConnectorPlugin ////////////////////////////////////////////////////////////////////////// class CUSTOMConnectorPlugin : public Plugin { public: CUSTOMConnectorPlugin(); virtual ~CUSTOMConnectorPlugin(); const char *get_name() override; void *get_data() override; int init() override; int shutdown() override; void update() override; private: IG::CUSTOM::Connector *connector; }; CUSTOMConnectorPlugin::CUSTOMConnectorPlugin() : connector(nullptr) { } CUSTOMConnectorPlugin::~CUSTOMConnectorPlugin() { CUSTOMConnectorInterpreterShutdown(); delete connector; } const char *CUSTOMConnectorPlugin::get_name() { return "CUSTOMConnector"; } void *CUSTOMConnectorPlugin::get_data() { return static_cast<IG::CUSTOM::ConnectorInterface *>(connector); } int CUSTOMConnectorPlugin::init() { connector = new IG::CUSTOM::Connector(); connector->init(); CUSTOMConnectorInterpreterInit(); return 1; } int CUSTOMConnectorPlugin::shutdown() { connector->shutdown(); return 1; } void CUSTOMConnectorPlugin::update() { connector->update(); } ////////////////////////////////////////////////////////////////////////// // Plugin export ////////////////////////////////////////////////////////////////////////// extern "C" UNIGINE_EXPORT void *CreatePlugin() { return new CUSTOMConnectorPlugin(); } extern "C" UNIGINE_EXPORT void ReleasePlugin(void *plugin) { delete static_cast<CUSTOMConnectorPlugin *>(plugin); }CUSTOMConnector.h CUSTOMConnector.h
Исходный код (C++)#ifndef __CUSTOM_CONNECTOR_H__ #define __CUSTOM_CONNECTOR_H__ #include <plugins/CUSTOMConnectorInterface.h> #include <plugins/Unigine/IG/UnigineIG.h> #include <UnigineInterface.h> #include <UnigineLogic.h> namespace IG { namespace CUSTOM { class CUSTOMWorldLogic; class Connector : public ConnectorInterface { public: Connector(); virtual ~Connector() {} // singleton static Connector *get() { if (connector == nullptr) Log::fatal("%s:: CUSTOM connector is NULL\n", __FUNCTION__); return connector; }; // automatic initialization on plugin load void init(); // update/shutdown client void update(); void shutdown(); // methods to be called by the CUSTOMWorldLogic class at the corresponding stages of the execution sequence void onWorldInit(); void onWorldShutdown(); private: static Connector *connector; IG::Manager *ig_manager = nullptr; CUSTOMWorldLogic *world_logic; }; // WorldLogic class class CUSTOMWorldLogic : public Unigine::WorldLogic { public: CUSTOMWorldLogic() {} virtual ~CUSTOMWorldLogic() {} virtual UNIGINE_INLINE int init() override { Connector::get()->onWorldInit(); return 1; } virtual UNIGINE_INLINE int shutdown() override { Connector::get()->onWorldShutdown(); return 1; } }; } } #endif /* __CUSTOM_CONNECTOR_H__ */CUSTOMConnector.cpp CUSTOMConnector.cpp
Исходный код (C++)#include "CUSTOMConnector.h" #include <UnigineEngine.h> #include <UnigineNode.h> using namespace Unigine; using namespace Math; using namespace IG; using namespace CUSTOM; Connector::Connector() { world_logic = new CUSTOMWorldLogic(); Engine::get()->addWorldLogic(world_logic); } void Connector::init() { const auto host = "127.0.0.1"; const auto port = 3000; int ig_plugin_index = Engine::get()->findPlugin("IG"); if (ig_plugin_index == -1) { Log::error("IG::CUSTOM::Connector::init(): IG plugin isn't loaded\n"); return; } ig_manager = (IG::Manager*)Engine::get()->getPluginData(ig_plugin_index); // IG setup ig_manager->setCoordinateSystem(IG::Manager::COORDINATE_SYSTEM::NED); } void Connector::update() { // read & write packets } void Connector::shutdown() { // shutdown client shutdown(); // clear static link connector = nullptr; // ... } void Connector::onWorldInit() { // actions to be performed when a new world is loaded } void Connector::onWorldShutdown() { // actions to be performed when current world is closed }CUSTOMConnectorInterpreter.h CUSTOMConnectorInterpreter.h
Исходный код (C++)#ifndef __CUSTOM_CONNECTOR_INTERPRETER_H__ #define __CUSTOM_CONNECTOR_INTERPRETER_H__ #include <UnigineBase.h> void CUSTOMConnectorInterpreterInit(); void CUSTOMConnectorInterpreterShutdown(); #endif /* __CUSTOM_CONNECTOR_INTERPRETER_H__ */CUSTOMConnectorInterpreter.cpp CUSTOMConnectorInterpreter.cpp
Исходный код (C++)#include <UnigineEngine.h> #include <UnigineInterface.h> #include <plugins/CUSTOMConnectorInterface.h> #include "CUSTOMConnector.h" using namespace Unigine; using namespace IG; void CUSTOMConnectorInterpreterInit() { int id = Interpreter::addGroup("CUSTOMConnectorInterpreter"); // defines Interpreter::addExternDefine("HAS_CUSTOM_CONNECTOR", id); // enums // Interpreter::addExternVariable("CUSTOM_VERSION_10", MakeExternConstant<int>(CUSTOM_VERSION_10), id); // functions Connector *connector = Connector::get(); Interpreter::addExternLibrary("engine.custom", id); //Interpreter::addExternFunction("engine.custom.init", MakeExternObjectFunction(connector, &Connector::init), id); //Interpreter::addExternFunction("engine.custom.shutdown", MakeExternObjectFunction(connector, &Connector::shutdown), id); } void CUSTOMConnectorInterpreterShutdown() { Interpreter::removeGroup("CUSTOMConnectorInterpreter"); }CUSTOMConnectorWrapper.cpp CUSTOMConnectorWrapper.cpp
Исходный код (C++)//push ignore deprecated warnings #ifdef __GNUC__ #pragma GCC diagnostic push #pragma GCC diagnostic ignored "-Wdeprecated-declarations" #elif defined(_MSC_VER) #pragma warning(push) #pragma warning(disable: 4996) #endif #include <UnigineEngine.h> #include <plugins/CUSTOMConnectorInterface.h> using namespace Unigine; extern "C" { //UNIGINE_EXPORT void CUSTOMConnector_method(CUSTOMConnector *self) { if (self) self->method(); } } //pop ignore deprecated warnings #ifdef __GNUC__ #pragma GCC diagnostic pop #elif defined(_MSC_VER) #pragma warning(pop) #endif
