Working with Landscape Terrain via Code
This article describes how to create and modify the Landscape Terrain object via code. But before we get down to coding, let's start with a bit of theory.
The surface of Landscape Terrain (ObjectLandscapeTerrain class) is represented by a single or multiple rectangular layers called Landscape Layer Maps (LandscapeLayerMap class). By creating and arranging layer maps you define the look and functionality of the terrain.
To see a terrain, at least one Landscape Layer Map is required. Data of each Landscape Layer Map (heights, albedo, and masks) is stored in an .lmap file. To create such a file the LandscapeMapFileCreator class is used. If you want to load, modify, and apply settings stored in this file later, use the LandscapeMapFileSettings class.
Landscape Terrain rendering and modification is managed via the Landscape class.
There is a set of API classes used to manage the Landscape Terrain object:
- ObjectLandscapeTerrain — managing general Landscape Terrain object parameters.
- TerrainDetail — managing terrain details that define its appearance. Details are organized into a hierarchy, each of them can have an unlimited number of children. Details are attached to detail masks and are drawn in accordance with their rendering order (the one with the highest order shall be rendered above all others).
- TerrainDetailMask — managing terrain detail masks. Each detail mask can have an unlimited number of details.
- LandscapeFetch — getting terrain data at a certain point (e.g. a height request) or check for an intersection with a traced line.
- LandscapeImages — to edit landscape terrain via API.
- LandscapeTextures — to edit landscape terrain via API.
See Also#
- C++ Sample set demonstrating various Landscape Terrain features and use cases
Creating a Terrain#
To create a Landscape Terrain based on arbitrary height and albedo maps, the following workflow is used:
- Create a LandscapeMapFileCreator instance, set necessary parameters (grid size, resolution, etc.) and generate a new .lmap file based on specified albedo and height images (tiles) via the Run() method. Here you can subscribe for events at different stages of creation.
- Create a LandscapeMapFileSettings instance, load target .lmap file for settings, set necessary parameters (opacity and blending for height and albedo data) and apply them.
- Create a new ObjectLandscapeTerrain object.
- Create a LandscapeLayerMap based on the previously created .lmap file.
Preparing a Project#
Before we get to code, perform the following:
- Open SDK Browser and create a new C# (.NET) or C++ project depending on the programming language selected.
- Open your project in UnigineEditor via the Open Editor button in SDK Browser.
-
Save the following images to your computer:
Albedo Map Height Map 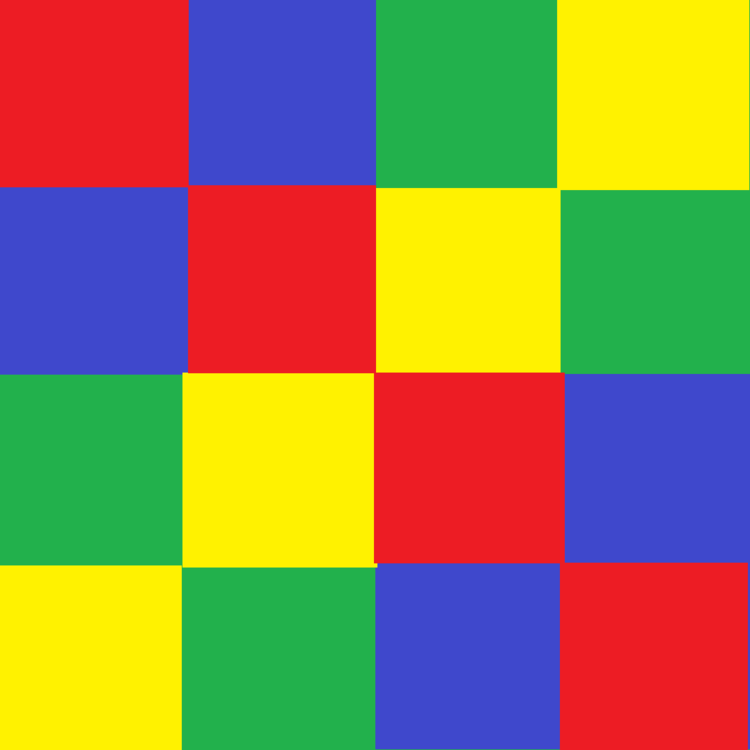
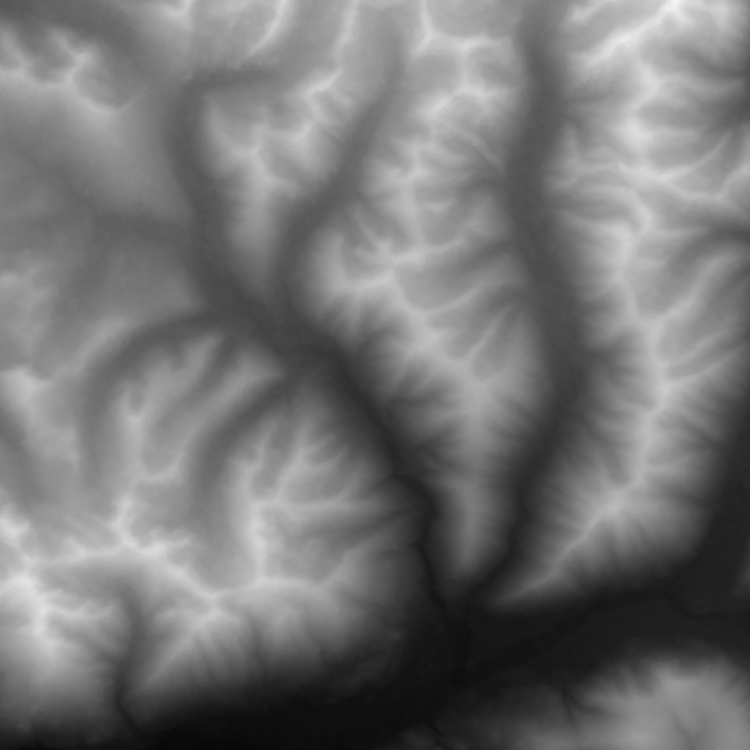
- Drag the height.png file directly to the Asset Browser window to add it to your project. In the Import Dialog for your height map, set Image Format to R32F and click Yes.
- Drag the albedo.png file directly to the Asset Browser window too. In the Import Dialog for your height map, set Texture Preset to Albedo (RGB — color, A — opacity) and click Yes.
Code#
Copy the source code below implemented as a C# component, save it to the LandscapeGenerator.cs file, create a new Dummy Node and assign the component to it.
LandscapeGenerator.cs
using System;
using System.Collections;
using System.Collections.Generic;
using Unigine;
#if UNIGINE_DOUBLE
using Vec3 = Unigine.dvec3;
using Vec2 = Unigine.dvec2;
#else
	using Vec3 = Unigine.vec3;
	using Vec2 = Unigine.vec2;
#endif
[Component(PropertyGuid = "AUTOGENERATED_GUID")] // <-- this line is generated automatically for a new component
public class LandscapeGenerator : Component
{
	[ShowInEditor]
	private Vec3 lmapPosition = Vec3.ZERO;

	[ShowInEditor]
	private float lmapRotation = 0.0f;

	[ShowInEditor]
	public Vec2 lmapSize = new Vec2(20.0f, 20.0f);

	[ShowInEditor]
	[ParameterSlider(Min = 0.0f)]
	private float lmapHeightScale = 1.0f;

	[ShowInEditor]
	[ParameterSlider(Min = 1)]
	private int lmapGridSizeX = 2;

	[ShowInEditor]
	[ParameterSlider(Min = 1)]
	private int lmapGridSizeY = 2;

	[ShowInEditor]
	[ParameterSlider(Min = 1)]
	private int lmapTileResolutionX = 512;

	[ShowInEditor]
	[ParameterSlider(Min = 1)]
	private int lmapTileResolutionY = 512;

	[ShowInEditor]
	private string lmapName = "map";

	public struct TileImages
	{
		[ParameterFile]
		public string albedoImagePath;

		[ParameterFile]
		public string heightImagePath;
	}

	[ShowInEditor]
	private List<TileImages> tiles = null;

	private ObjectLandscapeTerrain terrain = null;
	private LandscapeLayerMap lmap = null;

	private void Init()
	{
		Unigine.Console.Run("console_onscreen 1");
		if (tiles == null)
		{
			Log.Error("Fill the array with tiles.\n");
			return;
		}

		if (tiles.Count != lmapGridSizeX * lmapGridSizeY)
		{
			Log.Error("The count of tiles does not match the current grid size.\n");
			return;
		}

		if (string.IsNullOrEmpty(lmapName))
			lmapName = "map";

		// create .lmap file based on tiles with albedo and height images
		var lmapCreator = new LandscapeMapFileCreator();
		lmapCreator.Grid = new ivec2(lmapGridSizeX, lmapGridSizeY);
		lmapCreator.Resolution = new ivec2(lmapTileResolutionX * lmapGridSizeX, lmapTileResolutionY * lmapGridSizeY);
		lmapCreator.Path = lmapName + ".lmap";

		// subscribe for different stages of creation
		lmapCreator.EventCreate.Connect(OnCreatorCreate);
		lmapCreator.EventBegin.Connect(OnCreatorBegin);
		lmapCreator.EventProgress.Connect(OnCreatorProgress);
		lmapCreator.EventEnd.Connect(OnCreatorEnd);

		// start the creation process
		lmapCreator.Run();
	}

	private void OnCreatorCreate(LandscapeMapFileCreator creator, LandscapeImages images, int x, int y)
	{
		// get number of the current tile
		int tileNumber = x * lmapGridSizeY + y;
		Log.Message($"Create tile {tileNumber}\n");

		// set albedo for current tile
		if (FileSystem.IsFileExist(tiles[tileNumber].albedoImagePath))
		{
			Image albedoImage = new Image(tiles[tileNumber].albedoImagePath);
			if (albedoImage && albedoImage.Width == lmapTileResolutionX && albedoImage.Height == lmapTileResolutionY)
			{
				Image albedo = images.GetAlbedo();
				albedo.Create2D(albedoImage.Width, albedoImage.Height, albedoImage.Format, albedoImage.NumMipmaps);
				albedo.Copy(albedoImage, 0, 0, 0, 0, albedoImage.Width, albedo.Height);
			}
			else
				Log.Error("The albedo image cannot be loaded, or its resolution does not match the resolution of tile.\n");
		}
		else
			Log.Error("Albedo file does not exist.\n");

		// set height for current tile
		if (FileSystem.IsFileExist(tiles[tileNumber].heightImagePath))
		{
			Image heightImage = new Image(tiles[tileNumber].heightImagePath);
			if (heightImage && heightImage.Width == lmapTileResolutionX && heightImage.Height == lmapTileResolutionY)
			{
				Image height = images.GetHeight();
				height.Create2D(heightImage.Width, heightImage.Height, heightImage.Format, heightImage.NumMipmaps);
				height.Copy(heightImage, 0, 0, 0, 0, heightImage.Width, height.Height);
			}
			else
				Log.Error("The height image cannot be loaded, or its resolution does not match the resolution of tile.\n");
		}
		else
			Log.Error("Height file does not exist.\n");
	}

	private void OnCreatorBegin(LandscapeMapFileCreator creator)
	{
		Log.Message("--------------------\n");
		Log.Message($"--- {creator.Path} creation started ---\n");
		Log.Message("lmap creator begin\n");
	}

	private void OnCreatorProgress(LandscapeMapFileCreator creator)
	{
		Log.Message($"lmap creator progress: {creator.Progress}\n");
	}

	private void OnCreatorEnd(LandscapeMapFileCreator creator)
	{
		Log.Message("lmap creator end\n");
		Log.Message($"--- {creator.Path} created ---\n");
		Log.Message("--------------------\n");

		// after creating .lmap file apply settings
		ApplySettings();

		// and create terrain
		CreateTerrain();
	}

	private void ApplySettings()
	{
		// load target .lmap file for settings
		LandscapeMapFileSettings settings = new LandscapeMapFileSettings();
		settings.Load(FileSystem.GetGUID(lmapName + ".lmap"));

		// set parameters and apply them
		if (settings.IsLoaded)
		{
			// set alpha blend for height and albedo
			settings.HeightBlending = Landscape.BLENDING_MODE.ALPHA_BLEND;
			settings.AlbedoBlending = Landscape.BLENDING_MODE.ALPHA_BLEND;

			settings.EnabledHeight = true;
			settings.EnabledAlbedo = true;

			// disable opacity for height and albedo
			settings.EnabledOpacityAlbedo = false;
			settings.EnabledOpacityHeight = false;

			settings.Apply();
		}
	}

	private void CreateTerrain()
	{
		// create new terrain
		terrain = new ObjectLandscapeTerrain();
		terrain.ActiveTerrain = true;
		terrain.SetCollision(true, 0);

		// create layer map based on created .lmap file
		lmap = new LandscapeLayerMap();
		lmap.Parent = Landscape.GetActiveTerrain();
		lmap.Path = lmapName + ".lmap";
		lmap.Name = lmapName;
		lmap.Size = lmapSize;
		lmap.HeightScale = lmapHeightScale;
		lmap.WorldPosition = lmapPosition;
		lmap.SetWorldRotation(new quat(vec3.UP, lmapRotation));
	}

}
As the component is assigned, configure its settings in the Parameters window:
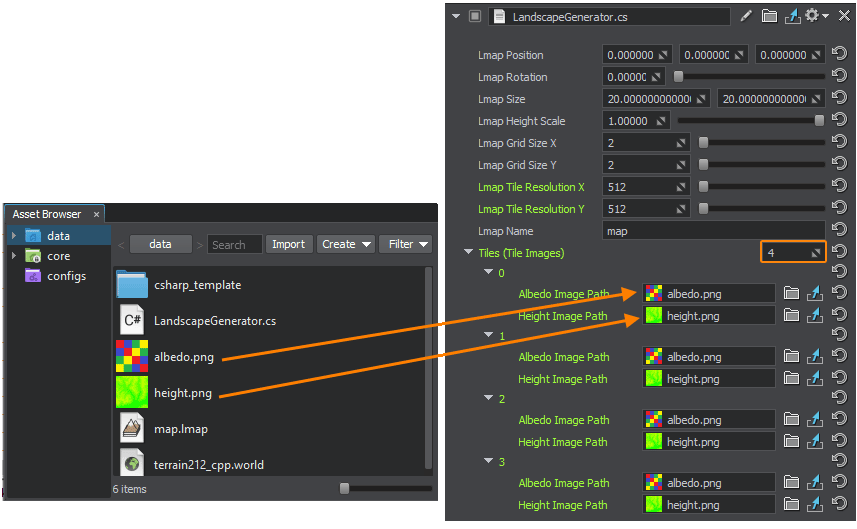
Set the number of tiles in the corresponding field and drag albedo.png and height.png files to the Albedo Image Path and Height Image Path fields of the component.
Now you can launch your application via the Run button right in UnigineEditor.
Modifying Terrain By Adding New Layer Maps#
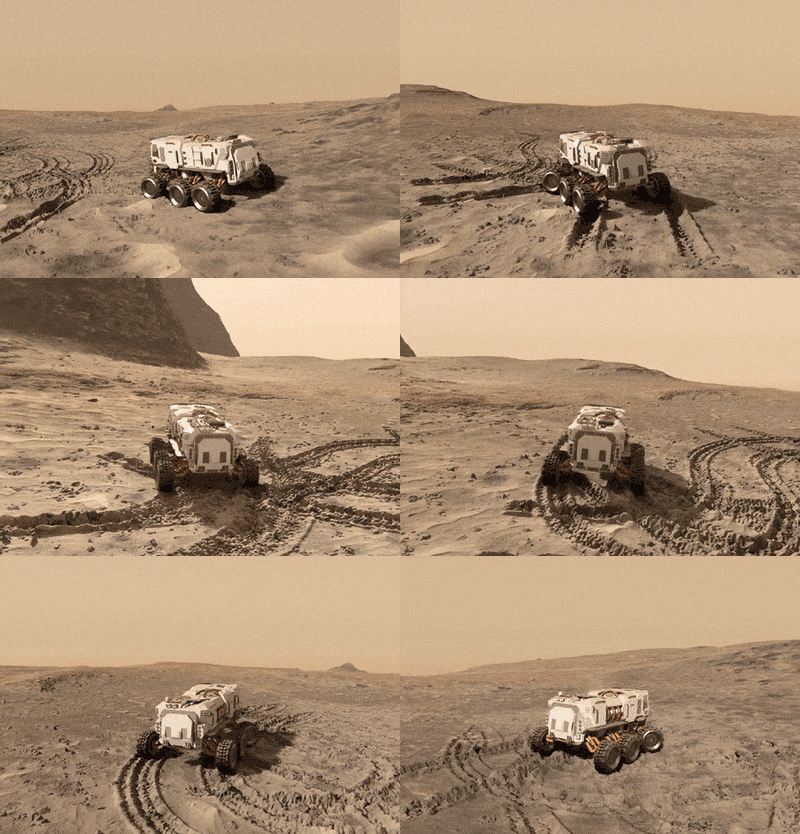
Spawn new Landscape Layer Maps (LandscapeLayerMap) to modify terrain surface, these layer maps can represent vehicle tracks, chunks of trenches, or pits. This way is similar to using Decals: each layer is a separate node, so you can control each modification separately. Moreover, using Landscape Layer Map implies no data density limits, enabling you to achieve realistic results with high-quality insets.
Adding Assets#
Let's create a new layer map for a crater, to do so, perform the following actions:
-
Save the following images to be used for the crater to your computer:
Crater Albedo Map Crater Height Map 

- Switch to UnigineEditor and Drag the crater_height.png file directly to the Asset Browser window to add it to your project (just like you did before for the terrain's Height map). In the Import Dialog for your height map, set Image Format to R32F and click Yes.
- Drag the crater_albedo.png file directly to the Asset Browser window (just like you did before for the terrain's Albedo map). In the Import Dialog for your albedo map set Texture Preset to Albedo (RGB — color, A — opacity) and click Yes.
-
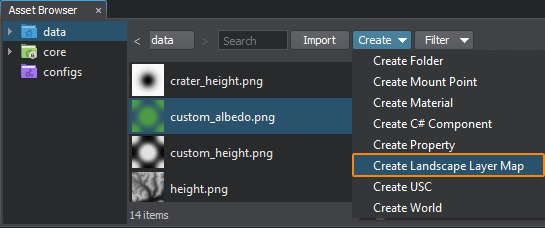
Select Create -> Create Landscape Layer Map in the Asset Browser.
- Enter a name for the layer map: crater.
-
Select your new crater.lmap asset and adjust its settings as shown below (assign our images, select blending mode and adjust heights range for the crater).
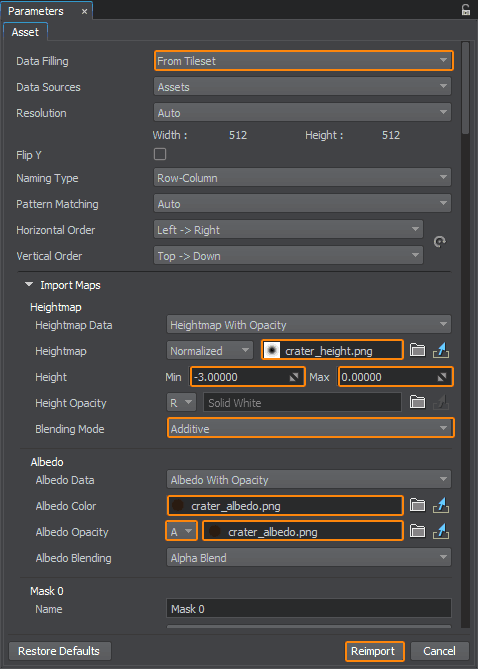
- Click Reimport and process to the Code section below.
Code#
So, we have a layer map file representing a crater (crater.lmap). To add a crater to the landscape surface at the desired location we simply create a new LandscapeLayerMap using our file and set its size and transformation.
// create a new layer map
LandscapeLayerMap crater_lmap = new LandscapeLayerMap();

// add the layer map as a child to the active terrain
crater_lmap.Parent = Landscape.GetActiveTerrain();

// set a path to the crater.lmap file representing a crater
crater_lmap.Path = "crater.lmap";
crater_lmap.Name = "crater";

// set the size of the crater layer to 5x5 units
crater_lmap.Size = new Vec2(5.0f, 5.0f);

// set the height scale multiplier
crater_lmap.HeightScale = 0.5f;

// set the position and rotation of the new layer
crater_lmap.WorldPosition = new Vec3(x, y, 0.0f);
crater_lmap.SetWorldRotation(new quat(vec3.UP, 35.0f));

// set the order of the new layer to place is above the first one (basic)
crater_lmap.Order = 2;This approach is non-destructive (i.e., it does not irreversibly change initial terrain data). To see the underlaying layer again in its initial state simply disable an overlaying layer map:
crater_lmap.Enabled = false;For example, after disabling a layer map representing a crater, you'll have the surface looking just the way it was before the explosion.
Let's create the CraterManager component to implement the functionality described above. We'll create the AddCrater() method to spawn a new crater at the specified location. And we shall call it on hitting Enter on the keyboard. The Backspace key shall show/hide all spawned craters at once.
Copy the source code below implemented as a C# component, save it to a CraterManager.cs file, and assign the component to the Dummy Node that you created earlier.
CraterManager.cs
using System;
using System.Collections;
using System.Collections.Generic;
using Unigine;
#if UNIGINE_DOUBLE
using Vec3 = Unigine.dvec3;
using Vec2 = Unigine.dvec2;
using Scalar = System.Double;
#else
	using Vec3 = Unigine.vec3;
	using Vec2 = Unigine.vec2;
	using Scalar = System.Single;
#endif

[Component(PropertyGuid = "AUTOGENERATED_GUID")] // <-- this line is generated automatically for a new component
public class CraterManager : Component
{
	// method spawning a new crater at the specified location
	private LandscapeLayerMap AddCrater(Scalar x, Scalar y){
	// create a new layer map
	LandscapeLayerMap crater_lmap = new LandscapeLayerMap();

	// add the layer map as a child to the active terrain
	crater_lmap.Parent = Landscape.GetActiveTerrain();

	// set a path to the crater.lmap file representing a crater
	crater_lmap.Path = "crater.lmap";
	crater_lmap.Name = "crater";

	// set the size of the crater layer to 5x5 units
	crater_lmap.Size = new Vec2(5.0f, 5.0f);

	// set the height scale multiplier
	crater_lmap.HeightScale = 0.5f;

	// set the position and rotation of the new layer
	crater_lmap.WorldPosition = new Vec3(x, y, 0.0f);
	crater_lmap.SetWorldRotation(new quat(vec3.UP, 35.0f));

	// set the order of the new layer to place is above the first one (basic)
	crater_lmap.Order = 2;
		return crater_lmap;
	}
	private void Init()
	{
		// write here code to be called on component initialization
	}

	List<LandscapeLayerMap> craters = new List<LandscapeLayerMap>();

	private void Update()
	{
		// spawn a new crater at a random point
		if (Input.IsKeyDown(Input.KEY.BACKSPACE))
			craters.Add(AddCrater(Game.GetRandomFloat(0.0f, (float)GetComponent<LandscapeGenerator>(node).lmapSize.x), Game.GetRandomFloat(0.0f, (float)GetComponent<LandscapeGenerator>(node).lmapSize.y)));

		// toggle visibility for all craters to show initial landscape state
		else if (Input.IsKeyDown(Input.KEY.ENTER))
			craters.ForEach(delegate(LandscapeLayerMap crater)
			{
				crater.Enabled = !crater.Enabled;
			});
	}
}
As the component is assigned, launch your application via the Run button right in UnigineEditor to check the result.
GPU-Based Terrain Modification#
Terrain modification is performed in asynchronous mode on GPU side by calling the asyncTextureDraw method of the Landscape class, that commences a drawing operation. The operation itself is to be implemented inside an event handler.
The workflow here is as follows:
- Implement your GPU-based terrain modification logic in a function.
- Set this handler function when subscribing for the Texture Draw event (when GPU-based terrain modification operation is performed) via getEventTextureDraw().
-
Commence a GPU drawing operation by calling the asyncTextureDraw() method. Here you should specify the GUID of an .lmap file of the landscape layer map to be modified, the coordinates of the top-left corner and the resolution of the segment of data to be modified, you should also define which data layers are to be affected (heights, albedo, masks) via a set of flags.
NoticeIf your modification requires additional data beyond the specified area as well as data of other landscape layer maps (e.g. a copy brush), you can enable force loading of required data. In this case you should use this overload of the asyncTextureDraw() method.
Adding Assets#
Let us modify the Heights and Albedo data of the terrain, so we need two custom maps for that. Save the following images to your computer and drag them to the Asset Browser window to add them to your project (just like you did before for the terrain's Albedo and Height maps):
| Custom Albedo Map | Custom Height Map |
|---|---|
 |
 |
Don't forget to set Image Format to R32F for your height map and set Texture Preset to Albedo (RGB — color, A — opacity) for your albedo map and reimport them with new settings.
Code#
// - - - - - - - - - - - - - - - - - - - - - - - - - - - - - - - - - - - - - - - - - - - - - - -
// 												(1)
// - - - - - - - - - - - - - - - - - - - - - - - - - - - - - - - - - - - - - - - - - - - - - - -

	// handler function to be executed on commencing a texture draw operation
	void my_texture_draw(UGUID guid, int id, LandscapeTextures buffer, ivec2 coord, int data_mask)
	{
		Log.Message("TEXTURE DRAW EVENT\n");

		// resize albedo and height images to fit the area to be modified
		custom_albedo_image.Resize(buffer.Resolution.x, buffer.Resolution.y);
		custom_height_image.Resize(buffer.Resolution.x, buffer.Resolution.y);

		// setting our custom image to the albedo buffer
		buffer.Albedo.SetImage(custom_albedo_image);

		// setting our custom image to the height buffer
		buffer.Height.SetImage(custom_height_image);

	}

// - - - - - - - - - - - - - - - - - - - - - - - - - - - - - - - - - - - - - - - - - - - - - - -
// 												(2)
// - - - - - - - - - - - - - - - - - - - - - - - - - - - - - - - - - - - - - - - - - - - - - - -

		// add a handler function to be executed on a Texture Draw operation
		Landscape.EventTextureDraw.Connect(my_texture_draw);

// - - - - - - - - - - - - - - - - - - - - - - - - - - - - - - - - - - - - - - - - - - - - - - -
// 												(3)
// - - - - - - - - - - - - - - - - - - - - - - - - - - - - - - - - - - - - - - - - - - - - - - -

			LandscapeLayerMap lmap = Landscape.GetActiveTerrain().GetChild(0) as LandscapeLayerMap;

			// generating a new ID for the draw operation
			int id = Landscape.GenerateOperationID();

			// commencing a Texture Draw operation for the selected landscape map at (100, 100) with the size of [512 x 512]
			Landscape.AsyncTextureDraw(id, lmap.GetGUID(), new ivec2(100, 100), new ivec2(512, 512), (int)(Landscape.FLAGS_FILE_DATA.HEIGHT | Landscape.FLAGS_FILE_DATA.ALBEDO));
Let's create a GPUModifier component to implement the functionality described above. We'll create the AddCrater() method to spawn a new crater at the specified location. And we shall call it on hitting Enter on the keyboard. The Backspace key shall show/hide all spawned craters at once.
Copy the source code below implemented as a C# component, save it to the GPUModifier.cs file, and assign the component to the Dummy Node that you've created earlier.
GPUModifier.cs
using System;
using System.Collections;
using System.Collections.Generic;
using Unigine;

[Component(PropertyGuid = "AUTOGENERATED_GUID")] // <-- this line is generated automatically for a new component
public class GPUModifier : Component
{
	[ParameterFile]
	public string CustomAlbedoImage = "custom_albedo.png";
	[ParameterFile]
	public string CustomHeightlbedoImage = "custom_height.png";

	// images to be used for terrain modification
	Image custom_albedo_image = null;
	Image custom_height_image = null;
	// handler function to be executed on commencing a texture draw operation
	void my_texture_draw(UGUID guid, int id, LandscapeTextures buffer, ivec2 coord, int data_mask)
	{
		Log.Message("TEXTURE DRAW EVENT\n");

		// resize albedo and height images to fit the area to be modified
		custom_albedo_image.Resize(buffer.Resolution.x, buffer.Resolution.y);
		custom_height_image.Resize(buffer.Resolution.x, buffer.Resolution.y);

		// setting our custom image to the albedo buffer
		buffer.Albedo.SetImage(custom_albedo_image);

		// setting our custom image to the height buffer
		buffer.Height.SetImage(custom_height_image);

	}
	private void Init()
	{
		// write here code to be called on component initialization
		// prepare images for terrain modification
		// create a new image to load a custom albedo map to
		custom_albedo_image = new Image(CustomAlbedoImage);

		// set the format required for the albedo map - RGBA8
		custom_albedo_image.ConvertToFormat(Image.FORMAT_RGBA8);

		// create a new image to load a custom height map to
		custom_height_image = new Image(CustomHeightlbedoImage);

		// set the format required for the heightmap - R32F
		custom_height_image.ConvertToFormat(Image.FORMAT_R32F);

		// add a handler function to be executed on a Texture Draw operation
		Landscape.EventTextureDraw.Connect(my_texture_draw);
	}

	private void Update()
	{
		// write here code to be called before updating each render frame
		if (Unigine.Input.IsKeyDown(Input.KEY.SPACE)){
			// getting the first layermap that we're going to modify

			LandscapeLayerMap lmap = Landscape.GetActiveTerrain().GetChild(0) as LandscapeLayerMap;

			// generating a new ID for the draw operation
			int id = Landscape.GenerateOperationID();

			// commencing a Texture Draw operation for the selected landscape map at (100, 100) with the size of [512 x 512]
			Landscape.AsyncTextureDraw(id, lmap.GetGUID(), new ivec2(100, 100), new ivec2(512, 512), (int)(Landscape.FLAGS_FILE_DATA.HEIGHT | Landscape.FLAGS_FILE_DATA.ALBEDO));
		}
	}
}
As the component is assigned, launch your application via the Run button right in UnigineEditor to check the result. You can assign other textures to modify height and albedo data of the terrain, and add new ones to modify masks, for example.
The information on this page is valid for UNIGINE 2.20 SDK.