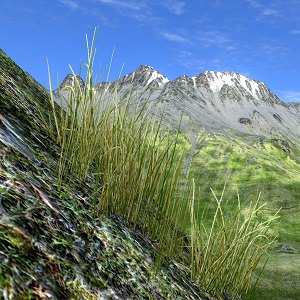
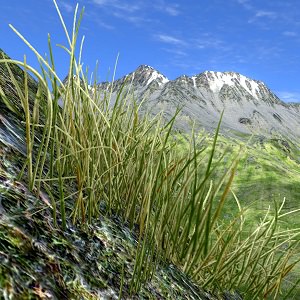
Grass
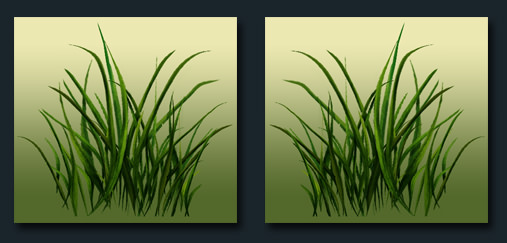
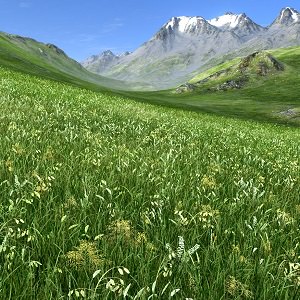
Grass is rendered as a set of 2D textures (blades), each of which represent a small grass tuft. Grass diversity is achieved by the probabilistic factor that influences the grass blades height, offset, color, etc., which grants convincing illusion of natural variation with fine details, while not monopolizing the GPU. The grass can be animated, which makes it realistically sway in the wind.

See Also
- An Adding grass tutorial
- An article on Grass Settings
- A grass_base material that is applied to grass
- An ObjectGrass class to edit grass via UnigineScript
Adding Grass
To add grass to the world, perform the following:
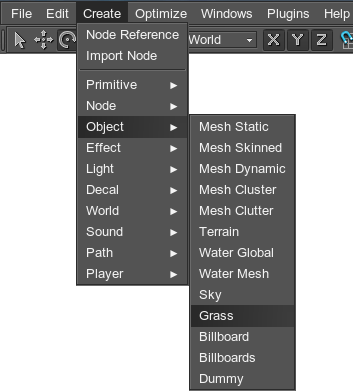
- On the Menu bar, click Create -> Object -> Grass.
- Place the object somewhere in the world.
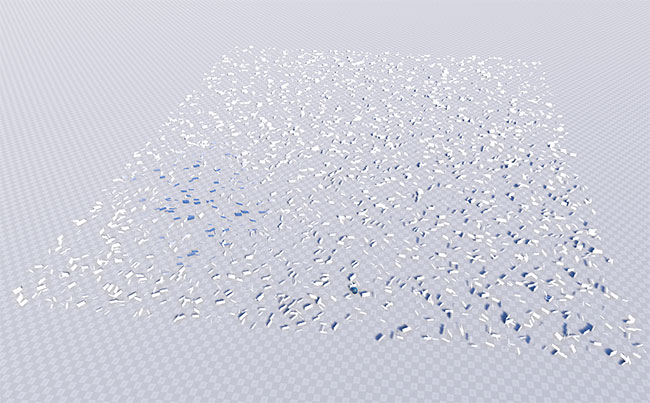
The default grass field would appear with the grass_base material assigned.
Rendering Grass
Rendering of grass mostly depends on two textures:
- A diffuse texture defines the grass shape and color.
- A mask texture determines grass mapping and density distribution on the terrain.
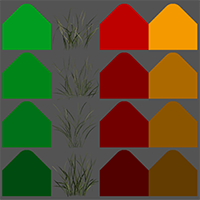
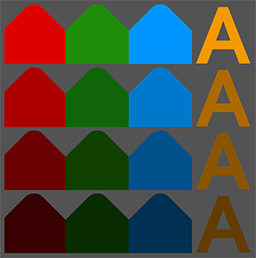
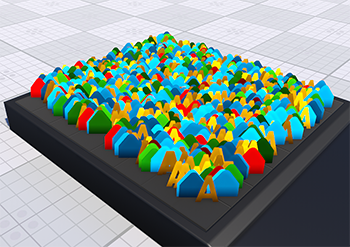
For convenience, diffuse texture is subdivided to the chunks. Each chunk will be rendered depending on the used mask values. To utilize maximum variations of the grass species, the chunks are placed on the texture in the following way:
- The horizontal row can have up to 4 chunks. Each chunk would correspond to the red, green, blue and alpha channels of the mask.
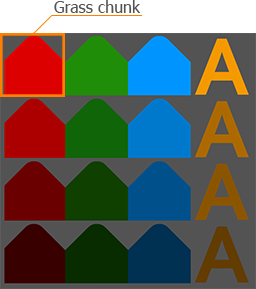
- The vertical column can have any amount of chunks. The chunks in the column represent the variations of the grass per the mask channel. Usually, each channel corresponds to the particular species of grass (thiner, thicker, tangled, etc.). If there are several grass clusters in a vertical column, they will be randomly spread across the masked area.
For the texture to be split on the correct number of chunks, the number of chunks that you've used should be specified in the Num textures field. For example, for the diffuse texture below, Num textures = 4 should be specified.
| Texture | Type | Setting |
|---|---|---|
| Diffuse | RGBA:
|
Set in the Textures tab of the grass_base material. |
| Mask | RGBA8: each channel controls the distribution of the chunks in the vertical column of the grass diffuse texture.
In case R8, RG8 or RGB8 texture is used as a mask, only the first, the first two or the first three columns of diffuse texture will be displayed. So, if your diffuse texture contains, for example, only 1 vertical column, the R8 texture will be enough. 0 mask channel values (no color) create areas where the grass should not grow. Non-zero channel values create a grassy area: the higher the value, the denser the grass grows. If the mask texture is not set, the default white texture is used. It doesn't have the set amount of channel: the type of this texture depends on the value set Num textures field. So, if Num textures = 2, the default mask texture will be RG8. |
Set in the ObjectGrass -> Grass tab - > Mask Image field. |
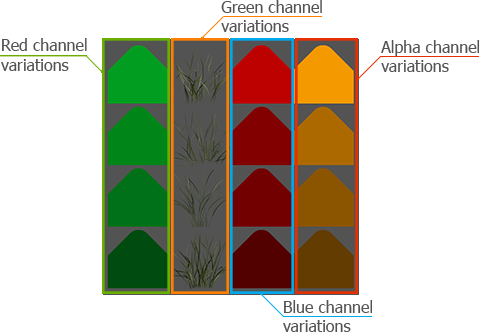
For example, we have the following diffuse and mask textures:
Diffuse texture
|
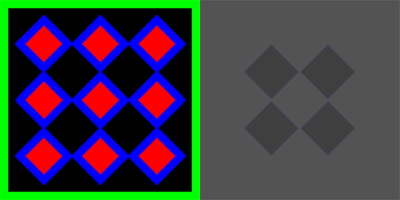
RBG and A channels of the mask
|
We see, that in the first column, chunks of the green shades correspond to the red channel of the mask, which is 9 red rhombuses; in the second column, chunks of the real grass variation correspond to the green channel of the mask, which is the square green mask frame; in the third column, chunks of the red shades correspond to the blue channel of the mask, which is the blue rhombuses frames; and in the fourth column, chunks of the yellow shades correspond to the alpha channel of the mask, which is the rest black areas (note that these parts won't re rendered, as there no alpha color data).
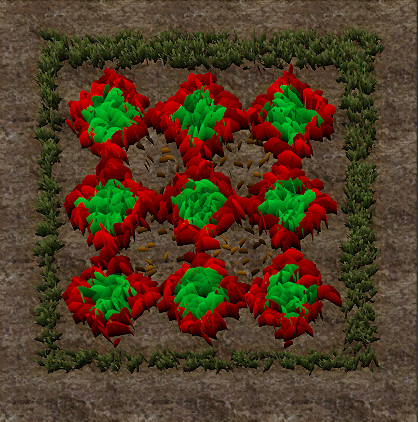
The result will be as follows:
Randomizing Grass
To randomize appearance of the grass blades, two types of values are used:
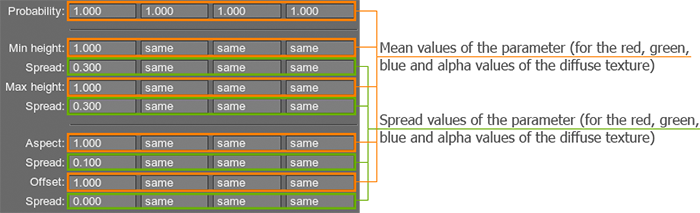
- Mean value (set in the main field of the parameter: Aspect, Minimum/Maximum Height, Offset) defines the average value of the distribution. Four fields correspond to the red, green, blue and alpha channels of the diffuse texture correspondingly. With its help the designer can set setting milestones to control the parameter.
-
Spread value defines the range for possible variation of the parameter. Four fields correspond to the red, green, blue and alpha channels of the diffuse texture correspondingly. The higher the value, the more diverse the final result will be.
NoticeSpread value is optional: if set to 0, it will not influence the simulation process and only the mean value will be uniformly used.
Probability
The probability of appearance of the grass chunk belonging to the definite mask channel (horizontal row) depends on the Probability parameter. The variations of the specie (vertical column) will be rendered randomly.

Lets check several variations of the set Probability parameter for the following diffuse texture:
As a mask the default RGBA8 white texture will be used (as there are 4 chucks in the diffuse texture, we would set Num textures to 4). As its value is white = 1, the whole grass area will be filled.
In the pictures below different options of the set Probability parameter are shown:
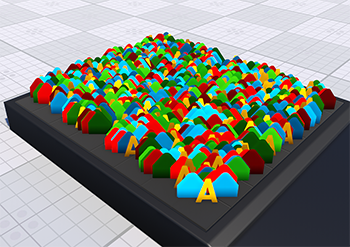
Probability = 1 1 1 1
|
Probability = 0,1 0 0 1
|
Probability = 0 1 0 1
|
Probability = 0,1 0,3 0,7 1
|
Minimum and Maximum Height
Both the minimum and maximum height are mean values and set for each of the diffuse texture columns separately.
Suppose, we set the following values for the height:
- The minimum height mean (Min height) value is set to 1.2 and the minimum height spread (Spread) value is set to 1.
 Min height = 1; Spread = 0.3
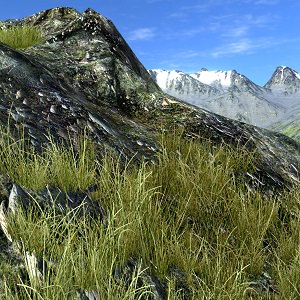 Min height = 1.2; Spread = 1
 - The maximum height mean (Max height) value is set to 3 and the maximum height spread Spread) value is set to 1.
 Min height = 1; Spread = 0.3; Max height = 3; Spread = 0.3
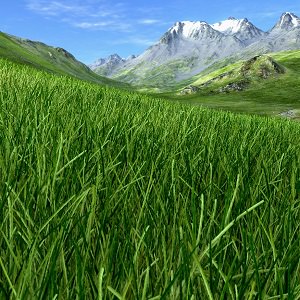 Min height = 1.2; Spread = 1; Max height = 3; Spread = 1
 - As a result, some grass quads on the field will be 3 units tall, some 2 and some 4 in the random order in areas with high density , but not less than 0.2 in areas with low density.
Aspect
To render the intended grass quad, besides the height, it should also have the width set. But in order to preserve the proportions more easily, the latter is not specified directly, but rather using the aspect parameter. So the final width is calculated by multiplying the Max height by the Aspect.
Aspect is set for each of the diffuse texture columns separately. Like the former, this parameter can be randomly varied if spread value set in addition to mean one. For example, setting spread to 0, yields the following result:
- If mean value is set to 1, the grass will be rendered in square proportions, with height equal width.
- If mean value is set to 2, the width of the grass quad will be twice longer than its height.
Aspect = 1; Spread = 0
|
Aspect = 2; Spread = 0
|
Offset
Sometimes to avoid visual artifacts, it is necessary to slightly raise the grass quads above the ground. This parameter specifies the offset in units up the surface normal, thus accurately repeating its relief. It is set by mean value (only positive) and additional spread value (positive or negative), if variation is required.
Texture Slots
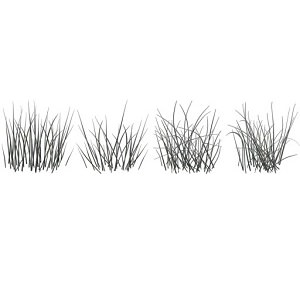
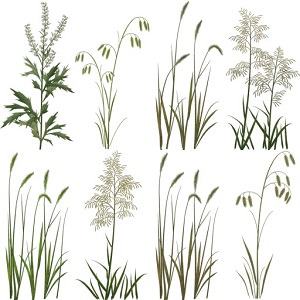
On one single field, it may be necessary to simulate grass that had grown in good and bad conditions, shooting young grass blades and withered straw. The grass diffuse texture can have 4 x n slots, each containing a separate grass cluster, plant or a flower. There can be any number of horizontal rows in the texture. However, the number of vertical columns may vary depending on the way the grass distribution is specified:
- If an image mask is used to specify the grass density distribution, the number of diffuse texture columns can be less than 4.
- If a mesh mask is used to specify the grass distribution, the number of diffuse texture columns must be equal to 4.
- If both masks are used (the image mask sets the grass density distribution and the mesh mask is used to exclude some areas such as roads and so, the number of diffuse texture columns also must be equal to 4.
Num textures parameter sets how many horizontal rows with grass clusters, plants or flowers are presented in the diffuse texture. After specifying the number, each grass cluster is rendered as a separate quad on the field.
|
|
|
4 Texture Slots; Num textures = 1
|
8 Texture Slots; Num textures = 2
|
Variation
To present additional diversity to the grass and avoid total uniformity of all the blades in the field (especially needed if it is represented as billboards), variation option can be enabled. On the randomly chosen quads, it flips the texture horizontally, automatically giving two variants available for rendering of varied blades.
Grass Quads Orientation
For grass quads to repeat the relief, the following parameters are set up:
-
Orientation. Grass quads can be oriented both along its own normal vector and along the normal vector of its parent node (usually - a terrain). However, on steep hills the grass oriented along the terrain normal can look unnatural (as the grass growth direction is up), so you will need to choose an appropriate value for the Angle parameter.
On the right picture below, the Angle parameter is set incorrectly and the grass grows almost perpendicular to the slope:
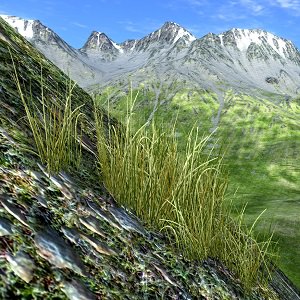 Grass Polygons Oriented Along Normal of Grass Object
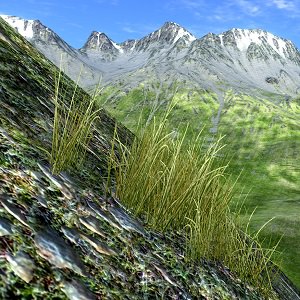 Grass Polygons Oriented Along Normal of Terrain
 - Angle. This parameter affects to grass distribution that varies depending on the ground slope angle. This parameter simulates the natural tendency of the grass to strike root in more flat places.
- Intersection. By reproducing the hilly landscape, it is essential that the grass follows the relief it grows on. For the grass to be rendered upon the ground, the following is necessary:
- Make the grass a child of the terrain or any arbitrary mesh (static or dynamic one). If there are some nodes in the hierarchy between a terrain or mesh node and grass, intersections will still be checked.
- Check the Intersection box.
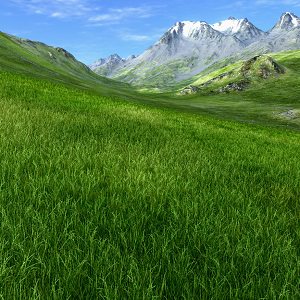
Size of the Grass Field
The grass can shoot as a few separate blades, or form a field of green verdure receding into horizon. The size of the field determines the extent of rectangular area, which will be covered with grass.
Step for Cell Division
Visually attractive grass, however, may reduce performance if its is rendered as whole. To allow rendering at interactive frame rates, the field is split into cells that form a grid. Each cell is estimated, whether it contributes to the grass field or stays grassless. The grassless cells are disregarded, while for the cells with grass all the required computations are done. Depending on the density, the blades are planted in the cell with random coordinates, imitating the natural vegetation sprouting. The cells are rendered one by one, starting from the camera and further forward.
To get the resulting number of cells, Size of the field (both along X and Y axes) is split by the Step.
Controlling the step for dividing field into cells allows you to change the field size, while not influencing the set density for planting the grass blades. On the other hand, that is why if we change the step and consequently the number of cells, while not altering the density value, the number of grass quads rendered will be different.
To choose the optimal size of the cell step (especially when a grass object is used as a distant LOD of World Clutter or Mesh Clutter), it is recommended to use one of the following formulas:
If the Step value is too small and the maximum visibility distance is large, cells will be rendered too long. Also the number of DIP calls will increase significantly. On the other hand, if the Step value is too large, there will be performance spikes due to the increased number of objects per cell. So the coefficient in range from 3 to 4 presented in the formula above will help to find the right balance.
Cell Subdivision
Each cell can also be subdivided into smaller parts by specifying a value of the Subdivision parameter. This is usually required when the grass is used as a low-poly distant LOD of a forest created by using World Clutter: the Subdivision parameter subdivides big grass cells so that they match the smaller clutter ones.
Masks for the Grass Field
Image Mask for the Grass Field
To simulate the convincingly looking pasture that naturally blends with the rest of the virtual environment, the grass field can take an arbitrary outline gradually shaping and growing on the ground. Furthermore, the grass can grow chaotically and irregularly forming clumps of green and grassless patches, just like in the nature. Making this effect possible, the mask is mapped on the terrain and determines the density distribution that will meet the requirement of the created landscape.
The mask is an RGBA8 texture. Each channel of it controls the distribution of the grass per vertical column of grass diffuse texture (there can be up to 4 columns in the diffuse texture).
- Red channel specifies the areas of growth for the 1st texture column. If there are several grass clusters in a vertical column, they will be randomly spread across the masked area.
- Green — for the 2nd texture column.
- Blue - for the 3rd texture column.
- Alpha - for the 4th texture column.
In case R8, RG8 or RGB8 texture is used as a mask, only the first, the first two or the first three columns of diffuse texture will be displayed. So, if your diffuse texture contains, for example, only 1 vertical column, the R8 texture will be enough.
For every channel separately, areas where the grass should not grow have 0 channel value (no color or alpha data). Non-zero channel value creates a grassy area: the higher the value, the denser the grass grows.
The image mask is characterized with the following parameters:
- Threshold that controls starting from what density (according to the mask), the grass should grow.
- Min value and Max value that set the color density range.
- Flip X and Flip Y that flips the texture horizontally and vertically (respectively).
Minimum and Maximum Mask Values
As a solution for advanced objects seeding and memory consumption optimization not only a whole mask, but any required part of it can be applied to the object. It means that different multiple objects can share the same mask, but use different levels.
By default, each channel of the image mask specifies the areas and the density of growth in the [0;255] color density range. However, by using Min value and Max value, you can specify any color density range in this diapason and that part of the mask, which contains the specified density range, will be used to seed the grass.
For example, there is the following R8 image mask:

Several grass objects that represent grass of different heights can share this mask as follows:
- In range from 100 to 200 density of the short grass can be stored. The part of the image mask, in which the specified range of color gradation is stored, will be applied for the short grass object.
- In range from 160 to 230 density of the grass of the mean height can be stored.
- In range from 190 to 255 density of the tall grass can be stored.
Mesh Mask
Vector masking allows creating roads, rivers and so on with extremely high precision as it is independent of the mask texture resolution. A mesh-based mask can be set for grass to specify areas where grass should or should not grow.
A mesh mask can be inverted by toggling the Inverse flag.
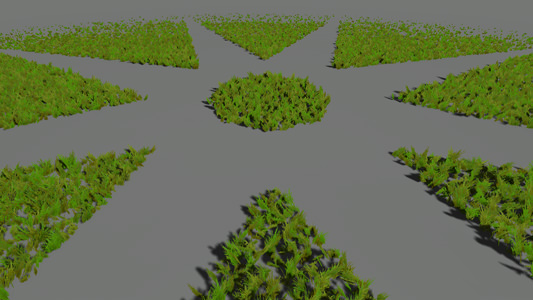
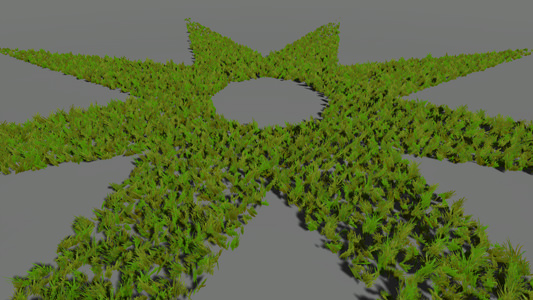
Field Mask
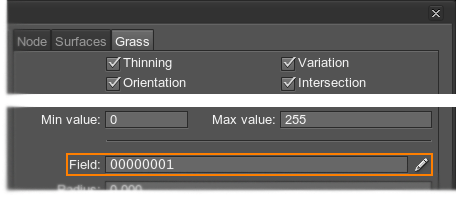
Any area of a grass field can be animated by using Fields. Fields can also be used to specify areas of grass that should not be rendered. Such areas of grass are specified by the Field mask on the Grass tab of the Nodes window.
See the example on animating grass with the animation field here.
Density of Growth and Grass Randomization
To achieve the sufficient richness of a grass field, Density parameter can be tweaked. It determines how many grass quads are to be rendered per square unit.
- The higher the value, the more grass blades quads are presented and the more closely they are positioned. But it should be kept in mind, that the final result also depends on the Step of division and the number of cells it defines.
To randomly position grass blades quads across an area by an image mask, set up the Seed value, which is actually an integer value used to generate pseudo-random successions of numbers (in other words, a random seed). To get a random seed value, press the Randomize button.
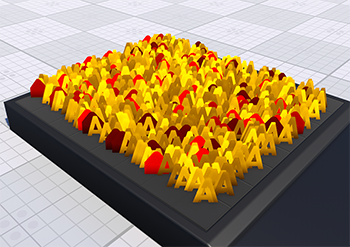
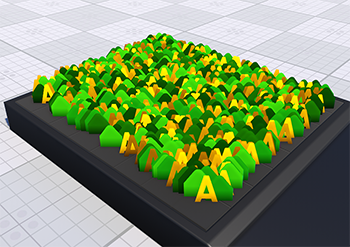
To achieve the predominance of one type of the grass over the other types, you can use the Probability parameter. This parameter sets the grass rendering probability per diffuse texture column: you can specify a probability factor for each column of the diffuse texture separately.
For example, if you set the probability factor to 5 for the 1st column of the diffuse texture, the grass blades quads stored in slots of this column will appear more often.
Probability = 1
|

Probability for the 1st column = 5
|
Additional Shadow Radius
Radius is the distance to draw additional grass blades quads outside the view frustum. This option allows eliminating popping of shadows at the edges of the screen when the camera is turning.
- The shadow radius to set depends on the grass size and the angle of the sun (which determines how long the shadows from it would be).
- Set the minimum possible value, as this parameter increases rendering load (check RTriangles counter in the performance profiler).
Grass Optimization
As it was mentioned above, rendering all grass cells at once (and therefore thousands of grass polygons) drastically drops performance. So, to reduce the number of polygons rendered each frame, it is necessary to set the Spawn rate that controls the number of cells rendered per frame. The higher the spawn rate, the more likely a performance spike will occur. However, at a low spawn rate and FPS values the grass will be generated right in front of your eyes (creating an effect of grass quads popping) on the approach of the camera to the grass field.
Except reducing the number of cells rendered per frame, the grass field can be thinned out with a distance: you can check the Thinning box in order not to render random grass polygons across the grass Fade distance.
Choosing the optimal Step for cells division is also important when optimizing the grass. Depending on the purpose of the grass usage, you should set different Step values:
- For the normal grass (that is used properly), the optimal step is in range [10..25].
- For the grass that is used as a distant LOD (for a forest, for example), the optimal step should be calculated according to the formula.
Using Grass as Low-Poly LOD
When using a grass object as a low-poly LOD (for example, to create a distant LOD for a forest), the clutter and the grass cells must match. So, you need to make sure that the following parameters match:
- Seed of both objects so that they are positioned the same way.
- Size X, Size Y of both objects.
- Clutter Step matches the ratio of Step/Subdivision values of the grass.
For example, if the maximum visibility distance for the mesh clutter is set to 400 units and for the grass object it is set to 6400 and the coefficient is 4, the cell step and subdivision will be calculated as follows:
- Step for the mesh clutter: 400/4 = 100
- Step for the grass: 6400/4 = 1600
- Grass cell subdivision: 1600/100 = 16
- Step for the mesh clutter:
- Orientation flag is enabled/disabled for both objects.
- Intersection flag is enabled/disabled for both objects.
- Flip X, Flip Y are enabled/disabled for both objects (in case an image mask is used).
- Inverse is enabled/disabled for both objects (in case a mesh mask is used).
- Min value and Max value of both objects (in case an image mask is used).
- Angle, Threshold, Density, Probability of both objects.