IG Host
In the simulation industry, an image generator (IG) receives data from a host via an interface (such as CIGI). For demonstration of IG features and debugging purposes, we started developing IG Host — a cross-platform and cross-protocol solution. Currently, IG Host is a simplified version of CIGI HEMU and includes a number of useful advantages:В индустрии моделирования генератор изображений (IG) получает данные от хоста через интерфейс (например, CIGI). Для демонстрации возможностей IG и целей отладки мы начали разработку IG Host - кроссплатформенного и кросс-протокольного решения. В настоящее время IG Host представляет собой упрощенную версию CIGI HEMU и включает ряд полезных преимуществ:
- Simplified entity controlУпрощенный контроль сущности
- Transparent packet transfer (requests and responses can be viewed in the console)Прозрачная передача пакетов (запросы и ответы можно посмотреть в консоли)
- CIGI Debug modeРежим отладки CIGI
- Improved LOS responsesУлучшенные ответы LOS
It is planned to add the HLA and DIS protocols in next versions.В следующих версиях планируется добавить протоколы HLA и DIS.
Running IG HostЗапуск IG Host#
IG Host is a part of CIGI demo. Therefore, to try out IG Host, you need to download and run CIGI demo. In the IG Configurator window, click the RunIG Host button.IG Host является частью Демо CIGI . Поэтому, чтобы опробовать IG Host, вам необходимо загрузить и запустить демо-версию CIGI. В окне IG Configurator нажмите кнопку Run IG Host.

Then click Connect.Затем щелкните Connect.
Using IG Host in IG ProjectsИспользование IG Host в проектах IG#
To run IG Host with your IG application, copy the ig_host binaries from the demos/cigi_demo/bin/ folder to your project:Чтобы запустить IG Host с вашим IG-приложением, скопируйте двоичные файлы ig_host из папки demos/cigi_demo/bin/ в свой проект:
- For Windows — ig_host_x64.pdb, ig_host_x64.exe, ig_host_x64d.exeДля Windows - ig_host_x64.pdb, ig_host_x64.exe, ig_host_x64d.exe
- For Linux — ig_host_x64, ig_host_x64dДля Linux - ig_host_x64, ig_host_x64d
IG Host Settings and ParametersНастройки и параметры IG Host#
To make things work, you need to perform the following actions:Чтобы все заработало, нужно выполнить следующие действия:
- Connect IG Host with IG.Подключить IG Host к IG.
- Open the world (database) that provides the environment.Открыть мир (базу данных) представляющий окружающую среду.
- Add an entity.Добавить объект .
- Create a view attached to the entity, which is displayed in IG.Создать вид прикрепленный к сущности, которая отображается в IG.
- Enable control of the entity movements.Включить управление движением сущности.
General SettingsОбщие настройки#
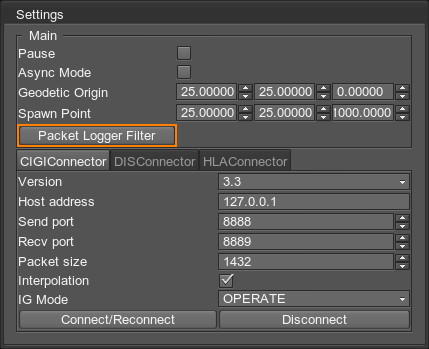
In the IG Host window, open the Settings window (File -> Settings) and set the following parameters:В окне IG Host откройте окно Settings (File -> Settings) и установите следующие параметры:
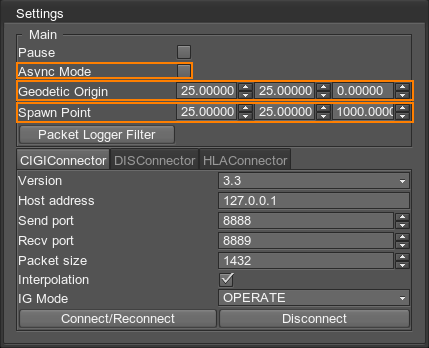
- Async Mode currently should be disabled.Async Mode в настоящее время должен быть отключен .
- Geodetic Origin — the coordinates that are set for the Geodetic Pivot in the world you have created.Geodetic Origin - координаты, которые установлены для Geodetic Pivot в мире, который вы создали.
- Spawn Point — the coordinates of the entity spawn location.Spawn Point - координаты места появления сущности.
- CIGIConnector settings, if necessary.CIGIConnector, если необходимо.
Adding and Loading the WorldДобавление и загрузка мира#
To have an environment displayed in IG, you need to load a world (database).Чтобы окружение отображалось в IG, вам необходимо загрузить мир (базу данных).
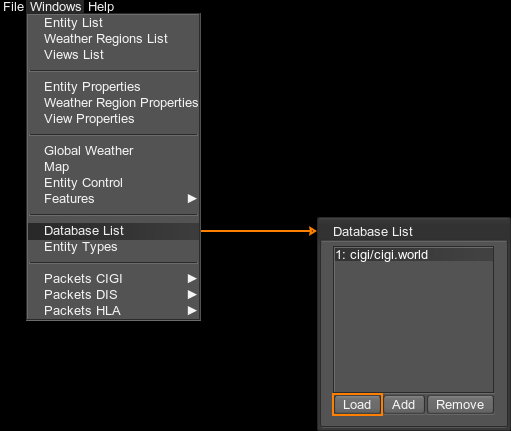
- Open the Database List window (Windows -> Database List).Откройте окно Database List (Windows -> Database List).
- Select a database from the list.Выберите базу данных из списка.
- Click Load.Щелкните Load.
- Check if the world has been loaded in the IG window. Click Connect/Reconnect in the Settings window, if necessary.Проверьте, загружен ли мир в окне IG. При необходимости щелкните Connect/Reconnect в окне Settings.
You can add more databases to the list. The databases you want to add should be located inside the /data folder of the project you work with. To add another world to the database list:Вы можете добавить в список другие базы данных. Базы данных, которые вы хотите добавить, должны находиться в папке /data проекта, с которым вы работаете. Чтобы добавить другой мир в список базы данных:

- Click Add.Щелкните Add.
- Select the *.world file to be loaded.Выберите файл *.world для загрузки.
- Specify the latitude and longitude of the geodetic pivot in that world.Укажите широту и долготу геодезической точки в этом мире.
- Click OK.Щелкните OK.
- Reopen IG and IG Host.Снова откройте IG и IG Host.
Adding an EntityДобавление объекта#
The entity is added as follows:Сущность добавляется следующим образом:
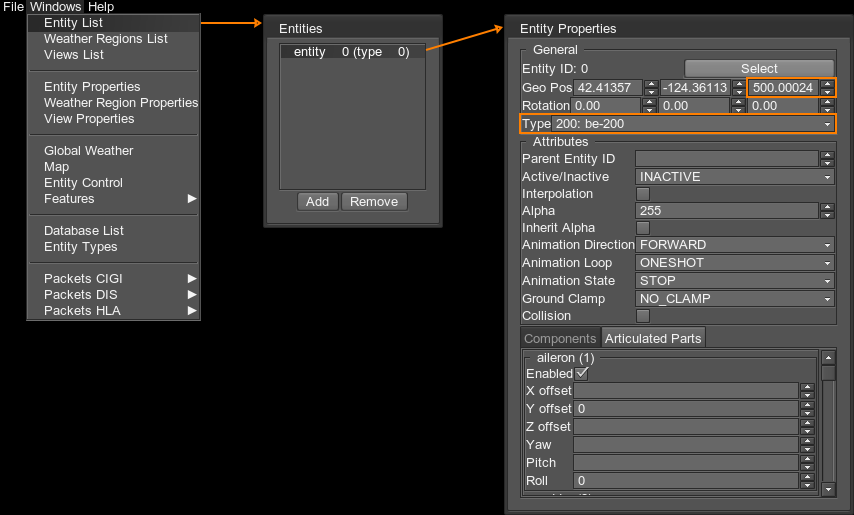
- Open the Entity List window (Windows -> Entity List).Откройте окно Entity List (Windows -> Entity List).
- Double-click an entity from the list to open Entity Properties.Дважды щелкните объект в списке, чтобы открыть Entity Properties.
- Set the entity Type, and check its position (most importantly along the Z axis to make sure it is not under the ground).Задайте Тип объекта и проверьте его положение (наиболее важно по оси Z, чтобы убедиться, что он не находится под землей).
- Set other parameters, if necessary.При необходимости установите другие параметры.
Setting the ViewНастройка вида (view)#
The view defines what actually is going to be displayed in IG.Вид определяет, что на самом деле будет отображаться в IG.

To open the view settings:Чтобы открыть настройки вида:
- Open the Views list (Windows -> Views List).Откройте список Views (Windows -> Views List).
- Double-click a view from the list to open its properties.Дважды щелкните вид в списке, чтобы открыть его свойства.
- Use Position and Rotation to adjust the camera relative to the entity. Both positive and negative values can be used.Используйте Position и Rotation, чтобы настроить камеру относительно объекта. Могут использоваться как положительные, так и отрицательные значения.
- Parent Entity ID — ID of the entity to which camera is attached. By changing this ID, you can switch between entities.Parent Entity ID - ID сущности, к которой привязана камера. Изменяя этот идентификатор, вы можете переключаться между объектами.
Controlling the EntityУправление сущностью#
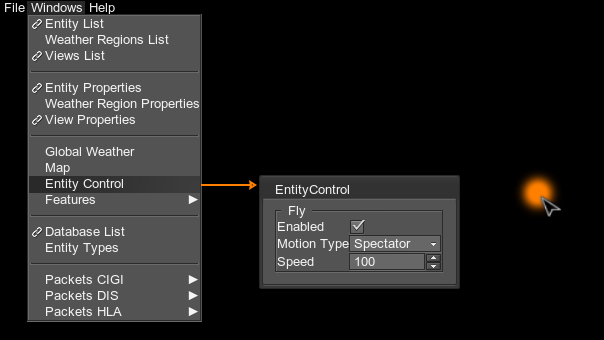
To move the entity around in IG:Чтобы переместить объект в IG:
- Select the entity in the Entity List.Выберите объект в Entity List.
- Open the EntityControl window (Windows -> Entity Control).Откройте окно EntityControl (Windows -> Entity Control).
- Activate the Enabled option.Активируйте опцию Enabled.
- Click in the black area within the IG Host window.Щелкните черную область в окне IG Host.
- Use WASDQE buttons and mouse movements to control the entity. Speed is controlled by using Shift + Mouse Scroll button.Используйте кнопки WASDQE и движения мыши для управления объектом. Скорость регулируется с помощью кнопки Shift + Mouse Scroll.
There are three Motion Types available:
Доступны три Motion Types:
- Spectator — camera follows the entity.Spectator - камера следует за объектом.
- Airplane — the entity moves with a predefined speed, the direction is controlled by the mouse movements.Airplane - объект движется с заданной скоростью, направление контролируется движениями мыши.
- Circle — entity moves circle-wise using the entered Radius and Circle Center coordinates.Circle - объект перемещается по кругу с использованием введенных координат Radius и Circle Center.
Only one entity can be controlled at a certain moment, switching to another entity stops the movement of the previous entity.
В определенный момент можно контролировать только одну сущность, переключение на другую сущность останавливает движение предыдущей сущность.
Setting the WeatherУстановка погоды#
To control the weather, open the Global Weather window (Windows -> Global Weather):Чтобы контролировать погоду, откройте окно Global Weather (Windows -> Global Weather):

Currently the weather settings are the same as in HEMU.В настоящее время настройки погоды такие же, как в HEMU.
Saving and Loading IG Host SettingsСохранение и загрузка настроек хоста IG#
In the File menu, the Save and Load options are available. You can save all IG Host settings and load them as needed.В меню File доступны параметры Save и Load. Вы можете сохранить все настройки IG Host и загрузить их по мере необходимости.
Sending CIGI PacketsОтправка пакетов CIGI#
To send packets, select the type of packets you want to send:Чтобы отправить пакеты, выберите тип пакетов, которые вы хотите отправить:
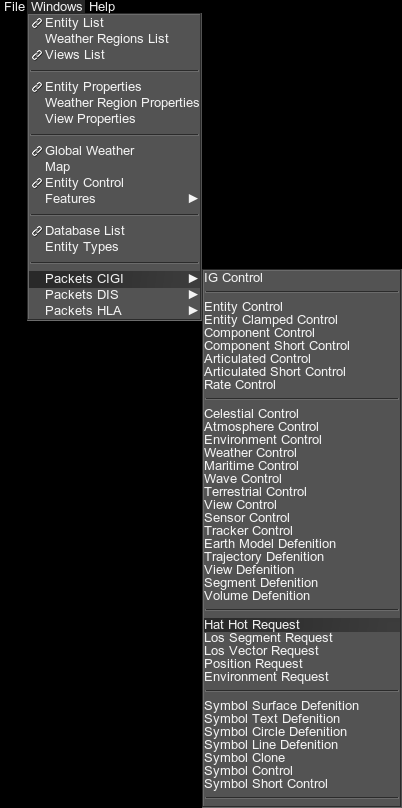
The corresponding window will open:Откроется соответствующее окно:
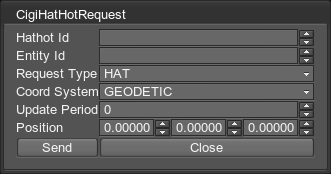
You can open as many windows and send as many requests as you want.Вы можете открывать столько окон и отправлять столько запросов, сколько хотите.
Logging CIGI PacketsРегистрация пакетов CIGI#
IG Host allows tracing both sent and received packets.IG Host позволяет отслеживать как отправленные, так и полученные пакеты.
In the Settings window (File -> Settings), click the Packet Logger Filter button to open the corresponding window:В окне Settings (File -> Settings) нажмите кнопку Packet Logger Filter, чтобы открыть соответствующее окно:
In the window that opens, enable the CIGI option and the packets that should be logged.В открывшемся окне включите опцию CIGI и пакеты, которые должны регистрироваться.

- Packets in the top area are the packets sent from Host to IG.Пакеты в верхней области - это пакеты, отправленные от хоста к IG.
- Packets in the bottom area are the packets sent from IG to Host.Пакеты в нижней части - это пакеты, отправленные от IG к хосту.
The information will be displayed in the console of the IG Host window (opened using the ` button).Информация будет отображаться в консоли окна IG Host (открывается с помощью кнопки `).
