Usage Example
This article describes a simple example of how to create Unigine native GUI by using User interface (UI) files.
Create UI Files#
Use a plain text editor to create a *.ui file that describes the GUI of your project. Then describe all of the required containers, widgets and their layout:
<?xml version="1.0" encoding="utf-8"?>
<ui version="1.0">
	<window name="window" export="1" width="250" height="150" sizeable="1" enabled="1" space_y="10">
		<text align="left">Language</text>
		<align align="left">
			<label><text>Choose the language:</text></label>
			<checkbox name="radiobutton_0" export="1" checked="1">
				<text>English</text>
			</checkbox>
			<checkbox name="radiobutton_1" export="1">
				<attach>radiobutton_0</attach>
				<text>Chinese</text>
			</checkbox>
		</align>
		<button>
			<text>Apply</text>
			<callback type="clicked">translation</callback>
		</button>
	</window>
</ui>
To get access to the widgets from the script, you must specify the name parameter and set the export parameter to1 for each of them.
To set the callback for the widget, simply define callback as a child tag and set the required value for itstype parameter. Also the callback function must be defined in the script.
Create Dictionary#
To support several languages in your project, create a single dictionary in the project folder that contains all necessary translations. For example, you can create English-Chinese dictionary, which is required to switch from English to Chinese and vice versa:
<?xml version="1.0" encoding="utf-8"?>
<dictionary version="1.00">
	<msg>
		<src>Apply</src>
		<en>Apply</en>
		<ch>申请</ch>
	</msg>
	<msg>
		<src>Choose the language:</src>
		<en>Choose the language:</en>
		<ch>选择语言:</ch>
	</msg>
	<msg>
		<src>Chinese</src>
		<en>Chinese</en>
		<ch>汉语</ch>
	</msg>
	<msg>
		<src>English</src>
		<en>English</en>
		<ch>English</ch>
	</msg>
	<msg>
		<src>Language</src>
		<en>Language</en>
		<ch>语</ch>
	</msg>
</dictionary>Add Script Logic#
When the *.ui file is created, the GUI is described, the dictionary is prepared and all the necessary fonts are added to the project, you need to add a script logic.
- Declare the root widget, its children (if necessary) and User interface as global variables in the script:
Source code (UnigineScript)
WidgetWindow window; // root widget WidgetCheckBox radiobutton_0; // the first radiobutton WidgetCheckBox radiobutton_1; // the second radiobutton UserInterface ui; // user interfaceNoticeThe name of each variable must match the name of the widget defined in the UI file. - Load User interface by using the UserInterface() constructor: Source code (UnigineScript)
int init(){ ui = new UserInterface(engine.getGui(),"my_project/my_project.ui"); return 1; } - Create an object of the GUI class and add the root widget to be rendered in the GUI interface via Gui::addChild(): Source code (UnigineScript)To set the root widget alignment via scripting, define one of the GUI_ALIGN_* pre-defined variables as the second argument of the addChild() function.
int init(){ ui = new UserInterface(engine.getGui(),"my_project/my_project.ui"); Gui gui = engine.getGui(); gui.addChild(window,GUI_ALIGN_CENTER); return 1; } - Define callback function that loads the chosen dictionary via engine.gui.addDictionary() (if necessary) and applies the language changes via updateWidgets(): Source code (UnigineScript)
void translation(){
	if (radiobutton_0.isChecked()){
		// load English-Chinese dictionary and specify <en> tag as the source of translation
		engine.gui.addDictionary("my_project/locale/my_project.locale","en");
		// set the default font
		engine.gui.setFont("core/gui/font.ttf");
	}
	else {
		// load English-Chinese dictionary and specify <ch> tag as the source of translation
		engine.gui.addDictionary("my_project/locale/my_project.locale","ch");
		// set the Chinese font for correct characters displaying
		engine.gui.setFont("my_project/gui/font_ch.ttf");
	}
	ui.updateWidgets();
}
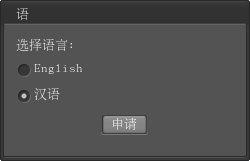
The script logic described in the example enables switching between English and Chinese:
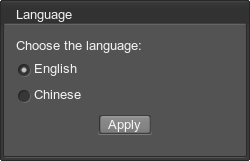
|
|
|
The first radiobutton was checked.
|
The second radiobutton was checked.
|