Creating Controllable Character
Let's create a playable robot that can move around the Play Area and collide with objects or wall obstacles. Our character will fly above the floor and rotate to face the cursor.
Step 1. Engage Physics for Robot's Model#
The robot with a complex 3D model will represent the playable character in the game. We have already imported the Node Reference with the skinned mesh, the flying animation, and materials for the robot.
The robot must be able to move around the Play Area and collide with static and physical objects. In order to do so, it should have a physical body and a collision shape approximating its volume.
- Place the imported programming_quick_start\character\robot\robot.node on the floor inside the Play Area by dragging it from the Asset Browser directly to the Editor Viewport.

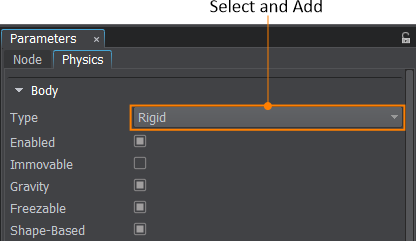
- With the robot node selected click Edit in the Reference section of the Parameters window. The Node Reference shall open and the current selection shall focus on the robot ObjectMeshSkinned node. Now switch to the Physics tab of the Parameters window and assign a Rigid body to the selected ObjectMeshSkinned.

- Set LDamping parameter to 5.0 to make sure that the robot will lose speed over time.
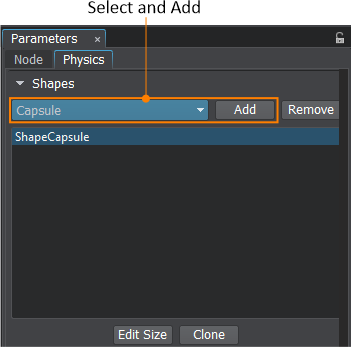
- Scroll down to the Shapes section and add a Capsule shape to the body.

The capsule shape will be used as an approximation volume for collisions with other objects in the world.
Step 2. Set Up Controls#
We will apply a linear impulse to the body to move the robot with keyboard WASD keys. The robot's motion will be determined according to the camera's orientation. Also, let's restrict the physics-based rotation and vertical movement to avoid unwanted control behavior.
To orient the robot to face the cursor, we will use one of the intersection types called World Intersection. It will trace a line from the cursor position to the floor to get an intersection point that will be used as a reference for the robot's rotation. You can read more about managing various intersections here.
The best way to manage keyboard and mouse inputs, is to use the Input class. It enables you to check the state of the buttons and get the current mouse coordinates. Alternative methods for input handling are described here.
Let's use the C++ Component System to implement this logic. We will create a C++ component and assign it to the robot's node in the world.
- To start writing code we should open our project in an IDE. Go to SDK Browser and choose Open Code IDE.
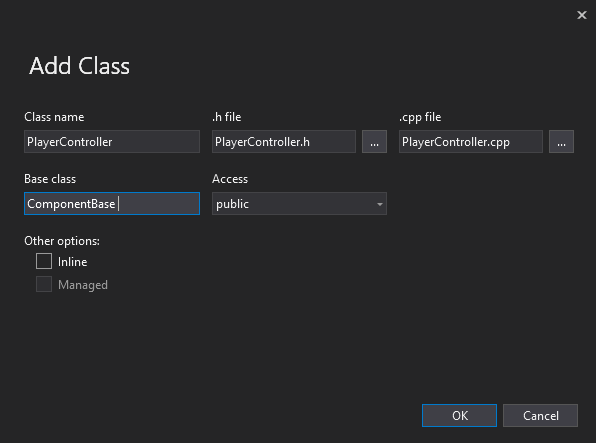
- In an IDE create a new C++ class (*.h and *.cpp files) and call it PlayerController. Make sure it inherits from the Unigine::ComponentBase class.

- Copy the code below and paste it to the corresponding files in your project and save them in your IDE.
NoticeIt is recommended to use Visual Studio as a default IDE.PlayerController.h (C++)
#pragma once
#include <UnigineComponentSystem.h>

#include <UnigineGame.h>
#include <UnigineControls.h>
#include <UnigineStreams.h>
#include <UniginePlayers.h>
#include <UnigineWorld.h>
#include <UnigineConsole.h>
#include <UnigineMathLib.h>
#include <UnigineApp.h>
#include <UnigineRender.h>

class PlayerController : public Unigine::ComponentBase
{
public:
	// declare constructor and destructor for our class and define a property name.
	COMPONENT_DEFINE(PlayerController, ComponentBase)
	// declare methods to be called at the corresponding stages of the execution sequence
	COMPONENT_INIT(init);
	COMPONENT_UPDATE_PHYSICS(updatePhysics);

protected:
	void init();
	void updatePhysics();

private:
	void move(const Unigine::Math::vec3 &direction);

	Unigine::PlayerPtr player;

	// a WorldIntersection object to store the information about the intersection
	Unigine::WorldIntersectionPtr intersection = Unigine::WorldIntersection::create();

	Unigine::Math::vec3 pos;

	Unigine::BodyRigidPtr rigid;
};
PlayerController.cpp (C++)#include "PlayerController.h" using namespace Unigine; using namespace Math; REGISTER_COMPONENT(PlayerController); void PlayerController::init() { player = Game::getPlayer(); if (node) { rigid = node->getObjectBodyRigid(); if (rigid) { rigid->setAngularScale(vec3(0.0f, 0.0f, 0.0f)); // restricting the rotation rigid->setLinearScale(vec3(1.0f, 1.0f, 0.0f)); // restricting Z movement rigid->setMaxLinearVelocity(8.0f); // clamping the max linear velocity } } } void PlayerController::updatePhysics() { // Write here code to be called before updating each physics frame: control physics in your application and put non-rendering calculations. // The engine calls updatePhysics() with the fixed rate (60 times per second by default) regardless of the FPS value. // WARNING: do not create, delete or change transformations of nodes here, because rendering is already in progress. if (!Console::isActive()) // do not process input if the console is shown { // check if W key is pressed if (Input::isKeyPressed(Input::KEY::KEY_W)) move(player->getWorldDirection(MathLib::AXIS::AXIS_Y)); // move forward // check if S key is pressed if (Input::isKeyPressed(Input::KEY::KEY_S)) move(player->getWorldDirection(MathLib::AXIS::AXIS_NY)); // move backward // check if A key is pressed if (Input::isKeyPressed(Input::KEY::KEY_A)) move(player->getWorldDirection(MathLib::AXIS::AXIS_NX)); // move left // check if D key is pressed if (Input::isKeyPressed(Input::KEY::KEY_D)) move(player->getWorldDirection(MathLib::AXIS::AXIS_X)); // move right // finding the positions of the cursor and the point moved 100 units away in the camera forward direction ivec2 mouse = Input::getMouseCoord(); vec3 p0 = player->getWorldPosition(); vec3 p1 = p0 + vec3(player->getDirectionFromScreen(mouse.x, mouse.y)) * 100; // casting a ray from p0 to p1 to find the first intersected object ObjectPtr obj = World::getIntersection(p0, p1, 1, intersection); // the first bit of the intersection mask is set to 1, the rest are 0s // finding the intersection position, creating a transformation matrix to face this position and setting the transform matrix for the body preserving current angular and linear velocities if (obj && rigid) { pos = intersection->getPoint(); pos.z = rigid->getTransform().getTranslate().z; // project the position vector to the Body Rigid pivot plane mat4 transform = Math::setTo(rigid->getTransform().getTranslate(), pos, vec3::UP, AXIS::AXIS_Y); rigid->setPreserveTransform(transform); // turn the character's body } } } // moving the rigid body with linear impulse in the specified direction void PlayerController::move(const Unigine::Math::vec3& direction) { if (rigid) // direction is a normalized camera axis vector rigid->addLinearImpulse(direction); } - Before you can use C++ components you should initialize the Component System. Modify the init() method of the AppSystemLogic class as shown below (AppSystemLogic.cpp file). Also enable automatic Node Reference unpacking for convenience.
AppSystemLogic.cpp (C++)
#include <UnigineComponentSystem.h> int AppSystemLogic::init() { // initialize ComponentSystem and register all components ComponentSystem::get()->initialize(); // unpack node references to find child nodes by name World::setUnpackNodeReferences(true); return 1; } - Build and run the project via your IDE (press Ctrl + F5 in Visual Studio), the Component System will generate a property-file for the component.
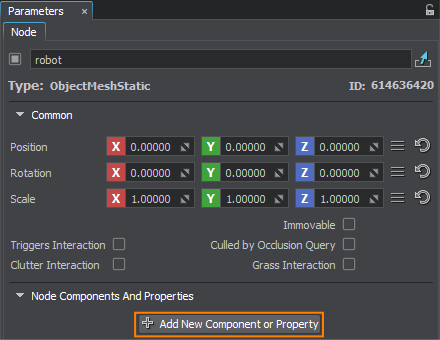
- Switch back to UnigineEditor and select the robot node (ObjectMeshSkinned) in the World Nodes window. Then click Add New Component or Property in the Parameters window and assign the newly generated PlayerController property.

Step 3. Finalize and Run#
- Turn off the Intersection detection for every surface of the robot node to ignore intersections with the robot's own surfaces, as we do not want it in our robot's rotation implementation.
- For every wall object in the world, go to the Parameters window and find the Surfaces section in the Node tab. Select the box surface of the mesh and open an Intersection Mask window. Uncheck the first Intersection Mask 0 bit to make sure that walls will not affect the player's character turning.
- To make the cursor always visible, go to Windows->Settings->Controls section, change the Mouse Handle mode to User. You can also control the cursor via API.
- Save changes to the world and the robot via File->Save World (or press Ctrl+S hotkey).
Build and run the game in your IDE to try out the robot's controls.