Создание пользовательского шейдера для постобработки
 Unigine engine allows you to create your own post-effects by writing custom shaders. To write post-effect shaders, you should use the same workflow as for deferred and forward rendering passes: create the material, write vertex and fragment shaders. Движок Unigine позволяет создавать собственные пост-эффекты, написав собственные шейдеры. Для написания шейдеров постэффектов следует использовать тот же рабочий процесс, что и для этапов отложенного и прямого рендеринга: создать материал, написать шейдеры вершин и фрагментов.
This tutorial explains how to create a post-effect material, write shaders for it (both vertex and fragment), add a parameter to the material to be able to specify the value from the UnigineEditor. В этом руководстве объясняется, как создать материал постэффекта, написать для него шейдеры (как вершину, так и фрагмент), добавить параметр к материалу, чтобы можно было указать значение из UnigineEditor.
This article assumes you have prior knowledge of the following topics. Please read them before proceeding:
- Getting StartedGetting Started
- Materials Files FormatsMaterials Files Formats
- Creating a Custom Shader for Deferred Rendering passCreating a Custom Shader for Deferred Rendering pass
- Creating a Custom Shader for Forward Rendering passCreating a Custom Shader for Forward Rendering pass
- UUSL Data Types and Common Intrinsic FunctionsUUSL Data Types and Common Intrinsic Functions
- UUSL TexturesUUSL Textures
- UUSL SemanticsUUSL Semantics
- UUSL ParametersUUSL Parameters
- Getting Started Начало работы
- Materials Files Formats Форматы файлов материалов
- Creating a Custom Shader for Deferred Rendering pass Создание настраиваемого шейдера для этапа отложенного рендеринга
- Creating a Custom Shader for Forward Rendering pass Создание настраиваемого шейдера для прохода прямого рендеринга
- UUSL Data Types and Common Intrinsic Functions Типы данных UUSL и общие внутренние функции
- UUSL Textures Текстуры UUSL
- UUSL Semantics Семантика UUSL
- UUSL Parameters Параметры UUSL
See AlsoСмотрите также#
- The article on Material Settings Статья о настройках материалов
- The article on Custom Materials Статья о Пользовательских материалах
Create a MaterialСоздаем материал#
As in all other shaders tutorials, you should create the material first. Let's add a new base material to your project. Как и во всех других уроках по шейдерам, вы должны сначала создать материал. Давайте добавим в ваш проект новый базовый материал .
To create post-effect material, you should specify the post pass for shaders and textures. Чтобы создать материал постэффекта, вы должны указать проход пост-обработки для шейдеров и текстур.
The material will have the following structure: Материал будет иметь следующую структуру:
<?xml version="1.0" encoding="utf-8"?>
<base_material version="2.0" name="custom_post" editable="0">

	<!-- Post-effect shaders -->
	<shader pass="post"
		defines="BASE_POST"
		vertex="shaders/vertex/post.vert"
		fragment="shaders/fragment/post.frag"/>

	<!-- Textures -->
	<texture name="color" pass="post" unit="0" type="procedural"/>
	<texture name="dirt" pass="post" unit="1" anisotropy="1" workflow="0" tooltip="Dirt color texture">core/textures/water_global/foam_d.dds</texture>

	<!-- Parameters -->
	<slider name="grayscale_power" shared="1" min="0.0" max="1.0" flags="max_expand">0.5</slider>
	<slider name="dirt_power" shared="1" min="-1.0" max="1.0" flags="max_expand">0.5</slider>

</base_material>
The key features of this post material are: Ключевые особенности этого пост-материала:
- Added shaders and textures for post pass. Добавлены шейдеры и текстуры для прохода post.
- Added the shared grayscale_power and dirt_power parameters. Добавлены общие параметры grayscale_power и dirt_power.
Save the new material as custom_post.basemat file to the data folder. Сохраните новый материал как файл custom_post.basemat в папку data.
Create Vertex ShaderСоздаем вершинный шейдер#
Since we write a simple shader example, let's write a simple shader like the vertex shader for the deferred rendering pass. Поскольку мы пишем простой пример шейдера, давайте напишем простой шейдер, такой как вершинный шейдер, для прохода отложенного рендеринга .
- Write the shader code in the plain text editor:
Source code (UUSL)
// Include the UUSL header #include <core/shaders/common/common.h> // Input data struct STRUCT(VERTEX_IN) INIT_ATTRIBUTE(float4,0,POSITION) // Vertex position INIT_ATTRIBUTE(float4,1,TEXCOORD0) // Vertex texcoords INIT_ATTRIBUTE(float4,2,COLOR0) // Vertex color END // Output data struct STRUCT(VERTEX_OUT) INIT_POSITION // Output projected position INIT_OUT(float2,0) // Texcoords (x and y only) END MAIN_BEGIN(VERTEX_OUT,VERTEX_IN) // Set output position OUT_POSITION = getPosition(IN_ATTRIBUTE(0)); OUT_DATA(0).xy = IN_ATTRIBUTE(1).xy; MAIN_END // endВниманиеYou should add a new line (press Enter) after closing the instruction (after MAIN_END command).Напишите код шейдера в текстовом редакторе:You should add a new line (press Enter) after closing the instruction (after MAIN_END command).You should add a new line (press Enter) after closing the instruction (after MAIN_END command).Source code (UUSL)// Include the UUSL header #include <core/shaders/common/common.h> // Input data struct STRUCT(VERTEX_IN) INIT_ATTRIBUTE(float4,0,POSITION) // Vertex position INIT_ATTRIBUTE(float4,1,TEXCOORD0) // Vertex texcoords INIT_ATTRIBUTE(float4,2,COLOR0) // Vertex color END // Output data struct STRUCT(VERTEX_OUT) INIT_POSITION // Output projected position INIT_OUT(float2,0) // Texcoords (x and y only) END MAIN_BEGIN(VERTEX_OUT,VERTEX_IN) // Set output position OUT_POSITION = getPosition(IN_ATTRIBUTE(0)); OUT_DATA(0).xy = IN_ATTRIBUTE(1).xy; MAIN_END // endВниманиеYou should add a new line (press Enter) after closing the instruction (after MAIN_END command). Вам следует добавить новую строку (нажмите Enter) после закрытия инструкции (после командыMAIN_END). - Save the shader file as post.vert to the data/shaders/vertex folder. Сохраните файл шейдера как post.vert в папке data/shaders/vertex.
The code of the vertex shader is simple since we don't need to work with the geometry. Код вершинного шейдера прост, так как нам не нужно работать с геометрией.
Use the materials_reload command to reload shaders whilst the engine is running.
Используйте команду materials_reload для перезагрузки шейдеров во время работы движка.
Create Fragment ShaderСоздаем фрагментный шейдер#
This section contains instruction how to create a fragment shader (also known as pixel shader). В этом разделе содержится инструкция по созданию фрагментного шейдера (также известного как пиксельный шейдер ).
To create the fragment shader for post-process pass, perform the following: Чтобы создать фрагментный шейдер для прохода постобработки, выполните следующие действия:
- Open a plain text editor, and write the following:
Source code (UUSL)
// Include the UUSL fragment shader header #include <core/shaders/common/fragment.h> // Define the texture of the scene INIT_TEXTURE(0,TEX_SCENE) INIT_TEXTURE(1,TEX_DIRT) // Input values STRUCT(FRAGMENT_IN) INIT_POSITION // Projected position INIT_IN(float2,0) // Texcoords END // Define the grayscale_power parameter CBUFFER(parameters) UNIFORM float grayscale_power; UNIFORM float dirt_power; END MAIN_BEGIN(FRAGMENT_OUT,FRAGMENT_IN) // Get the UV float2 uv = IN_DATA(0); // Get the scene color float4 scene_color = TEXTURE_BIAS_ZERO(TEX_SCENE,uv); // Get the dirt color float4 dirt_color = TEXTURE_BIAS_ZERO(TEX_DIRT,uv); // Calculate the grayscale float3 gray_scene_color = dot(float3(0.3f, 0.59f, 0.11f), scene_color.rgb); scene_color.rgb = lerp(scene_color.rgb,gray_scene_color,grayscale_power); // add some dirt OUT_COLOR = scene_color+dirt_color*dirt_power; MAIN_END // endВниманиеYou should add a new line (press Enter) after closing the instruction (after MAIN_END command).Откройте простой текстовый редактор и напишите следующее:You should add a new line (press Enter) after closing the instruction (after MAIN_END command).You should add a new line (press Enter) after closing the instruction (after MAIN_END command).Source code (UUSL)// Include the UUSL fragment shader header #include <core/shaders/common/fragment.h> // Define the texture of the scene INIT_TEXTURE(0,TEX_SCENE) INIT_TEXTURE(1,TEX_DIRT) // Input values STRUCT(FRAGMENT_IN) INIT_POSITION // Projected position INIT_IN(float2,0) // Texcoords END // Define the grayscale_power parameter CBUFFER(parameters) UNIFORM float grayscale_power; UNIFORM float dirt_power; END MAIN_BEGIN(FRAGMENT_OUT,FRAGMENT_IN) // Get the UV float2 uv = IN_DATA(0); // Get the scene color float4 scene_color = TEXTURE_BIAS_ZERO(TEX_SCENE,uv); // Get the dirt color float4 dirt_color = TEXTURE_BIAS_ZERO(TEX_DIRT,uv); // Calculate the grayscale float3 gray_scene_color = dot(float3(0.3f, 0.59f, 0.11f), scene_color.rgb); scene_color.rgb = lerp(scene_color.rgb,gray_scene_color,grayscale_power); // add some dirt OUT_COLOR = scene_color+dirt_color*dirt_power; MAIN_END // endВниманиеYou should add a new line (press Enter) after closing the instruction (after MAIN_END command). Вам следует добавить новую строку (нажмите Enter) после закрытия инструкции (после командыMAIN_END). - Save the shader file as post.frag to the data/shaders/fragment folder. Сохраните файл шейдера как post.frag в папке data/shaders/fragment.
Well, let's clarify what is under the hood of this fragment shader: Что ж, давайте проясним, что скрывается за этим фрагментным шейдером:
- We get the texture which was specified in the post-effect material. Мы получаем текстуру, которая была указана в материале пост-эффекта.
- By applying a standard grayscale equation, we change the color of the scene. Применяя стандартное уравнение градаций серого, мы меняем цвет сцены.
- By using lerp function (which performs a linear interpolation), we add the custom grayscale_power parameter to adjust the grayscale power. Используя функцию lerp (которая выполняет линейную интерполяцию), мы добавляем настраиваемый параметр grayscale_power для регулировки мощности оттенков серого.
- We also get the dirt texture and apply it to the final scene color to simulate dirn on camera lens (can also be used for vignette effect etc.) Мы также получаем текстуру грязи и применяем ее к окончательному цвету сцены, чтобы имитировать грязь на объективе камеры (также можно использовать для эффекта виньетки и т. д.)
- A custom dirt_power parameter to adjust intensity of the dirt texture (its impact on the final image). Пользовательский параметр dirt_power для регулировки интенсивности текстуры грязи (ее влияния на окончательное изображение).
Use the materials_reload console command to reload shaders whilst the engine is running.
Используйте консольную команду materials_reload для перезагрузки шейдеров во время работы движка.
See AlsoСмотрите также#
- Grayscale article on Wikipedia. Статью Grayscale в Википедии.
Editing the MaterialРедактирование материала#
Material has been created, shaders have been written, it's time to use it in the project! Материал создан, шейдеры написаны, пора использовать в проекте!
- Open UnigineEditor and launch your project. Откройте UnigineEditor и запустите свой проект.
- Create a new material by inheriting from the recently created one in the Materials Hierarchy window. Создайте новый материал, унаследовав его от недавно созданного в окне Materials Hierarchy.
- Open the Settings window by choosing Windows -> Settings from the main menu
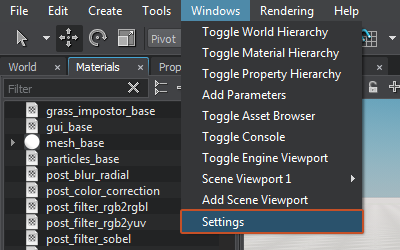 Откройте окно Settings, выбрав Windows -> Settings в главном меню
- In the Settings window choose Runtime -> World -> Render -> Screen Space Materials and specify the name of the child post material in the Post field.
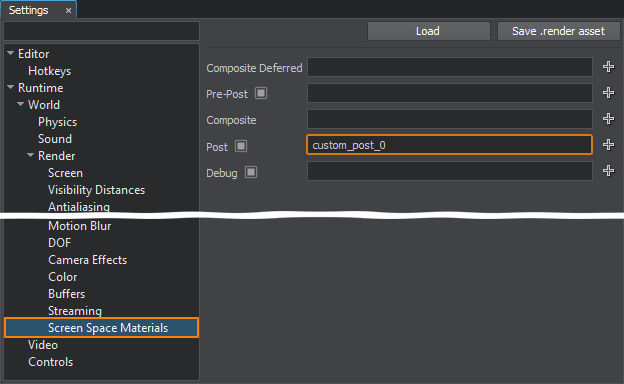
The grayscale post-effect will be applied.В окне Settings выберите Runtime -> World -> Render -> Screen Space Materials и укажите имя дочернего материала публикации в поле Post.The grayscale post-effect will be applied.The grayscale post-effect will be applied.
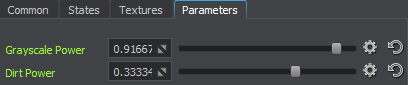
The grayscale post-effect will be applied. Будет применен пост-эффект оттенков серого. - Select your material in the Materials window. Then in the Parameters window select Parameters tab.
Configure your post-effect by adjusting the Grayscale Power and Dirt Power parameters.
 The final scene.The final scene.
The final scene.Выберите свой материал в окне Materials. Затем в окне Parameters выберите вкладку Parameters.
The final scene.The final scene.
The final scene.Выберите свой материал в окне Materials. Затем в окне Parameters выберите вкладку Parameters.
Настройте пост-эффект, отрегулировав параметры Grayscale Power и Dirt Power.
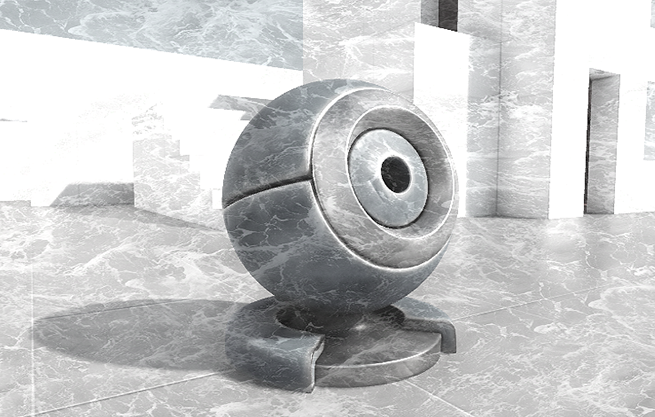
The final scene. Финальная сцена.