Landscape Layer Map
Landscape Layer Map object represents a rectangular Landscape Terrain layer and stores the data used for rendering in an .lmap asset:
- Height map used to generate the geometry of Landscape Terrain,
- Albedo texture representing color data,
- 20 single-channel mask textures.
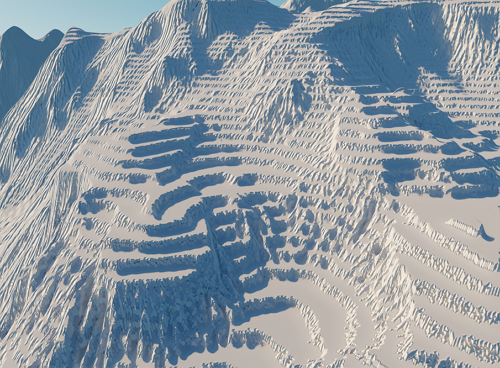
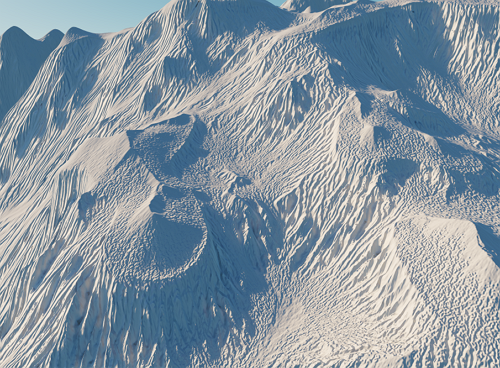
You can create a new Landscape Layer Map either from scratch, sculpting it with an extendable set of brushes available out-of-the-box, or using imported data (images or tilesets), be it an arbitrary terrain generated in terrain generator software (e.g., World Machine), or real digital elevation maps and satellite imagery data.
You can place layer maps anywhere in the scene by moving, scaling and rotating the node (rotation is available around the Z axis only). By blending different Landscape Layer Maps you can modify the terrain even at run time.
Depending on the size and resolution of your landscape, the size of the data can be quite large. You can use lossless and lossy compression options to reduce the size of the .lmap file.
See Also#
- The LandscapeLayerMap class to manage parameters of the Landscape Layer Map via API
- The LandscapeMapFileCreator class to generate .lmap files via API
- The LandscapeMapFileSettings class to load, modify, and apply Landscape Layer Map settings stored in a .lmap file via API
- The Editing Landscape Terrain article to learn about Brush Editor
Creating a Landscape Layer Map#
Create a new Landscape Layer Map via either of the following ways:
-
By creating a node:
-
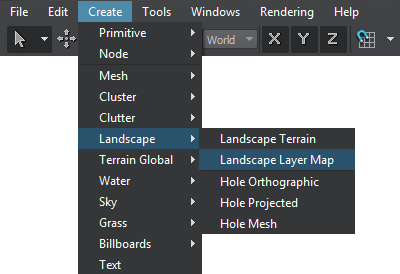
In the Create menu, select Landscape -> Landscape Layer Map and place the new Landscape Layer Map node in the scene.
-
By default, the map has the white, flat and read-only landscape_layer_map_base.lmap asset set in the Landscape parameter. Click
 to create a new landscape layer asset.
-
-
By creating an asset:
-
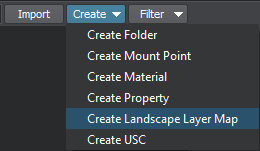
In the Asset Browser click Create -> Create Landscape Layer Map and specify a name for the new lmap asset.
- Then drag the asset to the Editor viewport and place a new Landscape Layer Map in the scene.
-
Specifying Graphic Data#
-
Generating from files:
- Set the Data Filling option to From Tileset.
-
Depending on the desired way to access to the resources, choose the value of the Data Sources parameter:
- Assets. Use available imported textures, which is a pretty good option for small and moderate terrains.
- External Files. Provide full paths to the resources (e.g. a network drive). A better option for large terrains with extremely dense graphic data.
- Specify the resources: albedo and height textures (or texture tilesets) and up to 20 mask textures. In the case of using tilesets, specify only first tiles and appropriate naming patterns.
- Adjust other import settings. For instance, you can redefine the Resolution of the Landscape Layer Map textures.
- Click Reimport to load the provided resources.
- Modify the layer using Brush Editor.
-
Sculpting from scratch:
- Set the Data Filling option to Manual.
- Choose the Resolution of the LandscapeLayerMap textures and click Reimport to apply changes.
- Click Brush Edit and open Brush Editor to draw over the layer map surface and thus sculpt the layer from scratch.
Watch a quick video guide below on creating and editing a Landscape Terrain and Layer Maps:
Size and Density of Graphic Data#
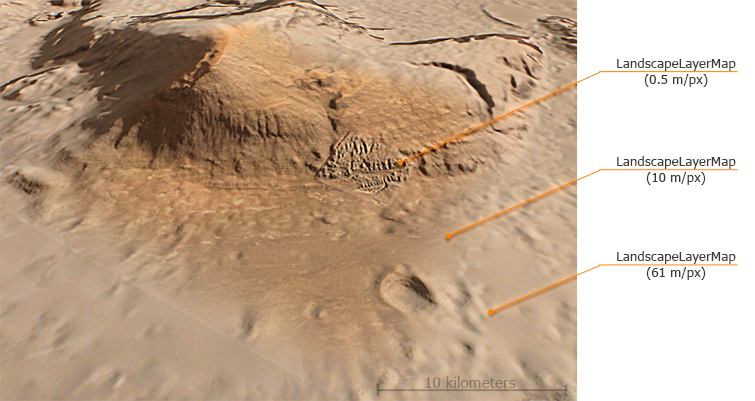
The spatial size of Landscape Layer Maps is limited only by precision of coordinates. However, the resolution of graphic data used has the direct influence on the size of an *.lmap asset on the hard drive.
The density of a Landscape Layer Map data is calculated as its Spatial Size divided by the Resolution of graphic data and expressed in meters/pixel (mpx). Knowing the target size and density of your Landscape Terrain layer, you can estimate the resolution of input textures required for achieving the desired quality as follows:
For example, if you need to create a square terrain 100 × 100 km and with 3 mpx density, you will need to prepare 32768 × 32768 px textures. You can slice huge textures to tilesets with proper naming, to operate on regular size textures (e.g., 8×8 textures each of 4096×4096 pixels).
Regardless of the bit depth of input textures, uncompressed graphic data of any Landscape Layer Map is saved using the following formats:
- Two R32F textures are used to store the Height and Height Opacity data (32 bits per pixel for each one).
- A single RGBA8 texture keeps the Albedo data including opacity (four 8-bit-per-pixel channels).
- Five RGBA8 textures are used to store 20 Masks and the same number of textures is used for Masks Opacity data (four 8-bit-per-pixel channels for each one).
Thus, if all components are used each pixel of graphic data takes more than 50 bytes on the hard drive, without service data taken into account. Putting it all together, this is how the size of an *.lmap asset depends on the resolution of the data used and components enabled approximately:
| Resolution, px* | Approximate size | Height | Albedo | Each 4 Masks | ||
|---|---|---|---|---|---|---|
| Color | Opacity | Color | Opacity | |||
| 1024×1024 | 74 Mb | 5.7 Mb | 5.7 Mb | 5.7 Mb | 5.7 Mb | 5.7 Mb |
| 2048×2048 | 295 Mb | 22.7 Mb | 22.7 Mb | 22.7 Mb | 22.7 Mb | 22.7 Mb |
| 4096×4096 | 1.1 Gb | 91 Mb | 91 Mb | 91 Mb | 91 Mb | 91 Mb |
| 8192×8192 | 4.6 Gb | 364 Mb | 364 Mb | 364 Mb | 364 Mb | 364 Mb |
| 16384×16384 | 18.3 Gb | 1.41 Gb | 1.41 Gb | 1.41 Gb | 1.41 Gb | 1.41 Gb |
| 32768×32768 | 74 Gb | 5.7 Gb | 5.7 Gb | 5.7 Gb | 5.7 Gb | 5.7 Gb |
| 65536×65536 | 295 Gb | 22.7 Gb | 22.7 Gb | 22.7 Gb | 22.7 Gb | 22.7 Gb |
When enabling/disabling any component in the Import Settings and reimporting data, the size of the file increases or decreases correspondingly. 20 Masks are grouped into 5 textures each of four channels (Masks 0-3, .., Masks 16-19), therefore, enabling at least one mask in a group of four will be treated as if all four masks in the group were enabled in terms of the asset size.
Although, the format of Landscape Layer Map assets implies asynchronous streaming of data of only necessary tiles, the perfomance might be an issue on workstations utilizing hard drives with poor throughput capacity. In this case, consider splitting a huge Landscape Layer Map into several smaller ones and engaging compression. Make note that using performant SSDs is preferable.
Compression#
Compression options serve for reduction of the size of the *.lmap file, which may also speed up asynchronous streaming of tiles. In some cases, compression ratio may exceed 100:1.
Supported compression methods:
- Our Method — recommended. UNIGINE compression method optimized for compressing 2D and 3D textures. It provides better results than LZ4 and Zlib without quality reduction.
- Zlib — for high compression ratio (can provide up to 2 times higher compression ratio, but takes up to 20 times longer).
- LZ4 — temporary option, planned to be removed in the upcoming releases.
Lossless and Lossy compression options are available. When it is needed to apply any changes, the graphic data needs to be decompressed first. Therefore, depending on applicability, these options have different advantages:
- Lossless compression ensures absence of quality deterioration and decompresses graphic data to its original state.
- Lossy compression provides a higher compression ratio but some information may be lost.
It is recommended to develop projects against Lossless compression algorithms (or with compression disabled) and apply a Lossy compression option when making the final build.
Landscape Layer Map Parameters#
Landscape Asset Parameters#
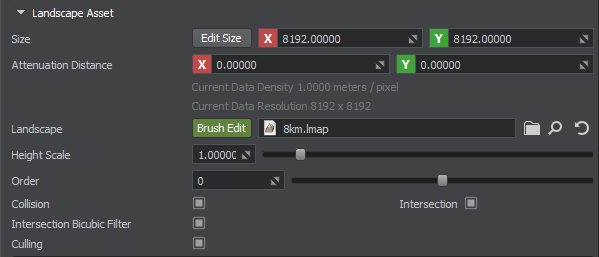
| Size | Width and Length, in units (meters). Click Edit Size to toggle the size editing mode. |
|---|---|
| Attenuation Distance | Distance of the transparency attenuation, starting from the edge of the map. |
| Current Data Density |
Landscape Layer Map density calculated as the ratio of the Size to the Resolution, in meters/pixel. Notice
The ratio is calculated for both dimensions separately: the spatial Width is divided by the texture Width, the same is done for the Length and the texture Height, and the maximum ratio value is considered the Current Data Density in meters/pixel. |
| Landscape |
.lmap asset to store the landscape data. By default, it is the blank read-only landscape_layer_map_base.lmap asset, to edit the layer map you can create a new asset by using the Notice
Several Landscape Layer Maps can refer to the same .lmap asset without extra memory required. |
| Height Scale | Scale multiplier along the Z axis. |
| Order | The layer rendering order used in layers blending (higher numbers on top). |
| Collision | Collision with the map. |
| Intersection | Intersection with the map. |
| Intersection Bicubic Filter | Enables bicubic filtering for intersection detection. |
| Culling | Streaming is based on using previously loaded geometry to define what is going to be streamed next. This option enables uploading preliminary low-level data of all maps to CPU to be used for initializing the streaming. If disabled, only low-level data of the base map is uploaded on CPU. |
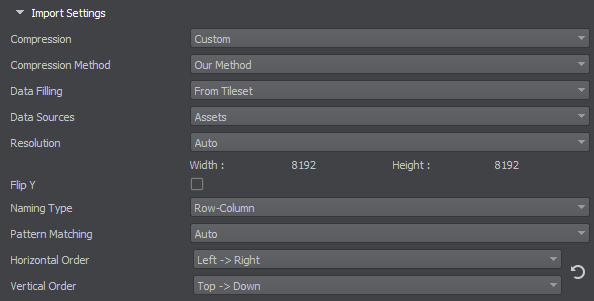
Import Settings#
Import Settings are the settings of the .lmap asset associated with the Landscape Layer Map node.
There is a set of buttons to work with import settings:

| Restore Defaults | Reset all settings to the default values. |
|---|---|
| Apply | Save and apply changes to the import parameters without reloading graphic resources. Click Apply after selecting a compression method option. |
| Reimport | Reload all graphic resources with respect to the specified import parameters. Click Reimport after making any changes to the import settings to apply them. |
| Cancel | Discard changes made to the import parameters. |
Import settings:
| Compression |
Compression options:
|
|---|---|
| Compression Method |
Compression method options:
|
| Data Filling |
Origin of terrain data:
|
| Data Sources |
Where data is taken from:
Notice
The engine doesn't track the changes made to external files. If there are some changes, you can update graphic data via the Reimport button. |
| Resolution |
Resolution of maps limited only by available video memory. The following values are available:
|
| Flip Y | Flip tiles along the Y axis. |
| Naming Type |
The source tileset layout type. The following values are available:
|
| Pattern Matching |
|
| Pattern | A string naming pattern (e.g. _x%X_y%Y for the Row Column naming type or _%X for the Indexed type). |
| Number of Columns | The number of columns in the tileset. |
| Horizontal Order |
Horizontal loading direction of the source tileset.
|
| Vertical Order |
Vertical loading direction of the source tileset.
|
Heightmap#
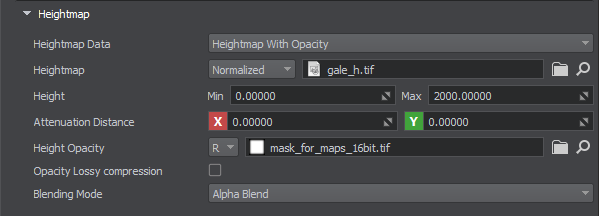
| Heightmap data |
|
|---|---|
| Heightmap |
A single-channel texture to be treated as the Heightmap. To use a tileset, specify the first tile here. Height values can be interpreted the following ways:
It is recommended to use 16bit or 32bit sources for height as lower bit depth may not provide sufficient quality:
|
| Height | Min/Max — the values used to transform the value [0,1] stored in the heightmap to meters. |
| Attenuation Distance | Distance of the transparency attenuation, starting from the edge of the map. |
| Height opacity | Sets the height opacity map and channel where data is stored. |
| Opacity Lossy Compression | Enables lossy compression. |
| Blending mode |
|
Albedo#

| Lossy Compression | Enables lossy compression. |
|---|---|
| Albedo Data |
|
| Albedo Color | Albedo color image. |
| Attenuation Distance | Distance of the transparency attenuation, starting from the edge of the map. |
| Albedo opacity | Sets the albedo opacity map and channel where data is stored. |
| Albedo Blending |
|
Masks#
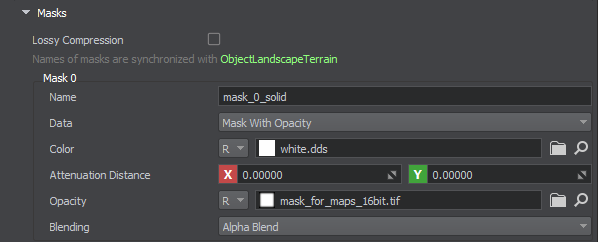
| Lossy Compression | Enables lossy compression. |
|---|---|
| Name |
The mask name, which is synchronized with the current active ObjectLandscapeTerrain. On change, no reimport required. Notice
Names of masks are stored by Landscape Terrain objects, i.e. names shown in the parameters of a Landscape Layer Map will change in correspondence with the current enabled Landscape Terrain. |
| Data |
|
| Color |
The image and its channel to be applied as mask to the LandscapeLayerMap. Notice
Instead of specifying a single-color image for the mask, you can set the Default Value for it and avoid excessive data loading. |
| Attenuation Distance | Distance of the transparency attenuation, starting from the edge of the map. |
| Opacity | Sets the opacity map and channel where data is stored. |
| Blending |
Mode of blending this detail layer with other data layers:
|
The information on this page is valid for UNIGINE 2.20 SDK.