Color Correction
This section describes settings for color correction of the scene.
Local Tonemapper#
Local tone mapping uses a spatially varying mapping function determined by the neighborhood of a pixel, which allows an increase in the local contrast and the visibility of some details of an image. The local tonemapper enables the generation of a mask based on the entire image, providing more pleasing results because human vision is more sensitive to local contrast.
| Local Tonemapper | The value indicating if the local tonemapper is enabled. disabled by default.
Console access: render_local_tonemapper (API control) |
|---|---|
| Debug | The value indicating whether the debug mode for the local tonemapper is enabled. disabled by default.
Console access: render_local_tonemapper_debug (API control) |
| Blur Resolution | The resolution of the blur applied during the tone mapping process.
Notice
One of the following values:It is recommended to use the Half resolution in conjunction with the Blur Upscale mode enabled.
Console access: render_local_tonemapper_blur_resolution (API control) |
| Blur Upscale | The value indicating whether upscaling the blurred image from the Quarter or Half resolution to the Full one is enabled. disabled by default.
Console access: render_local_tonemapper_blur_upscale (API control) |
| Blur Upscale Kernel Size | The size of the kernel used for upscaling the blurred image. The higher the value the better the upscaling quality, but the lower the performance. It is recommended to set the kernel size as follows:
Console access: render_local_tonemapper_blur_upscale_kernel_size (API control) |
| Blur Iterations | The number of blur iterations applied to the screen texture, which is used to define bright and dark portions of the screen. A higher number of iterations increases the blur radius and reduces halo artifacts around objects, but may affect performance. Range of values: [0, 10]. The default value is : 5. Console access: render_local_tonemapper_num_blur_iterations (API control) |
| Tonemapping Intensity | The intensity of the local tonemapping effect. Range of values: [0.0f, 1.0f]. The default value is : 0.5f. Console access: render_local_tonemapper_tonemapping_intensity (API control) |
| Effect On Dark Areas | The extent of applying the local tonemapping effect on dark areas. Range of values: [0.0f, 1.0f]. The default value is : 0.1f. Console access: render_local_tonemapper_effect_on_dark_areas (API control) |
| Effect On Dark Areas Gamma | The gamma correction value for dark areas. Specifying values greater than 1 decreases the local tone mapping effect in extremely dark areas. Range of values: [0.0f, inf]. The default value is : 5.0f. Console access: render_local_tonemapper_effect_on_dark_areas_gamma (API control) |
| Target Middle Gray | The target middle gray value for tonemapping. Range of values: [0.0f, 1.0f]. The default value is : 0.4f. Console access: render_local_tonemapper_target_middle_gray (API control) |
| Luma Blurred Intensity | The intensity of blurring the luma values. It is recommended to keep the default value for this setting. With the value set to 0, a regular screen texture is used instead of a blurred screen texture. This might be required in a rare case of reducing the halo effect and increasing the tonemapping effect for small details. Range of values: [0.0f, 1.0f]. The default value is : 1.0f. Console access: render_local_tonemapper_luma_blurred_intensity (API control) |
| Use Depth Difference | The value indicating whether considering of the depth difference between objects in the scene is enabled. Enabling this feature allows reducing halo artifacts around objects. However, we recommend using it only in exceptional cases, as it is a performance-costly operation. disabled by default.
Console access: render_local_tonemapper_depth_difference_enabled (API control) |
| Depth Threshold | The depth threshold value used to detect the areas affected by local tonemapping. A properly set value may help to reduce halo artifacts. Range of values: [0.0f, 1.0f]. The default value is : 0.9f. Console access: render_local_tonemapper_depth_threshold (API control) |
| Use Color Difference | The value indicating whether considering of the image color rendered on the screen is enabled. Enabling this feature allows reducing halo artifacts on surfaces with sharp color transitions. For example, it can significantly improve the appearance of a distinct shadow from the sun on asphalt. disabled by default.
Console access: render_local_tonemapper_color_difference_enabled (API control) |
| Color Difference Threshold | The threshold value that determines the extent to which color differences on the screen are considered. If you set the value to 1, the result will appear as if the Color Difference feature is turned off. Range of values: [0.0f, 1.0f]. The default value is : 0.1f. Console access: render_local_tonemapper_color_difference_threshold (API control) |
Tonemapper#
The tone mapping provides better image quality by remapping high dynamic range (HDR) colors into a range suitable for mediums with low dynamic range (LDR), like LCD or CRT screens. Its most common purpose is to make an image with a low dynamic range appear to have a higher range of colors providing a more dynamic and realistic effect. It lightens the darkest image regions and makes the lightest regions darker.
When using an HDR camera, always apply tonemapping, otherwise color intensity values exceeding 1 will be clamped at 1, altering the luminance balance of the scene.
| Tonemapper | The value indicating if tone mapping is enabled. enabled by default.
Console access: render_tonemapper (API control) |
|---|---|
| Tonemapper Mode | The mode of tone mapping. One of the following values:
Console access: render_tonemapper_mode (API control) |
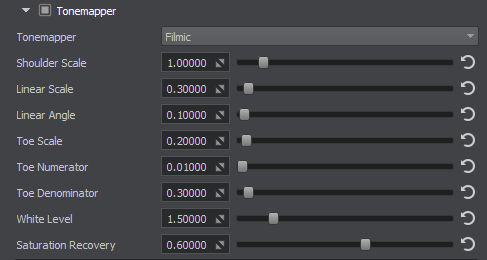
Filmic#
Parameters described below represent John Hable's artist-friendly tonemapping curve, which is constructed by using the following formula:
- A — Shoulder Scale
- B — Linear Scale
- C — Linear Angle
- D — Toe Scale
- E — Toe Numerator
- F — Toe Denominator
For more details about tone mapping curve construction see the article on Filmic Tonemapping with Piecewise Power Curves.
| Shoulder Scale | The Shoulder Strength tonemapping parameter value that is used to change bright values. Range of values: [0.0f, 1.0f]. The default value is : 0.2f. Console access: render_filmic_shoulder_scale (API control)
|
||
|---|---|---|---|
| Linear Scale | The Linear Strength tone mapping parameter value that is used to change gray values. The Linear Scale controls the length of the tone mapping curve linear part. Range of values: [0.0f, 1.0f]. The default value is : 0.3f. Console access: render_filmic_linear_scale (API control)
|
||
| Linear Angle | The Linear Angle tone mapping parameter value. This parameter controls the slope of the linear part of the tone mapping curve. Range of values: [0.0f, 1.0f]. The default value is : 1.0f. Console access: render_filmic_linear_angle (API control)
|
||
| Toe Scale | The Toe Scale tonemapping parameter value that is used to change dark values. The Toe Scale controls the slope of the tone mapping curve toe (the area of underexposure). Range of values: [0.0f, 1.0f]. The default value is : 0.2f. Console access: render_filmic_toe_scale (API control)
|
||
| Toe Numerator | The Toe Numerator tonemapping parameter value. Range of values: [0.0f, 1.0f]. The default value is : 0.01f. Console access: render_filmic_toe_numerator (API control)
|
||
| Toe Denominator | The Toe Denominator tonemapping parameter value. Range of values: [0.0f, 1.0f]. The default value is : 0.3f. Console access: render_filmic_toe_denominator (API control)
|
||
| White Level | The Linear White Point tonemapping parameter value, which is mapped as pure white in the resulting image. Range of values: [0.0f, inf]. The default value is : 1.0f. Console access: render_filmic_white_level (API control)
|
||
| Saturation Recovery | The color saturation recovery value for the filmic tonemapper. Filmic tonemapper desaturates image colors in bright areas making them look grayish. This parameter enables you to recover initial color saturation in such areas. Higher values make colors more saturated:
Notice
When the 1.0f value is set specular highlights appear too saturated, so the recommended value is 0.75f (default) Range of values: [0.0f, 1.0f]. The default value is : 0.75f. Console access: render_filmic_saturation_recovery (API control)
|


ACES#
| White Clip | The white clip parameter for the ACES operator. Controls the cut-off point for white. Range of values: [0.0f, 10.0f]. The default value is : 2.51f. Console access: render_aces_white_clip (API control) |
|---|---|
| Toe | The toe parameter for the ACES operator. Controls the dark color. Higher values result in darker colors. Range of values: [0.0f, 10.0f]. The default value is : 0.03f. Console access: render_aces_toe (API control) |
| Shoulder Angle | The shoulder angle parameter for the ACES operator. Controls how much overshoot should be added to the curve's shoulder. Range of values: [0.0f, 10.0f]. The default value is : 2.43f. Console access: render_aces_shoulder_angle (API control) |
| Shoulder Strength | The shoulder strength parameter for the ACES operator. Controls the strength of the transition between the curve's midsection and the curve's shoulder. Range of values: [0.0f, 10.0f]. The default value is : 0.59f. Console access: render_aces_shoulder_strength (API control) |
| Shoulder Length | The shoulder length parameter for the ACES operator. Controls the amount of f-stops to add to the dynamic range of the curve. Defines how much of the highlights the curve takes into account. Range of values: [0.0f, 1.0f]. The default value is : 0.59f. Console access: render_aces_shoulder_length (API control) |
Mix ACES With Reinhard#
| Mix With Reinhard | The ACES with Reinhard tonemapping operator contribution. If the value is closer to 0, then ACES prevails. Otherwise, when the value is closer to 1, the Reinhard has a grater impact. Range of values: [0.0f, 1.0f]. The default value is : 0.5f. Console access: render_aces_with_reinhard_mix (API control) |
|---|
Reinhard#
| Contribution | The Reinhard tonemapping operator contribution. The value is calculated according to the following formula: C / (1 + C) It controls the overall contribution that the Reinhard operator makes to the final color grading of the image. The higher values result in more tonemapping contribution to the final image. Range of values: [0.0f, 1.0f]. The default value is : 1.0f. Console access: render_reinhard_contribution (API control) |
|---|
Reinhard Luma-Based#
| Contribution | The Reinhard Luma-Based tonemapping operator contribution. Controls the overall contribution that the Reinhard operator makes to the final color grading of the image. Higher values result in more tonemapping contribution to the final image. Range of values: [0.0f, 1.0f]. The default value is : 1.0f. Console access: render_reinhard_luma_based_contribution (API control) |
|---|
Sharpness#

| Sharpness | The value indicating if the sharpening post-processing effect is enabled. disabled by default.
Console access: render_sharpen (API control) |
|---|---|
| Sharpen Intensity | The intensity of the sharpening effect. To use this option, sharpening post-processing effect should be enabled (see the Sharpen). Range of values: [0.0f, inf]. The default value is : 0.5f. Console access: render_sharpen_intensity (API control) |
| Blur Sigma | The smoothing applied to the Gaussian blur used in the sharpening post-processing effect. Lower values result in a smoother, less noticeable blur. Such values are effective when the blur radius is greater than 1 pixel. If the blur radius is set to 1 pixel, a value of 1 is typically sufficient. Range of values: [0.001f, inf]. The default value is : 1.0f. Console access: render_sharpen_blur_sigma (API control) |
| Blur Color Threshold | The brightness difference threshold between neighboring pixels to determine whether they should be blurred together when the sharpening post-processing effect is applied. If the brightness difference is below this threshold, the pixels will be blurred as a group. Lower values help avoid visual artifacts such as blooming around objects, harsh shadows, or thin details like wires against the sky. Range of values: [0.001f, inf]. The default value is : 0.2f. Console access: render_sharpen_blur_color_threshold (API control) |
| Blur Dark Color Threshold Bias | The bias value applied to the sharpening blur in dark regions of the image. This value is used in the sharpening post-processing effect to reduce excessive noise that may occur when sharpening low-light areas during post-processing. Range of values: [0.0f, 1.0f]. The default value is : 0.05f. Console access: render_sharpen_blur_dark_color_threshold_bias (API control) |
| Blur Radius | The radius of the blur applied in the sharpening post-processing effect. A radius greater than 1-2 pixels may cause an undesirable blooming effect and negatively affect performance. Range of values: [1, INT_MAX]. The default value is : 1. Console access: render_sharpen_blur_radius (API control) |
| Diagonal Samples | The value indicating diagonal neighboring pixels are included in the blur calculation, which is a part of the sharpening post-processing effect. When enabled, all eight surrounding pixels affect the blur, resulting in a more rounded and consistent blur shape, but may affect performance. Disabling it limits the effect to only horizontal and vertical neighbors (left, right, top, bottom). enabled by default.
Console access: render_sharpen_diagonal_samples (API control) |
Color Grading#
| Brightness |
Correction of the overall scene brightness:
|
|---|---|
| Contrast |
Correction of the overall scene contrast:
|
| Gamma | Correction of the overall scene gamma. |
| Fade Color | The fade color for the scene on the screen. By gradually changing this value it is possible to create "fade in" and "fade out" effects depending on the w component of the given vector. For example, when the following vectors are passed the result will be:
vec4_zero - default value (white) Console access: render_fade_color (API control) |
| White Level | White level of the scene. |
| 3D LUT Texture | The loading, viewing, or clearing of the Lookup Table texture for color transformation. |
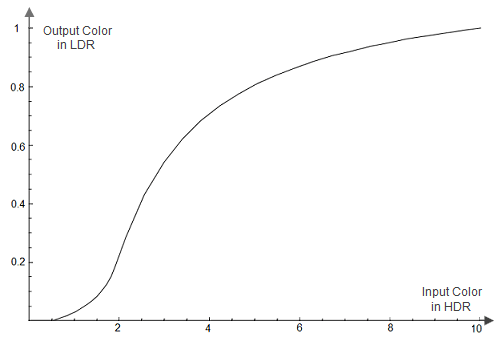
Color Correction by Curves#
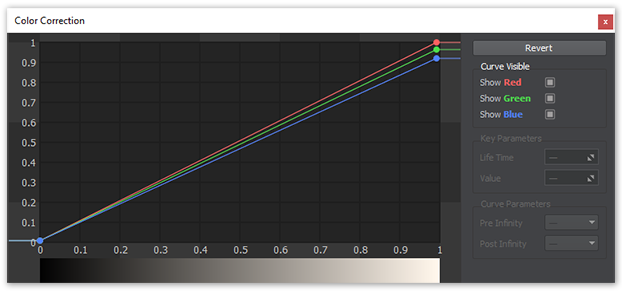
| Color Correction |
Tonal range and tone response of the final image. The horizontal input color values are mapped to the vertical output values based on curves for Red, Green and Blue channels. By adjusting all three channels at once, you control the luminance of the final image.
Color correction curves
|
|---|---|
| Preserve Saturation | Preserve initial scene color saturation after applying color correction. |
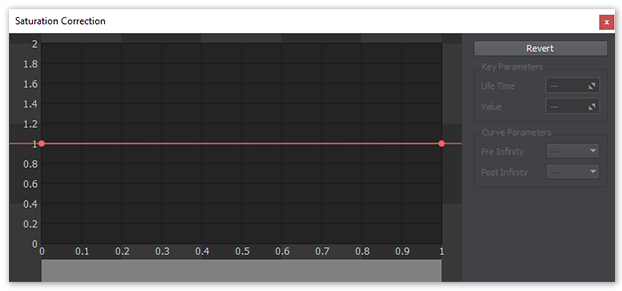
| Saturation Correction |
Correction curve of the overall scene saturation. The input luminance values are mapped to the vertical saturation values:
Saturation curve
Control the saturation of shadows by adjusting the values on the left, highlights - on the right.
|
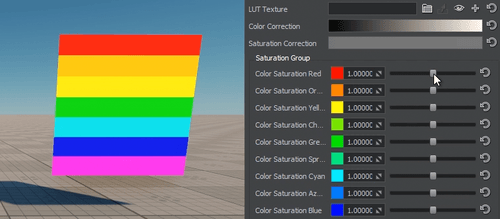
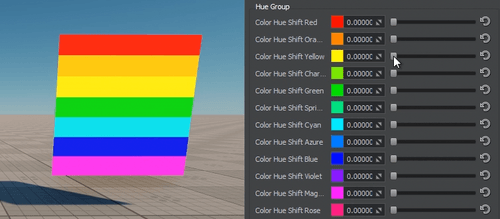
Saturation and Hue#
Color Correction LUT#
Color Correction LUT (Lookup Texture) is an optimized way of performing color grading in a post effect. Instead of tweaking individual color grading parameters, only a single texture is used to produce the corrected image. The lookup is performed by using the original image color as a vector to address the lookup texture.
One of the most common applications of lookup tables is to use them to see how images look in different media, such as TV/video or film, which have different color capabilities. Using a lookup table designed to mimic a certain display medium gives a much better idea what your current work will look like after it’s transferred to that medium.
Advantages of using a Color correction LUT include:
- Better performance — realtime computation is replaced by a simple array indexing operation.
- More professional workflow opportunities, where all color transforms can be defined using professional image editing software (such as Photoshop or GIMP), which provides a more precise result.

Lookup Texture Requirements#
The 2D texture representation must be laid out in a way that it represents an unwrapped volume texture (as an image sequence of "depth slices").

Workflow Example#
- Generate a default lookup texture by clicking the
 button (Save texture) right to the LUT texture field and saving it as a TGA file (by selecting it in the Typefield).
 - Take a screenshot of your scene.
- Import your screenshot into a graphics editor (e.g., Photoshop or GIMP) and perform all necessary image correction operations (brightness, contrast, etc.) to achieve a desired look.
- Import your generated default lookup texture into the graphics editor and perform the same operations as for the scene screenshot. Save the modified lookup texture as a new LUT.
- In Render Settings -> Color -> LUT texture, select you new texture.
Now your scene in UnigineEditor looks exactly as in the graphics editor!
The information on this page is valid for UNIGINE 2.20 SDK.