为延迟渲染过程创建自定义着色器
In UNIGINE all the opaque geometry is rendered in the deferred rendering pass. This article explains how to create your own material with shaders (both vertex and fragment) for the deferred rendering pass.在UNIGINE中,所有不透明的几何图形均在延迟的渲染过程中进行渲染。本文介绍了如何使用着色器(顶点和片段)为延迟的渲染过程创建自己的材质。
In this article, we create a material for static, dynamic and skinned meshes. We define a heightmap for the vertex shader and an albedo texture for the fragment shader. Also, we calculate normals to ensure proper lighting for our mesh.在本文中,我们为静态,动态和蒙皮网格物体创建材质。我们为顶点着色器定义一个高度图,为片段着色器定义一个反照率纹理。另外,我们计算法线以确保网格物体有适当的照明。
- Getting StartedGetting Started
- Materials Files FormatsMaterials Files Formats
- Unigine Language Object Notation (ULON)Unigine Language Object Notation (ULON)
- UUSL Data Types and Common Intrinsic FunctionsUUSL Data Types and Common Intrinsic Functions
- UUSL TexturesUUSL Textures
- UUSL SemanticsUUSL Semantics
- UUSL ParametersUUSL Parameters
See Also也可以看看#
- The article on Material Settings关于 材料设置 的文章
- The article on Custom Materials关于 自定义材料 的文章
Create a Material创建材料#
The material is the essential thing for rendering: you specify shaders, states, bindings, textures in the material, thus, telling the engine how to render it.材质是渲染所必需的:您在材质中指定着色器,状态,绑定,纹理,从而告诉引擎如何渲染。
Let's create our own ULON-based base material (for deferred pass only) and write the vertex and the fragment shaders for it. Perform the following steps to create the material:让我们创建自己的基于ULON的基础材料(仅适用于延迟传递),并为其编写顶点和片段着色器。执行以下步骤来创建材料:
- In your project folder open the data/materials folder.在项目文件夹中,打开data/materials文件夹。
- Create a new custom_mesh_material.basemat file and implement the following base material:
Source Code (ULON)
// describing the read-only custom mesh material to be used for static meshes, // setting prefixes to be used in shaders to refer to textures and parameters BaseMaterial custom_mesh_material <node=ObjectMeshStatic editable=false var_prefix=var texture_prefix=tex> { // enabling the deferred pass for our material and hiding it (will be invisible in the UnigineEditor) State deferred=1 <internal=true> ////////////////////////////////////////////////////////////////////////// // Passes ////////////////////////////////////////////////////////////////////////// // describing the deferred pass with links to shaders to be used Pass deferred <defines="BASE_DEFERRED"> { Vertex = "shaders/vertex/deferred.vert" Fragment = "shaders/fragment/deferred.frag" } // describing bindings for node types to which the material is to be applicable Bind ObjectMeshStatic=ObjectMeshDynamic Bind ObjectMeshStatic=ObjectMeshSkinned }- We defined a new custom_mesh_material base material with the deferred state (internal).We defined a new custom_mesh_material base material with the deferred state (internal).
- Also we defined shaders (fragment and vertex) for the deferred pass and set the paths to them (we will create both these shader files and a folder in the following sections).Also we defined shaders (fragment and vertex) for the deferred pass and set the paths to them (we will create both these shader files and a folder in the following sections).
- Finally, we defined the bindings: types of meshes for which the material can be assigned.Finally, we defined the bindings: types of meshes for which the material can be assigned.
Source Code (ULON)// describing the read-only custom mesh material to be used for static meshes, // setting prefixes to be used in shaders to refer to textures and parameters BaseMaterial custom_mesh_material <node=ObjectMeshStatic editable=false var_prefix=var texture_prefix=tex default=true> { // enabling the deferred pass for our material and hiding it (will be invisible in the UnigineEditor) State deferred=1 <internal=true> ////////////////////////////////////////////////////////////////////////// // Passes ////////////////////////////////////////////////////////////////////////// // describing the deferred pass with links to shaders to be used Pass deferred <defines="BASE_DEFERRED"> { Vertex = "shaders/vertex/deferred.vert" Fragment = "shaders/fragment/deferred.frag" } // describing bindings for node types to which the material is to be applicable Bind ObjectMeshStatic=ObjectMeshDynamic Bind ObjectMeshStatic=ObjectMeshSkinned }- We defined a new custom_mesh_material base material with the deferred state (internal).我们定义了一个具有延迟状态(内部)的新custom_mesh_material基础材料。
- Also we defined shaders (fragment and vertex) for the deferred pass and set the paths to them (we will create both these shader files and a folder in the following sections).我们还为延迟的传递定义了着色器(片段和顶点),并设置了它们的路径(我们将在以下各节中创建这些着色器文件和一个文件夹)。
- Finally, we defined the bindings: types of meshes for which the material can be assigned.最后,我们定义了绑定:可以为其分配材料的网格的类型。
- Save the changes.保存更改。
Create a Vertex Shader创建一个顶点着色器#
In this section, we shall explain how to create the structure for shaders and how to create the custom vertex shader.在本节中,我们将说明如何创建着色器的结构以及如何创建自定义顶点着色器。
We're gonna need to create two shaders for our material: vertex and fragment. To create a vertex shader, perform the following:我们将需要为材质创建两个着色器:顶点和片段。要创建顶点着色器,请执行以下操作:
- Create the shaders folder in your project's /data folder.在项目的/data文件夹中创建shaders文件夹。
- Inside the shaders folder, create two folders: vertex for vertex shaders, fragment for fragment shaders.在shaders文件夹中,创建两个文件夹:vertex用于顶点着色器,fragment用于片段着色器。
- Open a plain text editor and write the following:
Source code (UUSL)
// Include Unified Unigine Shader Language (UUSL) header #include <core/shaders/common/common.h> // Input data struct STRUCT(VERTEX_IN) INIT_ATTRIBUTE(float4,0,POSITION) // Vertex position INIT_ATTRIBUTE(float4,1,TEXCOORD0) // Vertex texcoord (uv) INIT_ATTRIBUTE(float4,2,TEXCOORD1) // Vertex basis tangent INIT_ATTRIBUTE(float4,3,TEXCOORD2) // Vertex color INIT_INSTANCE END // Our output vertex data struct STRUCT(VERTEX_OUT) INIT_POSITION // Out projected position INIT_OUT(float4,0) // Texcoord (uv) END MAIN_BEGIN(VERTEX_OUT,VERTEX_IN) // Get transform with scale and rotation (without translation) float4x4 transform = getObjectTransform(IN_INSTANCE); float4 row_0 = transform[0]; float4 row_1 = transform[1]; float4 row_2 = transform[2]; // Get Modelview-space transform float4 in_vertex = float4(IN_ATTRIBUTE(0).xyz,1.0f); float4 position = mul4(row_0,row_1,row_2,in_vertex); // Set output UV float4 texcoord = IN_ATTRIBUTE(1); OUT_DATA(0) = texcoord; // Set output position OUT_POSITION = getPosition(position); MAIN_END // end警告You should add a new line (press Enter) after closing the instruction (after MAIN_END command).You should add a new line (press Enter) after closing the instruction (after MAIN_END command).The code is pretty simple and clear. In the code above weThe code is pretty simple and clear. In the code above we
- Include the UUSL header.Include the UUSL header.
- Define the input vertex data structure.Define the input vertex data structure.
- Define the output vertex data structure.Define the output vertex data structure.
- Start the main program of the shader:
- Translate the object-space coordinates to clipping space coordinates.Translate the object-space coordinates to clipping space coordinates.
- Set the output UV.Set the output UV.
- Set the vertex position.Set the vertex position.
- Translate the object-space coordinates to clipping space coordinates.Translate the object-space coordinates to clipping space coordinates.
- Set the output UV.Set the output UV.
- Set the vertex position.Set the vertex position.
- Translate the object-space coordinates to clipping space coordinates.Translate the object-space coordinates to clipping space coordinates.
- Set the output UV.Set the output UV.
- Set the vertex position.Set the vertex position.
Source code (UUSL)// Include Unified Unigine Shader Language (UUSL) header #include <core/shaders/common/common.h> // Input data struct STRUCT(VERTEX_IN) INIT_ATTRIBUTE(float4,0,POSITION) // Vertex position INIT_ATTRIBUTE(float4,1,TEXCOORD0) // Vertex texcoord (uv) INIT_ATTRIBUTE(float4,2,TEXCOORD1) // Vertex basis tangent INIT_ATTRIBUTE(float4,3,TEXCOORD2) // Vertex color INIT_INSTANCE END // Our output vertex data struct STRUCT(VERTEX_OUT) INIT_POSITION // Out projected position INIT_OUT(float4,0) // Texcoord (uv) END MAIN_BEGIN(VERTEX_OUT,VERTEX_IN) // Get transform with scale and rotation (without translation) float4x4 transform = getObjectTransform(IN_INSTANCE); float4 row_0 = transform[0]; float4 row_1 = transform[1]; float4 row_2 = transform[2]; // Get Modelview-space transform float4 in_vertex = float4(IN_ATTRIBUTE(0).xyz,1.0f); float4 position = mul4(row_0,row_1,row_2,in_vertex); // Set output UV float4 texcoord = IN_ATTRIBUTE(1); OUT_DATA(0) = texcoord; // Set output position OUT_POSITION = getPosition(position); MAIN_END // end警告You should add a new line (press Enter) after closing the instruction (after MAIN_END command).关闭指令后(在MAIN_END命令之后),您应该添加新行(按Enter)。The code is pretty simple and clear. In the code above we该代码非常简单明了。在上面的代码中,我们
- Include the UUSL header. 包括UUSL标头。
- Define the input vertex data structure.定义输入顶点数据结构。
- Define the output vertex data structure.定义输出顶点数据结构。
- Start the main program of the shader:
- Translate the object-space coordinates to clipping space coordinates.Translate the object-space coordinates to clipping space coordinates.
- Set the output UV.Set the output UV.
- Set the vertex position.Set the vertex position.
- Translate the object-space coordinates to clipping space coordinates.将对象空间坐标转换为裁剪空间坐标。
- Set the output UV.设置输出UV。
- Set the vertex position.设置顶点位置。
- Save the shader file with the deferred.vert name and extension inside the data/shaders/vertex folder.将具有deferred.vert名称和扩展名的着色器文件保存在data/shaders/vertex文件夹中。
Create a Fragment Shader创建片段着色器#
This section contains instructions on how to create a fragment shader (also known as pixel shader).本节包含有关如何创建片段着色器(也称为 pixel shader )的说明。
To create a fragment shader, perform the following:要创建片段着色器,请执行以下操作:
- Open a plain text editor and write the following:
Source code (UUSL)
// Include the UUSL language header #include <core/shaders/common/fragment.h> // Input data struct STRUCT(FRAGMENT_IN) INIT_POSITION // Projected position INIT_IN(float4,0) // Texcoord (uv) END MAIN_BEGIN_DEFERRED(FRAGMENT_IN) // Create the G-Buffer and set it GBuffer gbuffer = GBufferDefault(); setGBuffer(gbuffer); MAIN_END // end警告You should add a new line (press Enter) after closing the instruction (after MAIN_END command).You should add a new line (press Enter) after closing the instruction (after MAIN_END command).Explanations on fragment shader:Explanations on fragment shader:
- We include the UUSL header for fragment shaders.We include the UUSL header for fragment shaders.
- Define the input fragment data struct (where we receive the data from output structure of the vertex shader).Define the input fragment data struct (where we receive the data from output structure of the vertex shader).
- Start the main program of the shader, where we create a GBuffer instance for metalness workflow and set it. Start the main program of the shader, where we create a GBuffer instance for metalness workflow and set it.
Source code (UUSL)// Include the UUSL language header #include <core/shaders/common/fragment.h> // Input data struct STRUCT(FRAGMENT_IN) INIT_POSITION // Projected position INIT_IN(float4,0) // Texcoord (uv) END MAIN_BEGIN_DEFERRED(FRAGMENT_IN) // Create the G-Buffer and set it GBuffer gbuffer = GBufferDefault(); setGBuffer(gbuffer); MAIN_END // end警告You should add a new line (press Enter) after closing the instruction (after MAIN_END command).关闭指令后(在MAIN_END命令之后),您应该添加新行(按Enter)。Explanations on fragment shader:有关片段着色器的说明:
- We include the UUSL header for fragment shaders.我们包括用于片段着色器的UUSL标头。
- Define the input fragment data struct (where we receive the data from output structure of the vertex shader).定义输入片段数据结构(我们从顶点着色器的输出结构接收数据)。
- Start the main program of the shader, where we create a GBuffer instance for metalness workflow and set it. 启动着色器的主程序,在此我们为金属性工作流程创建一个GBuffer实例并进行设置。
- Save the shader file with the deferred.frag name and extension to the data/shaders/fragment folder.将具有deferred.frag名称和扩展名的着色器文件保存到data/shaders/fragment文件夹。
Working with Material处理材料#
After performing all these steps you can see the recently created shaders in use. They are primitive, and don't provide a nice final image. Anyway, to check their work perform the following steps:执行所有这些步骤后,您可以看到正在使用的最近创建的着色器。它们是原始的,不能提供良好的最终图像。无论如何,要检查他们的工作,请执行以下步骤:
- Open your world by using UnigineEditor, The Editor will create all necessary resources in the data folder.使用UnigineEditor打开您的世界,编辑器将在data文件夹中创建所有必需的资源。
- Open the Materials Hierarchy window. You will see the recently created base material in the hierarchy.打开Materials Hierarchy窗口。您将在层次结构中看到最近创建的基础材料。
- Assign the created material to the material ball by dragging it to the object. Or create a primitive (e.g., a sphere) and assign the material to the primitive.通过将创建的材质拖动到对象,将其分配给材质球。或创建一个基本体(例如球体)并将材料分配给该基本体。
After that you'll get the following result:之后,您将获得以下结果:
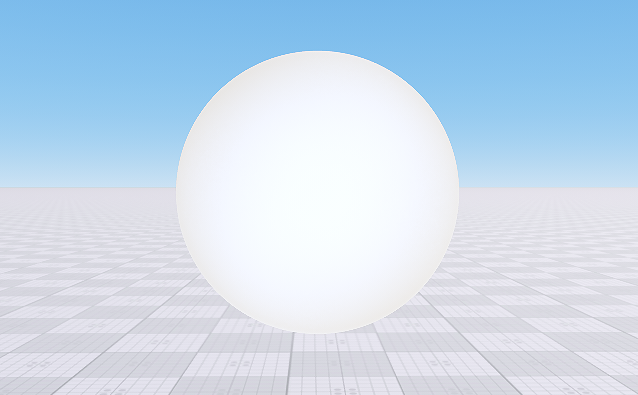
It doesn't look super good, but it works.看起来不太好,但是可以。
Let's go further and calculate the tangent basis for the mesh and assign textures to it.让我们进一步计算网格的切线基础并为其分配纹理。
Adding Textures to Shaders向材质球添加纹理#
Let's add textures to both shaders: vertex and fragment. In the vertex shader we will use a texture as a displacement map and in the fragment shader as an albedo map.让我们向两个着色器添加纹理:顶点和片段。在顶点着色器中,我们将使用纹理作为位移贴图,在片段中将使用反照率贴图。
Editing the Material编辑材料#
First, let's edit our custom base material and add two texture slots and a parameter to control displacement.首先,让我们编辑自定义基础材质,并添加两个纹理槽和一个参数以控制位移。
- Open the custom_mesh_material.basemat file from the data/materials folder by using plain text editor.使用纯文本编辑器从data/materials文件夹中打开custom_mesh_material.basemat文件。
- Modify it as follows:
Source Code (ULON)对其进行如下修改:
// describing the read-only custom mesh material to be used for static meshes, // setting prefixes to be used in shaders to refer to textures and parameters BaseMaterial custom_mesh_material <node=ObjectMeshStatic editable=false var_prefix=var texture_prefix=tex> { // enabling the deferred pass for our material and hiding it (will be invisible in the UnigineEditor) State deferred=1 <internal=true> // describing textures and parameters Group "Base" { Texture2D albedo="core/textures/common/grain.dds" <unit=0 pass=[deferred] tooltip="Albedo texture"> Texture2D displacement="core/textures/common/white.dds" <unit=1 pass=[deferred] tooltip="Displacement map"> Slider displacement_scale=0 <min=-0.5 max=0.5 tooltip="Displacement scale"> } ////////////////////////////////////////////////////////////////////////// // Passes ////////////////////////////////////////////////////////////////////////// // describing the deferred pass with links to shaders to be used Pass deferred <defines="BASE_DEFERRED"> { Vertex = "shaders/vertex/deferred.vert" Fragment = "shaders/fragment/deferred.frag" } // describing bindings for node types to which the material is to be applicable Bind ObjectMeshStatic=ObjectMeshDynamic Bind ObjectMeshStatic=ObjectMeshSkinned }Source Code (ULON)// describing the read-only custom mesh material to be used for static meshes, // setting prefixes to be used in shaders to refer to textures and parameters BaseMaterial custom_mesh_material <node=ObjectMeshStatic editable=false var_prefix=var texture_prefix=tex default=true> { // enabling the deferred pass for our material and hiding it (will be invisible in the UnigineEditor) State deferred=1 <internal=true> // describing textures and parameters Group "Base" { Texture2D albedo="core/textures/common/grain.dds" <unit=0 pass=[deferred] tooltip="Albedo texture"> Texture2D displacement="core/textures/common/white.dds" <unit=1 pass=[deferred] tooltip="Displacement map"> Slider displacement_scale=0 <min=-0.5 max=0.5 tooltip="Displacement scale"> } ////////////////////////////////////////////////////////////////////////// // Passes ////////////////////////////////////////////////////////////////////////// // describing the deferred pass with links to shaders to be used Pass deferred <defines="BASE_DEFERRED"> { Vertex = "shaders/vertex/deferred.vert" Fragment = "shaders/fragment/deferred.frag" } // describing bindings for node types to which the material is to be applicable Bind ObjectMeshStatic=ObjectMeshDynamic Bind ObjectMeshStatic=ObjectMeshSkinned }
Now the textures and the parameter will be available for the shaders. We specified the name of the texture, rendering pass, and the path to the default texture. Our parameter (displacement_scale) shall be controlled by a slider with the specified minimum, maximum, and default values.现在,纹理和参数将可用于着色器。我们指定了纹理的名称,渲染过程以及默认纹理的路径。我们的参数(displacement_scale)将由具有指定最小值,最大值和默认值的滑块控制。
Editing the Vertex Shader编辑顶点着色器#
Now we should edit the vertex shader code and add the texture to the shader.现在,我们应该编辑顶点着色器代码并将纹理添加到着色器。
The best way to add the texture in the shader (an example):在着色器中添加纹理的最佳方法(示例):
// Initialize the texture slot for a texture named TEX_COLOR
INIT_TEXTURE(0, TEX_COLOR)
It makes changing the number of textures slots easy without correction of the whole shader's code. Let's do it in the vertex shader:无需更改整个着色器的代码,即可轻松更改纹理插槽的数量。让我们在顶点着色器中进行操作:
- Open the vertex shader deferred.vert file in the data/shaders/vertex folder by using plain text editor.使用纯文本编辑器打开data/shaders/vertex文件夹中的顶点着色器deferred.vert文件。
- Edit the source code in the following way:
Source code (UUSL)
// Include Unified Unigine Shader Language (UUSL) header #include <core/shaders/common/common.h> // Input data struct STRUCT(VERTEX_IN) INIT_ATTRIBUTE(float4,0,POSITION) // Vertex position INIT_ATTRIBUTE(float4,1,TEXCOORD0) // Vertex texcoord (uv) INIT_ATTRIBUTE(float4,2,TEXCOORD1) // Vertex basis tangent INIT_ATTRIBUTE(float4,3,TEXCOORD2) // Vertex color INIT_INSTANCE END // Our output vertex data struct STRUCT(VERTEX_OUT) INIT_POSITION // Out projected position INIT_OUT(float4,0) // Texcoord (uv) INIT_OUT(float3,1) // Vertex TBN (X) INIT_OUT(float3,2) // Vertex TBN (Y) INIT_OUT(float3,3) // Vertex TBN (Z) END MAIN_BEGIN(VERTEX_OUT,VERTEX_IN) // Get transform with scale and rotation (without translation) float4x4 transform = getObjectTransform(IN_INSTANCE); float4 row_0 = transform[0]; float4 row_1 = transform[1]; float4 row_2 = transform[2]; // Perform Modelview-space transform float4 in_vertex = float4(IN_ATTRIBUTE(0).xyz,1.0f); float4 position = mul4(row_0,row_1,row_2,in_vertex); // Set output UV float4 texcoord = IN_ATTRIBUTE(1); OUT_DATA(0) = texcoord; // Define tangent basis float3 tangent,binormal,normal; // Get normal in object-space getTangentBasis(IN_ATTRIBUTE(2),tangent,binormal,normal); // Transform object-space TBN into camera-space TBN normal = normalize(mul3(row_0,row_1,row_2,normal)); tangent = normalize(mul3(row_0,row_1,row_2,tangent)); binormal = normalize(mul3(row_0,row_1,row_2,binormal)); // Set output TBN matrix OUT_DATA(1) = float3(tangent.x,binormal.x,normal.x); OUT_DATA(2) = float3(tangent.y,binormal.y,normal.y); OUT_DATA(3) = float3(tangent.z,binormal.z,normal.z); // Set the texture float4 displacement = TEXTURE_BIAS_ZERO(tex_displacement,texcoord.xy); // Perform the displacement mapping using the Displacement Scale parameter of the material (with the "var" prefix") position.rgb += normal * (displacement.r * var_displacement_scale); // Set output position OUT_POSITION = getPosition(position); MAIN_END // end警告You should add a new line (press Enter) after closing the instruction (after MAIN_END command).通过以下方式编辑源代码:You should add a new line (press Enter) after closing the instruction (after MAIN_END command).You should add a new line (press Enter) after closing the instruction (after MAIN_END command).Source code (UUSL)// Include Unified Unigine Shader Language (UUSL) header #include <core/shaders/common/common.h> // Create a texture sampler (slot 0 is used in the fragment shader for the color texture) INIT_TEXTURE(1,TEX_HEIGHT) // Input data struct STRUCT(VERTEX_IN) INIT_ATTRIBUTE(float4,0,POSITION) // Vertex position INIT_ATTRIBUTE(float4,1,TEXCOORD0) // Vertex texcoord (uv) INIT_ATTRIBUTE(float4,2,TEXCOORD1) // Vertex basis tangent INIT_ATTRIBUTE(float4,3,TEXCOORD2) // Vertex color INIT_INSTANCE END // Our output vertex data struct STRUCT(VERTEX_OUT) INIT_POSITION // Out projected position INIT_OUT(float4,0) // Texcoord (uv) INIT_OUT(float3,1) // Vertex TBN (X) INIT_OUT(float3,2) // Vertex TBN (Y) INIT_OUT(float3,3) // Vertex TBN (Z) END MAIN_BEGIN(VERTEX_OUT,VERTEX_IN) // Get transform with scale and rotation (without translation) float4x4 transform = getObjectTransform(IN_INSTANCE); float4 row_0 = transform[0]; float4 row_1 = transform[1]; float4 row_2 = transform[2]; // Perform Modelview-space transform float4 in_vertex = float4(IN_ATTRIBUTE(0).xyz,1.0f); float4 position = mul4(row_0,row_1,row_2,in_vertex); // Set output UV float4 texcoord = IN_ATTRIBUTE(1); OUT_DATA(0) = texcoord; // Define tangent basis float3 tangent,binormal,normal; // Get normal in object-space getTangentBasis(IN_ATTRIBUTE(2),tangent,binormal,normal); // Transform object-space TBN into camera-space TBN normal = normalize(mul3(row_0,row_1,row_2,normal)); tangent = normalize(mul3(row_0,row_1,row_2,tangent)); binormal = normalize(mul3(row_0,row_1,row_2,binormal)); // Set output TBN matrix OUT_DATA(1) = float3(tangent.x,binormal.x,normal.x); OUT_DATA(2) = float3(tangent.y,binormal.y,normal.y); OUT_DATA(3) = float3(tangent.z,binormal.z,normal.z); // Set the texture float4 displacement = TEXTURE_BIAS_ZERO(TEX_HEIGHT,texcoord.xy); // Perform the displacement mapping using the Displacement Scale parameter of the material (with the "var" prefix") position.rgb += normal * (displacement.r * var_displacement_scale); // Set output position OUT_POSITION = getPosition(position); MAIN_END // end警告You should add a new line (press Enter) after closing the instruction (after MAIN_END command).关闭指令后(在MAIN_END命令之后),您应该添加新行(按Enter)。 - Save the file. 保存文件。
That's it! Our vertex shader now calculates normals, gets a texture and performs displacement mapping taking into account the scale value. We've added three new output semantics and now we should receive them in our fragment shader.就是这样!现在,我们的顶点着色器可以计算法线,获取纹理并在考虑比例值的情况下执行位移映射。我们添加了三个新的输出语义,现在我们应该在片段着色器中接收它们。
Editing the Fragment Shader编辑片段着色器#
Now we should edit the fragment shader code and add the albedo texture to the shader.现在,我们应该编辑片段着色器代码,并将反照率纹理添加到着色器中。
- Open the fragment shader deferred.frag file in the data/shaders/fragment folder by using plain text editor.使用纯文本编辑器在data/shaders/fragment文件夹中打开片段着色器deferred.frag文件。
- Edit the source code in the following way:
源代码
// Include the UUSL language header #include <core/shaders/common/fragment.h> STRUCT(FRAGMENT_IN) INIT_POSITION // Projected position INIT_IN(float4,0) // Texcoord (uv) INIT_IN(float3,1) // Vertex TBN (X) INIT_IN(float3,2) // Vertex TBN (Y) INIT_IN(float3,3) // Vertex TBN (Z) END MAIN_BEGIN_DEFERRED(FRAGMENT_IN) // Get the UV coords float4 texcoord = IN_DATA(0); // Get the texture data float4 texture_data = TEXTURE(tex_albedo,texcoord.xy); // Define the normal of a fragment in tangent-space STATICVAR float3 tangentspace_normal = float3(0.0f,0.0f,1.0f); // Calculate the view-space normal float3 viewspace_normal; viewspace_normal.x = dot(IN_DATA(1),tangentspace_normal); viewspace_normal.y = dot(IN_DATA(2),tangentspace_normal); viewspace_normal.z = dot(IN_DATA(3),tangentspace_normal); viewspace_normal = normalize(viewspace_normal); // Fill G-Buffer: set the calculated normal and albedo color of the texture GBuffer gbuffer = GBufferDefault(); gbuffer.albedo = texture_data.rgb; gbuffer.normal = viewspace_normal; setGBuffer(gbuffer); MAIN_END // end警告You should add a new line (press Enter) after closing the instruction (after MAIN_END command).通过以下方式编辑源代码:You should add a new line (press Enter) after closing the instruction (after MAIN_END command).You should add a new line (press Enter) after closing the instruction (after MAIN_END command).源代码// Include the UUSL language header #include <core/shaders/common/fragment.h> // Adds a texture sampler (slot 0) INIT_TEXTURE(0, TEX_COLOR) STRUCT(FRAGMENT_IN) INIT_POSITION // Projected position INIT_IN(float4,0) // Texcoord (uv) INIT_IN(float3,1) // Vertex TBN (X) INIT_IN(float3,2) // Vertex TBN (Y) INIT_IN(float3,3) // Vertex TBN (Z) END MAIN_BEGIN_DEFERRED(FRAGMENT_IN) // Get the UV coords float4 texcoord = IN_DATA(0); // Get the texture data float4 texture_data = TEXTURE(TEX_COLOR,texcoord.xy); // Define the normal of a fragment in tangent-space STATICVAR float3 tangentspace_normal = float3(0.0f,0.0f,1.0f); // Calculate the view-space normal float3 viewspace_normal; viewspace_normal.x = dot(IN_DATA(1),tangentspace_normal); viewspace_normal.y = dot(IN_DATA(2),tangentspace_normal); viewspace_normal.z = dot(IN_DATA(3),tangentspace_normal); viewspace_normal = normalize(viewspace_normal); // Fill G-Buffer: set the calculated normal and albedo color of the texture GBuffer gbuffer = GBufferDefault(); gbuffer.albedo = texture_data.rgb; gbuffer.normal = viewspace_normal; setGBuffer(gbuffer); MAIN_END // end警告You should add a new line (press Enter) after closing the instruction (after MAIN_END command).关闭指令后(在MAIN_END命令之后),您应该添加新行(按Enter)。 - Save the file. 保存文件。
Now our shaders are ready to work! Let's see them in action!现在我们的着色器已准备就绪!让我们看看它们的作用!
Editing the Material编辑材料#
We've changed our materials and shaders, so we should reload them by using the relative console commands. 我们已经更改了材质和着色器,因此我们应该使用相对的控制台命令重新加载它们。
Open the console and execute the materials_reload command (or use the corresponding hotkey).打开控制台并执行 materials_reload 命令(或使用相应的 hotkey )。
Now the result is different — we see the white lit sphere:现在的结果有所不同—我们看到白色的球形:
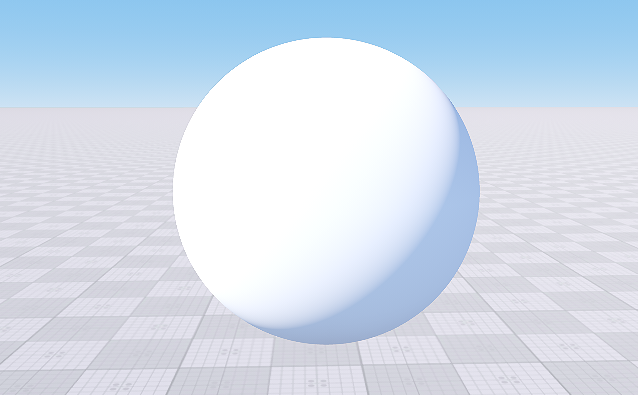
It looks much better! But let's go a bit further. Perform the following actions:看起来好多了!但是,让我们更进一步。执行以下操作:
- Inherit a material from your custom base material (a child material named custom_mesh_material_0 will be created).
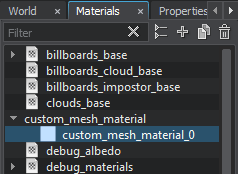 从您的自定义基础材料继承材料(将创建名为custom_mesh_material_0的子材料)。

- Assign the created child material custom_mesh_material_0 to the sphere by dragging it to the object.通过将创建的子材质custom_mesh_material_0拖动到对象,将其分配到球体。
- Go to the Parameters window.
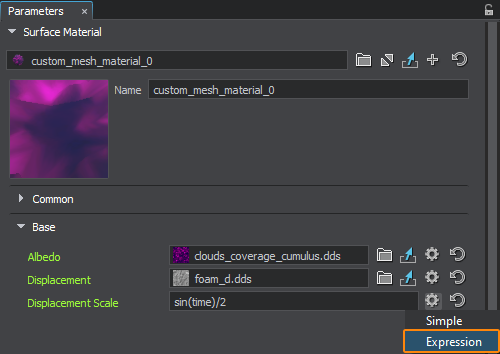 转到Parameters窗口。

- Choose the Albedo and the Displacement textures for the material and adjust the Displacement Scale parameter.注意You can also switch the parameter to the Expression mode and insert a script to animate the value, e.g.: sin(time)/2选择材质的Albedo和Displacement纹理,然后调整Displacement Scale参数。You can also switch the parameter to the Expression mode and insert a script to animate the value, e.g.: sin(time)/2You can also switch the parameter to the Expression mode and insert a script to animate the value, e.g.: sin(time)/2注意You can also switch the parameter to the Expression mode and insert a script to animate the value, e.g.: sin(time)/2您还可以将参数切换到 Expression 模式,并插入脚本以设置值的动画,例如: sin(time)/ 2
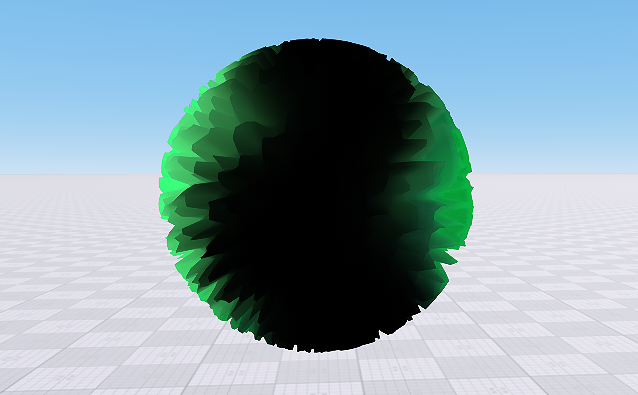
Voila! We just created a new deferred material with own shaders which uses two textures for albedo and displacement mapping!瞧!我们刚刚使用自己的着色器创建了一个新的延迟材质,该材质使用两个纹理进行反照率和位移映射!
