Editing Landscape Terrain
The built-in Brush Editor allows you to change the Landscape Terrain relief on the spot with the help of brushes. In the editing mode, you can draw various terrain features, such as rocky ground and other craggy details. All brushes modify only the selected Landscape Layer Map.
To start editing the required Landscape Layer Map, click the Brush Edit button in the Landscape Asset section of the Node tab in the Parameters window.

The following window will open:
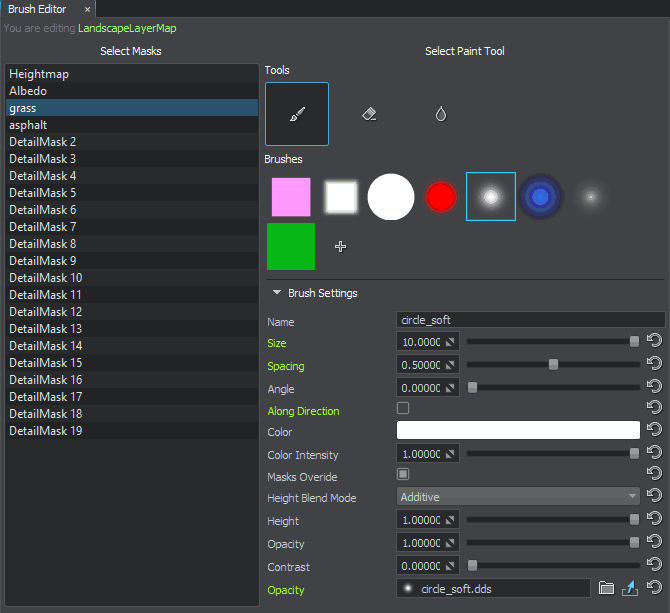
At the top of the window, the currently edited Landscape Layer Map is indicated. To select another Map for editing, just choose it in the World Hierarchy window.
To finish editing, click the current tool icon to disable it and close the Brush Editor window. To reset all changes made to a Landscape Layer Map, Reimport all its data.
Controls#
- To draw with a brush, select it, click LMB and drag the mouse.
- To change the brush size, use the mouse wheel.
- To switch to the brush tool, press B.
- To switch to the Eraser tool, press E.
- To invert the brush color of the current tool, press and hold Ctrl.
- To switch to the Smudge tool, press V.
- To grab the height / color / mask intensity (depending on the brush type) at the current point of terrain and set it as a brush value, press Alt + LMB.
Select Masks#
The list of masks contains all masks available for Landscape Layer Map. You can select one or several masks using the Ctrl or Shift buttons.
Tools#
The following tools are available for modifying the terrain:
 |
Applies the settings defined for the selected Brush in the Brush Settings depending on the selected mask or masks. |
 |
Erases albedo and height data. |
 |
Blurs image, height, or mask data based on the Brush Settings. |
Brushes#
Brush Editor contains a set of available brushes with various forms that can be modified as necessary by adjusting their Brush Settings. You can also add your own brushes by clicking the Plus icon.
Brush Settings#
Depending on the selected tool, the following brush settings may be available:
| Name | Name of the brush. |
|---|---|
| Size | Size of the brush. To change the value, the mouse wheel can also be scrolled. |
| Spacing | Distance between the brush marks in a stroke, in pixels. |
| Angle | Angle of the brush marks, in degrees. |
| Color Srgb | Convert the brush color to SRGB. |
| Color | Color of the brush. You can pick a screen color, if necessary. |
| Color Intensity | Intensity of the color applied to the terrain. The value in the range from 0 to 1. |
| Masks Override | Override detail masks:
|
| Height Blend Mode | Blending mode for the Height brush:
|
| Height | Height value for the brush. |
| Opacity | Strength of the brush when applying the layer color. Lower values create a more translucent brush, and higher values create a more opaque brush. Multiple applications of the brush with low opacity to the same place create a more opaque image. |
| Contrast | Hardness of the brush. Lower values create a softer brush. |
| Intensity | Intensity for the eraser. |
| Smooth Intensity | Intensity of the blur. |
| Opacity | Image file containing the opacity map to be used for the brush. |