Setting Up Environment to Develop Editor Plugins
This article describes the process of configuring development environment required to develop plugins for UnigineEditor depending on your operating system.
UnigineEditor is an application written entirely in C++ relying a lot on the Qt5 framework infrastructure. So, in order to extend its functionality not only C++ programming skills are required, but you should also be familiar with the Qt5 framework, CMake build system.
Windows Environment#
The following actions are to be performed to prepare your environment on Windows:
- Download an offline installer for the Qt open-source 5.12.3 from the official web-site for Windows operating system.
- Run the installer and click Next in the window that opens.
-
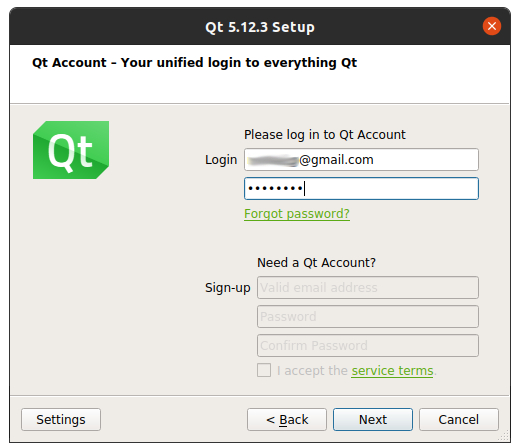
To start the installation process you will need to enter you Qt account credentials (if you already have an account) or you'll can Sign-up for a new account right in the installer by filling the fields offered, accepting the service terms and clicking Next.

- Before proceeding to the next step you'll have to confirm your email, so check your inbox for the new email verification message from the Qt Company and click verification link provided.
-
After clicking the link you will be redirected to your Qt account at https://login.qt.io/login and prompted to fill other required fields and click Confirm.

As you confirm you may return to your offline installer and click Next, the welcome message shall be displayed, click Next again and the installation process shall continue.
-
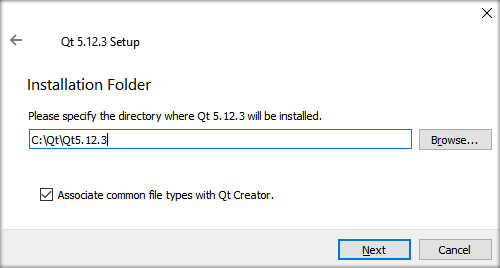
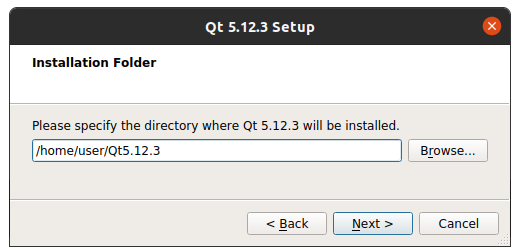
At the next stage specify installation directory and click Next to proceed to the Select Components stage.
-
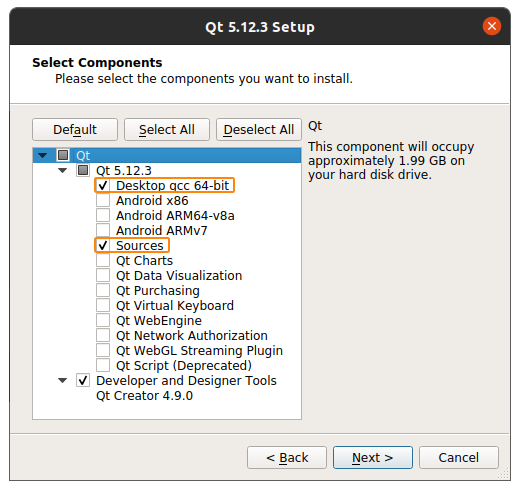
Select Components to be installed.
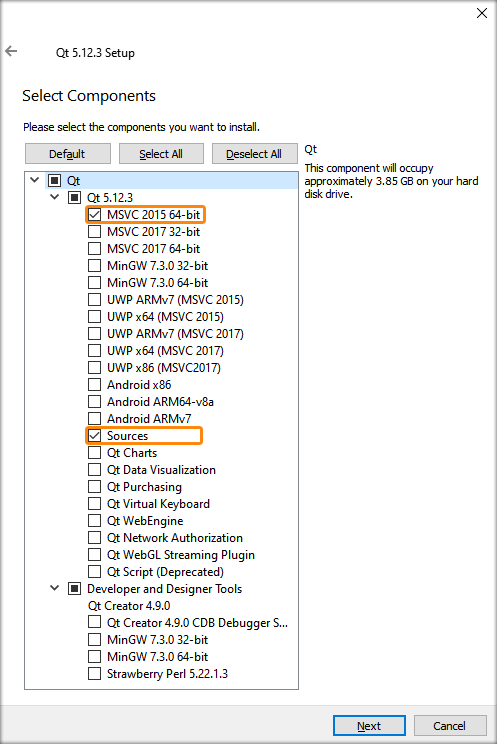 NoticeThe Sources component is optional, so tick it only if you need to browse through the Qt source code.
 - Read and confirm that you accept the License agreement and click Next to continue the installation process.
-
After successful installation of the Qt Framework 5.12.3 you should add a new environment variable named UNIGINE_QTROOT and set its value so that it points to the folder, where the MSVC2015 64bit compiler kit is located.
On Windows the path should be as follows:
<YOUR_QT_INSTALLATION FOLDER>\5.12.3\msvc2015_64.In our case, for example, "C:\Qt\Qt5.12.3\5.12.3\msvc2015_64"
- Open Control Panel → System and select Advanced System Settings
-
Follow the instructions given in the picture below.
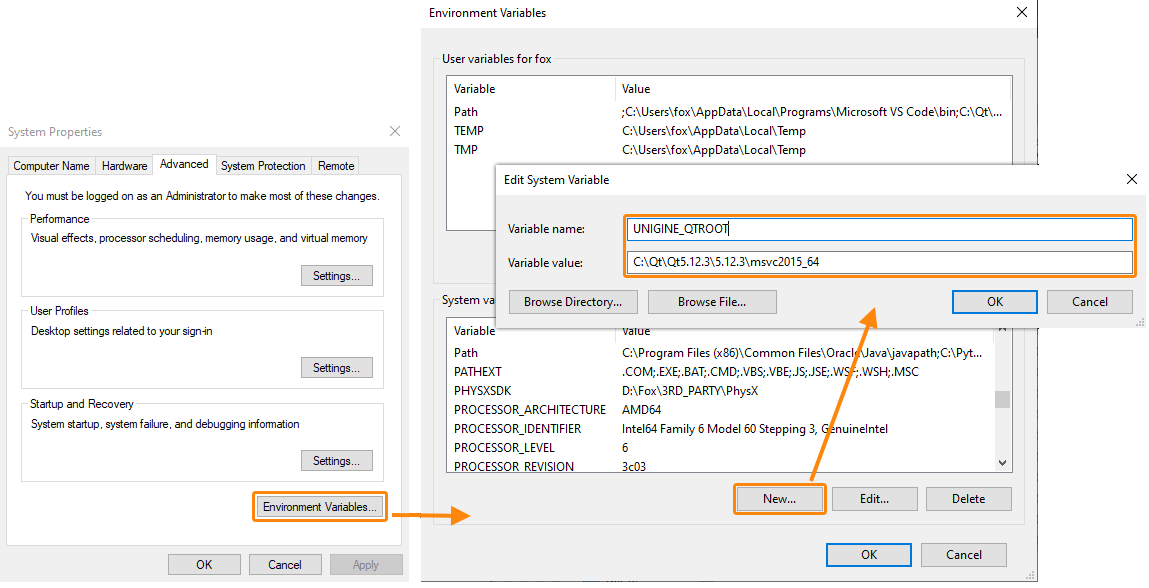
- Click OK and close the Control Panel.
NoticeIf you're using CMake, it's enough to have a path to Qt5.12.3 installation directory in the PATH variable. - Don't forget to restart your IDE, so that the information on environmental variables is updated.
- Now you are ready to start developing your first plugin for UnigineEditor!
Linux Environment#
The following actions are to be performed to prepare your environment on Linux:
- Download an offline installer for the Qt open-source 5.12.3 from the official web-site for Linux operating system.
- Run the installer and click Next in the window that opens.
-
To start the installation process you will need to enter you Qt account credentials (if you already have an account) or you'll can Sign-up for a new account right in the installer by filling the fields offered, accepting the service terms and clicking Next.
- Before proceeding to the next step you'll have to confirm your email, so check your inbox for the new email verification message from the Qt Company and click verification link provided.
-
After clicking the link you will be redirected to your Qt account at https://login.qt.io/login and prompted to fill other required fields and click Confirm.
As you confirm you may return to your offline installer and click Next, the welcome message shall be displayed, click Next again and the installation process shall continue.
-
At the next stage specify installation directory and click Next to proceed to the Select Components stage.
-
Select Components to be installed.
 NoticeThe Sources component is optional, so tick it only if you need to browse through the Qt source code.
 - Read and confirm that you accept the License agreement and click Next to continue the installation process.
-
After successful installation of the Qt Framework 5.12.3 you should add a new environment variable named UNIGINE_QTROOT and set its value so that it points to the folder, where the GCC 64bit compiler kit is located.
NoticeIf you're using CMake, it's enough adding a path to Qt5.12.3 installation directory to $PATH.On Linux the path should be as follows:
<YOUR_QT_INSTALLATION FOLDER>/5.12.3/gcc_64.- Open the current user's profile into a text editor
Source code
vi ~/.bash_profile - Add the export command for your environment variable.
Source code
export UNIGINE_QTROOT=<YOUR_QT_INSTALLATION FOLDER>/5.12.3/gcc_64 - Save your changes.
NoticeAdding the environment variable to a user's bash profile alone will not export it automatically, the variable will be exported the next time the user logs in. To immediately apply all changes to bash_profile, use the source command.Source codesource ~/.bash_profile - Open the current user's profile into a text editor
- Now you are ready to start developing your first plugin for UnigineEditor!