实施射击
Now, we can set up the shooting ability and prepare effects for it. When a player presses the Left Mouse Button, the robot fires a bullet from one of its guns. Since there are two guns, we can alternate the fire. 现在,我们可以设置射击能力并为其准备效果。 当玩家按下鼠标左键时,机器人会从它的一把枪中发射子弹。 由于有两支枪,我们可以交替开火。
Step 1. Create, Move, and Delete a Bullet步骤1。创建、移动和删除一颗子弹#
We need to set up a node to represent a bullet in the game. The bullet will fly in the specified direction and explode on impact with an object. If it doesn't hit anything and the time runs out, it will be destroyed. Upon an impact with any dynamic object within the Play Area, an impulse will be applied to its physical body.我们需要建立一个节点代表一颗子弹在游戏中。子弹飞在指定的方向和爆炸影响的对象。如果没有击中任何和耗尽的时候,它将被摧毁。在影响与任何游戏区域中的动态对象,一个脉冲将被应用到它的身体。
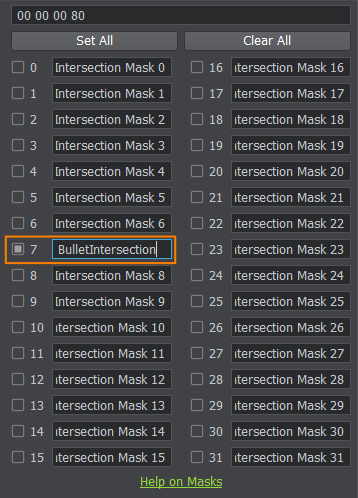
We will use the bit masking mechanism to identify the objects that can be hit by a bullet. A bullet checks for an intersection between its trajectory and surfaces of other objects with the BulletIntersection bit (described below) enabled in an Intersection mask. Our bullets will hit the walls and explode with a hit effect. The effect consists of a light flash, a cracks decal, a blaster sound, and sparks particles. The effect loads and plays at the hit position.我们将使用 位掩码 机制来识别可以被子弹击中的对象。 子弹通过 Intersection 掩码中启用的 BulletIntersection 位(如下所述)检查其轨迹和其他对象的曲面之间的相交。 我们的子弹会击中墙壁并以命中效果爆炸。 效果包括 light 闪光、裂缝 贴花、爆破器 声音,并激发粒子。 效果在命中位置加载和播放。
Every node has a transformation matrix, which encodes position, rotation, and scale of the node in the world. There are different ways to perform basic node transformations. We will calculate a new position for the bullet's trajectory each frame based on the time it took to render the last game frame. This way we will make sure its speed is the same (frame-rate independent) no matter how often the Update method is called by the player's hardware.每个节点都有一个变换矩阵,它编码了节点在世界中的位置、旋转和比例。 有不同的方式来执行基本节点 transformations。 我们将根据渲染最后一帧游戏所花费的时间为每一帧计算子弹轨迹的新位置。 这样,无论播放器硬件调用 Update 方法的频率如何,我们都将确保其速度相同(与帧速率无关)。
-
For every wall's box surface enable the 7th bit of the Intersection Mask, and call it BulletIntersection.对于每一个墙的box曲面启用Intersection位掩码的第七位,并称之为BulletIntersection。

-
Create a new C++ component in an IDE and call it Projectile. Copy the following code to the corresponding files and save the solution.在 IDE 中创建一个新的 C++ 组件,并将其命名为 Projectile。 将以下代码复制到相应的文件并保存解决方案。
Projectile.h (C++)#pragma once #include <UnigineComponentSystem.h> #include <UnigineGame.h> class Projectile : public Unigine::ComponentBase { public: // declare constructor and destructor for our class and define a property name. COMPONENT_DEFINE(Projectile, ComponentBase) // declare methods to be called at the corresponding stages of the execution sequence COMPONENT_INIT(init); COMPONENT_UPDATE(update); PROP_PARAM(File, bulletHitEffect); protected: void init(); void update(); private: // speed of the bullet float speed = 30.0f; Unigine::WorldIntersectionNormalPtr intersection; };Projectile.cpp (C++)#include "Projectile.h" #include "Destroy.h" REGISTER_COMPONENT(Projectile); using namespace Unigine; using namespace Math; void Projectile::init() { if (intersection == nullptr) intersection = WorldIntersectionNormal::create(); } void Projectile::update() { Vec3 oldPos = node->getWorldPosition(); vec3 dir = node->getWorldDirection(MathLib::AXIS::AXIS_Y); // calculate the next position of the bullet Vec3 newPos = oldPos + Vec3(dir) * speed * Game::getIFps(); // check the intersection with wall objects Unigine::ObjectPtr obj = World::getIntersection(oldPos, newPos, 0x00000080, intersection); // 7th BulletIntersection bit is set if (obj) { // spawn the hit effect at the hit point NodePtr hitEffect = World::loadNode(bulletHitEffect); if (hitEffect) { hitEffect->setPosition(intersection->getPoint()); // orient the effect towards the hit direction hitEffect->setWorldDirection(intersection->getNormal(), vec3_up, AXIS::AXIS_Y); } // add impulse to an object if it is a body rigid BodyRigidPtr rb = obj->getBodyRigid(); if (rb) { rb->setFrozen(false); rb->addWorldImpulse(obj->getWorldPosition(), node->getWorldDirection(MathLib::AXIS::AXIS_Y) * speed); } // remove the bullet node.deleteLater(); } else { // move the bullet to a new position node->setWorldPosition(newPos); } } As the Life Time of the bullet runs out we should delete it by simply calling the deleteLater() method. Create a new C++ component and call it Destroy. Copy the code below and paste it to the corresponding files in your project and save them in your IDE.随着子弹的生命周期用完,我们应该通过调用 deleteLater() 方法来删除它。 创建一个新的 C++ 组件 并将其命名为 Destroy。 复制下面的代码并将其粘贴到项目中的相应文件中,并保存在 IDE 中。
Destroy.h (C++)#pragma once #include <UnigineComponentSystem.h> #include <UnigineGame.h> class Destroy : public Unigine::ComponentBase { public: // declare constructor and destructor for our class and define a property name. COMPONENT_DEFINE(Destroy, ComponentBase) // declare methods to be called at the corresponding stages of the execution sequence COMPONENT_INIT(init); COMPONENT_UPDATE(update); // object's lifetime PROP_PARAM(Float, lifeTime); protected: void init(); void update(); private: float startTime; };Destroy.cpp (C++)#include "Destroy.h" using namespace Unigine; using namespace Math; REGISTER_COMPONENT(Destroy); void Destroy::init() { // remember initialization time of an object startTime = Game::getTime(); } void Destroy::update() { // wait until the life time ends and delete the object if (Game::getTime() - startTime > lifeTime) node.deleteLater(); }- Build and run the project via an IDE (press Ctrl + F5 in Visual Studio), the Component System will generate a property-file for the component.构建和运行项目通过IDE(在Visual Studio 中按Ctrl + F5),组件系统将生成一个组件的属性文件。
-
Drag programming_quick_start\character\bullet\bullet.node from the Asset Browser into the Viewport and click Edit in the Reference section of the Parameters window to make modifications. Add a Destroy component to the child ObjectMeshStatic bullet node and set the Life Time to 5.0.将 programming_quick_start\character\bullet\bullet.node节点从 Asset Browser 拖到 Viewport 并单击 Parameters 窗口的 Reference 部分中的 Edit 进行修改。 将 Destroy 组件添加到 ObjectMeshStatic 的 bullet 子节点并设置 Life Time 到 5.0。

-
Next, drag the programming_quick_start\character\bullet_hit\bullet_hit.node from the Asset Browser into the Viewport, click Edit in the Parameters window, add the Destroy property to the bullet_hit's NodeDummy and to the LightOmni. Set Life Time values to 10.0 and 0.05 seconds respectively. 接下来,将 Asset Browser 中的 programming_quick_start\character\bullet_hit\bullet_hit.node 拖到 Viewport 中,点击 Edit 在 Parameters 窗口中,将 Destroy 组件添加到 bullet_hit 的 NodeDummy 和 LightOmni。 将 Life Time 值分别设置为 10.0 和 0.05 秒。

- Then select the bullet_hit Node Reference and click Apply in the Reference section to save all changes made to it.然后选择 bullet_hit Node Reference 并在 Reference 部分中点击 Apply 保存对其所做的所有更改。
-
Add a Projectile property to the child ObjectMeshStatic bullet of the bullet Node Reference. Drag the bullet_hit.node node from the Asset Browser window to the Bullet Hit Effect field.将Projectile属性添加到bullet Node Reference 的 ObjectMeshStatic bullet 子节点。将bullet_hit.node节点从Asset Browser窗口拖到Bullet Hit Effect字段。

There is also the Speed field that allows specifying a spawn speed for the bullet.还有Speed字段允许指定一个产卵子弹的速度。
- Now disable Intersection detection for the bullet to avoid the bullet detecting intersections with itself. Select the bullet_mat surface and uncheck the Intersection option for it.现在禁用子弹的碰撞测试避免子弹与自身检测十字路口。选择bullet_mat曲面和取消Intersection选项。
- Save changes to the bullet Node Reference, by selecting it and clicking Apply in the Reference section or simply press Ctrl+S hotkey to save all changed assets.保存更改的bullet Node Reference,通过选择它并单击Apply Reference部分或简单地按Ctrl+S热键保存所有更改资源。
- Now you can delete the bullet and bullet_hit nodes from the world as we will spawn it via code.现在您可以从世界中删除bullet和bullet_hit,因为我们将通过代码生成它们。
Step 2. Spawn a Bullet步骤2。生成子弹#
Let's create special spawn nodes using Dummy Nodes with no visual representation. Their positions will be used as initial bullet positions.让我们使用 Dummy Node创建特殊刷出节点,但不使用视觉表示。它们的位置将被用作初始子弹的位置。
- Select the robot Node Reference in the World Nodes window and click Edit in the Reference section of the Parameters window.在 World Nodes 窗口中选择 robot Node Reference,然后在 Parameters 窗口的 Reference 部分中单击 Edit。
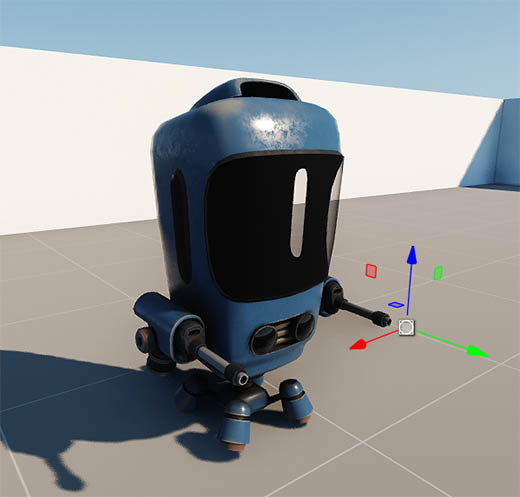
- Right-click on the child robot ObjectMeshSkinned in the World Nodes window to add a child node. Choose Create->Node->Dummy and position it in the Viewport near the end of the left gun. The Y axis (green arrow) must point in the fire direction, since Unigine uses the right-handed Cartesian coordinate system.在 World Nodes 窗口中右键单击子 robot ObjectMeshSkinned 以添加子节点。 选择 Create->Node->Dummy 并将其放置在 Viewport 靠近左枪末端的位置。 Y 轴(绿色箭头)必须指向射击方向,因为 UNIGINE 使用 右手 笛卡尔坐标系。
-
Rename the Dummy Node as "left_bullet_spawn". 将 Dummy Node 重命名为 "left_bullet_spawn"。

- Create a spawn point for the right gun the same way and call it "right_bullet_spawn".以同样的方式为右枪创建一个刷出点,并将其命名为 "right_bullet_spawn"。
To spawn bullets at run-time via API on Right Mouse Button click, add the following code to the PlayerController component. We use the file parameter of the property to reference the bullet node. Don't forget to save your code in an IDE.要在运行时通过 API 在单击鼠标右键时生成子弹,请将以下代码添加到 PlayerController 组件。 我们使用属性的file参数来引用子弹节点。 不要忘记将代码保存在 IDE 中。
PlayerController.h (C++)#pragma once #include <UnigineComponentSystem.h> #include <UnigineGame.h> #include <UnigineControls.h> #include <UnigineStreams.h> #include <UniginePlayers.h> #include <UnigineWorld.h> #include <UnigineConsole.h> #include <UnigineMathLib.h> #include <UnigineRender.h> class PlayerController : public Unigine::ComponentBase { public: // declare constructor and destructor for our class and define a property name. COMPONENT_DEFINE(PlayerController, ComponentBase) // declare methods to be called at the corresponding stages of the execution sequence COMPONENT_INIT(init); COMPONENT_UPDATE_PHYSICS(updatePhysics); //========================== NEW - BEGIN =============================== COMPONENT_UPDATE(update); // asset file that contains the bullet PROP_PARAM(File, bullet_path); // nodes in the world for bullets' spawn PROP_PARAM(Node, leftSpawn); PROP_PARAM(Node, rightSpawn); //========================== NEW - END =============================== protected: void init(); void updatePhysics(); //========================== NEW - BEGIN =============================== void update(); //=========================== NEW - END ================================ private: void move(const Unigine::Math::vec3& direction); Unigine::BodyRigidPtr rigid; Unigine::PlayerPtr player; // a WorldIntersection object to store the information about the intersection Unigine::WorldIntersectionPtr intersection = Unigine::WorldIntersection::create(); Unigine::Math::Vec3 pos; //========================== NEW - BEGIN =============================== bool isNextLeft = false; // mouse fire button Unigine::Input::MOUSE_BUTTON mouseFireKey = Unigine::Input::MOUSE_BUTTON::MOUSE_BUTTON_RIGHT; Unigine::NodePtr bullet; //=========================== NEW - END ================================ };PlayerController.cpp (C++)#include "PlayerController.h" //========================== NEW - BEGIN =============================== #include "Projectile.h" #include "Destroy.h" //========================== NEW - END =============================== using namespace Unigine; using namespace Math; REGISTER_COMPONENT(PlayerController); void PlayerController::init() { player = Game::getPlayer(); if (node) { rigid = node->getObjectBodyRigid(); if (rigid) { rigid->setAngularScale(vec3(0.0f, 0.0f, 0.0f)); // restricting the rotation rigid->setLinearScale(vec3(1.0f, 1.0f, 0.0f)); // restricting Z movement rigid->setMaxLinearVelocity(8.0f); // clamping the max linear velocity } } } //========================== NEW - BEGIN =============================== void PlayerController::update() { if (Input::isMouseButtonDown(mouseFireKey) && !Console::isActive()) { // load the bullet and set its position bullet = World::loadNode(bullet_path); if (isNextLeft && bullet) { if (rightSpawn) { bullet->setPosition(rightSpawn->getWorldPosition()); bullet->setRotation(rightSpawn->getWorldRotation()); } } else { if (leftSpawn) { bullet->setPosition(leftSpawn->getWorldPosition()); bullet->setRotation(leftSpawn->getWorldRotation()); } } // alternate between the left and the right gun isNextLeft = !isNextLeft; } // press ESC button to close the game if (Input::isKeyDown(Input::KEY::KEY_ESC)) { Engine::get()->quit(); } } //=========================== NEW - END ================================ void PlayerController::updatePhysics() { if (!Console::isActive()) // do not process input if the console is shown { // check if W key is pressed if (Input::isKeyPressed(Input::KEY::KEY_W)) move(player->getWorldDirection(MathLib::AXIS::AXIS_Y)); // move forward // check if S key is pressed if (Input::isKeyPressed(Input::KEY::KEY_S)) move(player->getWorldDirection(MathLib::AXIS::AXIS_NY)); // move backward // check if A key is pressed if (Input::isKeyPressed(Input::KEY::KEY_A)) move(player->getWorldDirection(MathLib::AXIS::AXIS_NX)); // move left // check if D key is pressed if (Input::isKeyPressed(Input::KEY::KEY_D)) move(player->getWorldDirection(MathLib::AXIS::AXIS_X)); // move right // finding the positions of the cursor and the point moved 100 units away in the camera forward direction ivec2 mouse = Input::getMousePosition(); Vec3 p0 = player->getWorldPosition(); Vec3 p1 = p0 + Vec3(player->getDirectionFromMainWindow(mouse.x, mouse.y)) * 100; // casting a ray from p0 to p1 to find the first intersected object ObjectPtr obj = World::getIntersection(p0, p1, 1, intersection); // the first bit of the intersection mask is set to 1, the rest are 0s // finding the intersection position, creating a transformation matrix to face this position and setting the transform matrix for the body preserving current angular and linear velocities if (obj && rigid) { pos = intersection->getPoint(); pos.z = rigid->getTransform().getTranslate().z; // project the position vector to the Body Rigid pivot plane Mat4 transform = Math::setTo(rigid->getTransform().getTranslate(), pos, vec3_up, AXIS::AXIS_Y); rigid->setPreserveTransform(transform); // turn the character's body } } } // moving the rigid body with linear impulse in the specified direction void PlayerController::move(const Unigine::Math::vec3& direction) { // direction is a normalized camera axis vector if (rigid) // direction is a normalized camera axis vector rigid->addLinearImpulse(direction); }- Build and run the solution in your IDE to regenerate the PlayerController property.在IDE中构建并运行解决方案以重新生成 PlayerController属性。
-
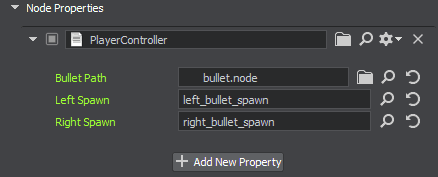
Drag left_bullet_spawn, and right_bullet_spawn to the corresponding fields of the PlayerController property of the robot node (ObjectMeshSkinned). And assign the bullet.node to the Bullet Path field.将 left_bullet_spawn 和 right_bullet_spawn 拖到 robot节点的 PlayerController 属性的对应字段中 (ObjectMeshSkinned)。 并将 bullet.node 分配给 Bullet Path 字段。

- Save changes to the world, go to File->Save World or press Ctrl+S hotkey.拯救世界的变化,去File->Save World或者按Ctrl+S热键。
- Build and run the game in your IDE to try out the new shooting ability.构建和运行您的IDE中的游戏尝试新的拍摄能力。
本页面上的信息适用于 UNIGINE 2.19 SDK.
