窗口管理
UNIGINE provides an advanced toolkit simplifying development of various visual tools, with a large number of widgets and capabilities.UNIGINE提供了一个先进的工具包,通过大量的小部件和功能简化了各种可视化工具的开发。
You can easily create and adjust window viewports and window groups, control their behavior and rendering order, stack them, handle events, check window intersections, and so on via API:你可以通过API轻松地创建和调整窗口视窗和窗口组,控制它们的行为和渲染顺序,堆叠它们,处理事件,检查窗口交集等等:
- All window management operations are performed via the WindowManager class, enabling you to access any application window, group or stack windows, create various dialogs, and so on.所有窗口管理操作都是通过WindowManager类执行的,使您能够访问任何应用程序窗口、组或堆栈窗口、创建各种对话框等等。
- Window components, relations with other windows, size, position, order, window events and intersections are managed by the base EngineWindow class.窗口组件、与其他窗口的关系、大小、位置、顺序、窗口事件和交集由基类EngineWindow管理。
- For window viewport creation, the EngineWindowViewport class is used. It inherits from EngineWindow class and allows managing window viewports: setting cameras, specifying engine tools available (console, profiler, visualizer, etc.), adding widgets to the client area.对于窗口视图创建,使用了EngineWindowViewport类。它继承自EngineWindow类,并允许管理窗口视口:设置相机,指定可用的引擎工具(控制台,分析器,可视化器等),向客户端区域添加小部件。
- For window groups, there is the EngineWindowGroup class. It also inherits from EngineWindow class and allows implementing custom grouping logic.对于窗口组,有EngineWindowGroup类。它还继承了EngineWindow类,并允许实现自定义分组逻辑。
- Both a window viewport and a window group are engine windows.窗口视窗和窗口组都是引擎窗口。
- Usually the engine windows stay available during the whole UNIGINE Engine runtime, so their creation and management should be implemented as a part of the System Logic.通常引擎窗口在整个UNIGINE引擎运行时保持可用,因此它们的创建和管理应该作为系统逻辑的一部分来实现。
See Also另请参阅#
- A set of SDK samples (samples/Api/WindowManager) demonstrating various usage aspects.一组SDK示例(samples/Api/WindowManager)演示了各种使用方面。
Creating a Window Viewport创建窗口视窗#
To create the engine window viewport, one of the EngineWindowViewport class constructors is used.要创建引擎窗口视窗,需要使用一个EngineWindowViewport类构造函数。
// create a window viewport of the specified size with the specified name
EngineWindowViewportPtr window = EngineWindowViewport::create("New Window", 580, 300);
// create the main window viewport of the specified size
EngineWindowViewportPtr main_window = EngineWindowViewport::create("Main Window", 580, 300, EngineWindow::FLAGS_MAIN);
When the window viewport is created, you can change its settings: specify the engine tools available, set the viewport as the main one, specify the camera the image from which is rendered into the viewport, and so on. All these operations are provided by the EngineWindowViewport class. For example:当创建窗口视口时,您可以更改其设置:指定可用的引擎工具,将视口设置为主视口,指定渲染到视口的图像的相机,等等。所有这些操作都是由0_php类提供的。例如:
// set a window size
window->setSize(Math::ivec2(580, 300));

// enable the console, profiler and visualizer for the window
window->setConsoleUsage(true);
window->setProfilerUsage(true);
window->setVisualizerUsage(true);
You can also add widgets to the client area of the window:您还可以向窗口的客户端区域添加小部件:
// add widgets to the client area of the window
window->addChild(WidgetLabel::create(window->getSelfGui(), String::format("This is %s window.", window->getTitle())));
window->addChild(WidgetButton::create(window->getSelfGui(), window->getTitle()), Gui::ALIGN_CENTER);To control window components, its behaviour, visual representaion, and style, use the EngineWindow class functionality. The corresponding article contains short samples that cover most of the available functions.要控制窗口组件、其行为、可视化表示和样式,请使用EngineWindow类功能。相应的文章包含涵盖大多数可用功能的简短示例。
Also UNIGINE SDK provides a set of samples (source/samples/Api/WindowManager) that allow you to try all settings in action. For example, in the WindowSandbox sample, you can create a window viewport and adjust it.此外,UNIGINE SDK提供了一组示例(source/samples/Api/WindowManager),允许您在实际操作中尝试所有设置。例如,在1_ight示例中,您可以创建一个窗口视口并对其进行调整。
Creating a Window Group新建窗口组#
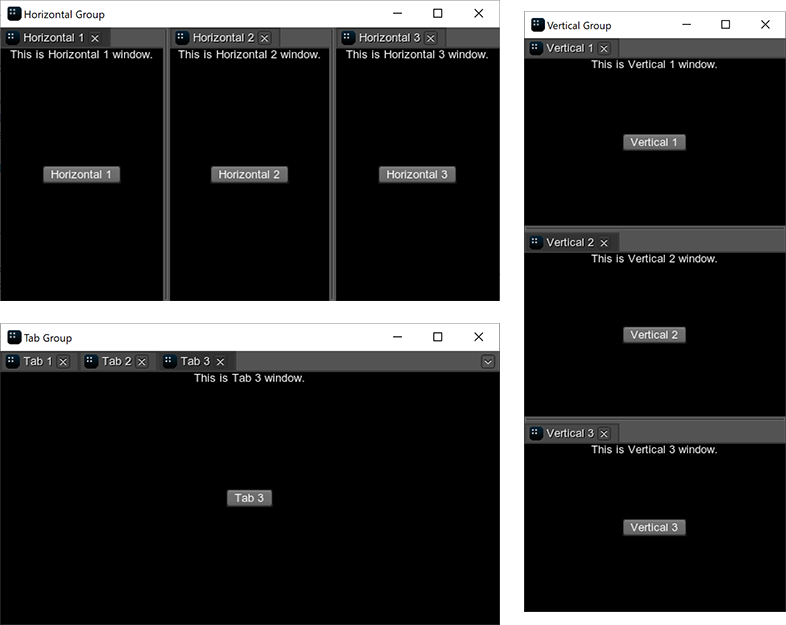
When the engine windows are grouped, a new window containing these windows is created. This new window is called a group, and the windows in the group - nested. The number of windows in the group is unlimited. Moreover, you can group both the separate engine windows and the existing window groups.将引擎窗口分组后,将创建一个包含这些窗口的新窗口。这个新窗口被称为组,而组中的窗口嵌套在中。组中的窗口数量是无限的。此外,您可以对单独的引擎窗口和现有的窗口组进行分组。
There are three types of the window groups:窗口组有三种类型:
- Vertical垂直
- Horizontal水平
- Group of tabs选项卡组
Within the group, all windows are stacked according to one of these types.在组中,所有窗口都根据其中一种类型堆叠。
Grouping via Code按代码分组#
A window group is an instance of the EngineWindowGroup class that can be created in one of the following ways:窗口组是EngineWindowGroup类的一个实例,可以通过以下方式之一创建:
-
You can create an empty group using one of the EngineWindowGroup class constructors and then add windows or other groups to it.您可以使用一个EngineWindowGroup类构造函数创建一个空组,然后向其中添加窗口或其他组。
源代码 (C++)// create window viewports EngineWindowViewportPtr horizontal_1 = EngineWindowViewport::create("Horizontal 1", 580, 300); EngineWindowViewportPtr horizontal_2 = EngineWindowViewport::create("Horizontal 2", 580, 300); EngineWindowViewportPtr horizontal_3 = EngineWindowViewport::create("Horizontal 3", 580, 300); // create a horizontal window group EngineWindowGroupPtr horizontal_group = EngineWindowGroup::create(EngineWindowGroup::GROUP_TYPE_HORIZONTAL, "Horizontal Group", 565, 310); // add previously created windows to the group horizontal_group->add(horizontal_1); horizontal_group->add(horizontal_2); horizontal_group->add(horizontal_3);注意This approach implies that you implement custom grouping and ungrouping logic: check if the windows can be nested or produce a group, set the automatic deletion mode, and so on. The EngineWindow and EngineWindowGroup classes provide the required funtionality for controlling the engine windows stacking.这种方法意味着实现自定义分组和取消分组逻辑:检查窗口是否可以嵌套或生成组,设置自动删除模式,等等。EngineWindow和EngineWindowGroup类提供了控制引擎窗口堆叠所需的功能。 - You can stack windows using WindowManager class functionality. In this case, the manager will automatically validate windows before adding them to the group and manage the group after removing a window from it.您可以使用WindowManager类功能堆叠窗口。在这种情况下,管理员将在将窗口添加到组之前自动验证窗口,并在从中删除窗口后管理该组。
When the window group is created, you can adjust its elements: set titles and icons for tabs, change its width or height, adjust separators. All these operations are provided by the EngineWindowGroup class.创建窗口组后,您可以调整其元素:设置选项卡的标题和图标,更改其宽度或高度,调整分隔符。所有这些操作都是由0_php类提供的。
For example, to change the first tab in the group, you can do the following:例如,要更改组中的第一个选项卡,您可以执行以下操作:
// set a new tab name and icon
horizontal_group->setTabTitle(0, "New tab name");
horizontal_group->setTabIcon(0,"icons/tab_icon.jpg");
// change the tab width
horizontal_group->setHorizontalTabWidth(0, 10);
// update the position of the first tab separator
horizontal_group->setSeparatorPosition(0, 200);
UNIGINE SDK provides several samples (source/samples/Api/WindowManager) on the window groups: you can check different group types in the GroupTypes sample or create a new window group and try to adjust it in the WindowSandbox sample. Also the article on the EngineWindowGroup class contains short samples demonstrating the available functions.UNIGINE SDK提供了几个关于窗口组的示例(source/samples/Api/WindowManager):您可以在GroupTypes示例中检查不同的组类型,或者创建一个新的窗口组并尝试在WindowSandbox示例中对其进行调整。另外,关于EngineWindowGroup类的文章包含简短的示例,演示了可用的函数。
Grouping Using the Mouse鼠标分组#
While the application is running, you can group and ungroup the existing windows by using the mouse.当应用程序运行时,您可以使用鼠标对现有窗口进行分组和取消分组。
To group two separate windows, do the following:要将两个单独的窗口分组,请执行以下操作:
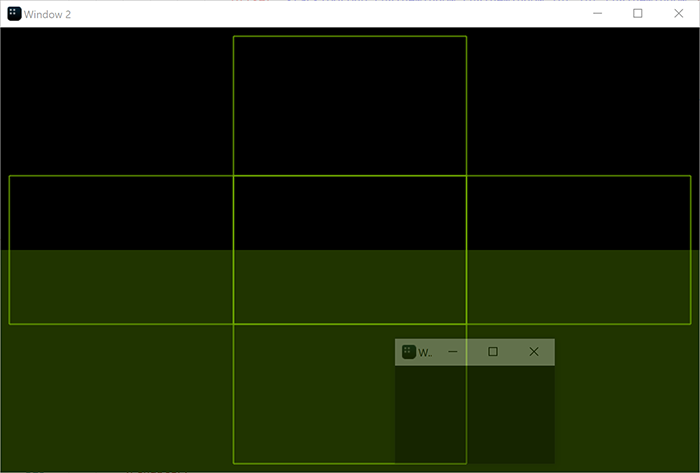
- Hold the mouse button while moving the window to the destination one. The destination window will be divided into 9 sectors.在移动窗口到目标窗口时按住鼠标按钮。目的地窗口将分为9个扇区。
- Choose the required sector and release the mouse button — the windows will be grouped.选择所需的扇区并释放鼠标按钮:窗口将被分组。
To add the window to the existing group, you should hold the mouse button while moving the window and release it in one of the following areas:要将窗口添加到现有组,您应该在移动窗口时按住鼠标按钮,然后在以下区域之一释放它:
-
For the horizontal group:水平组:
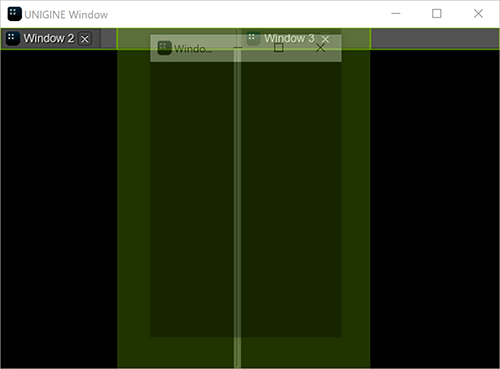
-
For the vertical group:垂直组:
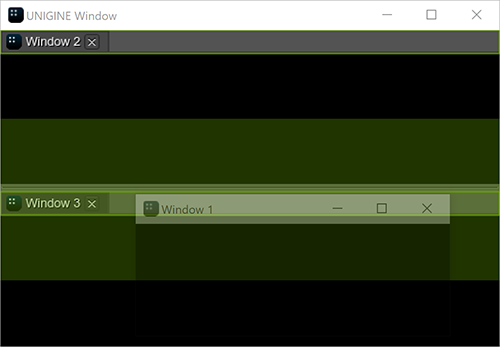
-
For the group of tabs:对于标签组:
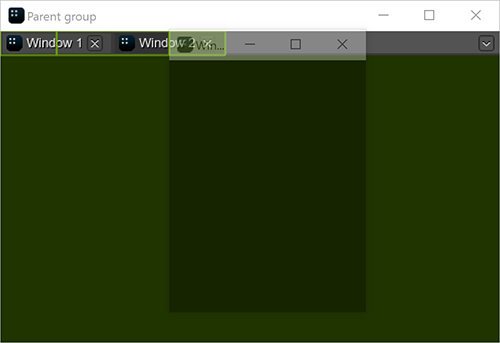
To ungroup the window, move it outside the group by dragging the title bar.若要取消对窗口的分组,请通过拖动标题栏将其移出分组。
Accessing Windows访问Windows#
The engine window can be accessed via the getWindow() function of the WindowManager class.可以通过WindowManager类的getWindow()函数访问引擎窗口。
// get the number of windows
int num = WindowManager::getNumWindows();
// check each window
for (int i = 0; i < num; i++)
{
	// get the window with the current index
	EngineWindowPtr window = WindowManager::getWindow(i);
	// change its position and size if it is main
	if (window->isMain())
	{
		window->setPosition(Math::ivec2(1020, 60));
		window->setSize(Math::ivec2(305, 670));
	}
}
There are also some functions (like getMainWindow()) that allow accessing the specific windows (the main, focused, fullscreen window and so on). For example:还有一些函数(如getMainWindow())允许访问特定的窗口(主, 聚焦, 全屏窗口等)。例如:
// get the main window
EngineWindowPtr main_window = WindowManager::getMainWindow();
// change its position and size
if (main_window)
{
	main_window->setPosition(Math::ivec2(1020, 60));
	main_window->setSize(Math::ivec2(305, 670));
}
Managing Window Groups管理窗口组#
As it was mentioned above, you can implement custom logic for grouping and ungrouping windows or use functionality provided by the WindowManager class. Here we will consider the latter.正如上面提到的,您可以实现对窗口进行分组和取消分组的自定义逻辑,或者使用WindowManager类提供的功能。这里我们将考虑后者。
In the WindowManager class, there are two main functions for grouping windows:在WindowManager类中,有两个用于分组窗口的主要函数:
- WindowManager::stack() creates a group of two windows.WindowManager::stack()创建一个包含两个窗口的组。
- WindowManager::stackGroups() creates a group of two window groups.WindowManager::stackGroups()创建一个包含两个窗口组的组。
// create separate windows
EngineWindowViewportPtr horizontal_1 = EngineWindowViewport::create("Horizontal 1", 512, 256);
EngineWindowViewportPtr horizontal_2 = EngineWindowViewport::create("Horizontal 2", 512, 256);
EngineWindowViewportPtr horizontal_3 = EngineWindowViewport::create("Horizontal 3", 512, 256);
EngineWindowViewportPtr horizontal_4 = EngineWindowViewport::create("Horizontal 4", 512, 256);

// create 2 horizontal window groups
EngineWindowGroupPtr horizontal_group_1 = WindowManager::stack(horizontal_1, horizontal_2, 1, EngineWindowGroup::GROUP_TYPE_HORIZONTAL);
EngineWindowGroupPtr horizontal_group_2 = WindowManager::stack(horizontal_3, horizontal_4, 1, EngineWindowGroup::GROUP_TYPE_HORIZONTAL);
// create a vertical group of 2 horizontal groups
EngineWindowGroupPtr vertical_group = WindowManager::stackGroups(horizontal_group_1, horizontal_group_2, EngineWindowGroup::GROUP_TYPE_VERTICAL);
// specify position, size, title of the verical window group
vertical_group->setPosition(Math::ivec2(50, 60));
vertical_group->setSize(Math::ivec2(565, 310));
vertical_group->setTitle("Vertical Group");
// render the window group
vertical_group->show();
Each window or window group has a state, so it changes after stacking.每个窗口或窗口组都有一个状态,所以它在堆叠后会发生变化。
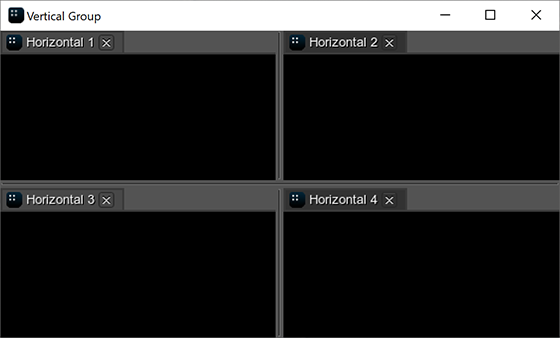
There are also functions based on the stack() function that should be used in specific cases to avoid additional checking of arguments:还有一些基于stack()函数的函数应该在特定情况下使用,以避免对参数进行额外检查:
-
WindowManager::stackToParentGroup() stacks the second window to the parent group of the first window. In the result, both windows passed as arguments will be on the same level in the group hierarchy.WindowManager::stackToParentGroup()将第二个窗口堆栈到第一个窗口的父组。结果,作为参数传递的两个窗口将在组层次结构中处于同一级别。
源代码 (C++)// stack 2 separate windows EngineWindowGroupPtr group_0 = WindowManager::stackWindows(window_1, window_2, EngineWindowGroup::GROUP_TYPE_HORIZONTAL); // stack a separate window to the parent group of "window_1" WindowManager::stackToParentGroup(window_1,window_3);
-
WindowManager::stackWithWindow() stacks the window to the other window. If the first argument is the separate window, a new window group is returned. If the first argument is the nested window, the window is added to its group.WindowManager::stackWithWindow()将窗口堆叠到另一个窗口。如果第一个参数是单独的窗口,则返回一个新的窗口组。如果第一个参数是嵌套窗口,则该窗口将被添加到其组中。
源代码 (C++)// create a group of 2 windows EngineWindowGroupPtr group_1 = WindowManager::stack(window_1, window_2, 1, EngineWindowGroup::GROUP_TYPE_HORIZONTAL); // stack a separate window to the window from the window group WindowManager::stackToWindow(window_1, window_3, EngineWindowGroup::GROUP_TYPE_VERTICAL);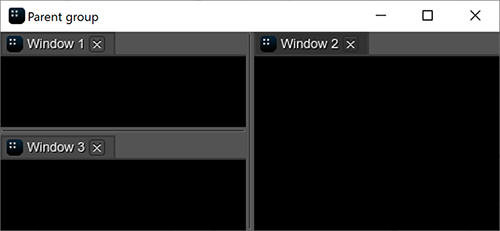
- WindowManager::stackWindows() creates a group of the separate/nested windows. The windows are stacked in the default order.WindowManager::stackWindows()创建一组独立/嵌套的窗口。窗口按默认顺序堆叠。
- WindowManager::stackToGroup() stacks the window or window group to another window group.WindowManager::stackToGroup()将窗口或窗口组堆栈到另一个窗口组。
For ungrouping, the WindowManager::unstack() function is used: it removes the window or the window group from the parent group. If only one window remains in the group, it is automatically removed from the group and the group is deleted.对于取消分组,使用WindowManager::unstack()函数:它从父组中删除窗口或窗口组。如果组中只剩下一个窗口,则自动将该窗口从组中移除,并删除该组。
Working with Dialogs使用对话#
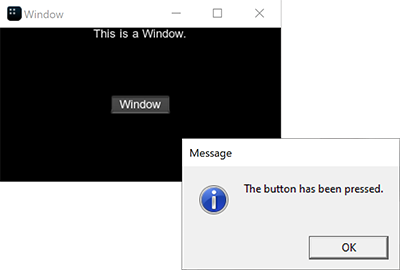
To create a dialog window, use the corresponding functions of the class. For example:要创建对话框窗口,请使用类的相应函数。例如:
// event handler function
int AppSystemLogic::onButtonClicked()
{
	// show the message dialog
	WindowManager::dialogMessage("Message", "The button has been pressed.");

	return 1;

}

int AppSystemLogic::init()
{
	// create a window with widgets in the client area
	auto create_window = [](const char *name)
	{
		EngineWindowPtr window = EngineWindow::create(name, 512, 256);

		window->addChild(WidgetLabel::create(window->getSelfGui(), String::format("This is a {0}.", name)), Gui::ALIGN_TOP);
		window->addChild(WidgetButton::create(window->getSelfGui(), name), Gui::ALIGN_CENTER);

		return window;

	};

	{
		// create a window
		EngineWindowPtr window = create_window("Window");
		// get the child widget of the window
		WidgetPtr button = window->getChild(1);
		// add a callback for this widget
		button->addCallback(Gui::CLICKED, MakeCallback(this, &AppSystemLogic::onButtonClicked));
		// show the window
		window->setPosition(Math::ivec2(50, 60));
		window->show();
	}

	return 1;

}
If you press the button in the client area of the created window, the following dialog will be shown:如果在创建的窗口的客户端区域按下按钮,将显示如下对话框:
