Реализация стрельбы
 Now, we can set up the shooting ability and prepare effects for it. When a player presses the Left Mouse Button, the robot fires a bullet from one of its guns. Since there are two guns, we can alternate the fire.
Теперь мы можем реализовать возможность стрельбы и подготовить для нее эффекты. Когда игрок нажимает левую кнопку мыши, робот выстреливает пулю из одного из своих орудий. Поскольку здесь два орудия, мы можем чередовать выстрелы.
Now, we can set up the shooting ability and prepare effects for it. When a player presses the Left Mouse Button, the robot fires a bullet from one of its guns. Since there are two guns, we can alternate the fire.
Теперь мы можем реализовать возможность стрельбы и подготовить для нее эффекты. Когда игрок нажимает левую кнопку мыши, робот выстреливает пулю из одного из своих орудий. Поскольку здесь два орудия, мы можем чередовать выстрелы.
Step 1. Create, Move, and Delete a BulletШаг 1. Создание, перемещение и удаление пули#
We need to set up a node to represent a bullet in the game. The bullet will fly in the specified direction and explode on impact with an object. If it doesn't hit anything and the time runs out, it will be destroyed. Upon an impact with any dynamic object within the Play Area, an impulse will be applied to its physical body.Нам нужно настроить ноду, которая будет представлять пули в игре. Пуля полетит в указанном направлении и взорвется при столкновении с предметом. Если она ни во что не попадет и время ее существования закончится, она будет уничтожена. При столкновении с любым динамическим объектом в пределах Игровой зоны к его физическому телу будет применен импульс.
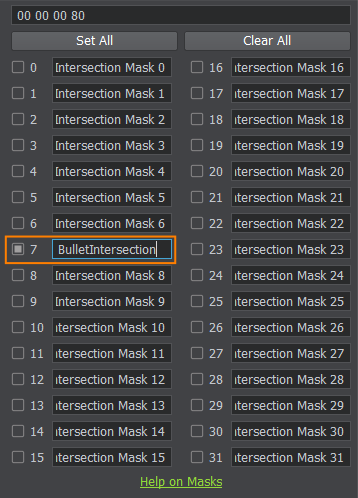
We will use the bit masking mechanism to identify the objects that can be hit by a bullet. A bullet checks for an intersection between its trajectory and surfaces of other objects with the BulletIntersection bit (described below) enabled in an Intersection mask. Our bullets will hit the walls and explode with a hit effect. The effect consists of a light flash, a cracks decal, a blaster sound, and sparks particles. The effect loads and plays at the hit position.Мы будем использовать механизм битовых масок для идентификации объектов, в которые может попасть пуля. Пуля проверяет пересечение своей траектории с поверхностями других объектов с включенным битом BulletIntersection (описанным ниже) в маске Intersection. Наши пули будут попадать в стены и взрываться с эффектом попадания. Эффект состоит из световой вспышки, декали трещин, звука взрыва и искр частиц. Эффект загружается и воспроизводится в позиции попадания.
Every node has a transformation matrix, which encodes position, rotation, and scale of the node in the world. There are different ways to perform basic node transformations. We will calculate a new position for the bullet's trajectory each frame based on the time it took to render the last game frame. This way we will make sure its speed is the same (frame-rate independent) no matter how often the Update method is called by the player's hardware.Каждая нода имеет матрицу трансформации, которая кодирует положение, поворот и масштаб ноды в мире. Существуют различные способы выполнения базовых преобразований ноды. Мы будем вычислять новую позицию для траектории пули в каждом кадре на основе времени, затраченного на рендеринг последнего игрового кадра. Таким образом, мы обеспечим одинаковую скорость (не зависящую от частоты кадров), на которую не повлияет изменение частоты вызова метода Update аппаратным обеспечением игрока.
-
For every wall's box surface enable the 7th bit of the Intersection Mask, and call it BulletIntersection.Для всех поверхностей box, из которых составлены стены, включите 7-й бит маски Intersection и назовите его BulletIntersection.
-
Create a new C++ component in an IDE and call it Projectile. Copy the following code to the corresponding files and save the solution.Создайте новый компонент C++ в среде IDE и назовите его Projectile. Скопируйте следующий код в соответствующие файлы и сохраните решение.Projectile.h (C++)
#pragma once
#include <UnigineComponentSystem.h>

#include <UnigineGame.h>

class Projectile : public Unigine::ComponentBase
{
public:
	// declare constructor and destructor for our class and define a property name.
	COMPONENT_DEFINE(Projectile, ComponentBase)
	// declare methods to be called at the corresponding stages of the execution sequence
	COMPONENT_INIT(init);
	COMPONENT_UPDATE(update);

	PROP_PARAM(File, bulletHitEffect);

protected:
	void init();
	void update();

private:
	// speed of the bullet
	float speed = 30.0f;

	Unigine::WorldIntersectionNormalPtr intersection;
};
Projectile.cpp (C++)#include "Projectile.h" #include "Destroy.h" REGISTER_COMPONENT(Projectile); using namespace Unigine; using namespace Math; void Projectile::init() { if (intersection == nullptr) intersection = WorldIntersectionNormal::create(); } void Projectile::update() { Vec3 oldPos = node->getWorldPosition(); vec3 dir = node->getWorldDirection(MathLib::AXIS::AXIS_Y); // calculate the next position of the bullet Vec3 newPos = oldPos + Vec3(dir) * speed * Game::getIFps(); // check the intersection with wall objects Unigine::ObjectPtr obj = World::getIntersection(oldPos, newPos, 0x00000080, intersection); // 7th BulletIntersection bit is set if (obj) { // spawn the hit effect at the hit point NodePtr hitEffect = World::loadNode(bulletHitEffect); if (hitEffect) { hitEffect->setPosition(intersection->getPoint()); // orient the effect towards the hit direction hitEffect->setWorldDirection(intersection->getNormal(), vec3_up, AXIS::AXIS_Y); } // add impulse to an object if it is a body rigid BodyRigidPtr rb = obj->getBodyRigid(); if (rb) { rb->setFrozen(false); rb->addWorldImpulse(obj->getWorldPosition(), node->getWorldDirection(MathLib::AXIS::AXIS_Y) * speed); } // remove the bullet node.deleteLater(); } else { // move the bullet to a new position node->setWorldPosition(newPos); } } - As the Life Time of the bullet runs out we should delete it by simply calling the deleteLater() method. Create a new C++ component and call it Destroy. Copy the code below and paste it to the corresponding files in your project and save them in your IDE.Когда время существования пули истечет, мы должны удалить ее, это можно сделать просто вызвав метод deleteLater(). Создайте новый компонент C++ и назовите его Destroy. Скопируйте приведенный ниже код и вставьте его в соответствующие файлы в своем проекте и сохраните их в своей среде IDE.Destroy.h (C++)
#pragma once
#include <UnigineComponentSystem.h>
#include <UnigineGame.h>

class Destroy : public Unigine::ComponentBase
{
public:
	// declare constructor and destructor for our class and define a property name.
	COMPONENT_DEFINE(Destroy, ComponentBase)
	// declare methods to be called at the corresponding stages of the execution sequence
	COMPONENT_INIT(init);
	COMPONENT_UPDATE(update);

	// object's lifetime
	PROP_PARAM(Float, lifeTime);

protected:
	void init();
	void update();

private:
	float startTime;
};
Destroy.cpp (C++)#include "Destroy.h" using namespace Unigine; using namespace Math; REGISTER_COMPONENT(Destroy); void Destroy::init() { // remember initialization time of an object startTime = Game::getTime(); } void Destroy::update() { // wait until the life time ends and delete the object if (Game::getTime() - startTime > lifeTime) node.deleteLater(); } - Build and run the project via an IDE (press Ctrl + F5 in Visual Studio), the Component System will generate a property-file for the component.Создайте и запустите проект с помощью IDE (нажмите Ctrl + F5 в Visual Studio), система компонентов сгенерирует файл свойств для компонента.
-
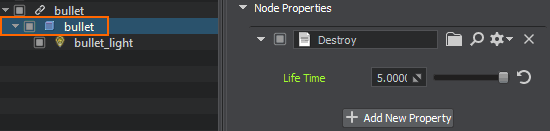
Drag programming_quick_start\character\bullet\bullet.node from the Asset Browser into the Viewport and click Edit in the Reference section of the Parameters window to make modifications. Add a Destroy component to the child ObjectMeshStatic bullet node and set the Life Time to 5.0.Перетащите ноду programming_quick_start\character\bullet\bullet.node из Asset Browser в Viewport и нажмите Edit в разделе Reference окна Parameters, чтобы внести изменения. Добавьте компонент Destroy к дочерней ноде ObjectMeshStatic bullet и установите для Life Time значение 5.0.
-
Next, drag the programming_quick_start\character\bullet_hit\bullet_hit.node from the Asset Browser into the Viewport, click Edit in the Parameters window, add the Destroy property to the bullet_hit's NodeDummy and to the LightOmni. Set Life Time values to 10.0 and 0.05 seconds respectively.Затем перетащите ноду programming_quick_start\character\bullet_hit\bullet_hit.node из Asset Browser в Viewport, нажмите Edit в окне Parameters, добавьте свойство Destroy к NodeDummy bullet_hit и к LightOmni. Установите значения Life Time равными 10,0 и 0,05 секунд соответственно.

- Then select the bullet_hit Node Reference and click Apply in the Reference section to save all changes made to it.Затем выберите Node Reference bullet_hit и нажмите Apply в разделе Reference, чтобы сохранить все внесенные в нее изменения.
-
Add a Projectile property to the child ObjectMeshStatic bullet of the bullet Node Reference. Drag the bullet_hit.node node from the Asset Browser window to the Bullet Hit Effect field.Добавьте свойство Projectile к дочернему ObjectMeshStatic bullet из Node Reference bullet. Перетащите ноду bullet_hit.node из окна Asset Browser в поле Bullet Hit Effect.
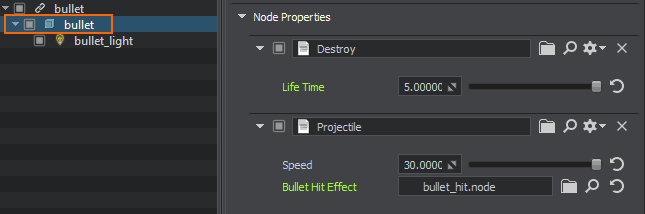 There is also the Speed field that allows specifying a spawn speed for the bullet.Существует также поле Speed, которое позволяет указать скорость появления пули.
 - Now disable Intersection detection for the bullet to avoid the bullet detecting intersections with itself. Select the bullet_mat surface and uncheck the Intersection option for it.Теперь отключите обнаружение пересечений для пули, чтобы пуля не обнаруживала пересечения с самой собой. Выберите поверхность bullet_mat и снимите для нее флажок Intersection.
- Save changes to the bullet Node Reference, by selecting it and clicking Apply in the Reference section or simply press Ctrl+S hotkey to save all changed assets.Сохраните изменения в Node Reference bullet, выбрав ее и нажав Apply в разделе Reference, или просто нажмите горячую клавишу Ctrl+S, чтобы сохранить все измененные ассеты.
- Now you can delete the bullet and bullet_hit nodes from the world as we will spawn it via code.Теперь вы можете удалить ноды bullet и bullet_hit из мира, поскольку мы будем создавать их с помощью кода.
Step 2. Spawn a BulletШаг 2. Генерация пули#
Let's create special spawn nodes using Dummy Nodes with no visual representation. Their positions will be used as initial bullet positions.Давайте создадим специальные spawn-ноды, используя Dummy Nodes без визуального представления. Их позиции будут использоваться в качестве начальных позиций для пуль.
- Select the robot Node Reference in the World Nodes window and click Edit in the Reference section of the Parameters window.Выберите Node Reference robot в окне World Nodes и нажмите Edit в разделе Reference окна Parameters.
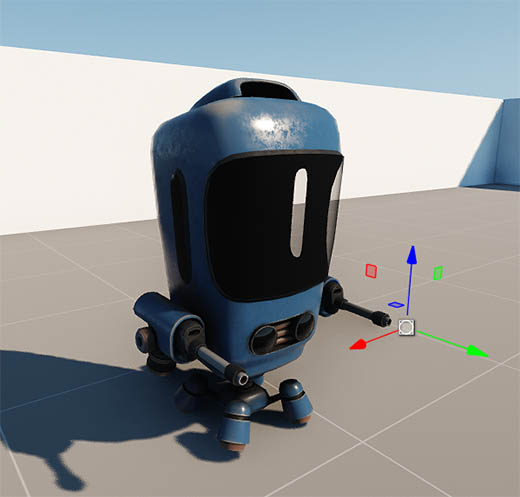
- Right-click on the child robot ObjectMeshSkinned in the World Nodes window to add a child node. Choose Create->Node->Dummy and position it in the Viewport near the end of the left gun. The Y axis (green arrow) must point in the fire direction, since Unigine uses the right-handed Cartesian coordinate system.Щелкните правой кнопкой мыши на дочерней ноде ObjectMeshSkinned robot в окне World Nodes, чтобы добавить дочернюю ноду. Выберите Create->Node->Dummy и поместите ее во Viewport рядом с дулом левого пистолета. Ось Y (зеленая стрелка) должна указывать в направлении огня, поскольку UNIGINE использует правую декартову систему координат.
-
Rename the Dummy Node as "left_bullet_spawn".
Переименуйте Dummy Node в "left_bullet_spawn".
- Create a spawn point for the right gun the same way and call it "right_bullet_spawn".Создайте spawn-точку для правого дула таким же образом и назовите ее "right_bullet_spawn".
- To spawn bullets at run-time via API on Right Mouse Button click, add the following code to the PlayerController component. We use the file parameter of the property to reference the bullet node. Don't forget to save your code in an IDE. Чтобы создавать пули во время выполнения через API при щелчке правой кнопкой мыши, добавьте следующий код в компонент PlayerController. Мы используем параметр file свойства для ссылки на ноду пули. Не забудьте сохранить свой код в IDE.PlayerController.h (C++)
#pragma once
#include <UnigineComponentSystem.h>

#include <UnigineGame.h>
#include <UnigineControls.h>
#include <UnigineStreams.h>
#include <UniginePlayers.h>
#include <UnigineWorld.h>
#include <UnigineConsole.h>
#include <UnigineMathLib.h>
#include <UnigineRender.h>

class PlayerController : public Unigine::ComponentBase
{
public:
	// declare constructor and destructor for our class and define a property name.
	COMPONENT_DEFINE(PlayerController, ComponentBase)
	// declare methods to be called at the corresponding stages of the execution sequence
	COMPONENT_INIT(init);
	COMPONENT_UPDATE_PHYSICS(updatePhysics);
//========================== NEW - BEGIN ===============================
	COMPONENT_UPDATE(update);

	// asset file that contains the bullet
	PROP_PARAM(File, bullet_path);
	// nodes in the world for bullets' spawn
	PROP_PARAM(Node, leftSpawn);
	PROP_PARAM(Node, rightSpawn);
//========================== NEW - END ===============================

protected:
	void init();
	void updatePhysics();
//========================== NEW - BEGIN ===============================
	void update();
//=========================== NEW - END ================================

private:
	void move(const Unigine::Math::vec3& direction);

	Unigine::BodyRigidPtr rigid;

	Unigine::PlayerPtr player;

	// a WorldIntersection object to store the information about the intersection
	Unigine::WorldIntersectionPtr intersection = Unigine::WorldIntersection::create();

	Unigine::Math::Vec3 pos;
//========================== NEW - BEGIN ===============================
	bool isNextLeft = false;

	// mouse fire button
	Unigine::Input::MOUSE_BUTTON mouseFireKey = Unigine::Input::MOUSE_BUTTON::MOUSE_BUTTON_RIGHT;

	Unigine::NodePtr bullet;
//=========================== NEW - END ================================

};
PlayerController.cpp (C++)#include "PlayerController.h" //========================== NEW - BEGIN =============================== #include "Projectile.h" #include "Destroy.h" //========================== NEW - END =============================== using namespace Unigine; using namespace Math; REGISTER_COMPONENT(PlayerController); void PlayerController::init() { player = Game::getPlayer(); if (node) { rigid = node->getObjectBodyRigid(); if (rigid) { rigid->setAngularScale(vec3(0.0f, 0.0f, 0.0f)); // restricting the rotation rigid->setLinearScale(vec3(1.0f, 1.0f, 0.0f)); // restricting Z movement rigid->setMaxLinearVelocity(8.0f); // clamping the max linear velocity } } } //========================== NEW - BEGIN =============================== void PlayerController::update() { if (Input::isMouseButtonDown(mouseFireKey) && !Console::isActive()) { // load the bullet and set its position bullet = World::loadNode(bullet_path); if (isNextLeft && bullet) { if (rightSpawn) { bullet->setPosition(rightSpawn->getWorldPosition()); bullet->setRotation(rightSpawn->getWorldRotation()); } } else { if (leftSpawn) { bullet->setPosition(leftSpawn->getWorldPosition()); bullet->setRotation(leftSpawn->getWorldRotation()); } } // alternate between the left and the right gun isNextLeft = !isNextLeft; } // press ESC button to close the game if (Input::isKeyDown(Input::KEY::KEY_ESC)) { Engine::get()->quit(); } } //=========================== NEW - END ================================ void PlayerController::updatePhysics() { if (!Console::isActive()) // do not process input if the console is shown { // check if W key is pressed if (Input::isKeyPressed(Input::KEY::KEY_W)) move(player->getWorldDirection(MathLib::AXIS::AXIS_Y)); // move forward // check if S key is pressed if (Input::isKeyPressed(Input::KEY::KEY_S)) move(player->getWorldDirection(MathLib::AXIS::AXIS_NY)); // move backward // check if A key is pressed if (Input::isKeyPressed(Input::KEY::KEY_A)) move(player->getWorldDirection(MathLib::AXIS::AXIS_NX)); // move left // check if D key is pressed if (Input::isKeyPressed(Input::KEY::KEY_D)) move(player->getWorldDirection(MathLib::AXIS::AXIS_X)); // move right // finding the positions of the cursor and the point moved 100 units away in the camera forward direction ivec2 mouse = Input::getMousePosition(); Vec3 p0 = player->getWorldPosition(); Vec3 p1 = p0 + Vec3(player->getDirectionFromMainWindow(mouse.x, mouse.y)) * 100; // casting a ray from p0 to p1 to find the first intersected object ObjectPtr obj = World::getIntersection(p0, p1, 1, intersection); // the first bit of the intersection mask is set to 1, the rest are 0s // finding the intersection position, creating a transformation matrix to face this position and setting the transform matrix for the body preserving current angular and linear velocities if (obj && rigid) { pos = intersection->getPoint(); pos.z = rigid->getTransform().getTranslate().z; // project the position vector to the Body Rigid pivot plane Mat4 transform = Math::setTo(rigid->getTransform().getTranslate(), pos, vec3_up, AXIS::AXIS_Y); rigid->setPreserveTransform(transform); // turn the character's body } } } // moving the rigid body with linear impulse in the specified direction void PlayerController::move(const Unigine::Math::vec3& direction) { // direction is a normalized camera axis vector if (rigid) // direction is a normalized camera axis vector rigid->addLinearImpulse(direction); } - Build and run the solution in your IDE to regenerate the PlayerController property.Создайте и запустите решение в вашей среде разработки, чтобы перегенерировать свойство PlayerController.
-
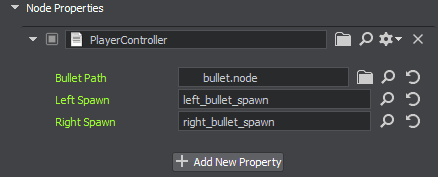
Drag left_bullet_spawn, and right_bullet_spawn to the corresponding fields of the PlayerController property of the robot node (ObjectMeshSkinned). And assign the bullet.node to the Bullet Path field.Перетащите left_bullet_spawn и right_bullet_spawn в соответствующие поля свойства PlayerController ноды robot (ObjectMeshSkinned). И присвойте bullet.node полю Bullet Path.
- Save changes to the world, go to File->Save World or press Ctrl+S hotkey.Сохраните изменения в мире, выбрав File->Save World или нажав горячую клавишу Ctrl+S.
- Build and run the game in your IDE to try out the new shooting ability.Создайте и запустите игру в своей среде разработки, чтобы опробовать новую способность к стрельбе.
Информация, представленная на данной странице, актуальна для версии UNIGINE 2.20 SDK.