Вывод изображения на Varjo с плагином AppVarjo
The AppVarjo plugin is used to support the Varjo VR-2 / VR-2 Pro head-mounted displays. Varjo VR-2 Pro currently combines the use of Varjo Software for rendering and head pose tracking and SteamVR Tracking technology for controllers and input. It is supposed that you already have Varjo Base and SteamVR installed.Плагин AppVarjo используется для поддержки головных дисплеев Varjo VR-2 / VR-2 Pro. В настоящее время Varjo VR-2 Pro сочетает в себе использование программного обеспечения Varjo для рендеринга и отслеживания позы головы, а также технологию отслеживания SteamVR для контроллеров и ввода. Предполагается, что у вас уже установлены Varjo Base и SteamVR.
Both the windowed and the full screen modes are supported. By default, on the PC display the image is rendered in mono mode (image from the left eye). Use setViewportMode() to change the mode to stereo (both eyes) as follows:Поддерживаются как оконный, так и полноэкранный режимы. По умолчанию на дисплее ПК изображение рендерится в монохромном режиме (изображение для левого глаза). Используйте setViewportMode(), чтобы изменить режим на стерео (оба глаза) следующим образом:

Смотрите также
Implementing Unigine Application with Varjo SupportРеализация приложения Unigine с поддержкой Varjo#
To use the Varjo VR-2 / VR-2 Pro virtual display with Unigine, perform the following:Чтобы использовать виртуальный дисплей Varjo VR-2 / VR-2 Pro с Unigine, выполните следующие действия:
- Download Varjo SDK and perform all required steps.Скачайте Varjo SDK и выполните все необходимые шаги.
-
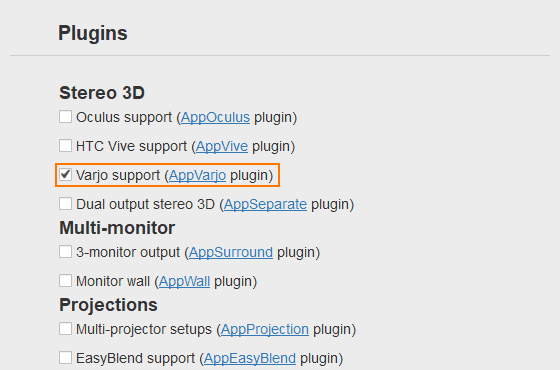
Create a new project with AppVarjo support via UNIGINE SDK Browser: click Plugins, check the Varjo support (AppVarjo plugin) option in the form that opens and click OK.
ПримечаниеTo add Varjo support to an existing project, in UNIGINE SDK Browser, click Other Actions -> Configure Project -> Plugins -> Varjo support (AppVarjo plugin) -> OK. To add Varjo support to an existing project, in UNIGINE SDK Browser, click Other Actions -> Configure Project -> Plugins -> Varjo support (AppVarjo plugin) -> OK.
 To add Varjo support to an existing project, in UNIGINE SDK Browser, click Other Actions -> Configure Project -> Plugins -> Varjo support (AppVarjo plugin) -> OK.
Создайте новый проект с поддержкой AppVarjo через UNIGINE SDK Browser: нажмите Plugins , отметьте опцию Поддержка Varjo (плагин AppVarjo) в открывшейся форме и нажмите ОК .
ПримечаниеTo add Varjo support to an existing project, in UNIGINE SDK Browser, click Other Actions -> Configure Project -> Plugins -> Varjo support (AppVarjo plugin) -> OK. Чтобы добавить поддержку Varjo в существующий проект, в браузере UNIGINE SDK нажмите Other Actions -> Configure Project -> Plugins -> Varjo support (AppVarjo plugin) -> OK.

- Implement the application logic by using functions of the AppVarjo plugin API.Реализуйте логику приложения с помощью функций API плагина AppVarjo.
- Plug in the Varjo virtual display.Подключите виртуальный дисплей Varjo.
- Launch the AppVarjo plugin on the application start-up. Запустите подключаемый модуль AppVarjo при запуске приложения.
Launching AppVarjoЗапуск AppVarjo#
To launch the plugin, specify the extern_plugin command line option on the application start-up:Чтобы запустить плагин, укажите параметр командной строки extern_plugin при запуске приложения:
main_x64.exe -extern_plugin "AppVarjo"If you run the application via UNIGINE SDK Browser, set the Stereo 3D option to AppVarjo in the Options tab and click Apply. Если вы запускаете приложение через UNIGINE SDK Browser, установите для параметра Stereo 3D значение AppVarjo на вкладке Options и щелкните Apply.
Console CommandsКонсольные команды#
The following console commands can be run for the AppVarjo plugin.Следующие команды console можно запустить для подключаемого модуля AppVarjo.
