Создание пользовательского шейдера для прямого прохода рендеринга
 Since Unigine rendering pipeline includes forward rendering pass for transparent objects, you are able to create custom shaders for the forward rendering pass. Forward pass can be added to the already created custom material or you can create new material for it. This article shows you how to write a material with custom shaders for the forward rendering pass. Поскольку конвейер рендеринга Unigine включает проход прямого рендеринга для прозрачных объектов, вы можете создавать собственные шейдеры для прохода прямого рендеринга. Прямой проход можно добавить к уже созданному пользовательскому материалу или создать для него новый материал. В этой статье показано, как написать материал с пользовательскими шейдерами для этапа прямого рендеринга.
This article assumes you have prior knowledge of the following topics. Please read them before proceeding:
- Getting StartedGetting Started
- Materials Files FormatsMaterials Files Formats
- Unigine Language Object Notation (ULON)Unigine Language Object Notation (ULON)
- Creating a Custom Shader for Deferred Rendering passCreating a Custom Shader for Deferred Rendering pass
- UUSL Data Types and Common Intrinsic FunctionsUUSL Data Types and Common Intrinsic Functions
- UUSL TexturesUUSL Textures
- UUSL SemanticsUUSL Semantics
- UUSL ParametersUUSL Parameters
- Getting Started Начало работы
- Materials Files Formats Форматы файлов материалов
- Unigine Language Object Notation (ULON) Нотация объектов Unigine Language (ULON)
- Creating a Custom Shader for Deferred Rendering pass Создание настраиваемого шейдера для этапа отложенного рендеринга
- UUSL Data Types and Common Intrinsic Functions Типы данных UUSL и общие внутренние функции
- UUSL Textures Текстуры UUSL
- UUSL Semantics Семантика UUSL
- UUSL Parameters Параметры UUSL
See AlsoСмотрите также#
- The article on Material Settings Статья о настройках материалов
- The article on Custom Materials Статья о Пользовательских материалах
Create a MaterialСоздаем материал#
First, we should create a material with the forward pass. Another way (if you already created the material with the deferred pass) is to add the forward pass to the already created custom base material). But for now let's add a new custom ULON-based base material for the forward rendering pass (similar to deferred rendering pass material. Во-первых, мы должны создать материал с прямым проходом. Другой способ (если вы уже создали материал с отложенным проходом ) - добавить прямой проход к уже созданному пользовательскому базовому материалу ). Но пока давайте добавим новый пользовательский базовый материал на основе ULON для прохода прямого рендеринга (аналогично проходу отложенного рендеринга материала.
The material will have the following structure: Материал будет иметь следующую структуру:
// describing the read-only custom forward material to be used for static meshes,
// setting prefixes to be used in shaders to refer to textures and parameters
BaseMaterial custom_forward_material <node=ObjectMeshStatic editable=false var_prefix=var texture_prefix=tex default=true>
{
	// enabling the custom transparency preset
	Option transparent=2

	// enabling the ambient pass for our material and hiding it (will be invisible in the UnigineEditor)
	State ambient=1	<internal=true>

	// describing textures
	Group "Base"
	{
		Texture2D albedo="core/textures/common/white.dds" <unit=0 pass=[deferred || ambient] tooltip="Albedo texture">
		Texture2D height="core/textures/common/red.dds" <unit=1 pass=[deferred || ambient] tooltip="Displacement map">
		Texture2D              <unit=2 type=opacity_depth>
		Texture2D              <unit=3 type=gbuffer_normal>
	}

	//////////////////////////////////////////////////////////////////////////
	// Pass
	//////////////////////////////////////////////////////////////////////////

	//describing the ambient pass with links to shaders to be used
	Pass ambient <defines="AMBIENT">
	{
		Vertex   = "shaders/vertex/ambient.vert"
		Fragment = "shaders/fragment/ambient.frag"
	}

	// describing bindings for node types to which the material is to be applicable
	Bind ObjectMeshStatic=ObjectMeshDynamic
	Bind ObjectMeshStatic=ObjectMeshSkinned
}
The key changes of the material are: Ключевые изменения материала:
- Added a new ambient state for the custom material. Добавлено новое состояние окружающей среды для пользовательского материала.
- Defined shaders for forward (ambient) rendering pass. ПримечаниеIn UNIGINE we use "ambient pass" instead of "forward pass".Определенные шейдеры для forward (ambient) проход рендеринга.In UNIGINE we use "ambient pass" instead of "forward pass".In UNIGINE we use "ambient pass" instead of "forward pass".ПримечаниеIn UNIGINE we use "ambient pass" instead of "forward pass". В UNIGINE мы используем "ambient pass"вместо"forward pass".
- Added ambient pass to the textures attributes. Добавлен проход ambient к атрибутам текстур.
- Added two new textures for the fragment shader of the ambient pass: opacity_depth and gbuffer_normal. These textures contain the information from the corresponding buffers of the deferred rendering pass. Добавлены две новые текстуры для фрагментного шейдера прохода ambient: opacity_depth и gbuffer_normal. Эти текстуры содержат информацию из соответствующих буферов прохода отложенного рендеринга.
Save the new material as custom_forward_material.basemat file to the data/materials folder. Сохраните новый материал как файл custom_forward_material.basemat в папку data/materials.
Now, in the project, there are materials with forward and deferred rendering passes. Теперь в проекте есть материалы с прямым и отложенным проходами рендеринга.
Create a Vertex ShaderСоздаем вершинный шейдер#
Since we write a simple shader example, let's use the vertex shader for the deferred rendering pass. Поскольку мы пишем простой пример шейдера, давайте использовать вершинный шейдер для прохода отложенного рендеринга .
The vertex shader code is the following: Код вершинного шейдера следующий:
// Include Unified Unigine Shader Language (UUSL) header
#include <core/shaders/common/common.h>

// Create a texture sampler
INIT_TEXTURE(1,TEX_HEIGHT)

// Input data struct
STRUCT(VERTEX_IN)
	INIT_ATTRIBUTE(float4,0,POSITION)	// Vertex position
	INIT_ATTRIBUTE(float4,1,TEXCOORD0)	// Vertex texcoord (uv)
	INIT_ATTRIBUTE(float4,2,TEXCOORD1)	// Vertex basis tangent
	INIT_ATTRIBUTE(float4,3,TEXCOORD2)	// Vertex color
	INIT_INSTANCE
END

// Our output vertex data struct
STRUCT(VERTEX_OUT)
	INIT_POSITION					// Out projected position
	INIT_OUT(float4,0)				// Texcoord (uv)
	INIT_OUT(float3,1)				// TBN matrix
	INIT_OUT(float3,2)				// TBN matrix
	INIT_OUT(float3,3)				// TBN matrix
END

MAIN_BEGIN(VERTEX_OUT,VERTEX_IN)

	// Get transform with scale and rotation (without translation)
	float4x4 transform = getObjectTransform(IN_INSTANCE);
	float4 row_0 = transform[0];
	float4 row_1 = transform[1];
	float4 row_2 = transform[2];

	// Get Modelview-space transform
	float4 in_vertex = float4(IN_ATTRIBUTE(0).xyz,1.0f);
	float4 position = mul4(row_0,row_1,row_2,in_vertex);

	// Set output UV
	float4 texcoord = IN_ATTRIBUTE(1);
	OUT_DATA(0) = texcoord;

	// Define tangent basis
	float3 tangent,binormal,normal;

	// Get normal in object-space
	getTangentBasis(IN_ATTRIBUTE(2),tangent,binormal,normal);

	// Transform object-space TBN into camera-space TBN
	normal = normalize(mul3(row_0,row_1,row_2,normal));
	tangent = normalize(mul3(row_0,row_1,row_2,tangent));
	binormal = normalize(mul3(row_0,row_1,row_2,binormal));

	// Set output TBN matrix
	OUT_DATA(1) = float3(tangent.x,binormal.x,normal.x);
	OUT_DATA(2) = float3(tangent.y,binormal.y,normal.y);
	OUT_DATA(3) = float3(tangent.z,binormal.z,normal.z);

	// Set the texture
	float4 height = TEXTURE_BIAS_ZERO(TEX_HEIGHT,texcoord.xy);

	// Perform the displacement mapping
	position.rgb += normal * (height.r) * 0.2f;

	// Set output position
	OUT_POSITION = getPosition(position);

MAIN_END

// endSave the shader as ambient.vert to the data/shaders/vertex folder of your project. Сохраните шейдер как ambient.vert в папке data/shaders/vertex вашего проекта.
Use the materials_reload command to reload shaders whilst the engine is running. Используйте команду materials_reload для перезагрузки шейдеров во время работы движка. Create a Fragment ShaderСоздаем фрагментный шейдер#
This section contains instructions on how to create a fragment shader (also known as pixel shader). Forward rendering pass doesn't use deferred buffers to render the final image. В этом разделе содержатся инструкции по созданию фрагментного шейдера (также известного как пиксельный шейдер ). Этап прямого рендеринга не использует отложенные буферы для рендеринга окончательного изображения.
Let's create the fragment shader with some interesting code. We took the current textures of deferred shaders buffers (normal buffer and depth buffer) and use them to form the output color. Here is a code of the fragment shader: Давайте создадим фрагментный шейдер с интересным кодом. Мы взяли текущие текстуры буферов отложенных шейдеров (нормальный буфер и буфер глубины) и использовали их для формирования выходного цвета. Вот код фрагментного шейдера:
- Open a plain text editor, and write the following:
Source code (UUSL)
// Include the UUSL language header #include <core/shaders/common/fragment.h> // Adds texture samplers INIT_TEXTURE(0,TEX_COLOR) INIT_TEXTURE(2,TEX_DEFERRED_DEPTH) INIT_TEXTURE(3,TEX_DEFERRED_NORMAL) // Input data structure STRUCT(FRAGMENT_IN) INIT_POSITION // Projected position INIT_IN(float4,0) // Texcoord (uv) INIT_IN(float3,1) // Vertex TBN (X) INIT_IN(float3,2) // Vertex TBN (Y) INIT_IN(float3,3) // Vertex TBN (Z) END MAIN_BEGIN(FRAGMENT_OUT,FRAGMENT_IN) // Get the UV coords float4 texcoord = IN_DATA(0); // Calculate the screen UV float2 screen_uv = IN_POSITION.xy * s_viewport.zw; // Get the texture data float4 texture_data = TEXTURE(TEX_COLOR,texcoord.xy); // Define the normal of a fragment in tangent-space STATICVAR float3 tangentspace_normal = float3(0.0f,0.0f,1.0f); // Calculate the view-space normal float3 viewspace_normal; viewspace_normal.x = dot(IN_DATA(1),tangentspace_normal); viewspace_normal.y = dot(IN_DATA(2),tangentspace_normal); viewspace_normal.z = dot(IN_DATA(3),tangentspace_normal); viewspace_normal = normalize(viewspace_normal); // Create a Gbuffer GBuffer gbuffer = GBufferDefault(); // Set normal and depth textures loadGBufferNormal(gbuffer,TEXTURE_OUT(TEX_DEFERRED_NORMAL),screen_uv); float deferred_depth = getLinearizedDepth(TEXTURE_OUT(TEX_DEFERRED_DEPTH),screen_uv); // Cut the sky from the buffer float depth_cutout = deferred_depth >= s_depth_range.y ? 0.0f : 1.0f; // Set the output color by components OUT_COLOR.r = texture_data.r*0.05 + abs(dot(viewspace_normal,gbuffer.normal)) * depth_cutout; OUT_COLOR.g = texture_data.g*0.05 + abs(dot(viewspace_normal,gbuffer.normal)) * depth_cutout; OUT_COLOR.b = texture_data.b*0.05 + abs(dot(viewspace_normal,gbuffer.normal)) * depth_cutout; OUT_COLOR.a = 1.0f; MAIN_END // endВниманиеYou should add a new line (press Enter) after closing the instruction (after MAIN_END command).Откройте простой текстовый редактор и напишите следующее:You should add a new line (press Enter) after closing the instruction (after MAIN_END command).You should add a new line (press Enter) after closing the instruction (after MAIN_END command).Source code (UUSL)// Include the UUSL language header #include <core/shaders/common/fragment.h> // Adds texture samplers INIT_TEXTURE(0,TEX_COLOR) INIT_TEXTURE(2,TEX_DEFERRED_DEPTH) INIT_TEXTURE(3,TEX_DEFERRED_NORMAL) // Input data structure STRUCT(FRAGMENT_IN) INIT_POSITION // Projected position INIT_IN(float4,0) // Texcoord (uv) INIT_IN(float3,1) // Vertex TBN (X) INIT_IN(float3,2) // Vertex TBN (Y) INIT_IN(float3,3) // Vertex TBN (Z) END MAIN_BEGIN(FRAGMENT_OUT,FRAGMENT_IN) // Get the UV coords float4 texcoord = IN_DATA(0); // Calculate the screen UV float2 screen_uv = IN_POSITION.xy * s_viewport.zw; // Get the texture data float4 texture_data = TEXTURE(TEX_COLOR,texcoord.xy); // Define the normal of a fragment in tangent-space STATICVAR float3 tangentspace_normal = float3(0.0f,0.0f,1.0f); // Calculate the view-space normal float3 viewspace_normal; viewspace_normal.x = dot(IN_DATA(1),tangentspace_normal); viewspace_normal.y = dot(IN_DATA(2),tangentspace_normal); viewspace_normal.z = dot(IN_DATA(3),tangentspace_normal); viewspace_normal = normalize(viewspace_normal); // Create a Gbuffer GBuffer gbuffer = GBufferDefault(); // Set normal and depth textures loadGBufferNormal(gbuffer,TEXTURE_OUT(TEX_DEFERRED_NORMAL),screen_uv); float deferred_depth = getLinearizedDepth(TEXTURE_OUT(TEX_DEFERRED_DEPTH),screen_uv); // Cut the sky from the buffer float depth_cutout = deferred_depth >= s_depth_range.y ? 0.0f : 1.0f; // Set the output color by components OUT_COLOR.r = texture_data.r*0.05 + abs(dot(viewspace_normal,gbuffer.normal)) * depth_cutout; OUT_COLOR.g = texture_data.g*0.05 + abs(dot(viewspace_normal,gbuffer.normal)) * depth_cutout; OUT_COLOR.b = texture_data.b*0.05 + abs(dot(viewspace_normal,gbuffer.normal)) * depth_cutout; OUT_COLOR.a = 1.0f; MAIN_END // endВниманиеYou should add a new line (press Enter) after closing the instruction (after MAIN_END command). Вам следует добавить новую строку (нажмите Enter) после закрытия инструкции (после командыMAIN_END). - Save the shader file as ambient.frag to the data/shaders/fragment folder of your project. Сохраните файл шейдера как ambient.frag в папке data/shaders/fragment вашего проекта.
Well, let's clarify what is under the hood of this fragment shader: Что ж, давайте проясним, что скрывается за этим фрагментным шейдером:
- We defined 2 textures in material:
opacity_depth (depth buffer texture) and
gbuffer_normal (normal buffer texture) to use them in our fragment shader.
Мы определили 2 текстуры в материале:
opacity_depth (текстура буфера глубины) и
gbuffer_normal (обычная буферная текстура), чтобы использовать их в нашем фрагментном шейдере. .
- We defined the depth_cutout variable to cut out the sky. Мы определили переменную depth_cutout, чтобы вырезать небо.
- We set the output color by using our initial albedo texture and the dot product of normal vectors. Мы устанавливаем выходной цвет, используя нашу исходную текстуру альбедо и скалярное произведение векторов нормалей.
- We didn't fill the G-buffer, because it's the fragment shader for ambient pass. Мы не заполнили G-buffer, потому что это фрагментный шейдер для внешнего прохода.
Use the materials_reload console command to reload shaders whilst the engine is running.
Используйте консольную команду materials_reload для перезагрузки шейдеров во время работы движка.
Editing the MaterialРедактирование материала#
After performing all these steps, you can see recently created shaders in use. Now you should open the UnigineEditor and assign the material. Выполнив все эти шаги, вы увидите, что недавно созданные шейдеры используются. Теперь вам нужно открыть UnigineEditor и назначить материал.
- Open your project in the UnigineEditor. Откройте свой проект в UnigineEditor.
- Create a primitive, for example, a sphere. Создайте примитив, например сферу.
- Assign the created material by dragging it to the the primitive. Назначьте созданный материал, перетащив его на примитив.
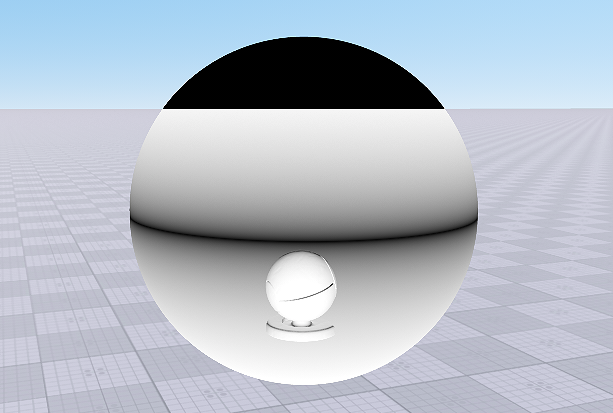
After that you'll get the following result. После этого вы получите следующий результат.