在SDK 浏览器1中处理项目
 A project is an independent entity that contains all data on your application content organized in a set of directories. The .project file containing metadata is associated with the project.项目是一个独立的实体,包含以一组目录组织的有关您的应用程序内容的所有数据。包含元数据的.project文件与项目关联。
Release and Development Builds发布和开发版本#
You can choose the Development or Release build of UNIGINE Engine:您可以选择UNIGINE Engine的Development或Release版本:
- The Development build includes additional features that can be useful for project's development (Microprofile, etc.)Development构建包含可用于项目开发的其他功能(Microprofile等)
- The Release build allows checking the final performance of the application.Release构建允许检查应用程序的最终性能。
By default, the project is configured to use Development Engine binaries that contain additional debugging tools. Development binaries of the Engine require a running SDK Browser instance, just the same way as for the UnigineEditor.默认情况下,该项目被配置为使用包含其他调试工具的 Development 引擎二进制文件。引擎的 Development 二进制文件需要一个正在运行的SDK Browser实例,就像UnigineEditor一样。
You can run your application without running SDK Browser via the launch_release file in the project folder, but first, you should reconfigure the project to use the Release binaries.您可以通过项目文件夹中的 launch_release launch_release文件在不运行SDK Browser的情况下运行您的应用程序,但首先,您应该重新配置项目以使用 Release 二进制文件。
To reconfigure the project:重新配置项目:
- Click Other Actions -> Configure Project.单击 Other Actions -> Configure Project。
- Select the Release option in the Engine drop-down.在 Engine 下拉菜单中选择 Release 选项。
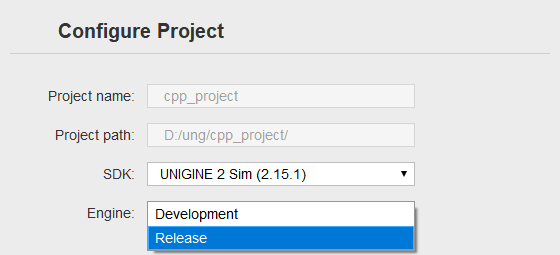
- Click the Update Configuration button at the bottom of the configuration window to save the configuration.单击配置窗口底部的 Update Configuration 按钮保存配置。
As soon as the project has been reconfigured to the Release build, it can be run without SDK Browser — run the launch_release file in the project folder.一旦项目被重新配置为 Release 版本,它就可以在没有SDK浏览器的情况下运行——运行项目文件夹中的 launch_release 文件。
The Release binaries should be used in the final build of the project.Release 二进制文件应该在项目的最终构建中使用。
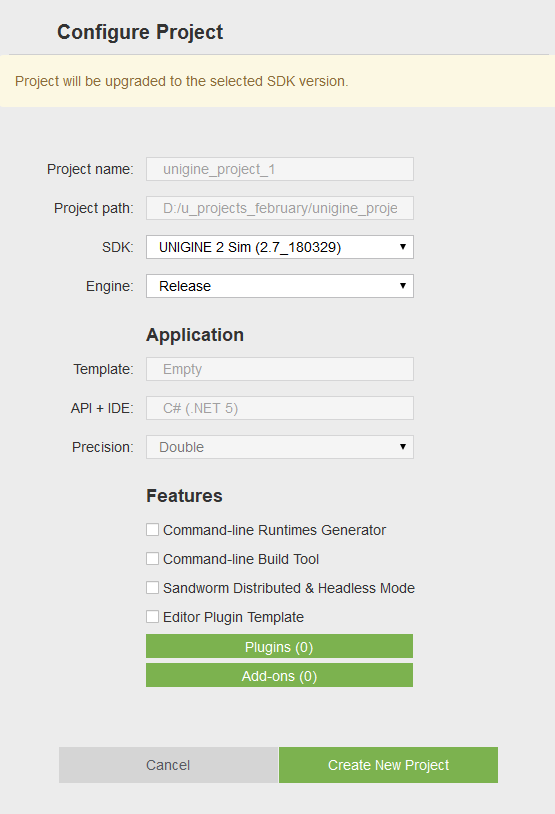
Creating New Project创建新项目#
Before starting to create new projects you should have an SDK installed. Once you have the required version of the SDK, you can create a new project as follows:在开始创建新项目之前,您应该已经安装了 SDK 。拥有所需版本的SDK后,您可以按以下方式创建一个新项目:
- Open the Projects tab in the SDK browser.
在SDK浏览器中打开Projects标签。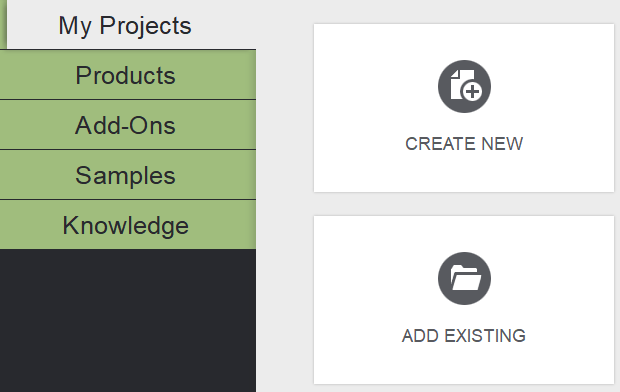
- Click Create New. The new project creation window will be opened.单击Create New。新的项目创建窗口将打开。
- Define the name of the project, choose a path to store project files, specify the SDK and UNIGINE Engine build to be used.
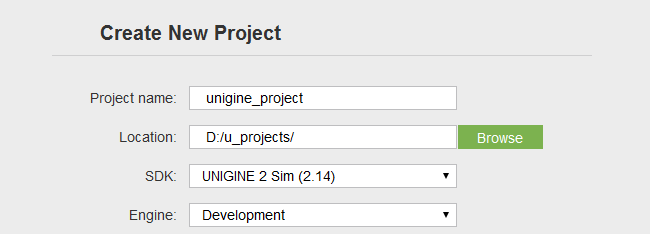
The project will be created in the <project path>/<unigine_project> folder.定义项目的名称,选择存储项目文件的路径,指定要使用的SDK和UNIGINE Engine build 。The project will be created in the <project path>/<unigine_project> folder.The project will be created in the <project path>/<unigine_project> folder.
The project will be created in the <project path>/<unigine_project> folder.该项目将在<project path>/<unigine_project>文件夹中创建。 - Specify the required application and general settings.指定所需的应用程序和常规设置。
- Specify the add-ons to be added (optional).指定要添加的附件(可选)。
- Click Create New Project. The project will appear in the projects list.
单击Create New Project。该项目将出现在项目列表中。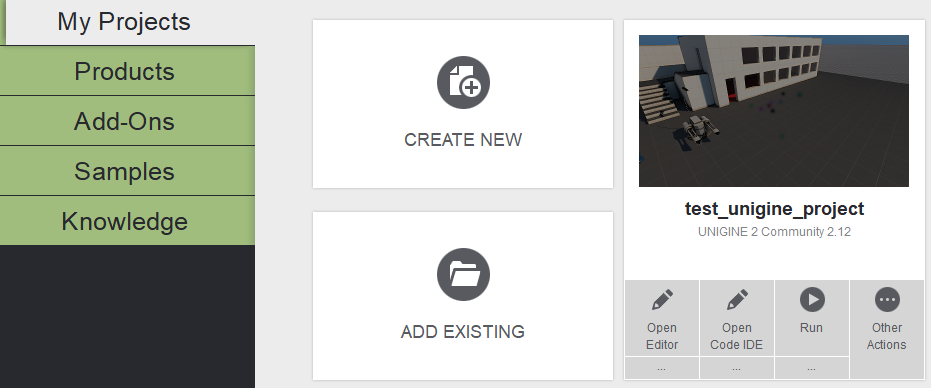
You can change the project settings any time by clicking Other Actions -> Configure Project.您可以随时单击Other Actions -> Configure Project更改项目设置。Application Settings应用程序设置#
The project can be created with the following application settings:可以使用以下应用程序设置创建项目:
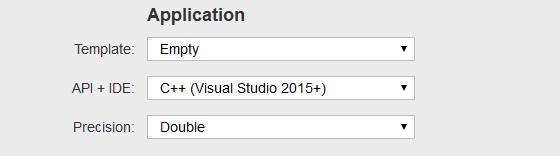
| Template | A template that is used as a basis for the project:
|
|---|---|
| API+IDE | Programming language to be used for project creation. The following APIs are available:
注意
App* plugins (AppProjection, AppSurround, AppWall, AppPanorama, and others) cannot be used in Qt-based applications.On Linux:
App* plugins (AppProjection, AppSurround, AppWall, AppPanorama, and others) cannot be used in Qt-based applications.App* plugins (AppProjection, AppSurround, AppWall, AppPanorama, and others) cannot be used in Qt-based applications.
|
| Precision | The coordinates precision to be used:
|
Features功能#
The project can be created with the following features:该项目可以创建以下功能:
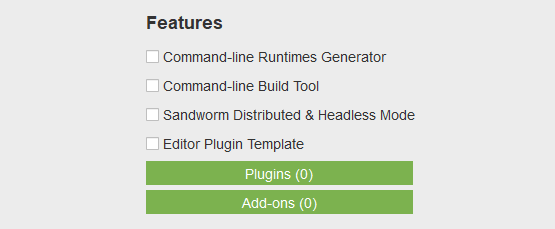
| Command-line Runtimes Generator | Enables Command-line Runtimes Generator for the project.为项目启用命令行运行时生成器。 |
|---|---|
| Command-line Build Tool | Enables the Command-line Build Tool for the project.为项目启用命令行生成工具。 |
| Sandworm Distributed & Headless Mode | Enables creation of the console application required on Worker computers for distributed computing and headless generation of terrain using the Sandworm tool for the project.支持在 Worker 计算机上创建所需的控制台应用程序,以便使用项目的Sandworm工具进行分布式计算和无头生成地形。 |
| Editor Plugin Template |
注意
After the plugin template is selected and the project created (or reconfigured), you won't be able to change the template anymore.在插件模板被选中并且项目被创建(或者重新配置)之后,你就不能再修改模板了。 |
The Plugins (0) button opens the list of available plugins:Plugins (0)按钮打开可用插件列表:
| STEREO 3D | |
| Oculus support (AppOculus plugin) | Create project with the Oculus Rift virtual display support.创建具有 Oculus Rift虚拟显示支持的项目。 |
|---|---|
| Dual output stereo 3D (AppSeparate plugin) | Output 2 separate images for each eye.
注意
The AppSeparate supports DirectX 11 only.每只眼睛输出 2张单独的图像。
The AppSeparate supports DirectX 11 only.The AppSeparate supports DirectX 11 only.注意
The AppSeparate supports DirectX 11 only.AppSeparate仅支持 DirectX 11 。 |
| Varjo support (AppVarjo plugin) | Create project with the Varjo output support.创建具有 Varjo输出支持的项目。 |
| HTC Vive support (AppVive plugin) | Create project with the HTC Vive output support.创建具有 HTC Vive输出支持的项目。 |
| MULTI-MONITOR | |
| 3-monitor output (AppSurround plugin) | Render the application across 3 monitors simultaneously.同时在 3个监视器上渲染应用程序。 |
| Monitor wall (AppWall plugin) | Render the application into the configurable number of monitors.将应用程序渲染到可配置的监视器数量中。 |
| PROJECTIONS | |
| Multi-projector setups (AppProjection plugin) | Create a project with the AppProjection plugin. All necessary files are copied and the launcher with the corresponding settings is generated.使用AppProjection插件创建一个项目。复制所有必需的文件,并生成具有相应设置的启动器。 |
| EasyBlend support (AppEasyBlend plugin) | Create a project with the AppEasyBlend plugin.使用AppEasyBlend插件创建一个项目。 |
| NETWORK | |
| ARTTracker plugin | Create a project with the ARTTracker plugin.使用 ARTTracker 插件创建一个项目。 |
| SSLSocket plugin | Create a project with the SSLSocket plugin.使用 SSLSocket 插件创建一个项目。 |
| Steam plugin | Create a project with the plugin for Steam integration.使用用于Steam集成的插件创建一个项目。 |
| Syncker plugin | Create a project with the Syncker plugin for multi-channel rendering synchronization.使用Syncker插件创建一个项目,以进行多通道渲染同步。 |
| VRPN Client plugin | Create a project with the VRPN Client plugin.使用VRPN Client插件创建一个项目。 |
| SPECIALS | |
| GPU Monitor plugin | Enable GPU frequencies and temperature monitoring for your project.为您的项目启用 GPU频率和温度监控。 |
| Interface plugin | Create a project with the Interface plugin.使用Interface插件创建一个项目。 |
| Kinect2 Plugin | Create a project with the Kinect2 plugin.使用 Kinect2 插件创建一个项目。 |
| Leap Motion plugin | Tracking hands and fingers with Leap Motion.用Leap Motion跟踪手和手指 |
| TeslaSuit plugin | Creating sensations, tracing the body motions, and capturing the user's biometrics with Teslasuit.创造感觉,追踪身体动作,用 Teslasuit捕捉用户的生物特征。 |
| GEODETIC | |
| Geodetics plugin | Plugin that allows translating GPS latitude, longitude, and altitude coordinates to X, Y, and Z and vice versa.允许将GPS纬度,经度和海拔坐标转换为X, Y和Z,反之亦然的插件。 |
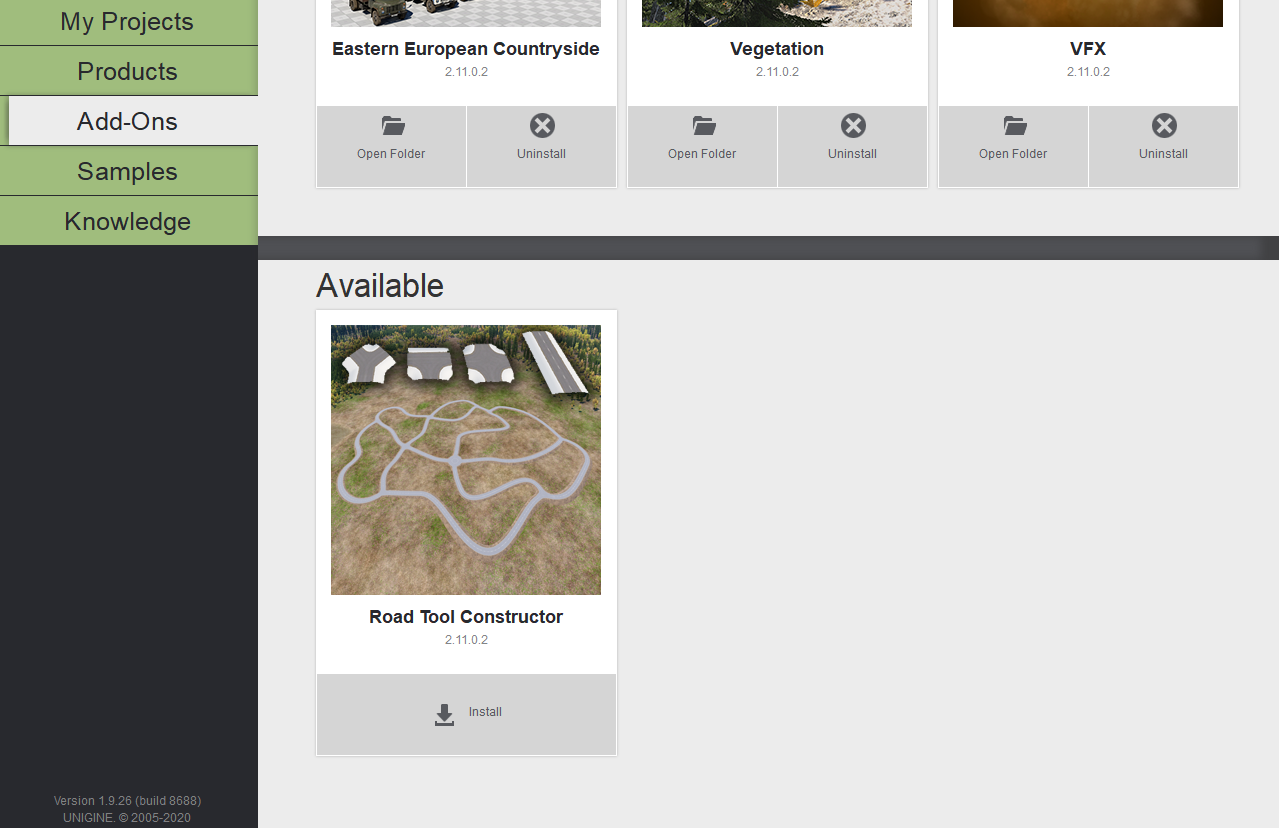
Add-Ons附加组件#
The project can be created including any add-on available in the Add-Ons tab. All required add-ons can be added both on and after project's creation.可以创建项目,包括Add-Ons选项卡中可用的任何加载项。所有必需的附件都可以在创建项目时或创建后添加。
Specifying Add-Ons on Project's Creation在创建项目时指定附加组件#
To create the project with an add-on:要创建带有附件的项目:
- Download the required add-on in the Add-Ons tab by clicking Install.
 注意Any amount of add-ons could be added to a project afterwards.通过单击Install在Add-Ons选项卡中下载所需的加载项。Any amount of add-ons could be added to a project afterwards.Any amount of add-ons could be added to a project afterwards.
注意Any amount of add-ons could be added to a project afterwards.之后可以将任何数量的附加组件添加到项目中。
注意Any amount of add-ons could be added to a project afterwards.通过单击Install在Add-Ons选项卡中下载所需的加载项。Any amount of add-ons could be added to a project afterwards.Any amount of add-ons could be added to a project afterwards.
注意Any amount of add-ons could be added to a project afterwards.之后可以将任何数量的附加组件添加到项目中。 - On the project creation, specify the add-ons to be included by clicking the Add-ons (0) button.
在项目创建上,通过单击Add-ons (0)按钮指定要包含的加载项。
- Drop the required add-ons from the Available field to In Use. You can add any amount of add-ons to the project. After all add-ons are dropped, click Ok.
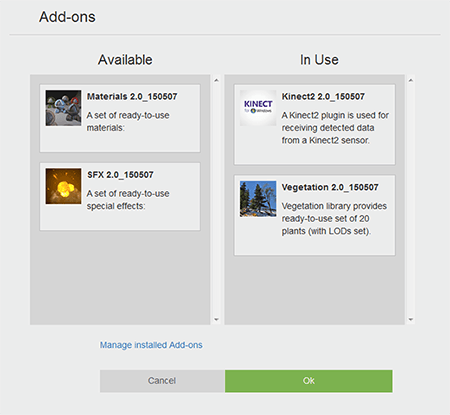 注意If you haven't downloaded the add-on, click Manage installed add-ons. You will be redirected to the page with available add-ons.将所需的附件从Available字段拖放到In Use。您可以向项目添加任意数量的附件。删除所有加载项后,单击Ok。If you haven't downloaded the add-on, click Manage installed add-ons. You will be redirected to the page with available add-ons.If you haven't downloaded the add-on, click Manage installed add-ons. You will be redirected to the page with available add-ons.
注意If you haven't downloaded the add-on, click Manage installed add-ons. You will be redirected to the page with available add-ons.如果尚未下载加载项,请单击Manage installed add-ons。您将被重定向到具有可用加载项的页面。
注意If you haven't downloaded the add-on, click Manage installed add-ons. You will be redirected to the page with available add-ons.将所需的附件从Available字段拖放到In Use。您可以向项目添加任意数量的附件。删除所有加载项后,单击Ok。If you haven't downloaded the add-on, click Manage installed add-ons. You will be redirected to the page with available add-ons.If you haven't downloaded the add-on, click Manage installed add-ons. You will be redirected to the page with available add-ons.
注意If you haven't downloaded the add-on, click Manage installed add-ons. You will be redirected to the page with available add-ons.如果尚未下载加载项,请单击Manage installed add-ons。您将被重定向到具有可用加载项的页面。 - Click Create New Project. To enable added add-ons in the project, you should follow instructions on each add-on.单击Create New Project。要在项目中启用添加的附件,应遵循每个附件上的指示。
Specifying Add-Ons for Existing Project指定现有项目的附件#
To extend an existing project with add-ons:要使用附件扩展现有项目:
- Download the required add-on in the Add-Ons tab by clicking Install.
注意Any amount of add-ons could be added to a project afterwards.通过单击Install在Add-Ons选项卡中下载所需的加载项。Any amount of add-ons could be added to a project afterwards.Any amount of add-ons could be added to a project afterwards.
注意Any amount of add-ons could be added to a project afterwards.之后可以将任何数量的附加组件添加到项目中。
- Click Other Actions -> Configure Project.
单击Other Actions -> Configure Project。
- Click the Add-ons (0) button and drag and drop the required add-ons from the Available field to In Use.
注意If you haven't downloaded the add-on, click Manage installed add-ons. You will be redirected to the page with available add-ons.单击Add-ons (0)按钮,然后将所需的附件从Available字段拖放到In Use。If you haven't downloaded the add-on, click Manage installed add-ons. You will be redirected to the page with available add-ons.If you haven't downloaded the add-on, click Manage installed add-ons. You will be redirected to the page with available add-ons.
注意If you haven't downloaded the add-on, click Manage installed add-ons. You will be redirected to the page with available add-ons.如果尚未下载加载项,请单击Manage installed add-ons。您将被重定向到具有可用加载项的页面。
- Click Ok and then click Update Configuration.单击Ok,然后单击Update Configuration。
Adding Existing Project添加现有项目#
To add an existing project to the browser:要将现有项目添加到浏览器:
- Click Add Existing in the Projects tab.
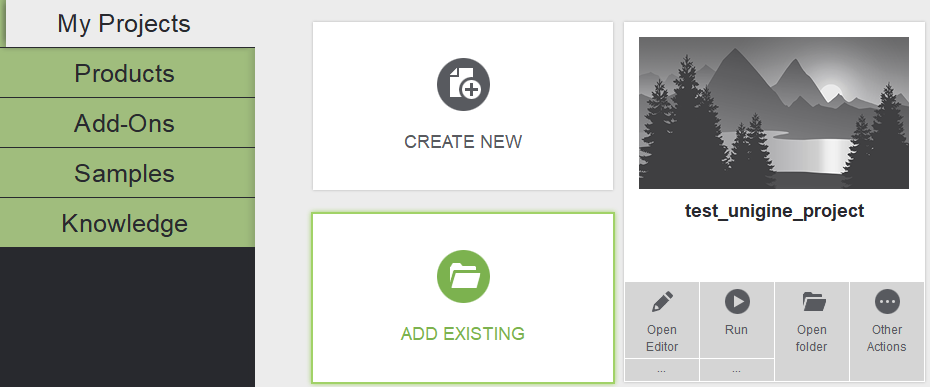 单击Projects选项卡中的Add Existing。
- In the file dialog window that opens, specify the path to the project folder and click Apply. The project will appear in the projects list.
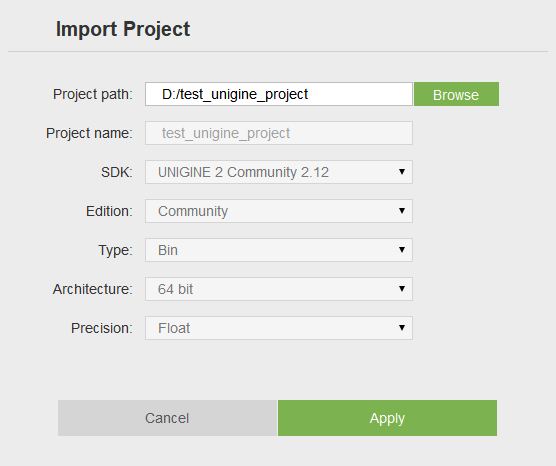 在打开的文件对话框窗口中,指定项目文件夹的路径,然后单击Apply。该项目将出现在项目列表中。
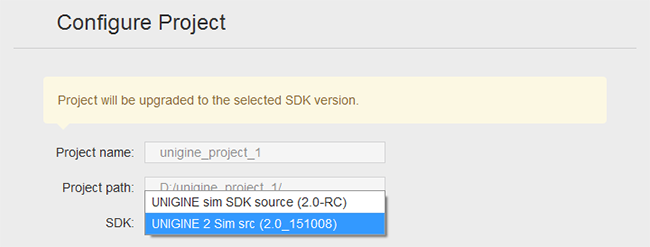
If the added project was created in the SDK of a previous version, it will be marked with the Upgrade available label.如果添加的项目是在以前版本的SDK中创建的,则它将标有Upgrade available标签。Upgrading Existing Project升级现有项目#
Projects that require upgrade are marked with the Upgrade available label: 需要升级的项目带有Upgrade available标签:
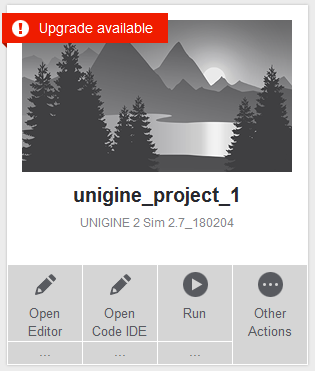
To upgrade your project to the newest installed version of UNIGINE SDK:要将项目升级到UNIGINE SDK的最新安装版本:
- Click this label or Other Actions -> Configure Project. The following form will open:
 单击此标签或Other Actions -> Configure Project。将打开以下格式:
- Choose the newest installed version of the SDK and click Update Configuration.
 选择最新安装的SDK版本,然后单击Update Configuration。
- Specify a path to the backup folder into which the original project will be copied. Leave Migrate Content checked and click Upgrade Project.
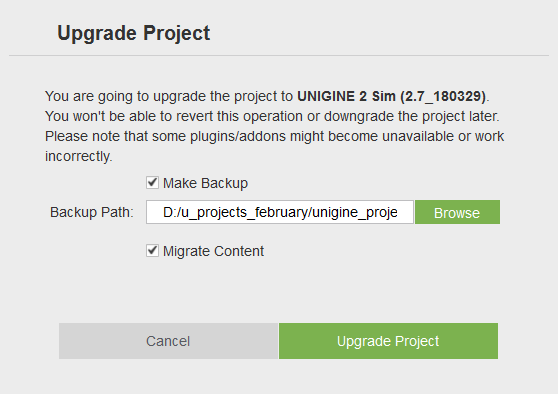 指定将原始项目复制到的备份文件夹的路径。选中Migrate Content,然后单击Upgrade Project。
The project will be upgraded automatically. You can also manually upgrade the project by running the upgrade script. In both cases, the same script will be used.该项目将自动升级。您还可以通过运行升级脚本手动升级项目。在这两种情况下,将使用相同的脚本。
The source code should be upgraded manually by using the Migration Guide.应该使用 迁移指南 手动升级源代码。Running Project with Default Settings使用默认设置运行项目#
There are several options of running a project with default settings:有一些使用默认设置运行项目的选项:
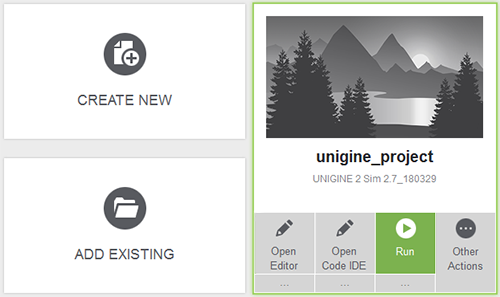
- Run the project without the loaded editor by clicking Run.
 单击Run,在没有加载的编辑器的情况下运行项目。
- Run the project with the loaded editor by clicking Open Editor.
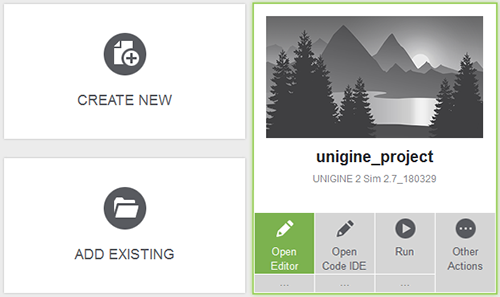 单击Open Editor,使用加载的编辑器运行项目。
Clicking Open Editor will only launch the Editor, you will have to load the world manually: via the console, via the File -> Open World in the Menu Bar of the UnigineEditor, or by double-clicking the *.world file in the Asset Browser.点击Open Editor仅会启动编辑器,您将必须手动加载世界:通过控制台,通过UnigineEditor菜单栏中的File -> Open World, 或在Asset Browser中双击*.world文件。You can also use launchers created by default in the project folder:您还可以使用在项目文件夹中默认创建的启动器:
-
 launch_debug — the launcher of the project's debug version.
launch_debug —项目的调试版本的启动器。
launch_debug — the launcher of the project's debug version.
launch_debug —项目的调试版本的启动器。 -
launch_editor — the launcher of the project's with the loaded editor.
launch_editor-使用已加载的编辑器启动项目的启动器。
-
launch_release — the launcher of the project's release version.
launch_release-项目发行版本的启动器。注意要使用发布启动器,您应该首先将你的项目配置为 Release 二进制文件。
Running Project with Custom Settings使用自定义设置运行项目#
There are also several options of running project with custom settings:使用自定义设置来运行项目还有几种选择:
- Run the project without the loaded editor by clicking an ellipsis under the Run button:
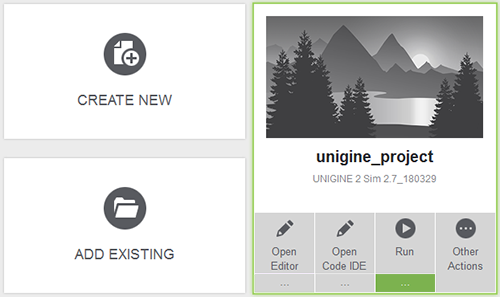
In the Customize Run Options form that opens, set the required values and click Run.通过单击Run按钮下的省略号来运行没有加载的编辑器的项目:In the Customize Run Options form that opens, set the required values and click Run.In the Customize Run Options form that opens, set the required values and click Run.
In the Customize Run Options form that opens, set the required values and click Run.在打开的Customize Run Options表单中,设置所需的值,然后单击Run。 - Run the project with the loaded editor by clicking an ellipsis under the Open Editor button:

In the Customize UnigineEditor Options form that opens, set the required values and click Edit.通过单击Open Editor按钮下的省略号,使用加载的编辑器运行项目:In the Customize UnigineEditor Options form that opens, set the required values and click Edit.In the Customize UnigineEditor Options form that opens, set the required values and click Edit.
In the Customize UnigineEditor Options form that opens, set the required values and click Edit.在打开的Customize UnigineEditor Options表单中,设置所需的值,然后单击Edit。
Clicking Open Editor will only launch the Editor, you will have to load the world manually via the console or via the File -> Open World in the main menu of the UnigineEditor.单击Open Editor仅会启动编辑器,您将必须通过控制台或通过UnigineEditor菜单栏中的File -> Open World。Customize Run Options自定义运行选项#
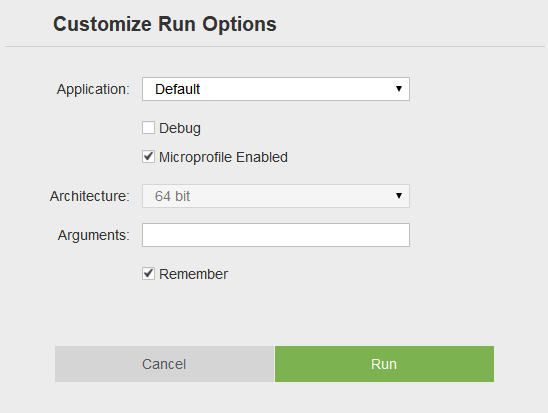
Via this form, the project without the loaded editor can be run with the custom settings.通过此表单,可以使用自定义设置来运行没有加载编辑器的项目。
Depending on the value of the Application option, different sets of options are available:根据Application选项的值,可以使用不同的选项集:
- Default — the default main application (<project_name>_x*.exe) will be run:
 The default main application should be used when only UnigineScript is used to implement the project. In this case, the following options can be customized:The default main application should be used when only UnigineScript is used to implement the project. In this case, the following options can be customized:
The default main application should be used when only UnigineScript is used to implement the project. In this case, the following options can be customized:Indicates whether debug or release version of the application should be run.Run the application with the Microprofile tool enabled. Start-up command-line options.Indicates whether to remember the specified custom settings for future run or not.Default —将运行默认的主应用程序(<project_name>_x*.exe):Debug Indicates whether debug or release version of the application should be run.Indicates whether debug or release version of the application should be run.Microprofile Enabled Run the application with the Microprofile tool enabled.Run the application with the Microprofile tool enabled.Arguments Start-up command-line options. Start-up command-line options.Remember Indicates whether to remember the specified custom settings for future run or not.Indicates whether to remember the specified custom settings for future run or not.
The default main application should be used when only UnigineScript is used to implement the project. In this case, the following options can be customized:当仅使用 UnigineScript 实施项目时,应使用默认的主应用程序。在这种情况下,可以自定义以下选项:Debug Indicates whether debug or release version of the application should be run.指示应运行应用程序的调试版本还是发行版。Microprofile Enabled Run the application with the Microprofile tool enabled.启用 Microprofile 工具运行该应用程序。Arguments Start-up command-line options.启动命令行选项。Remember Indicates whether to remember the specified custom settings for future run or not.指示是否记住指定的自定义设置以供将来运行。 - Custom — a custom main application will be run:
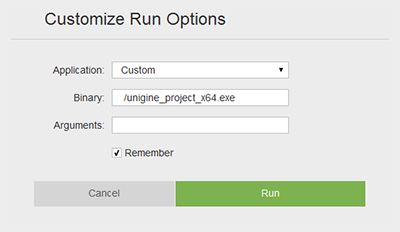 This option should be chosen if the C++ or C# API is used to implement the project (besides UnigineScript). In this case, the following options can be customized:This option should be chosen if the C++ or C# API is used to implement the project (besides UnigineScript). In this case, the following options can be customized:
This option should be chosen if the C++ or C# API is used to implement the project (besides UnigineScript). In this case, the following options can be customized:Name of the custom main application. Here the name of the compiled binary executable located in the bin folder of the project should be specified. If the binary executable is located outside this folder, a path to it relative to the bin folder should be specified. Start-up command-line options.Indicates whether to remember the specified custom settings for future run or not.Custom —将运行自定义的主应用程序:Binary Name of the custom main application. Here the name of the compiled binary executable located in the bin folder of the project should be specified. If the binary executable is located outside this folder, a path to it relative to the bin folder should be specified.Name of the custom main application. Here the name of the compiled binary executable located in the bin folder of the project should be specified. If the binary executable is located outside this folder, a path to it relative to the bin folder should be specified.Arguments Start-up command-line options. Start-up command-line options.Remember Indicates whether to remember the specified custom settings for future run or not.Indicates whether to remember the specified custom settings for future run or not.
This option should be chosen if the C++ or C# API is used to implement the project (besides UnigineScript). In this case, the following options can be customized:如果使用C++ or C# API实施项目(除UnigineScript外),则应选择此选项。在这种情况下,可以自定义以下选项:Binary Name of the custom main application. Here the name of the compiled binary executable located in the bin folder of the project should be specified. If the binary executable is located outside this folder, a path to it relative to the bin folder should be specified.定制主应用程序的名称。在这里,应指定位于项目bin文件夹中的已编译二进制可执行文件的名称。如果二进制可执行文件位于此文件夹之外,则应指定相对于bin文件夹的二进制路径。Arguments Start-up command-line options.启动命令行选项。Remember Indicates whether to remember the specified custom settings for future run or not.指示是否记住指定的自定义设置以供将来运行。
Customize UnigineEditor Options自定义UnigineEditor选项#

| Additional arguments | Start-up command-line options.启动命令行选项。 |
|---|---|
| Debug | The editor version (debug or release) that will be used for project's editing.将用于项目编辑的编辑器版本(调试或发行版)。 |
| Microprofile Enabled | Run the application with the Microprofile tool enabled.启用 Microprofile 工具运行该应用程序。 |
| Remember | Indicates whether to remember the specified custom settings for a future run or not.指示是否记住指定的自定义设置以备将来运行。 |
Editing Project编辑项目#
To open the project for editing:要打开项目进行编辑:
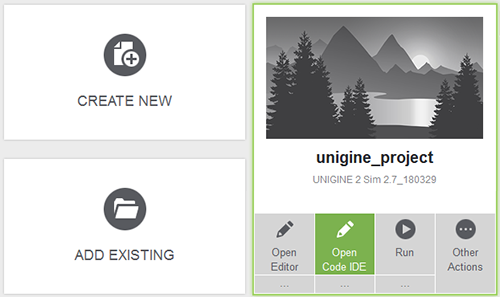
- On Windows, click Open Code IDE:
 The project will be opened for editing in an associated tool. To change a tool, click an ellipsis under Open Code IDE. By default, the following form will open:The project will be opened for editing in an associated tool. To change a tool, click an ellipsis under Open Code IDE. By default, the following form will open:
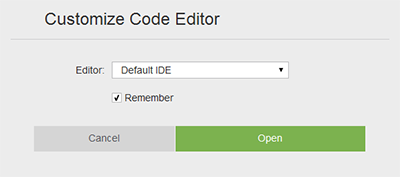 Choose Custom in the drop-down list and specify a path to a custom tool (e.g. IDE or editor) with required arguments:Choose Custom in the drop-down list and specify a path to a custom tool (e.g. IDE or editor) with required arguments:
The project will be opened for editing in an associated tool. To change a tool, click an ellipsis under Open Code IDE. By default, the following form will open:Choose Custom in the drop-down list and specify a path to a custom tool (e.g. IDE or editor) with required arguments:在Windows上,单击Open Code IDE: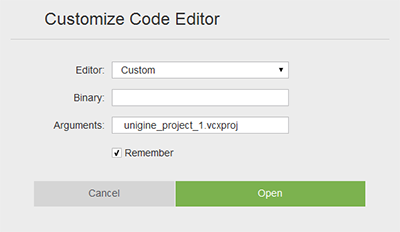 The project will be opened for editing in an associated tool. To change a tool, click an ellipsis under Open Code IDE. By default, the following form will open:将打开该项目,以便在关联的工具中进行编辑。要更改工具,请单击Open Code IDE下的省略号。默认情况下,将打开以下表单:
Choose Custom in the drop-down list and specify a path to a custom tool (e.g. IDE or editor) with required arguments:在下拉列表中选择Custom,然后使用必需的参数指定自定义工具(例如IDE或编辑器)的路径:
The project will be opened for editing in an associated tool. To change a tool, click an ellipsis under Open Code IDE. By default, the following form will open:将打开该项目,以便在关联的工具中进行编辑。要更改工具,请单击Open Code IDE下的省略号。默认情况下,将打开以下表单:
Choose Custom in the drop-down list and specify a path to a custom tool (e.g. IDE or editor) with required arguments:在下拉列表中选择Custom,然后使用必需的参数指定自定义工具(例如IDE或编辑器)的路径:
- On Linux, click Open folder and then edit code in an associated tool:
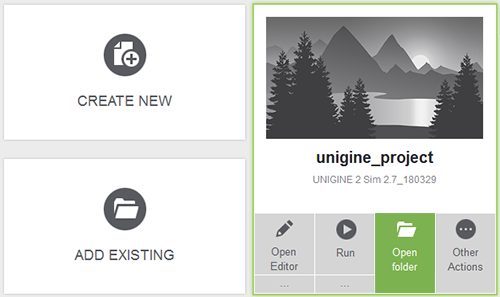 在Linux上,单击Open folder,然后在关联的工具中编辑代码:
See Also也可以看看#
- Articles in the Programming Overview section to learn how to edit the opened project 编程概述 部分中的文章,以了解如何编辑打开的项目
- The video tutorial demonstrating how to change the IDE视频教程演示如何更改IDE
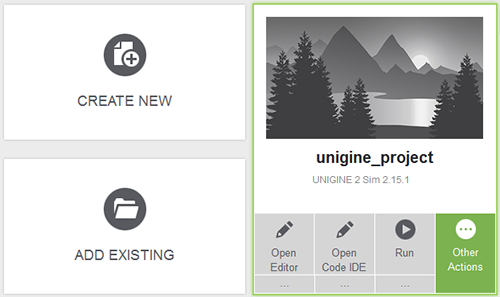
Other Actions其他行为#
When clicking the Other Actions button, the following form opens: 单击Other Actions按钮时,将打开以下表单:
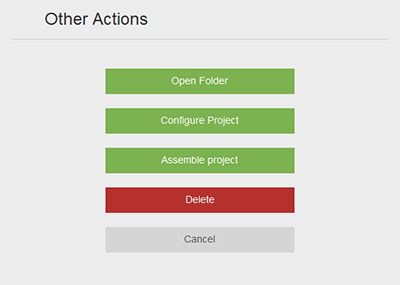
| Configure Project | Change project settings.更改项目设置。 |
|---|---|
| Open Folder | Open the project folder.打开项目文件夹。 |
| Delete | Delete the project.删除项目。 |
Updating Project Configuration更新项目配置#
When clicking Other Actions -> Configure Project, the following form opens: 单击Other Actions -> Configure Project时,将打开以下表单:

Via this form, you can change settings of an existing project: the UNIGINE Engine build used for the project, the version of the release application, the coordinates precision, and the general settings. This option should also be used when you need to upgrade the existing project to the newest SDK version.通过此表单,您可以更改现有项目的设置:用于该项目的 UNIGINE Engine版本,发布应用程序的版本,坐标精度和常规设置。当您需要将现有项目升级到最新的SDK版本时,也应该使用此选项。
Moreover, you can restore the project's files that were corrupted, missed, or mistakenly modified. For this, you should leave settings in the form unchanged and press the Update Configuration button.
In this case, the following files of the project will be restored (they will be copied from the SDK):此外,您可以还原已损坏,丢失或错误修改的项目文件。为此,您应保持表格形式的设置不变,然后按Update Configuration按钮。
在这种情况下,将还原项目的以下文件(它们将从SDK复制):
- 二进制文件
- core.ung, editor.ung and scripts.ung
- 启动器
If some of the files listed above are changed, the .modified postfix is added to names of such files. At that, the files from the SDK will also be copied.如果更改了上面列出的某些文件,则会将.modified后缀添加到此类文件的名称。届时,SDK中的文件也将被复制。