Importing Cars to City Traffic
This article is a tutorial that will help you to import your car to City Traffic.
Requirements
- It is supposed that you already have a 3D model of a car and wheels ready to be exported.
- It is supposed that City Traffic has been already installed.
Exporting Options
This section contains some important rules that you should keep to while exporting your model from a 3d editor. Meshes of a car and wheels are to be exported separately.
To import your car mesh to City Traffic, you should export it with specific parameters:
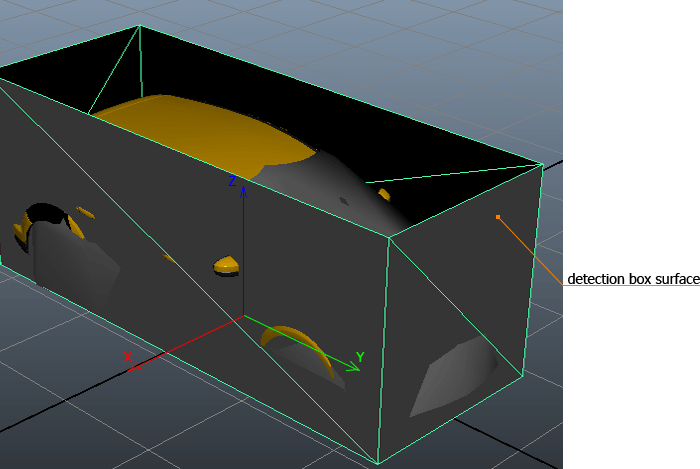
- Your car should have a detection box surface. This surface is used to detect the car by intersection rays.
- The orientation of the car should be +Y. That means the front of the car should have a positive Y-direction.
 WarningIt is NOT recommended to change orientation of the mesh inside the Unigine editor. You need to set the mesh in a 3d editor and then export it!
While exporting wheels, you should take into account the following:
- You need to export vertical standing wheel.

- You should export 2 wheels (left and right) from a 3d editor, or export one wheel with different surfaces for the right and left sides, because it is strictly forbidden to rotate the wheel in the Unigine editor.
Adding an Entity
This section describes, how to add the exported car from the 3d editor to City Traffic.
As City Traffic is based on Game Framework, each vehicle is an entity with a node reference assigned. The base class for vehicles is named "Car". Each car variation should be saved as a separate .node file.
To create a new entity, you should do the following:
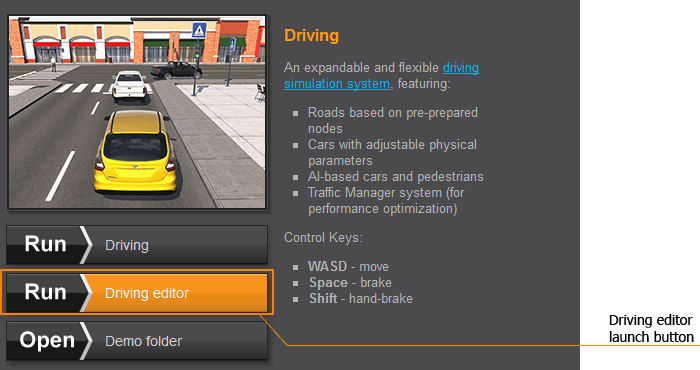
- Launch Driving Editor in the SDK browser.
- Open the Game Framework plugin window by clicking Plugins -> Game Framework.
- In the window that opened, choose the Car entity and click the New Entity button to create a new car entity that inherited from the Car base class.
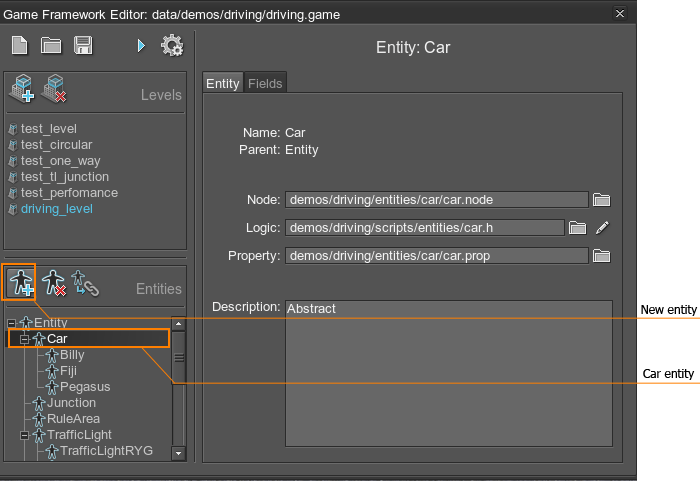
- Click Create to create the entity for your car.
- Choose the created entity and click the Edit logic button.
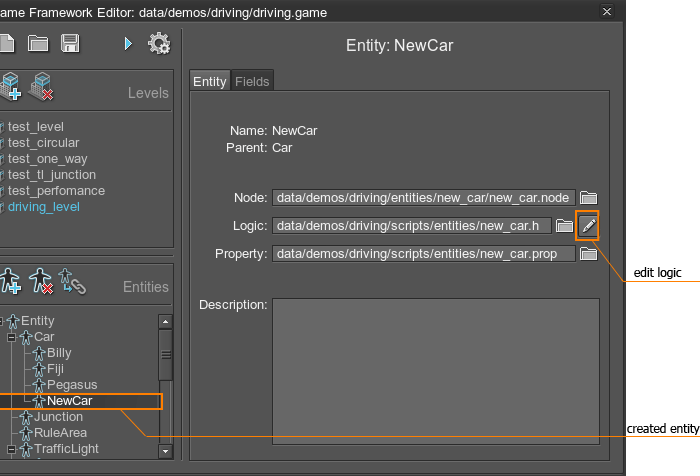
- In the opened file, comment the following part of the code:
Source code
void onInit() {
	// place your init code here
}

void onShutdown() {
	// place your shutdown code here
}

void onUpdate() {
	// place your update code here
}

void onRender() {
	// place your render code here
}

void onFlush() {
	// place your flush code here
}
Importing a Car
After creating the entity, you need to add the car to City Traffic. To import the car, you should do the following:
- Add a car as an ObjectMeshStatic to City Traffic.
- Open the Nodes panel and select the node of the car you just added. Switch to the Surfaces tab.

- Choose the detection box surface and change the following parameters:
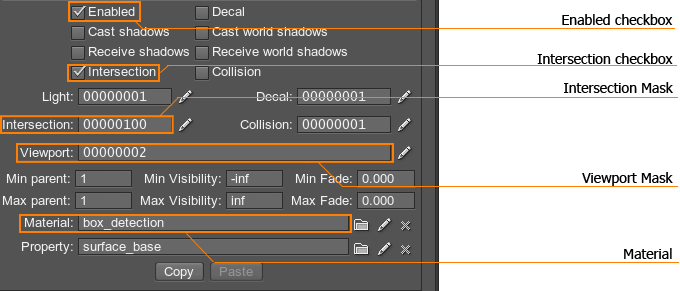
- Uncheck all the checkboxes except Intersection and Enabled. Only Intersection and Enabled checkboxes should be enabled.
- Change Intersection mask to 00000100.
- Change Viewport mask to 00000002.
- Set the box_detection material.
- Uncheck Intersection and Collision checkboxes for of the rest surfaces.
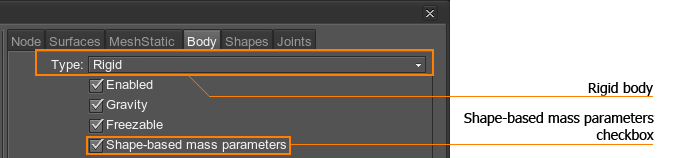
- Add the Rigid body to the node and check the Shape-based mass parameters checkbox if it is not checked.
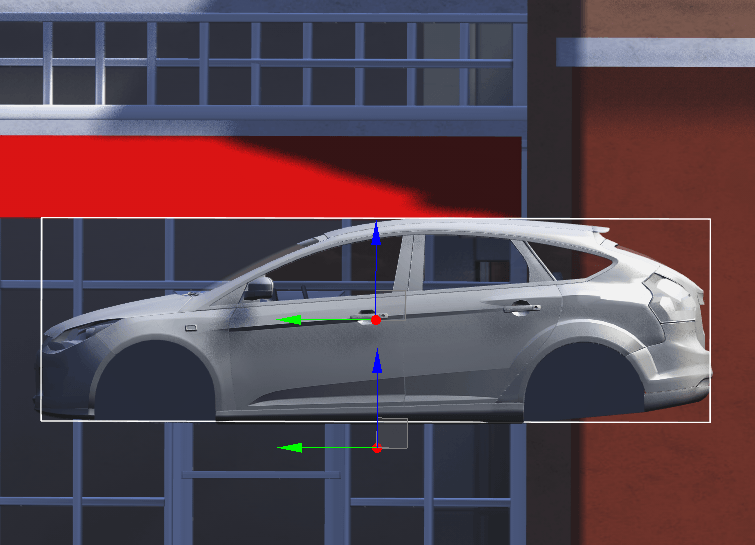
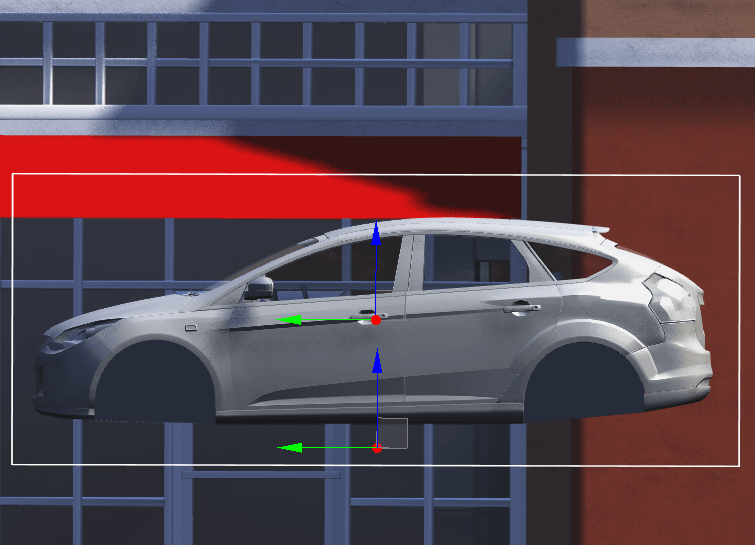
- Add the Box shape to the node and specify the size and the position of the shape. Physics of the world has influence on the added shape that is why you should specify shape boundaries close to the boundaries of the car body mesh.

 Correct shape size and positionIncorrect shape size and position
 - Change the following Shape parameters:
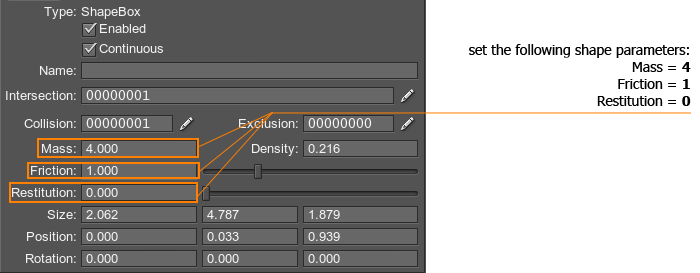
- Set the Mass parameter to 4.
- Set the Friction parameter to 1.
- Set the Restitution parameter to 0.
WarningDo NOT change the X value of the Shape position! - Uncheck the Shape-based mass parameters checkbox in the Body tab.
Importing Wheels
After adding a car, you should add wheels to it:
- Add a wheel as an ObjectMeshStatic to City Traffic.
- Make the wheel the child node of the car.
- Set the wheel to the car. The wheel should be in the maximum height position of car suspension (like when the car is lifted with a jack).
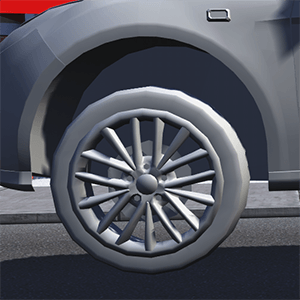
 Correct wheel positionIncorrect wheel position
 - Uncheck Intersection and Collision checkboxes for each surface of the wheel.
- Add the Rigid body to the node and uncheck the Shape-based mass parameters checkbox if it is checked.
- Assign the car_wheel property to the wheel and click the Edit property button.
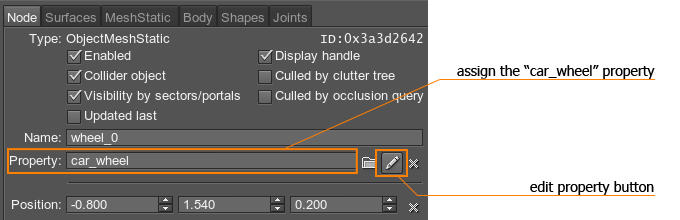
- Specify the necessary parameters for the wheel
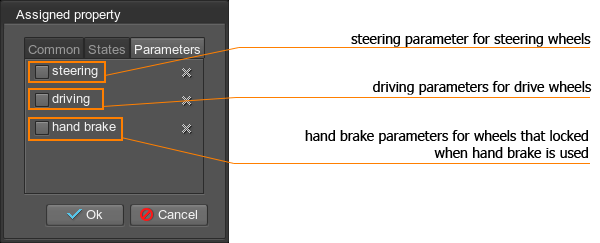 NoticeBy default we use front wheels for steering and driving, rear wheels for hand brake.
 - Add other wheels to the car. Perform the previous steps for each added wheel.
WarningDo NOT rotate the wheel in the Unigine editor! You should have 2 different wheel meshes for the right and left wheel, or one wheel mesh with right and left surfaces!NoticeIf you want to clone the wheel node, do not forget to specify property parameters for it.
Adding a NodeReference to the Entity
After creating a car node with wheels, you should create a node reference for the already created entity. You should do the following:
- Choose your car node and click the Make a NodeReference button.
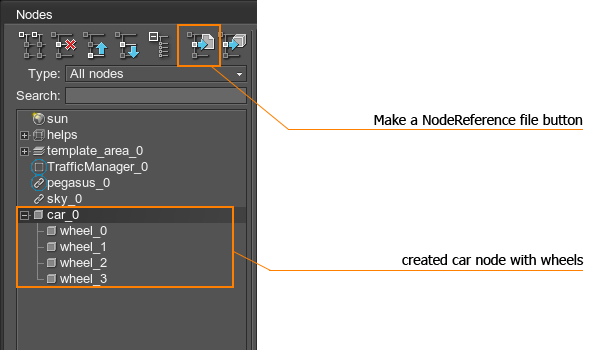
- In the dialog that opens, choose a folder to save the node and specify a name for the node file.
After the NodeReference file has been created, you should assign it to the entity. For that, do the following:
- Open the Game Framework plugin window by clicking Plugins -> Game Framework.
- Choose your entity and click the Select node file button.

- In the dialog that opens, choose saved node file.
NoticeAfter the NodeReference file has been created, you can remove the car node from the world.
Now you have the entity with the assigned node. To add it to the world, just drag and drop the entity (from Game Framework plugin window) to the editor.
If you added a car entity to the world and have troubles with it (for example, wheels of the car is above the ground) you should specify parameters of the added node. For that, open the Nodes window, select added entity node and choose the Entity Fields tab.

Here, you can find a lot of parameters which can help you to tune your car behavior. For example:
- If you want to control your car, you should set Driver Type parameter to Player and set the Camera Target checkbox.
WarningOnly one entity can have Camera Target checkbox enabled!
- If wheels of the car is above the ground, specify the Wheel Radius parameter.