VR入门
 The article reviews the creation of C# VR projects only. You can switch to the C++ version in the upper right corner of the page.本文仅回顾了C#VR项目的创建。 您可以在页面右上角切换到C++版本。
This article is for anyone who wants to start developing Virtual Reality projects in UNIGINE and is highly recommended for all new users. We're going to use the VR Template for C# to easily get started on our own project for VR. We will also look into a VR sample (included in the C# VR template), which can be used as the basis for a VR application, and consider some simple examples of extending the basic functionality of this sample.本文适用于任何想要开始在UNIGINE中开发虚拟现实项目的人,强烈推荐给所有新用户。 我们将使用C#的VR Template来轻松地开始我们自己的VR项目。 我们还将研究VR Sample,它可以用作VR应用程序的基础,并考虑一些扩展此示例基本功能的简单示例。
So, let's get started!那么,我们开始吧!
1. Making a Template Project1、制作模板项目#
UNIGINE has a ready-to-use template for development of C# VR projects. It supports all SteamVR-compatible devices out of the box. It also includes a sample called vr_sample the corresponding world with a set of props and components is located in the data/vr_template/vr_sample/ folder (please do not confuse it with the VR Sample Demo project which is available for C++ API only). The template provides automatic loading of controller models in run-time. Additionally, it includes the implementation of basic mechanics such as grabbing and throwing objects, pressing buttons, opening/closing drawers, and a lot more.UNIGINE有一个现成的模板用于开发C#VR项目。 它支持所有SteamVR兼容的设备开箱即用。 它还包括一个示例项目(VR Sample)。 该模板提供了在运行时自动加载控制器模型。 此外,它还包括基本机制的实现,如抓取和投掷物体,按下按钮,打开/关上桌子抽屉等等。
The world in this sample project has its settings optimized for the best performance in VR.此示例项目中的世界已针对VR中的最佳性能进行了优化设置。Both the template and the sample project are created using the Component System - components attached to objects determine their functionality.模板和示例项目都是使用组件系统创建的-附加到对象的组件确定其功能。
You can extend object's functionality simply by assigning it more components. For example, the laser pointer object in the vr_sample has the following components attached:您可以通过分配更多组件来扩展对象的功能。 例如,VR Sample中的激光指示器对象具有附加的以下组件:
- VRTransformMovableObject - enables grabbing and throwing an objectVRTransformMovableObject 允许抓取和抛出一个对象
- VRLaserPointer - enables casting a ray of light by the objectVRLaserPointer 启用投射光线的对象
You can also implement your own components to extend functionality.您还可以实现自己的组件来扩展功能。
The main features of the embedded vr_sample:VR Sample的主要特点:
- VR supportVR支持
- A set of physical objects that can be manipulated via controllers (physical objects, buttons, drawers)一组可以通过控制器(物理对象,按钮,抽屉)操纵的物理对象
- An interactive laser pointer object交互式激光指示器对象
- Teleportation around the scene场景周围的传送
- GUIGUI
- Interaction with GUI objects via controllers通过控制器与GUI对象的交互
Let's create a project based on the C# VR Template.让我们创建一个基于C#VR Template的项目。
- Open SDK Browser, go to the My Projects tab, and click Create New.打开SDK Browser,转到My Projects选项卡,然后单击Create New。
-
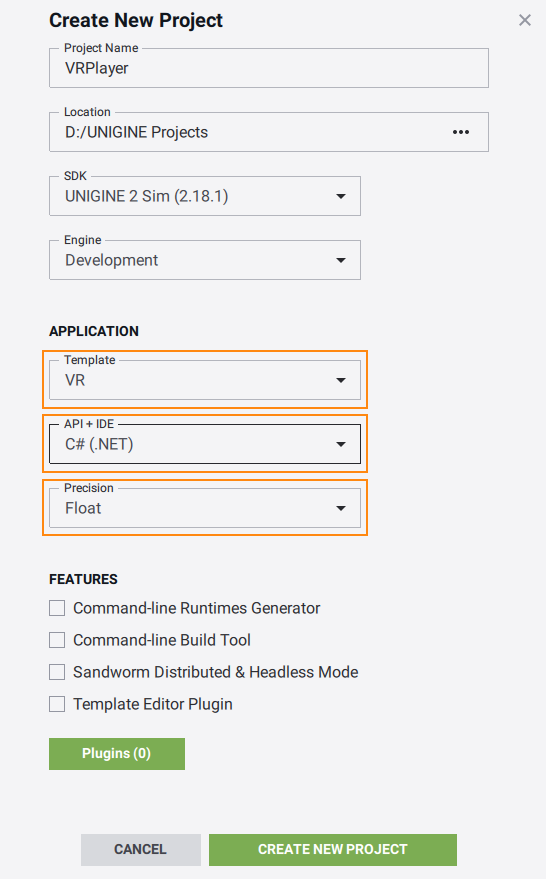
In the Create New Project window, specify the project name VRProject, select VR in the Template menu, then C#(.NET) in the API+IDE menu, and select Float in the Precision menu. Then click Create New Project.在Create New Project窗口中,指定项目名称VRProject,在Template菜单中选择VR,然后在API+IDE菜单中选择C#(.NET),在Precision菜单中选择Float。 然后点击Create New Project。
- When the project is successfully created, open it in UnigineEditor.当项目创建成功后,在UnigineEditor中打开它。
- In the Asset Browser, open the vr_sample.world file located in the data/vr_template/vr_sample/ folder. We will work with this world.在资源浏览器中,打开位于data/vr_template/vr_sample/文件夹中的vr_sample.world文件。 我们将处理这个场景。
2. Setting Up a Device and Configuring Project2、设置设备和配置项目#
Suppose you have successfully installed your Head-Mounted Display (HMD) of choice.假设您已成功安装所选的头戴式显示器(HMD)。
Learn more on setting up devices for diffent VR platforms. If you have any difficulties, please visit the Steam Support. In case of Vive devices, this Troubleshooting guide might be helpful.了解有关为不同 VR 平台设置设备的详细信息。 如果您遇到任何困难,请访问 Steam 支持。 对于 Vive 设备,此故障排除指南可能会有所帮助。
For Mixed Reality application development, you will need to download and install Varjo Base in addition to SteamVR.对于Mixed Reality应用程序开发,除了SteamVR之外,您还需要下载并安装Varjo Base。All SteamVR-compatible devices are supported out-of-the-box.所有SteamVR兼容的设备都支持开箱即用。
By default, VR is not initialized. So, you need to perform one of the following:默认情况下,VR未初始化。 因此,您需要执行以下操作之一:
-
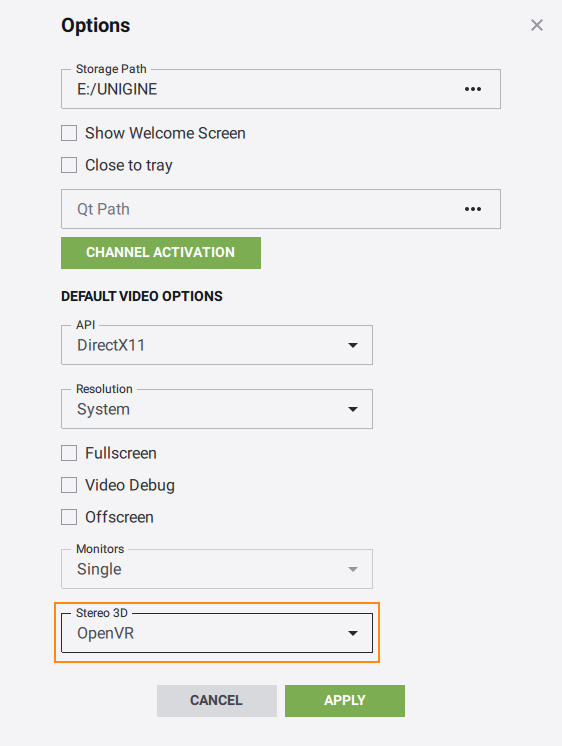
If you run the application via UNIGINE SDK Browser, set the Stereo 3D option to the value that corresponds to the installed HMD (OpenVR or Varjo) in the Global Options tab and click Apply.如果通过UNIGINE SDK浏览器运行应用程序,请在Global Options选项卡中将Stereo 3D选项设置为与已安装HMD(OpenVR或Varjo)相对应的值,然后单击Apply。
 Alternatively, you can specify the -vr_app command-line option in the Customize Run Options window, when running the application via the SDK Browser.或者,您可以在通过SDK浏览器运行应用程序时,在Customize Run Options窗口中指定-vr_app命令行选项。
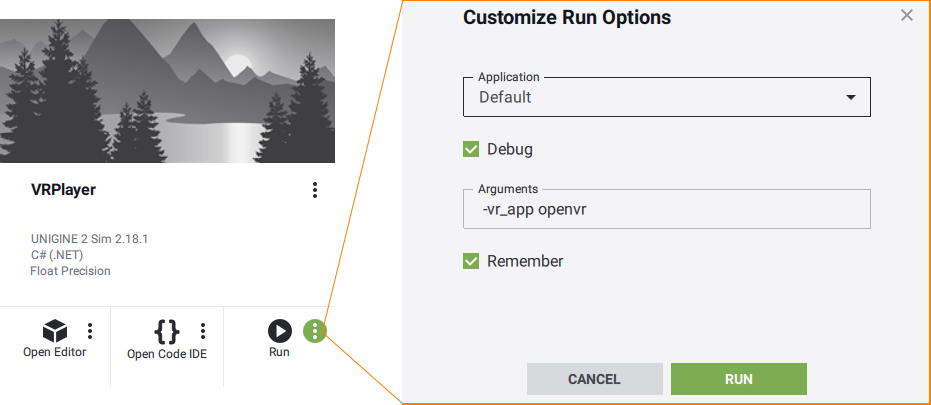
-
If you launch the application from UnigineEditor, specify the corresponding VR mode:如果从UnigineEditor启动应用程序,请指定相应的VR mode:
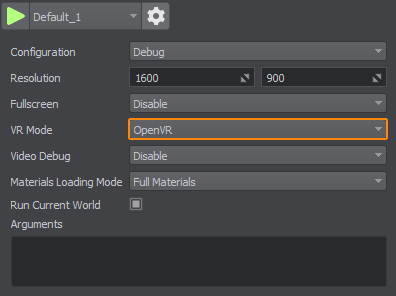
The integration of OpenVR functionality in the UNIGINE VR system enables the implementation of applications for Oculus HMDs. That's why the OpenVR should be specified in case of utilizing Oculus devices.在UNIGINE VR系统中集成OpenVR功能,可以实现Oculus Hmd的应用程序。 这就是为什么在使用Oculus设备时应该指定OpenVR的原因。Run the application and learn about basic mechanics, grab and throw objects, try to teleport and interact with objects in the scene.运行应用程序并了解基本机制,抓取和投掷物体,尝试瞬移并与场景中的物体进行交互。
3. Extending Functionality3、扩展功能#
So, as a part of our first VR project, let's learn how to use the vr_sample functionality and how it can be extended.因此,作为我们第一个VR项目的一部分,让我们学习如何使用VR Sample功能以及如何扩展它。
3.1. Attaching Object to HMD3.1、将对象附加到HMD#
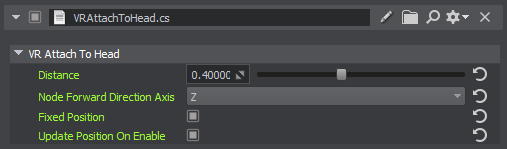
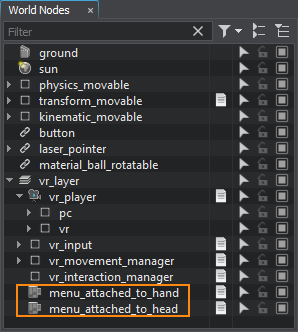
Sometimes it might be necessary to attach some object to the HMD to follow it. It can be a menu (like the menu_attached_to_head node in the sample), or glasses with colored lenses, or a smoking cigar. To attach a node to the HMD position, just assign the VRAttachToHead component to this node and specify the required settings: distance, forward direction axis, and flags indicating whether the node position is fixed and updated when the component is enabled.有时可能需要在HMD上附加一些对象来跟随它。它可以是菜单(如示例中的menu_attached_to_head节点)、带彩色镜片的眼镜或抽着的雪茄。要将节点附加到HMD位置,只需将VRAttachToHead组件分配给该节点并指定所需的设置:距离,向前方向轴和标志,指示节点位置是否固定并在组件启用时更新。
3.2. Attaching Objects to Controllers3.2、将对象附加到控制器#
If you need to attach some object loaded in run-time to a controller (e.g., a menu), you can assign the VRAttachToHand component to this object.如果您需要将一些在运行时加载的对象附加到控制器(例如菜单),则可以将VRAttachToHand组件分配给此对象。
For example, if you have a GUI object and want to attach it to the controller, select this object in the World Hierarchy, click Add New Component or Property in the Parameters window, and specify the VRAttachToHand component.例如,如果您有一个GUI对象并希望将其附加到控制器,请在World Hierarchy中选择此对象,在Parameters窗口中单击添加新组件或属性,并指定VRAttachToHand组件。

The component settings allow specifying the controller to which the object should be attached (either left or right), as well as the object's transformation.组件设置允许指定对象应附加到的控制器(左或右),以及对象的转换。
In the vr_sample, this component is attached to the menu_attached_to_hand node and initializes widgets in run-time.在VR Sample中,该组件附加到menu_attached_to_hand节点,并在运行时初始化小部件。
3.3. Restricting Teleportations3.3. 限制传送#
In VR projects, sometimes we use teleporting to move around, especially in large scenes. By default, it is possible to teleport to any point of the scene. But sometimes, it might be necessary to restrict teleportation to certain areas (for example, to the roof). VR Template provides the TeleportationMovement component (assigned to the vr_layer -> vr_movement_manager -> teleportation_movement node) that implements teleportation logic and allows specifying the maximum teleportation distance, the appearance of the ray and target point, and so on.在 VR Template 中,有时我们会使用瞬移来移动,特别是在大型场景中。 默认情况下,可以传送到场景的任何点。 但有时,可能需要限制传送到某些区域(例如,到屋顶)。 VR模板提供了TeleportationMovement组件(分配给vr_layer -> vr_movement_manager -> teleportation_movement节点),该组件实现了传送逻辑,并允许指定最大传送距离、射线和目标点的外观等。
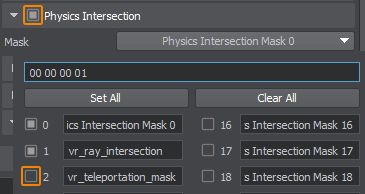
You can teleport to an object if its Physics Intersection mask matches the Teleportation mask in the component settings. By default, the 2nd bit of the Teleportation mask is used. So, you can teleport to objects, for which the Physics Intersection option is enabled and the 2nd bit of the Physics Intersection mask is set.如果对象的Physics Intersection mask与组件设置中的Teleportation mask匹配,则可以传送到对象。 默认情况下,使用Teleportation mask的第2位。 因此,您可以传送到启用Physics Intersection选项并设置Physics Intersection mask的第2位的对象。

To restrict teleportation to a certain area, do the following:要将传送限制在某个区域,请执行以下操作:
- Create a new Static Mesh object by using the default plane (core/meshes/plane.mesh) or an arbitrary mesh that will define the restricted area.通过使用默认平面(core/meshes/plane.mesh)或将定义受限区域的任意网格来创建新的Static Mesh对象。
- Place the Static Mesh in the scene just above the floor.将Static Mesh放在地板上方的场景中。
-
In the Parameters window, enable the Physics Intersection option for the object and check that the 2nd bit of the Physics Intersection Mask is disabled.在 Parameters 窗口中,为对象启用Physics Intersection选项,并检查Physics Intersection Mask的第2位是否被禁用。
-
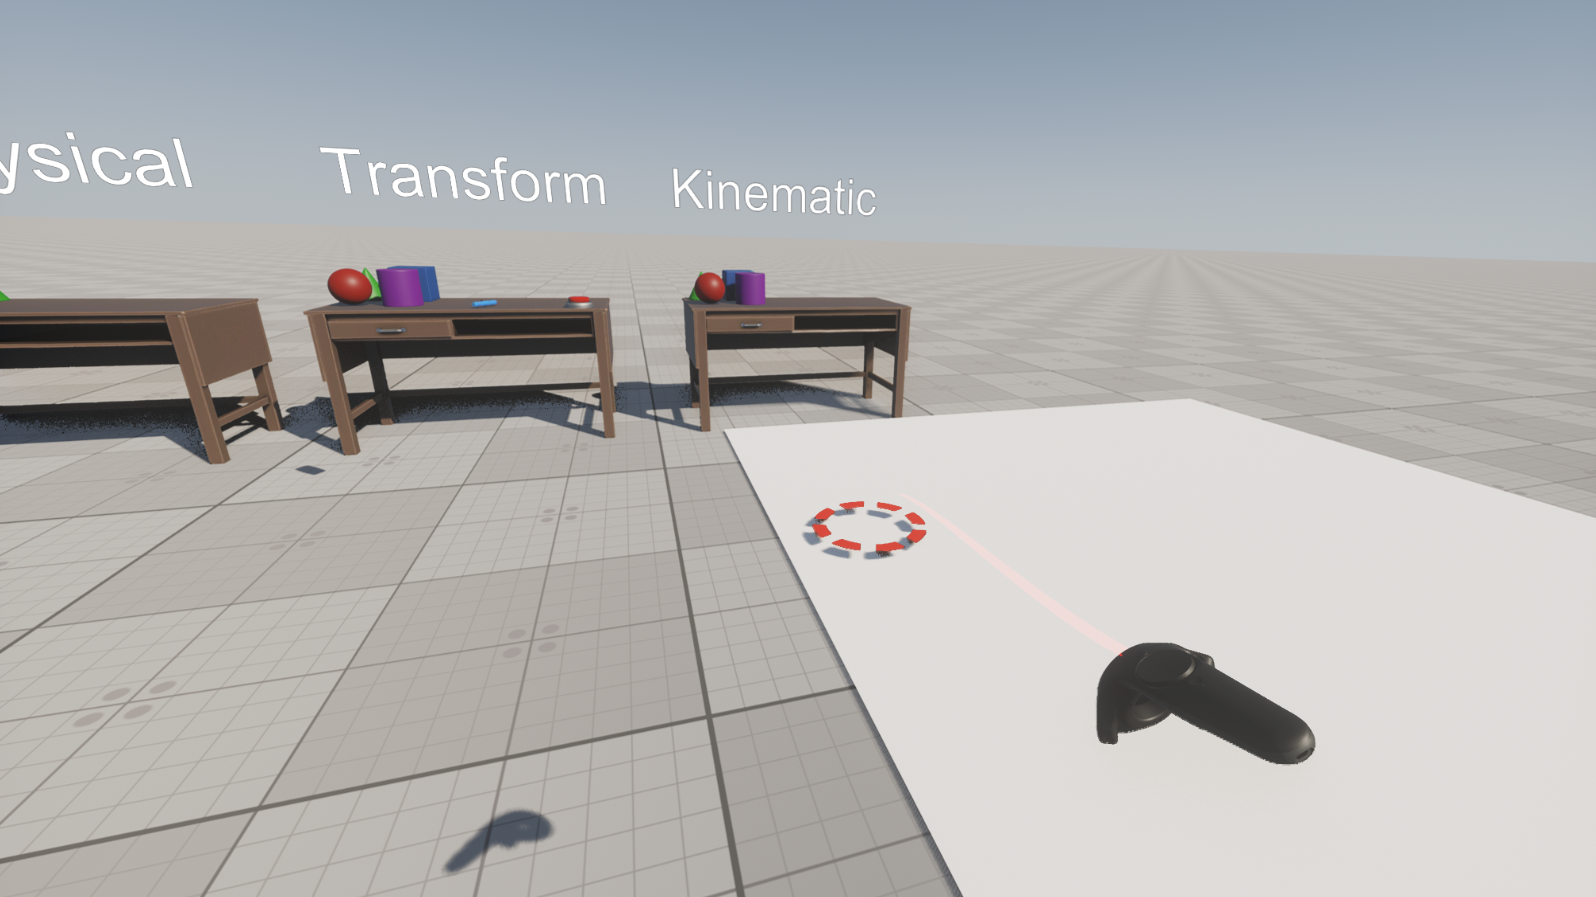
Save and run the application. Now you cannot teleport to the area defined by the rectangular plane (the ray and the target point are red).保存并运行应用程序。 现在您不能瞬移到矩形平面定义的区域(射线和目标点是红色的)。
-
To hide the Static Mesh, disable all bits of its Viewport and Shadow masks.要隐藏Static Mesh,请禁用其Viewport和Shadow掩码的所有位。

-
Save changes and run the application: the rectangular plane is invisible now.保存更改并运行应用程序:矩形平面现在不可见。
3.4. Changing Controller Grip Button to Trigger3.4. 将控制器手柄按钮更改为触发器#
You might want to remap actions or swap the controls in your VR application. As an example, let's do this for the controller. We will remap the Grab action from the Grip button to Trigger, and the Use action to the Grip button.你可能想要在VR应用程序中重新映射动作或交换控制。作为一个例子,让我们对控制器这样做。我们将把Grab动作从Grip按钮重新映射到Trigger,把Use动作重新映射到Grip按钮。
You can discover how inputs on different types of controllers are mapped to the buttons and axes within the UNIGINE input system.您可以了解如何将不同类型控制器上的输入映射到UNIGINE输入系统中的按钮和轴。User input for the controller is defined in the VRControllerInput component. It is assigned to the left_preset_0 and right_preset_0 nodes (vr_player -> vr_input) in our VR sample.控制器的用户输入在VRControllerInput组件中定义。 它被分配给VR示例中的left_preset_0和right_preset_0节点(vr_player -> vr_input)。
To remap actions, do the following:要重新映射操作,请执行以下操作:
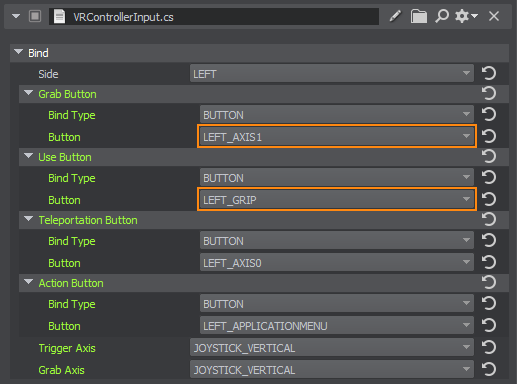
- Select the left_preset_0 node that contains settings for the left controller (the Bind -> Side parameter value is set to LEFT).选择包含左侧控制器设置的left_preset_0节点(Bind -> Side参数值设置为LEFT)。
-
Change the Grab Button -> Button value to LEFT_AXIS1, and the Use Button -> Button value to LEFT_GRIP:将Grab Button -> Button值更改为LEFT_AXIS1,将Use Button -> Button值更改为LEFT_GRIP:
- Select the right_preset_0 node that contains settings for the right controller.选择包含右控制器设置的right_preset_0节点。
- Change the Grab Button -> Button value to RIGHT_AXIS1, and the Use Button -> Button value to RIGHT_GRIP.将Grab Button -> Button值更改为RIGHT_AXIS1,将Use Button -> Button值更改为RIGHT_GRIP。
- Save changes (Ctrl+S) and press the Play button to run the application.保存更改(Ctrl+S)并按播放按钮运行应用程序。
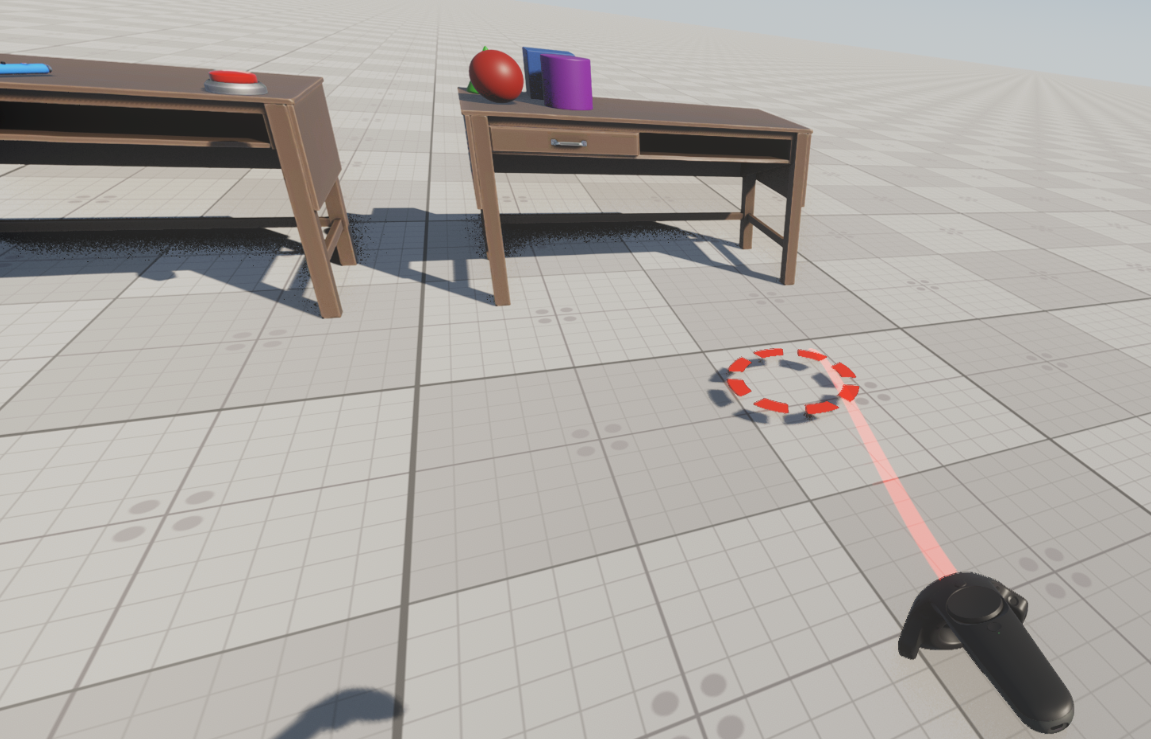
Now you can grab objects by the trigger, and use them by the Grip side button.现在,您可以通过触发器抓取对象,并通过Grip侧边按钮使用它们。
3.5. Adding an Interactive Area3.5. 添加交互区域#
In games and VR applications, some actions are performed when you enter a special area in the scene (for example, music starts, sound or visual effects appear). Let's implement this in our project: when you enter or teleport to a certain area, it rains inside it.在游戏和VR应用程序中,当您进入场景中的特殊区域时,会执行一些操作(例如,音乐开始,声音或视觉效果出现)。 让我们在我们的项目中实现这一点:当您进入或传送到某个区域时,它内部会下雨。
In UNIGINE, the World Trigger node is used to track when any node (collider or not) gets inside or outside of it (for objects with physical bodies, the Physical Trigger node is used).在UNIGINE中,World Trigger节点用于跟踪任何节点(碰撞器或不碰撞器)何时进入或离开该区域(对于具有物理体的对象,使用Physical Trigger节点)。
-
First of all, create a trigger to define the rain area. On the Menu bar, choose Create -> Logic -> World Trigger and place the trigger near the Material Ball, for example. Set the trigger size to (2, 2, 2).首先,创建一个触发器来定义降雨区域。 在菜单栏上,选择Create -> Logic -> World Trigger并将触发器放在Material Ball附近,例如。 将触发器大小设置为(2, 2, 2)。

-
Create a new TriggerZone component that will turn the rain node on and off (in our case, it is a particle system simulating rain), depending on the trigger state. Add the following code to the component and then assign it to the World Trigger node:创建一个新的TriggerZone组件,它将打开和关闭rain节点(在我们的例子中,它是一个模拟雨的粒子系统),具体取决于触发状态。 将以下代码添加到组件中,然后将其分配给World Trigger节点:
TriggerZone.cs
源代码 (C#)using System; using System.Collections; using System.Collections.Generic; using Unigine; [Component(PropertyGuid = "AUTOGEN_GUID")] // <-- an identifier is generated automatically for the component public class TriggerZone : Component { private WorldTrigger trigger = null; public Node ControlledNode = null; private void Init() { // check if the component is assigned to WorldTrigger if (node.Type != Node.TYPE.WORLD_TRIGGER) { Log.Error($"{nameof(TriggerZone)} error: this component can only be assigned to a WorldTrigger.\n"); Enabled = false; return; } // check if ControlledNode is specified if (ControlledNode == null) { Log.Error($"{nameof(TriggerZone)} error: 'ControlledNode' is not set.\n"); Enabled = false; return; } // add event handlers to be fired when a node gets inside and outside the trigger trigger = node as WorldTrigger; trigger.EventEnter.Connect(trigger_enter); trigger.EventLeave.Connect(trigger_leave); } private void Update() { // write here code to be called before updating each render frame } // handler function that enables ControlledNode when vr_player enters the trigger private void trigger_enter(Node node) { ControlledNode.Enabled = true; } // handler function that disables ControlledNode when vr_player leaves the trigger private void trigger_leave(Node node) { if (node.Name != "vr_player") return; ControlledNode.Enabled = false; } } -
Now let's add the rain effect. Drag the rain_effect.node asset (available in the vr/particles folder of the UNIGINE Starter Course Project add-on) to the scene, add it as the child to the trigger node and turn it off (the component will turn it on later).现在让我们添加雨效果。 将rain_effect.node资源(在UNIGINE Starter Course Project插件的vr/particles文件夹中可用)拖动到场景中,将其作为子节点添加到触发器节点并将其关闭(组件将在稍后将其打开)。

-
Drag the rain_effect node from the World Hierarchy window to the Controlled Node field of the TriggerZone (in the Parameters window).将rain_effect节点从World Hierarchy窗口拖到TriggerZone的Controlled Node字段(在Parameters窗口中)。

-
Select the vr_player (PlayerDummy) node in the World Hierarchy and check the Triggers Interaction option for it to make the trigger react on contacting it.在World Hierarchy中选择vr_player (PlayerDummy)节点,并检查它的Triggers Interaction选项,使触发器在接触它时作出反应。

-
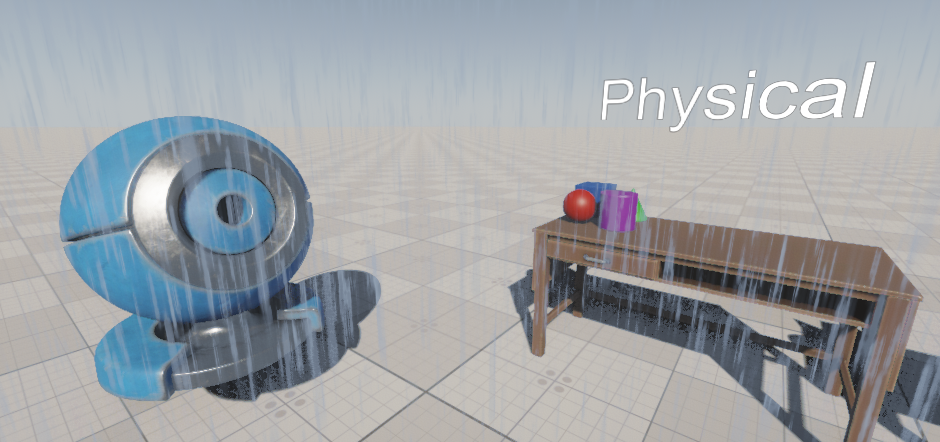
Save changes (Ctrl+S), click Play to run the application, and try to enter the area defined by the trigger - it is raining inside.保存更改(Ctrl+S),单击播放以运行应用程序,并尝试进入触发器定义的区域:内部会下雨。
3.6. Adding a New Interaction3.6. 添加新的交互#
Another way to extend functionality is to add a new action for the object.扩展功能的另一种方法是为对象添加新操作。
We have a laser pointer that we can grab, throw, and use (turn on a laser beam). Now, let's add an alternative use action - change the pointed object's material. This action will be executed when we press and hold the Grip side button on one controller while using the laser pointer gripped by the opposite controller.我们有一个激光指示器,我们可以抓取,抛出和使用(打开激光束)。 现在,让我们添加一个替代使用操作:更改指向对象的材质。 当我们按下并按住一个控制器上的握把侧按钮,同时使用另一个控制器握持的激光指示器时,这个动作将被执行。
The VRLaserPointer.cs component implements the base functionality of the laser pointer.VRLaserPointer.cs 组件实现了激光指示器的基本功能。
The base component for all interactive objects is VRBaseInteractable (vr_template/components/base/VRInteractable.cs). It defines all available states of the interactive objects (NOT_INTERACT, HOVERED, GRABBED, USED) and methods executed on certain actions performed on the objects (OnHoverBegin, OnHoverEnd, OnGrabBegin, OnGrabEnd, OnUseBegin, OnUseEnd).所有交互对象的基本组件是 VRBaseInteractable (vr_template/components/base/VRInteractable.cs)。 它定义交互对象(NOT_INTERACT, HOVERED, GRABBED, USED)的所有可用状态以及对对象(OnHoverBegin, OnHoverEnd, OnGrabBegin, OnGrabEnd, OnUseBegin, OnUseEnd)执行的某些操作执行的方法。
Components inherited from VRBaseInteractable must implement overrides of these methods (for example, the grab logic for the object must be implemented in the OnGrabBegin method of the inherited component).从 VRBaseInteractable 继承的组件必须实现这些方法的复盖(例如,对象的抓取逻辑必须在继承组件的OnGrabBegin方法中实现)。
So, we need to add a new action and map it to a new state (the Grip side button is pressed on one controller while the laser pointer gripped (Grip) by the opposite controller is used):因此,我们需要添加一个新的动作并将其映射到一个新的状态(在一个控制器上按下Grip侧按钮,而使用另一个控制器抓取的激光指示器(Grip)):
-
Add a new OnAltUse action (alternative use) and a new ALT_USED state to the VRBaseInteractable base component:在 VRBaseInteractable 基础组件中添加一个新的 OnAltUse 动作(替代使用)和一个新的 ALT_USED 状态:
VRBaseInteractable.cs
源代码 (C#)using System; using System.Collections; using System.Collections.Generic; using Unigine; [Component(PropertyGuid = "AUTOGEN_GUID")] // <-- an identifier is generated automatically for the component public class VRBaseInteractable : Component { static public event Action onInit; public enum INTERACTABLE_STATE { NOT_INTERACT, HOVERED, GRABBED, USED, ALT_USED // add a new state } public INTERACTABLE_STATE CurrentState { get; set; } protected void Init() { onInit?.Invoke(this); } public virtual void OnHoverBegin(VRBaseInteraction interaction, VRBaseController controller) { } public virtual void OnHoverEnd(VRBaseInteraction interaction, VRBaseController controller) { } public virtual void OnGrabBegin(VRBaseInteraction interaction, VRBaseController controller) { } public virtual void OnGrabEnd(VRBaseInteraction interaction, VRBaseController controller) { } public virtual void OnUseBegin(VRBaseInteraction interaction, VRBaseController controller) { } public virtual void OnUseEnd(VRBaseInteraction interaction, VRBaseController controller) { } // add methods for a new "alternative use" action public virtual void OnAltUse(VRBaseInteraction interaction, VRBaseController controller) { } public virtual void OnAltUseEnd(VRBaseInteraction interaction, VRBaseController controller) { } } -
Add overrides of the OnAltUse() and OnAltUseEnd() methods to the VRLaserPointer component (as we are going to add a new action for the laser pointer). In the Update() method, implement the logic of the AltUse action that is executed when the corresponding flags are set.将 OnAltUse() 和 OnAltUseEnd() 方法的复盖添加到 VRLaserPointer 组件(因为我们将为激光指示器添加一个新操作)。 在 Update() 方法中,实现在设置相应标志时执行的 AltUse 动作的逻辑。
VRLaserPointer.cs
源代码 (C#)#region Math Variables #if UNIGINE_DOUBLE using Scalar = System.Double; using Vec2 = Unigine.dvec2; using Vec3 = Unigine.dvec3; using Vec4 = Unigine.dvec4; using Mat4 = Unigine.dmat4; #else using Scalar = System.Single; using Vec2 = Unigine.vec2; using Vec3 = Unigine.vec3; using Vec4 = Unigine.vec4; using Mat4 = Unigine.mat4; using WorldBoundBox = Unigine.BoundBox; using WorldBoundSphere = Unigine.BoundSphere; using WorldBoundFrustum = Unigine.BoundFrustum; #endif #endregion using System; using System.Collections; using System.Collections.Generic; using Unigine; [Component(PropertyGuid = "AUTOGEN_GUID")] // <-- an identifier is generated automatically for the component public class VRLaserPointer : VRBaseInteractable { [ShowInEditor] [Parameter(Title = "Laser", Group = "VR Laser Pointer")] private Node laser = null; [ShowInEditor] [Parameter(Title = "Laser Ray", Group = "VR Laser Pointer")] private Node laserRay = null; [ShowInEditor] [Parameter(Title = "Laser Hit", Group = "VR Laser Pointer")] private Node laserHit = null; [ShowInEditor] [Parameter(Title = "Object Text", Group = "VR Laser Pointer")] private ObjectText objText = null; private Mat4 laserRayMat; private WorldIntersection intersection = new WorldIntersection(); private float rayOffset = 0.05f; private bool grabbed = false; private bool altuse = false; public List<Material> materials = null; private int current_material = 0; protected override void OnReady() { laserRayMat = new Mat4(laserRay.Transform); laser.Enabled = false; // if the list of textures is empty/not defined, report an error if(materials == null || materials.Count < 0) { Log.Error($"{nameof(VRLaserPointer)} error: materials list is empty.\n"); Enabled = false; return; } } private void Update() { if(laser.Enabled && grabbed) { laserRay.Transform = laserRayMat; vec3 dir = laserRay.GetWorldDirection(MathLib.AXIS.Y); Vec3 p0 = laserRay.WorldPosition + dir * rayOffset; Vec3 p1 = p0 + dir * 1000; Unigine.Object hitObj = World.GetIntersection(p0, p1, 1, intersection); if(hitObj != null) { laserRay.Scale = new vec3(laserRay.Scale.x, MathLib.Length(intersection.Point - p0) + rayOffset, laserRay.Scale.z); laserHit.WorldPosition = intersection.Point; laserHit.Enabled = true; } else { laserHit.Enabled = false; } if (hitObj != null) { objText.Enabled = true; objText.Text = hitObj.Name; float radius = objText.BoundSphere.Radius; vec3 shift = vec3.UP * radius; objText.WorldTransform = MathLib.SetTo(laserHit.WorldPosition + shift, VRPlayer.LastPlayer.HeadController.WorldPosition, vec3.UP, MathLib.AXIS.Z); // implement logic of the "alternative use" action (cyclic change of materials on the object according to the list) if(altuse) { current_material++; if (current_material >= materials.Capacity) current_material = 0; hitObj.SetMaterial(materials[current_material], 0); Log.Message("ALTUSE HIT\n"); altuse = false; } } else objText.Enabled = false; } } public override void OnGrabBegin(VRBaseInteraction interaction, VRBaseController controller) { grabbed = true; } public override void OnGrabEnd(VRBaseInteraction interaction, VRBaseController controller) { grabbed = false; laser.Enabled = false; objText.Enabled = false; } public override void OnUseBegin(VRBaseInteraction interaction, VRBaseController controller) { if(grabbed) laser.Enabled = true; } public override void OnUseEnd(VRBaseInteraction interaction, VRBaseController controller) { laser.Enabled = false; objText.Enabled = false; } // override the method that is called when the "alternative use" action is performed on the object public override void OnAltUse(VRBaseInteraction interaction, VRBaseController controller) { altuse = true; CurrentState = VRBaseInteractable.INTERACTABLE_STATE.ALT_USED; } // override the method that is called when the "alternative use" action is done public override void OnAltUseEnd(VRBaseInteraction interaction, VRBaseController controller) { altuse = false; CurrentState = VRBaseInteractable.INTERACTABLE_STATE.NOT_INTERACT; } } -
Add an execution condition for the OnAltUse action. All available types of interactions are implemented in the VRHandShapeInteraction component (vr_template/components/interactions/interactions/VRHandShapeInteraction.cs). So, add the following code to the Interact() method of this component:为 OnAltUse 操作添加执行条件。 所有可用类型的交互都在 VRHandShapeInteraction 组件(vr_template/components/interactions/interactions/VRHandShapeInteraction.cs)中实现。 因此,在此组件的 Interact() 方法中添加以下代码:
VRHandShapeInteraction.cs
源代码 (C#)public override void Interact(VRInteractionManager.InteractablesState interactablesState, float ifps) { // ... // update current input bool grabDown = false; bool grabUp = false; bool useDown = false; bool useUp = false; // reset flags before checking the current input bool altUse = false; bool altUseUp = false; switch (controller.Device) { case VRInput.VRDevice.LEFT_CONTROLLER: grabDown = VRInput.IsLeftButtonDown(VRInput.ControllerButtons.GRAB_BUTTON); grabUp = VRInput.IsLeftButtonUp(VRInput.ControllerButtons.GRAB_BUTTON); useDown = VRInput.IsLeftButtonDown(VRInput.ControllerButtons.USE_BUTTON); useUp = VRInput.IsLeftButtonUp(VRInput.ControllerButtons.USE_BUTTON); // for the left controller, the Use button must be hold on the right controller altUse = VRInput.IsRightButtonPress(VRInput.ControllerButtons.USE_BUTTON); altUseUp = VRInput.IsRightButtonUp(VRInput.ControllerButtons.USE_BUTTON); break; case VRInput.VRDevice.RIGHT_CONTROLLER: grabDown = VRInput.IsRightButtonDown(VRInput.ControllerButtons.GRAB_BUTTON); grabUp = VRInput.IsRightButtonUp(VRInput.ControllerButtons.GRAB_BUTTON); useDown = VRInput.IsRightButtonDown(VRInput.ControllerButtons.USE_BUTTON); useUp = VRInput.IsRightButtonUp(VRInput.ControllerButtons.USE_BUTTON); // for the right controller, the Use button must be hold on the left controller altUse = VRInput.IsLeftButtonPress(VRInput.ControllerButtons.USE_BUTTON); altUseUp = VRInput.IsLeftButtonUp(VRInput.ControllerButtons.USE_BUTTON); break; case VRInput.VRDevice.PC_HAND: grabDown = VRInput.IsGeneralButtonDown(VRInput.GeneralButtons.FIRE_1); grabUp = VRInput.IsGeneralButtonUp(VRInput.GeneralButtons.FIRE_1); useDown = VRInput.IsGeneralButtonDown(VRInput.GeneralButtons.FIRE_2); useUp = VRInput.IsGeneralButtonUp(VRInput.GeneralButtons.FIRE_2); // for the keyboard, the JUMP button must be held altUse = VRInput.IsGeneralButtonDown(VRInput.GeneralButtons.JUMP); altUseUp = VRInput.IsGeneralButtonUp(VRInput.GeneralButtons.JUMP); break; default: break; } // stop the "alternative use" action - call OnAltUseEnd // for all components of the hovered object that have an implementation of this method if (altUseUp) { foreach (var hoveredObjectComponent in hoveredObjectComponents) hoveredObjectComponent.OnAltUseEnd(this, controller); } // can grab and use hovered object if (hoveredObject != null) { if (grabDown && grabbedObject == null) { grabbedObject = hoveredObject; grabbedObjectComponents.Clear(); grabbedObjectComponents.AddRange(hoveredObjectComponents); foreach (var grabbedObjectComponent in grabbedObjectComponents) { if (VRInteractionManager.IsGrabbed(grabbedObjectComponent)) { VRBaseInteraction inter = VRInteractionManager.GetGrabInteraction(grabbedObjectComponent); VRInteractionManager.StopGrab(inter); } grabbedObjectComponent.OnGrabBegin(this, controller); interactablesState.SetGrabbed(grabbedObjectComponent, true, this); } } if (useDown) { usedObject = hoveredObject; usedObjectComponents.Clear(); usedObjectComponents.AddRange(hoveredObjectComponents); foreach (var usedObjectComponent in usedObjectComponents) { usedObjectComponent.OnUseBegin(this, controller); interactablesState.SetUsed(usedObjectComponent, true, this); } } // call OnAltUse for all components of the hovered object that have an implementation of this method if (altUse) { foreach (var hoveredObjectComponent in hoveredObjectComponents) if (hoveredObjectComponent.CurrentState != VRBaseInteractable.INTERACTABLE_STATE.ALT_USED) hoveredObjectComponent.OnAltUse(this, controller); altUse = false; } } // ... } -
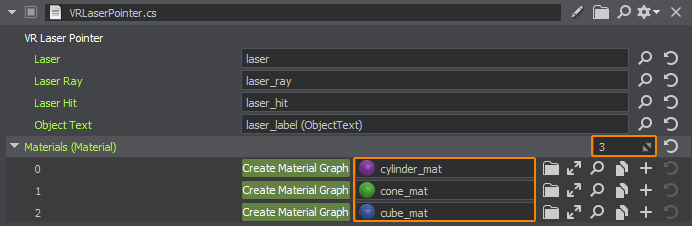
Specify the list of materials that will be applied to the object. Select the laser_pointer node and click Edit in the Parameters window. Then find the VRLaserPointer component, specify the number of elements for the Materials array (for example, 3) and drag the required materials from the Materials window to fill the array.指定将应用于对象的材质列表。 选择 laser_pointer 节点并在 Parameters 窗口中单击 Edit。然后找到 VRLaserPointer 组件,为 Materials 数组指定元素的数量(例如,3)并从Materials窗口拖动所需的材质以填充数组。
- Save changes (Ctrl+S) and press the Play button to run the application.保存更改(Ctrl+S)并按 Play 按钮运行应用程序。
3.7. Customizing Menu3.7. 自定义菜单#
The VR template includes two menus: the first one is attached to the HMD position, and the second - to the hand. In the VR sample, the menu_attached_to_head node (ObjectGui) is used for the main menu, and the menu_attached_to_hand node (ObjectGui) - for the additional menu. VR模板包括两个菜单:第一个附加到HMD位置,第二个附加到手部。 在VR示例中, menu_attached_to_head 节点(ObjectGui)用于主菜单, menu_attached_to_hand 节点(ObjectGui)用于附加菜单。
All menu nodes have the same VRMenuSample.cs component assigned. It is inherited from the base VRBaseUI component that implements a user interface. In general, the user interface is implemented as follows:所有菜单节点都分配了相同的 VRMenuSample.cs 组件。 它继承自实现用户界面的基础 VRBaseUI 组件。一般来说,用户界面实现如下:
- Inherit a new component from the base VRBaseUI.从基 VRBaseUI 继承一个新组件。
- Implement the user interface with the required widgets in the overridden InitGui() method.在重写的 InitGui() 方法中使用所需的小部件实现用户界面。
- Implement handlers for processing widgets events (pressing a button, selecting elements in the drop-down menu, etc.).实现处理小部件事件的处理程序(按下按钮,在下拉菜单中选择元素等)。
- Subscribe the corresponding widgets to the events in the InitGui() method.将相应的小部件订阅到 InitGui() 方法中的事件。
- Assign the component to the ObjectGui node that will display the user interface.将组件分配给将显示用户界面的 ObjectGui 节点。
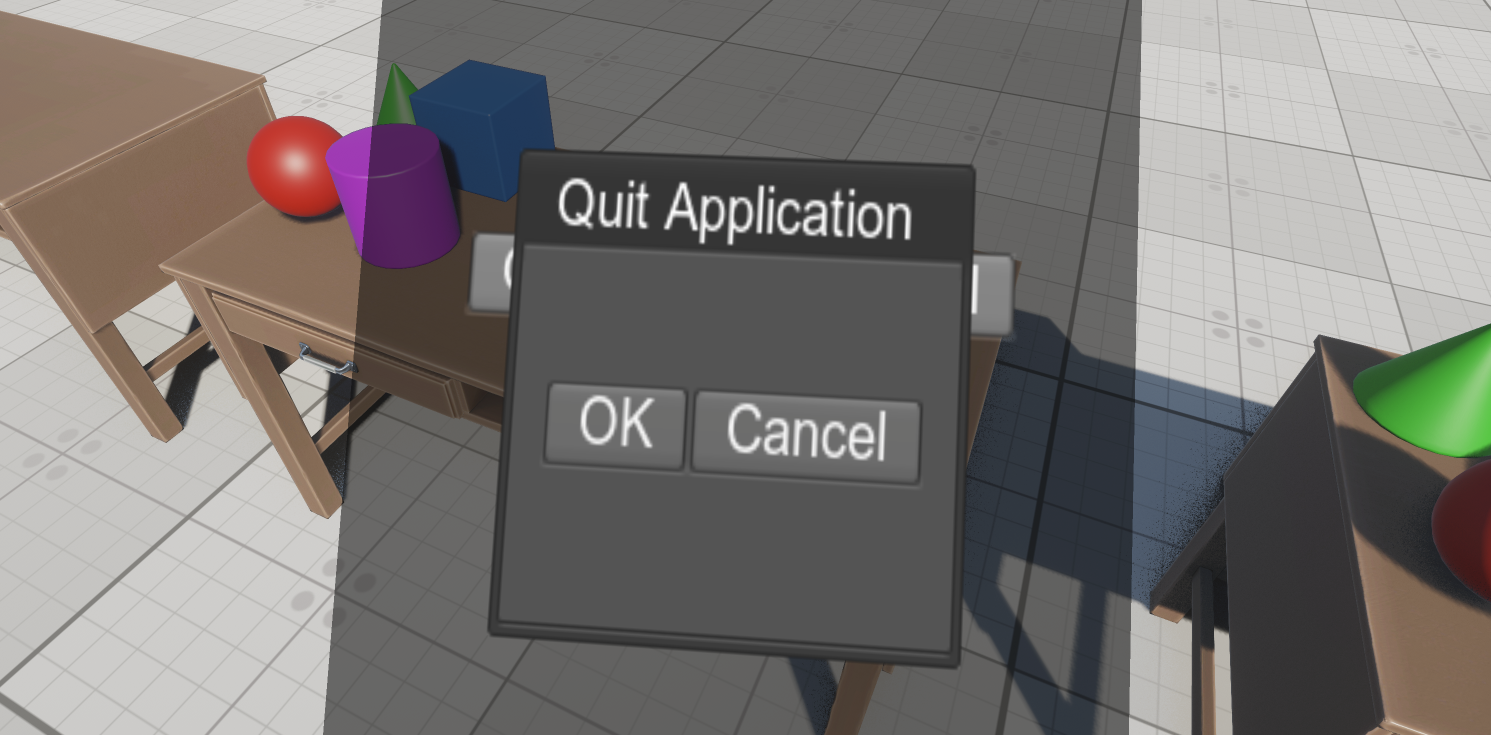
Let's create a new menu for the left controller and add the quit button:让我们为左侧控制器创建一个新菜单并添加退出按钮:
-
Inherit a new component from the base VRBaseUI, call it VRHandMenu and copy the following code to it:从基 VRBaseUI 继承一个新组件,调用它 VRHandMenu 并将以下代码复制到它:
VRHandMenu.cs
源代码 (C#)using System; using System.Collections; using System.Collections.Generic; using Unigine; [Component(PropertyGuid = "AUTOGEN_GUID")] // <-- an identifier is generated automatically for the component public class VRHandMenu : VRBaseUI { // declare required widgets private WidgetSprite background; private WidgetVBox VBox; private WidgetButton quitButton; private WidgetWindow window; private WidgetButton okButton; private WidgetButton cancelButton; private WidgetHBox HBox; // overriden method that is called on interface initialization, // it adds the required widgets and subscribes to events protected override void InitGui() { if (gui == null) return; background= new WidgetSprite(gui, "core/textures/common/black.texture"); background.Color = new vec4(1.0f, 1.0f, 1.0f, 0.5f); gui.AddChild(background, Gui.ALIGN_BACKGROUND | Gui.ALIGN_EXPAND); // add a vertical column container WidgetVBox to GUI VBox = new WidgetVBox(); VBox.Width = gui.Width; VBox.Height = 100; gui.AddChild(VBox, Gui.ALIGN_OVERLAP|Gui.ALIGN_CENTER); // add the quit button to the container quitButton = new WidgetButton(gui, "QUIT APPLICATION"); quitButton.FontSize = 20; VBox.AddChild(quitButton); quitButton.EventClicked.Connect(ButtonQuitClicked); VBox.Arrange(); // create a quit confirmation window window = new WidgetWindow(gui, "Quit Application"); window.FontSize = 20; // add a horizontal row container WidgetHBox to the confirmation window HBox = new WidgetHBox(); HBox.Width = window.Width; HBox.Height = 100; window.AddChild(HBox); // add the "OK" button and assign the "OkClicked" handler that will close the application okButton = new WidgetButton(gui, "OK"); okButton.FontSize = 20; HBox.AddChild(okButton); okButton.EventClicked.Connect(OkClicked); // add the "Cancel" button and assign the "OkClicked" handler that will close the confirmation window cancelButton = new WidgetButton(gui, "Cancel"); cancelButton.FontSize = 20; HBox.AddChild(cancelButton); cancelButton.EventClicked.Connect(CancelClicked); } // function to be executed on clicking "quitButton" private void ButtonQuitClicked() { gui.AddChild(window, Gui.ALIGN_OVERLAP | Gui.ALIGN_CENTER); } // function to be executed on clicking "cancelButton" private void CancelClicked() { gui.RemoveChild(window); } // function to be executed on clicking "okButton" private void OkClicked() { // quit the application Engine.Quit(); } } -
Assign the VRHandMenu.cs component to the menu_attached_to_hand node. And disable the VRMenuSample.cs component which is assigned to this node by default.将 VRHandMenu.cs 组件分配给 menu_attached_to_hand 节点。并禁用默认分配给此节点的 VRMenuSample.cs 组件。

- Save changes (Ctrl+S) and click Play to run the application.保存更改(Ctrl+S)并单击 Play 以运行应用程序。
3.8. Adding a New Interactable Object3.8. 添加新的可交互对象#
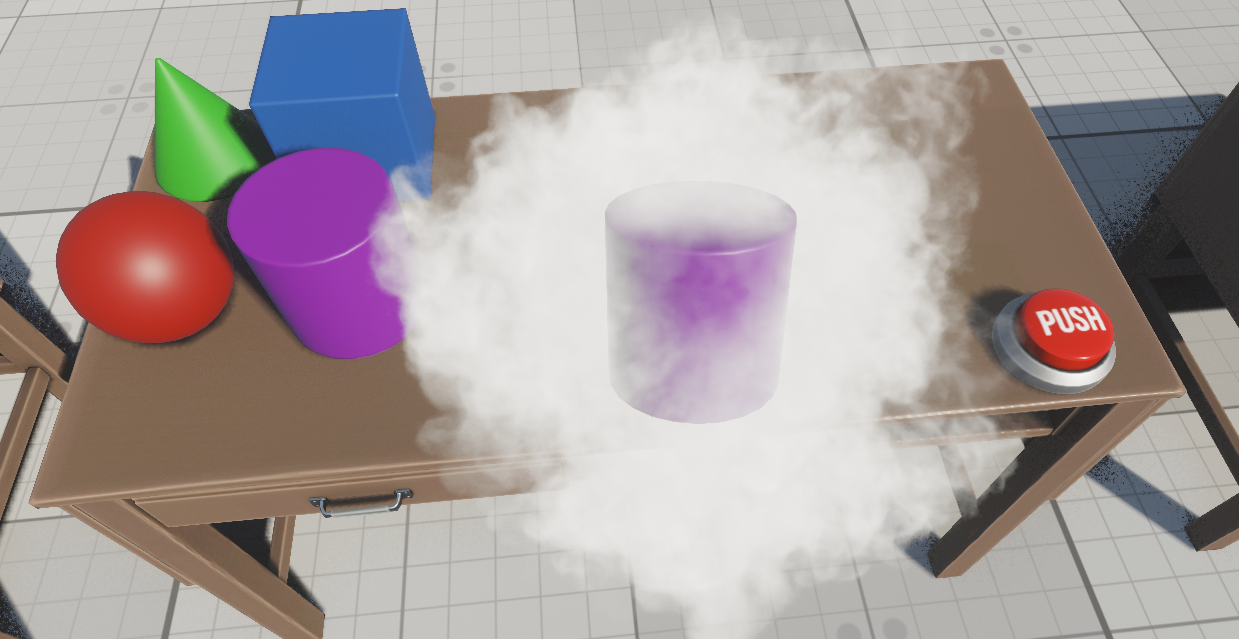
Let's add a new type of interactable object that we can grab, hold, and throw (i.e. it will be inherited from the VRBaseInteractable component) with an additional feature: some visual effect (for example, smoke) will appear when we grab the object and, it will disappear when we release the object. In addition, it will display certain text in the console, if the corresponding option is enabled.让我们添加一个新类型的可交互对象,我们可以抓取,持有和抛出(即它将从 VRBaseInteractable 组件继承),并具有一个附加功能:当我们抓取对象时会出现一些视觉效果(例 此外,如果启用了相应的选项,它将在控制台中显示某些文本。
-
Create a new VRObjectVFX component and add the following code to it:创建一个新的 VRObjectVFX 组件,并在其中添加以下代码:
VRObjectVFX.cs
源代码 (C#)using System; using System.Collections; using System.Collections.Generic; using Unigine; [Component(PropertyGuid = "AUTOGEN_GUID")] // <-- an identifier is generated automatically for the component public class VRObjectVFX : VRBaseInteractable { // an asset with an effect that occurs when the object is grabbed public AssetLinkNode vfx_node = null; private Node vfx = null; private Unigine.Object obj = null; // this method is called for the interactable object each frame private void Update() { // update transformation of the effect if the object is grabbed if(CurrentState == VRBaseInteractable.INTERACTABLE_STATE.GRABBED) vfx.WorldTransform = node.WorldTransform; } // this overridden method is called after component initialization // (you can implement checks here) protected override void OnReady() { // check if the asset with the visual effect is specified if (vfx_node == null) { Log.Error($"{nameof(VRObjectVFX)} error: 'vfx_node' is not assigned.\n"); Enabled = false; return; } else { vfx = vfx_node.Load(); vfx.Enabled = false; } } // this overridden method is called when grabbing the interactable object public override void OnGrabBegin(VRBaseInteraction interaction, VRBaseController controller) { // show the effect vfx.Enabled = true; // set the current object state to GRABBED CurrentState = VRBaseInteractable.INTERACTABLE_STATE.GRABBED; } // this overridden method is called when releasing the interactable object public override void OnGrabEnd(VRBaseInteraction interaction, VRBaseController controller) { // hide the effect vfx.Enabled = false; // set the current object state to NOT_INTERACT CurrentState = VRBaseInteractable.INTERACTABLE_STATE.NOT_INTERACT; } } - Assign the VRObjectVFX.cs component to the cylinder node (the child of the kinematic_movable dummy node).将 VRObjectVFX.cs 组件连接到 cylinder 节点(kinematic_movable 虚拟节点的子节点)。
-
Drag the vr/particles/smoke.node asset to the Vfx Node field. This node stores the particle system representing the smoke effect. It is available in the vr/particles folder of UNIGINE Starter Course Projects add-on.将 vr/particles/smoke.node 资源拖到 Vfx Node 字段。 此节点存储表示烟雾效果的粒子系统。 它在 UNIGINE Starter Course Projects 附加组件的 vr/particles 文件夹中可用。

- Save changes (Ctrl+S) and press the Play button to run the application.保存更改(Ctrl+S)并按 Play 按钮运行应用程序。
Now if you grab and hold the cylinder, it will emit smoke:现在,如果您抓取并握住圆柱,它会发出烟雾:
4. Packing a Final Build4、打包最终版本#
Now, you can build the project. Specify the required settings and ensure the final build includes all content, code, and necessary libraries. Ensure all unused assets are deleted. And don't forget to enable the VR modes!现在,您可以构建项目。 指定所需的设置,并确保最终构建包含所有内容、代码和必要的库。 确保删除所有未使用的资源。 别忘了启用VR模式!
To get more information on how to pack the final build, refer to the Programming Quick Start section.要获取有关如何打包最终构建的更多信息,请参阅编程快速入门部分。
Where to Go From Here下一步可以做什么#
Congratulations! Now, you can continue developing the project on your own. Here are some helpful recommendations for you:祝贺您! 现在,您可以继续自己开发项目。 以下是一些对您有用的建议:
- Try to analyze the source code of the sample further to figure out how it works and use it as a reference to write your own code.尝试进一步分析示例的源代码,以弄清楚它是如何工作的,并将其用作编写自己的代码的参考。
- Read the Virtual Reality Best Practices article for more information and tips on preparing content for VR and enhancing the user experience.阅读VR最佳实践文章,了解有关为VR准备内容和增强用户体验的更多信息和提示。
- Learn more about the Component System by reading the Component System article.阅读组件系统,了解有关使用组件系统的更多信息。
- Check out the Component System Usage Example for more details on implementing logic using the Component System.查看组件系统使用示例了解有关使用组件系统实现逻辑的更多详细信息。
本页面上的信息适用于 UNIGINE 2.19.1 SDK.