Generating Physical Objects
We need some geometric primitives that the player can move around the Play Area and shoot at. Let's generate them via code.
A primitive should have a body and a shape to collide with the Player Character and be affected by gravity. We have implemented interaction with bullets via Intersections at the previous step, so we should set the BulletIntersection bit for the object's Intersection mask.
When the robot moves fast and the application framerate is low, the character will be teleported each frame and may go through physical objects due to discrete collision detection. To avoid this we are going to use continuous collision detection.
-
Create a new C++ component in your IDE and call it ObjectGenerator. Copy the following code to the corresponding files and save the solution. This component generates the physical objects and places them in the world.
ObjectGenerator.h (C++)#include <UnigineComponentSystem.h> #include <UnigineGame.h> #pragma once class ObjectGenerator : public Unigine::ComponentBase { public: COMPONENT_DEFINE(ObjectGenerator, ComponentBase); COMPONENT_INIT(init, 1); // 1st initialization order protected: void init(); };ObjectGenerator.cpp (C++)#include "ObjectGenerator.h" using namespace Unigine; REGISTER_COMPONENT(ObjectGenerator); void ObjectGenerator::init() { // cube MeshPtr meshBox = Mesh::create(); meshBox->addBoxSurface("box_surface", Math::vec3(1.0f)); ObjectMeshStaticPtr box = ObjectMeshStatic::create(meshBox); box->setTriggerInteractionEnabled(1); box->setIntersectionMask(0x00000080, meshBox->findSurface("box_surface")); // check the BulletIntersection bit box->setWorldTransform(translate(Math::Vec3(0.5f, 7.5f, 1.0f))); box->setMaterialPath("materials/mesh_base_0.mat", "*"); box->setName("box"); Unigine::BodyRigidPtr bodyBox = BodyRigid::create(box); ShapeBoxPtr shapeBox = ShapeBox::create(bodyBox, Math::vec3(1.0f)); ShapeSphere::create(bodyBox, 0.5f); bodyBox->setShapeBased(0); bodyBox->setMass(2.0f); // sphere MeshPtr meshSphere = Mesh::create(); meshSphere->addSphereSurface("sphere_surface", 0.5f, 9, 32); ObjectMeshStaticPtr sphere = ObjectMeshStatic::create(meshSphere); sphere->setTriggerInteractionEnabled(1); sphere->setIntersectionMask(0x00000080, meshSphere->findSurface("sphere_surface")); // check the BulletIntersection bit sphere->setWorldTransform(translate(Math::Vec3(4.5f, 5.5f, 1.0f))); sphere->setMaterialPath("materials/mesh_base_1.mat", "*"); sphere->setName("sphere"); BodyRigidPtr bodySphere = BodyRigid::create(sphere); ShapeSphere::create(bodySphere, 0.5f); bodySphere->setShapeBased(0); bodySphere->setMass(2.0f); // capsule MeshPtr meshCapsule = Mesh::create(); meshCapsule->addCapsuleSurface("capsule_surface", 0.5f, 1.0f, 9, 32); ObjectMeshStaticPtr capsule = ObjectMeshStatic::create(meshCapsule); capsule->setTriggerInteractionEnabled(1); capsule->setIntersectionMask(0x00000080, meshCapsule->findSurface("capsule_surface")); // check the BulletIntersection bit capsule->setWorldTransform(translate(Math::Vec3(4.5f, 0.5f, 3.0f))); capsule->setMaterialPath("materials/mesh_base_2.mat", "*"); capsule->setName("capsule"); BodyRigidPtr bodyCapsule = BodyRigid::create(capsule); ShapeCapsule::create(bodyCapsule, 0.5f, 1.0f); bodyCapsule->setShapeBased(0); bodyCapsule->setMass(2.0f); }NoticeDo not change the size of an object after the creation. The physics doesn't support scaling nodes with Body attached. - Build and run the solution in your IDE to generate a property file for the component.
- Switch back to the UnigineEditor and create a new Dummy Node, rename it to "object_generator", and place it somewhere in the world.
- Attach the created ObjectGenerator component to the "object_generator" node to make it generate physical objects on the initialization.
-
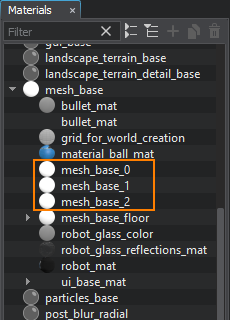
Create 3 new materials in the UnigineEditor: in the Materials window, right-click the mesh_base material and choose Create Child. By default, the created materials are named as specified in the previous code snippet (mesh_base_*). Move the materials to the data/materials folder of your project (create this folder if it doesn't exist).
-
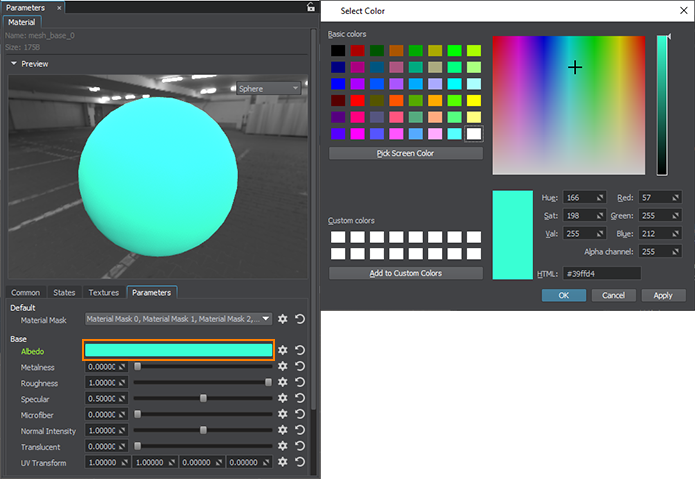
Select materials one by one in the Materials window and in the Parameters window switch to the Parameters tab and click on the color field near Albedo to choose different colors for the objects via the color picker.
- Save changes to the world via Ctrl + S.
- Run the project in your IDE to see the spawned physical objects in the world.