This page has been translated automatically.
Видеоуроки
Interface
Essentials
Advanced
Подсказки и советы
Основы
Программирование на C#
Рендеринг
Принципы работы
Свойства (properties)
Компонентная Система
Рендер
Физика
Редактор UnigineEditor
Обзор интерфейса
Работа с ассетами
Настройки и предпочтения
Работа с проектами
Настройка параметров ноды
Setting Up Materials
Настройка свойств
Освещение
Landscape Tool
Sandworm
Использование инструментов редактора для конкретных задач
Extending Editor Functionality
Встроенные объекты
Ноды (Nodes)
Объекты (Objects)
Эффекты
Декали
Источники света
Geodetics
World Nodes
Звуковые объекты
Объекты поиска пути
Players
Программирование
Основы
Настройка среды разработки
Примеры использования
C++
C#
UnigineScript
Унифицированный язык шейдеров UUSL
Плагины
File Formats
Rebuilding the Engine Tools
GUI
Двойная точность координат
API
Containers
Common Functionality
Controls-Related Classes
Engine-Related Classes
Filesystem Functionality
GUI-Related Classes
Math Functionality
Node-Related Classes
Objects-Related Classes
Networking Functionality
Pathfinding-Related Classes
Physics-Related Classes
Plugins-Related Classes
IG Plugin
CIGIConnector Plugin
Rendering-Related Classes
Работа с контентом
Оптимизация контента
Материалы
Material Nodes Library
Miscellaneous
Input
Math
Matrix
Textures
Art Samples
Tutorials
Внимание! Эта версия документация УСТАРЕЛА, поскольку относится к более ранней версии SDK! Пожалуйста, переключитесь на самую актуальную документацию для последней версии SDK.
Внимание! Эта версия документации описывает устаревшую версию SDK, которая больше не поддерживается! Пожалуйста, обновитесь до последней версии SDK.

Fade By Depth Sample

This material graph sample demonstrates how to implement an effect of fading by depth.

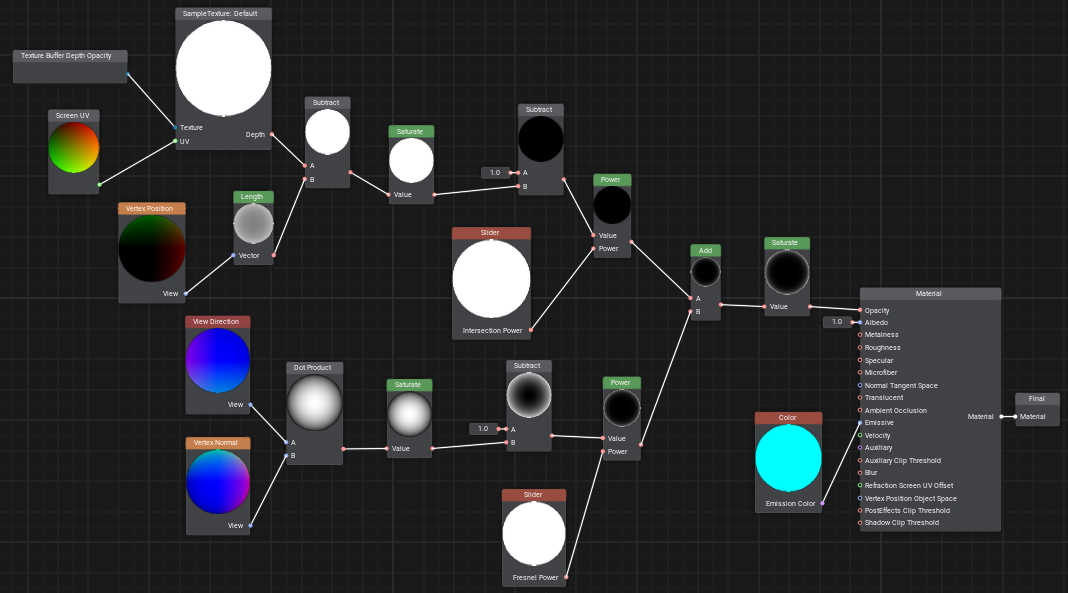
The Transparent PBR material has white albedo color and the emission color controlled via the Parameters panel, the resulting appearance is controlled by opacity.

Resulting Opacity is defined by the combination of:

  • the Fresnel effect (glow in the areas along the edges). Here we find the angle between the mesh’s surface normal and view direction using the Dot Product node, which looks like a “glow” around the edge of the object. We can increase the Fresnel Power input to make this glow thinner and closer to the edges.
  • data on intersected geometry of the scene (shield contours shall be projected onto intersected geometry). Here we’ll handle the intersection effect with scene geometry. Via the Texture Buffer Depth Opacity node we get Scene Depth and subtract the object's depth (the distance to the Vertex Position in the view space), then we saturate the result in the [0.0f; 1.0f] range and subtract it from 1 to get an inverse intensity. This gives us values close to 1 in the area of intersection with the geometry of other objects. At this point we can add a Power node to be able to control the intensity using a value provided by a Slider node (enabling you to adjust float values via the Parameters panel in the UnigineEditor).

Both these components are added together and saturated.

The result.
Last update: 18.02.2022
Build: ()