Cubemap Texture Sample
These material graph samples demonstrate creation of materials applying custom cubemap textures for reflective and refractive materials.

Cubemap Reflection Sample#
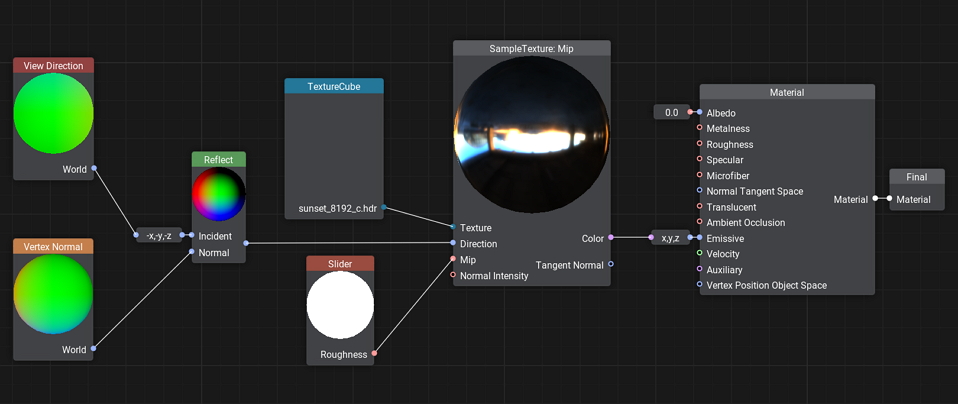
First, we get a reflection vector based on current camera's view direction vector and the object's normal vector, both in the world space. So, to the input ports of the Reflect node we connect outputs of the Vertex Normal node and the View Direction node (using the -X|-Y|-Z port adapter to get the opposite direction, as incident vector is the opposite of the view vector).
Then, according to the obtained coordinates in the world space, the Sample Texture node obtains the pixel data from the cubemap (Texture Cube node), sampling a specified MIP level provided by the Slider parameter node (adjustable via the Parameters panel in the UnigineEditor) to fake roughness of the surface. The color value is passed to the Emissive slot of the material.
The zero Albedo value (to preserve initial colors of the cubemap texture) is specified directly.
Finally, the data output is passed to the Final node.
Cubemap Refraction Sample#
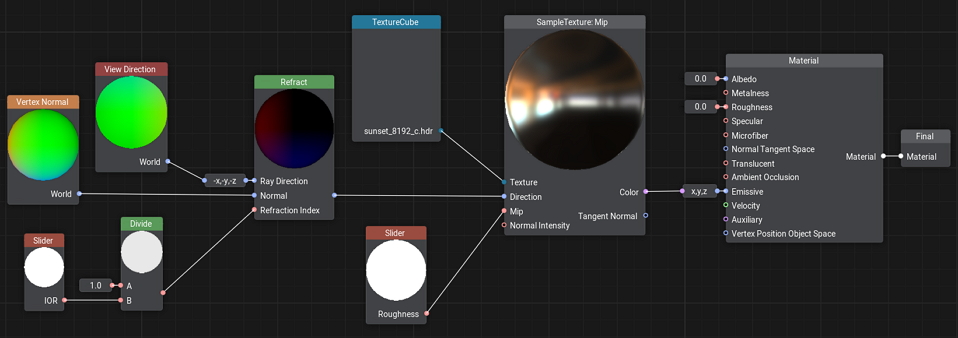
First, we get a refraction vector based on current camera's view direction vector and the object's normal vector, both in the world space. So, to the input ports of the Refract node we connect the outputs of the Vertex Normal node and the View Direction node (using the -X|-Y|-Z port adapter to get the opposite direction, as incident vector is the opposite of the view vector).
The Refraction Index is the ratio of indices of refraction of two environments, so we pass 1 (IOR of air) divided by the desired IOR value of our material.
Then, according to the obtained coordinates in the world space, the Sample Texture node obtains the pixel data from the cubemap (Texture Cube node), sampling a specified MIP level provided by the Slider parameter node (adjustable via the Parameters panel in the UnigineEditor) to fake roughness of the surface. The first three components (x,y,z) of the color value are passed to the Emissive slot of the material.
The zero Albedo and Roughness values (to preserve initial colors of the cubemap texture) are specified directly.
Finally, the data output is passed to the Final node.