Making Screenshots at Runtime
This article provides the code sufficient to create a screenshot making component configurable via Editor and making screenshots at runtime.
Component Code#
In your IDE, create a component and insert this code into its header:
Source code (C++)
#pragma once

#include <UnigineComponentSystem.h>
#include <UnigineViewport.h>


class ScreenshotMaker : public Unigine::ComponentBase
{
	enum Format
	{
		tga = 0,
		png,
		jpg
	};

public:
	COMPONENT_DEFINE(ScreenshotMaker, Unigine::ComponentBase);


	PROP_PARAM(String, name_prefix, "screenshot");
	PROP_PARAM(IVec2, size, Unigine::Math::ivec2(640,480));
	PROP_PARAM(Switch, format, 0, "tga,png,jpg");
	PROP_PARAM(Toggle, alfa_channel, false);

	COMPONENT_INIT(init);
	COMPONENT_UPDATE(update);

private:
	Unigine::ImagePtr image;
	Unigine::ViewportPtr viewport;
	int count = 0;


	void init();
	void update();

};
Insert this code into the .cpp file of the component:
Source code (C++)
#include "ScreenshotMaker.h"
#include <UnigineConsole.h>
#include <UnigineInput.h>
#include <UnigineApp.h>
#include <UnigineGame.h>


REGISTER_COMPONENT(ScreenshotMaker);

using namespace Unigine;

void ScreenshotMaker::init()
{
	image = Image::create();
	viewport = Viewport::create();
	// We render with the turned off visualizer, and also velocity buffer to avoid temporal effects artifacts
	viewport->setSkipFlags(Viewport::SKIP_VISUALIZER | Viewport::SKIP_VELOCITY_BUFFER);

	Console::setOnscreen(1);
	Console::onscreenMessageLine(Math::vec4_green, "Screenshot component is initialized.");
}

void ScreenshotMaker::update()
{
	if (App::clearKeyState('t'))
	{
		auto player = Game::getPlayer();
		if (!player)
		{
			Console::onscreenMessageLine(Math::vec4_red, "No active camera.");
			return;
		}

		Console::onscreenMessageLine(Math::vec4_green, "Trying to take a screenshot...");

		viewport->setMode(Render::getViewportMode());

		// We temporarily set exposure adaptation time to 0, otherwise the image may be too dark
		float exposureAdaptation = Render::getExposureAdaptation();
		Render::setExposureAdaptation(0.0f);


		viewport->renderImage2D(player->getCamera(), image, size.get().x, size.get().y);

		Render::setExposureAdaptation(exposureAdaptation);

		if (!alfa_channel.get() || format.get() == Format::jpg)
		{
			if (image->getFormat() == Image::FORMAT_RGBA8)
				image->convertToFormat(Image::FORMAT_RGB8);
			else if (image->getFormat() == Image::FORMAT_RGBA16F)
				image->convertToFormat(Image::FORMAT_RGB16F);
		}

		auto str_formats = String::split("tga,png,jpg", ",");

		String fullName = String::format("%s_%d.%s", name_prefix.get(), count, str_formats[format.get()]);
		image->save(fullName.get());
		Console::onscreenMessageLine(Math::vec4_green, "%s saved.", fullName.get());

		count++;
	}

}
Add the following into AppSystemLogic to initialize the Component System.
Source code (C++)
int AppSystemLogic::init()
{
	Unigine::ComponentSystem::get()->initialize();
	// Write here code to be called on engine initialization.
	return 1;
}
Then run your application to have the component registered in the Component System.
Making Screenshots#
Now you have a component in your project. To be able to make screenshots, you need to do the following:
-
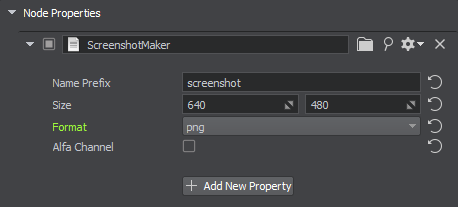
Assign the ScreenshotMaker component to any node in the Editor (or create a Node Dummy and assign the component to it).

-
Adjust settings as necessary.
Name Prefix The prefix used in the file name. Size Width and height of the saved screenshot image. Format Format of the saved screenshot image. Alpha Channel If enabled, transparent areas are cut off. - Run your app and take screenshots.
- Check the data/ folder of your project.
Last update:
13.12.2021
Помогите сделать статью лучше
Была ли эта статья полезной?
(или выберите слово/фразу и нажмите Ctrl+Enter