创建用于后处理的自定义着色器
UNIGINE engine allows you to create your own post-effects by writing custom shaders. To write post-effect shaders, you should use the Scriptable Materials workflow: create the material, write the necessary shaders, and apply it globally or per-camera. Unigine引擎允许您通过编写自定义着色器来创建自己的后效果。要编写后效果着色器,应使用与延迟渲染和前向渲染过程相同的工作流程:创建材质,编写顶点和片段着色器。
This tutorial explains how to create a post-effect grayscale material, write the shader for it, add a parameter to the material to be able to specify the value from the UnigineEditor.本教程介绍了如何创建后效果材质,为其编写着色器(顶点和片段),向材质添加参数以能够从UnigineEditor中指定值。
- Getting StartedGetting Started
- Materials Files FormatsMaterials Files Formats
- UUSL Data Types and Common Intrinsic FunctionsUUSL Data Types and Common Intrinsic Functions
- UUSL TexturesUUSL Textures
- UUSL SemanticsUUSL Semantics
- UUSL ParametersUUSL Parameters
See Also也可以看看#
- The article on Material Settings关于 材质设置 的文章
- The article on Custom Materials关于 自定义材质 的文章
Create a Material创建材质#
As in all other shaders tutorials, you should create the material first. Let's add a new base material to your project.Write the Expression callback in UNIGINE Script which is called after the Post Materials stage (RENDER_CALLBACK_END_POST_MATERIALS) of the render sequence to perform the custom grayscale render pass.与所有其他着色器教程一样,您应该首先创建材质。让我们向您的项目添加新的基础材质。
To create post-effect material, you should specify the custom pass for shaders and textures.要创建后效材质,应为着色器和纹理指定后期处理。
The material will have the following structure:该材质将具有以下结构:
BaseMaterial <preview_hidden=true var_prefix=var texture_prefix=tex>
{

	Texture color <source=procedural>
	Texture dirt = "core/textures/water_global/foam_d.dds" <anisotropy=true>


	Slider grayscale_power = 0.5 <min=0.0 max=1.0 max_expand=true>
	Slider dirt_power = 0.5 <min=-1.0 max=1.0 max_expand=true>

	/* ... */
	// more code below
}
The key features of this post material are:这篇文章的主要特征是:
- Added the shader and textures for post pass.为post传递添加了着色器和纹理。
- Added the shared grayscale_power and dirt_power parameters.添加了共享的grayscale_power和dirt_power参数。
Save the new material as grayscale.basemat file to the data folder.Save the material file and let's proceed to UnigineEditor.将新材质作为custom_post.basemat文件保存到data文件夹。
创建顶点着色器#
- 在纯文本编辑器中编写着色器代码:
Source Code (ULON) greyscale.basemat
/* ... */ // define the custom render pass Pass my_pass { Fragment = #{ // Include the UUSL fragment shader header #include <core/materials/shaders/api/common.h> MAIN_FRAG_BEGIN(FRAGMENT_IN) // Get the UV float2 uv = IN_DATA(0); // Get the scene color float4 scene_color = TEXTURE_BIAS_ZERO(tex_color, uv); // Get the dirt color float4 dirt_color = TEXTURE_BIAS_ZERO(tex_dirt, uv); // Calculate the grayscale float3 gray_scene_color = toFloat3(rgbToLuma(scene_color.rgb)); scene_color.rgb = lerp(scene_color.rgb, gray_scene_color, var_grayscale_power); // add some dirt and calculate the final color OUT_COLOR = scene_color + dirt_color * var_dirt_power; MAIN_FRAG_END // end #} } /* ... */ // more code below - 将着色器文件另存为post.vert到data/shaders/vertex文件夹。
顶点着色器的代码很简单,因为我们不需要使用几何。
Create Fragment Shader创建片段着色器#
This section contains the sample code for the fragment shader (also known as pixel shader).本节包含有关如何创建片段着色器(也称为 pixel shader )的说明。
To create the fragment shader for the custom pass, add the following ULON node to the material:要为后处理传递创建片段着色器,请执行以下操作:
- 打开一个纯文本编辑器,并编写以下内容:
Source code (UUSL)
// Include the UUSL fragment shader header #include <core/shaders/common/fragment.h> // Define the texture of the scene INIT_TEXTURE(0,TEX_SCENE) INIT_TEXTURE(1,TEX_DIRT) // Input values STRUCT(FRAGMENT_IN) INIT_POSITION // Projected position INIT_IN(float2,0) // Texcoords END // Define the grayscale_power parameter CBUFFER(parameters) UNIFORM float grayscale_power; UNIFORM float dirt_power; END MAIN_BEGIN(FRAGMENT_OUT,FRAGMENT_IN) // Get the UV float2 uv = IN_DATA(0); // Get the scene color float4 scene_color = TEXTURE_BIAS_ZERO(TEX_SCENE,uv); // Get the dirt color float4 dirt_color = TEXTURE_BIAS_ZERO(TEX_DIRT,uv); // Calculate the grayscale float3 gray_scene_color = dot(float3(0.3f, 0.59f, 0.11f), scene_color.rgb); scene_color.rgb = lerp(scene_color.rgb,gray_scene_color,grayscale_power); // add some dirt OUT_COLOR = scene_color+dirt_color*dirt_power; MAIN_END // end - 将着色器文件另存为post.frag到data/shaders/fragment文件夹。
Well, let's clarify what is under the hood of this fragment shader:好吧,让我们澄清一下该片段着色器的内幕:
- We get the texture which was specified in the post-effect material.我们获得后效果材质中指定的纹理。
- We convert the color of the scene to grayscale.通过应用标准灰度方程式,我们可以更改场景的颜色。
- By using lerp function (which performs a linear interpolation), we add the custom grayscale_power parameter to adjust the grayscale power.通过使用lerp函数(执行线性插值),我们添加了自定义grayscale_power参数来调整灰度等级。
- We also get the dirt texture and apply it to the final scene color to simulate dirt on camera lens (can also be used for vignette effect etc.)我们还获得了污垢纹理并将其应用于最终场景颜色,以模拟相机镜头上的污垢(也可以用于晕影效果等)。
- A custom dirt_power parameter to adjust intensity of the dirt texture (its impact on the final image).一个自定义dirt_power参数,用于调整污垢纹理的强度(其对最终图像的影响)。
See Also也可以看看#
- Grayscale article on Wikipedia. Grayscale article on Wikipedia.
Editing the Material编辑材质#
Material has been created, the shader has been written, it's time to use it in the project!已经创建了材质,编写了着色器,是时候在项目中使用它了!
- Open UnigineEditor and launch your project.打开UnigineEditor并启动您的项目。
- Create a new material by inheriting from the recently created grayscale material in the Materials Hierarchy window.通过继承Materials Hierarchy窗口中最近创建的材质来创建新材质。
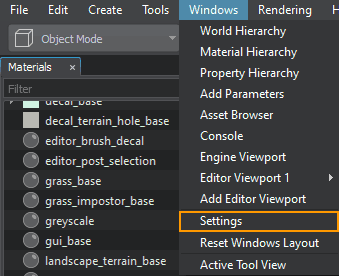
- Open the Settings window by choosing Windows -> Settings from the main menu
 通过从主菜单中选择Windows -> Settings打开Settings窗口。

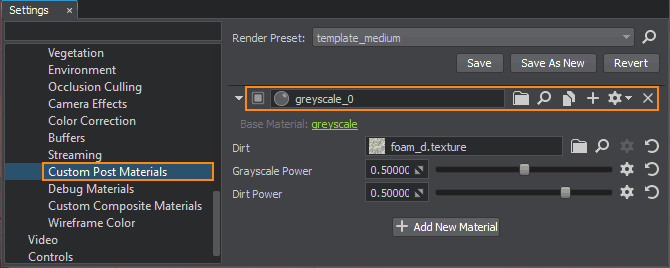
- In the Settings window choose Runtime -> World -> Render -> Custom Post Materials and specify the name of the child grayscale material in the field.

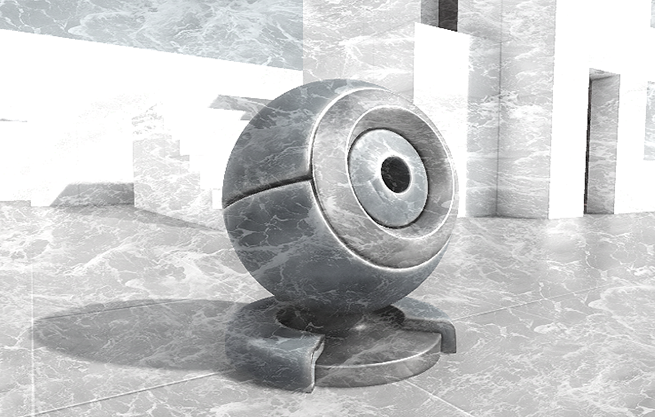
The grayscale post-effect will be applied.The grayscale post-effect will be applied.
The grayscale post-effect will be applied.在Settings窗口中,选择Runtime -> World -> Render -> Screen Space Materials,然后在Post字段中指定子帖子材质的名称。

The grayscale post-effect will be applied.将应用灰度后效果。
-
Configure your post-effect by adjusting the Grayscale Power and Dirt Power parameters.
 The final scene.The final scene.The final scene.在Materials窗口中选择材质。然后在Parameters窗口中选择Parameters选项卡。
通过调整Grayscale Power和Dirt Power参数来配置后效果。
 The final scene.最终场景。
